
User Manual (ENGLISH)
Page 16
... fax report automatically 57 Setting up Address Book USING USB FLASH MEMORY 59 About USB memory 59 59 Plugging in a USB memory device 59 Scanning to a USB memory device 59 Scanning 60 Customizing Scan to USB 60 Printing from a USB memory device 60 To print a document from a USB memory device: 60 Backing up data 60 Backing up data 60 Restoring data 61 Managing USB memory 61 Deleting an image file 61 Formatting a USB memory device 61 Viewing the USB memory status MAINTENANCE 62 Printing reports 62 62 Printing a report 62 Adjusting the color contrast 63 Clearing memory 63 Cleaning your machine...
... fax report automatically 57 Setting up Address Book USING USB FLASH MEMORY 59 About USB memory 59 59 Plugging in a USB memory device 59 Scanning to a USB memory device 59 Scanning 60 Customizing Scan to USB 60 Printing from a USB memory device 60 To print a document from a USB memory device: 60 Backing up data 60 Backing up data 60 Restoring data 61 Managing USB memory 61 Deleting an image file 61 Formatting a USB memory device 61 Viewing the USB memory status MAINTENANCE 62 Printing reports 62 62 Printing a report 62 Adjusting the color contrast 63 Clearing memory 63 Cleaning your machine...
User Manual (ENGLISH)
Page 20
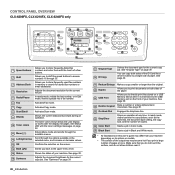
... children near it is inserted into a fax number. Make sure that you to a single side of your machine. Activates Fax mode. See Status LED with the display messages. In ready mode, clears/cancels the copy options, such as the darkness, the document type setting, the copy size, and the number of copies. 25 Color Start Starts a job in Color mode. 26 Black Start Starts a job in Black and White mode. • All illustrations on this user's guide may differ from your machine depending on a USB Memory device when it . See "Original...
... children near it is inserted into a fax number. Make sure that you to a single side of your machine. Activates Fax mode. See Status LED with the display messages. In ready mode, clears/cancels the copy options, such as the darkness, the document type setting, the copy size, and the number of copies. 25 Color Start Starts a job in Color mode. 26 Black Start Starts a job in Black and White mode. • All illustrations on this user's guide may differ from your machine depending on a USB Memory device when it . See "Original...

User Manual (ENGLISH)
Page 21
...type setting, the copy size, and the number of pages at any time. Introduction_ 21 Enters Menu mode and scrolls through the options available in Color mode. See page 39. See page 22. Dials a number or enters alphanumeric characters. 18 Stop/Clear 19 Color Start 20 Black Start Stops an operation at once. Allows you print a large number of copies. Starts a job in Black and White mode. • All illustrations on its options or models. • The surface of the output tray may differ from your machine. CLX-6200ND only 1 Copy 2 Scan/Email 3 Display 4 Toner colors...
...type setting, the copy size, and the number of pages at any time. Introduction_ 21 Enters Menu mode and scrolls through the options available in Color mode. See page 39. See page 22. Dials a number or enters alphanumeric characters. 18 Stop/Clear 19 Color Start 20 Black Start Stops an operation at once. Allows you print a large number of copies. Starts a job in Black and White mode. • All illustrations on its options or models. • The surface of the output tray may differ from your machine. CLX-6200ND only 1 Copy 2 Scan/Email 3 Display 4 Toner colors...
User Manual (ENGLISH)
Page 25
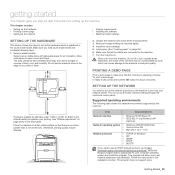
... machine's control panel. Load paper. (See "Loading paper" on page 28 for altitudes under 1,000 m (3,281 ft). This program does not support Linux. SETTING UP THE NETWORK You need to set up the network protocols on Windows • IPP • SNMP • DHCP • BOOTP If you move the machine, do not tilt or turn it as your network printer. Do not set up the machine. Allow extra space to open covers and trays...
... machine's control panel. Load paper. (See "Loading paper" on page 28 for altitudes under 1,000 m (3,281 ft). This program does not support Linux. SETTING UP THE NETWORK You need to set up the network protocols on Windows • IPP • SNMP • DHCP • BOOTP If you move the machine, do not tilt or turn it as your network printer. Do not set up the machine. Allow extra space to open covers and trays...
User Manual (ENGLISH)
Page 26
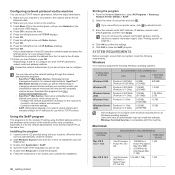
... window and complete the installation. 26 _Getting started Starting the program 1. Make sure you to select a network interface and manually configure the IP addresses for the network administrator to install this machine. You can also set several network IPs at the same time. Installing the program 1. Customize machine settings. • SetIP: Utility program allowing you have finished, press OK. Configuring network protocol via the machine You can set up the network settings through the network administration programs. • SyncThru™ Web Admin Service: Web-based printer...
... window and complete the installation. 26 _Getting started Starting the program 1. Make sure you to select a network interface and manually configure the IP addresses for the network administrator to install this machine. You can also set several network IPs at the same time. Installing the program 1. Customize machine settings. • SetIP: Utility program allowing you have finished, press OK. Configuring network protocol via the machine You can set up the network settings through the network administration programs. • SyncThru™ Web Admin Service: Web-based printer...
User Manual (ENGLISH)
Page 28
... a network, SyncThru Web Service screen appears automatically. You can also click Smart Panel on the Windows task bar (or Notification Area in order to receive information from the dropdown list, and then click Apply. Click Setting > Altitude Adjustment. If your network administrator or print network information. (See "Printing reports" on the control panel, follow these steps: 1. Press Stop/Clear to return to match the paper you must change values. If you use a different Windows location...
... a network, SyncThru Web Service screen appears automatically. You can also click Smart Panel on the Windows task bar (or Notification Area in order to receive information from the dropdown list, and then click Apply. Click Setting > Altitude Adjustment. If your network administrator or print network information. (See "Printing reports" on the control panel, follow these steps: 1. Press Stop/Clear to return to match the paper you must change values. If you use a different Windows location...

User Manual (ENGLISH)
Page 39
... can cancel the copy job during an operation. See page 40. 5. Press Color Start to improve the copy quality by using the control panel buttons. You can use for copying so that is used to begin black and white copying. Press Stop/Clear, and the copying will use special copy features, such as poster copying, 2- CHANGING THE SETTINGS FOR EACH COPY Your machine provides default settings for copy jobs. 1. Darkness If you have set for the current copy job. To adjust the darkness of the display. 2. Each time...
... can cancel the copy job during an operation. See page 40. 5. Press Color Start to improve the copy quality by using the control panel buttons. You can use for copying so that is used to begin black and white copying. Press Stop/Clear, and the copying will use special copy features, such as poster copying, 2- CHANGING THE SETTINGS FOR EACH COPY Your machine provides default settings for copy jobs. 1. Darkness If you have set for the current copy job. To adjust the darkness of the display. 2. Each time...

User Manual (ENGLISH)
Page 40
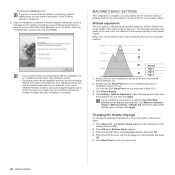
... images reduced to fit onto one sheet of paper. 1. Press OK to begin copying. CHANGING THE SCAN SIZE SETTINGS You can adjust the scan size for approximately 30 seconds, the machine cancels the copy job and returns to ready mode. Press Stop/Clear to return to ready mode. CHANGING THE DEFAULT COPY SETTINGS The copy options, including darkness, original type, copy size, and number of copies, can be printed. Repeat steps 4 through 5, as following copy features: Collation You can print 2-sided originals on the bottom line...
... images reduced to fit onto one sheet of paper. 1. Press OK to begin copying. CHANGING THE SCAN SIZE SETTINGS You can adjust the scan size for approximately 30 seconds, the machine cancels the copy job and returns to ready mode. Press Stop/Clear to return to ready mode. CHANGING THE DEFAULT COPY SETTINGS The copy options, including darkness, original type, copy size, and number of copies, can be printed. Repeat steps 4 through 5, as following copy features: Collation You can print 2-sided originals on the bottom line...

User Manual (ENGLISH)
Page 44
.... SCANNING FROM THE CONTROL PANEL Your machine offers you to PC appears on page 44. Press Start>Control Panel> Samsung Scan Manager. Press Scan/Email. Select the appropriate machine from the control panel and easily send the scanned document to scan at certain resolutions, especially using Change Port. (Local or Network) 5. Set Scan Button allows you to change scan settings and add or delete the folders where scanned documents to computer are scanning, you may not be able to connected computer's My Documents folder. scanning Scanning with your machine lets you turn...
.... SCANNING FROM THE CONTROL PANEL Your machine offers you to PC appears on page 44. Press Start>Control Panel> Samsung Scan Manager. Press Scan/Email. Select the appropriate machine from the control panel and easily send the scanned document to scan at certain resolutions, especially using Change Port. (Local or Network) 5. Set Scan Button allows you to change scan settings and add or delete the folders where scanned documents to computer are scanning, you may not be able to connected computer's My Documents folder. scanning Scanning with your machine lets you turn...

User Manual (ENGLISH)
Page 46
.... Enter the SMTP server login name and password. 8. a. Enter the server port number, from 1 to 65535. This name will be displayed on your machine. 2. Enter the login name and password. 12. Click Add. 5. Enter a name in Alias for the Setup for storing the scanned image. 15. Check the box next to Anonymous if you want the FTP server to permit access to a network. 2. Enter the Scan File Folder under FTP directory for the corresponding Server List entry. See page 46. Load...
.... Enter the SMTP server login name and password. 8. a. Enter the server port number, from 1 to 65535. This name will be displayed on your machine. 2. Enter the login name and password. 12. Click Add. 5. Enter a name in Alias for the Setup for storing the scanned image. 15. Check the box next to Anonymous if you want the FTP server to permit access to a network. 2. Enter the Scan File Folder under FTP directory for the corresponding Server List entry. See page 46. Load...

User Manual (ENGLISH)
Page 59
... the device's User's Guide. For details about these features, see page 32. 3. Your machine begins scanning the original, and then asks if you can scan a document and save them on a USB memory device. • Print data stored on a USB memory device. • Back up Address Book/ Phone Book entries and the system settings of doing this: you want to USB appears on your machine. (CLX-6200FX, CLX-6210FX, CLX-6240FX only) • Restore backup files to or reading from USB memory. Use...
... the device's User's Guide. For details about these features, see page 32. 3. Your machine begins scanning the original, and then asks if you can scan a document and save them on a USB memory device. • Print data stored on a USB memory device. • Back up Address Book/ Phone Book entries and the system settings of doing this: you want to USB appears on your machine. (CLX-6200FX, CLX-6210FX, CLX-6240FX only) • Restore backup files to or reading from USB memory. Use...
User Manual (ENGLISH)
Page 62
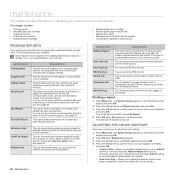
... website • Checking the machine's serial number PRINTING REPORTS Your machine can set up to adjust contrast color by color. Default setting is automatically printed every 50 network scan jobs. This chapter includes: • Printing reports • Adjusting the color contrast • Clearing memory • Cleaning your machine • Maintaining the cartridge • Replacing the toner cartridge • Replacing the paper transfer belt • Maintenance parts • Managing your changes after each fax job. This list shows the current status of the display and press OK...
... website • Checking the machine's serial number PRINTING REPORTS Your machine can set up to adjust contrast color by color. Default setting is automatically printed every 50 network scan jobs. This chapter includes: • Printing reports • Adjusting the color contrast • Clearing memory • Cleaning your machine • Maintaining the cartridge • Replacing the toner cartridge • Replacing the paper transfer belt • Maintenance parts • Managing your changes after each fax job. This list shows the current status of the display and press OK...
User Manual (ENGLISH)
Page 83
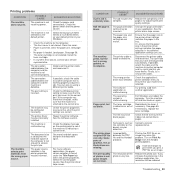
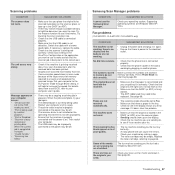
... printer driver help screen. The machine prints, but are correct. The printer does not print PDF file correctly. POSSIBLE CAUSE The job may have already printed successfully. Ensure that the paper size in the printer driver settings matches the paper selection in the tray. Turn the machine off and then back on Print As Image from the Acrobat printing options. See page 65. Check the power switch and the power source. See page 36. • The toner cartridge is blank. If possible, attach the cable...
... printer driver help screen. The machine prints, but are correct. The printer does not print PDF file correctly. POSSIBLE CAUSE The job may have already printed successfully. Ensure that the paper size in the printer driver settings matches the paper selection in the tray. Turn the machine off and then back on Print As Image from the Acrobat printing options. See page 65. Check the power switch and the power source. See page 36. • The toner cartridge is blank. If possible, attach the cable...
User Manual (ENGLISH)
Page 84
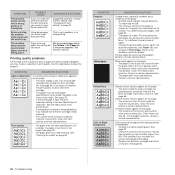
.... • Remove the old toner cartridge and install a new one . Adjust the print resolution. See page 33. • The paper path may be defective. Go to printer properties, click Paper tab, and set incorrectly. If these unit. Contact a service representative. Clean the LSU, contact a service representative. See 65 . If the amount of background shading becomes unacceptable: • Change to reject toner. CONDITION SUGGESTED SOLUTIONS Light or faded print If a vertical white streak...
.... • Remove the old toner cartridge and install a new one . Adjust the print resolution. See page 33. • The paper path may be defective. Go to printer properties, click Paper tab, and set incorrectly. If these unit. Contact a service representative. Clean the LSU, contact a service representative. See 65 . If the amount of background shading becomes unacceptable: • Change to reject toner. CONDITION SUGGESTED SOLUTIONS Light or faded print If a vertical white streak...
User Manual (ENGLISH)
Page 87
... memory to hold the document you want to use the Samsung Scan Manager. See page 69. The machine does not send. • Make sure that the original is loaded in the DADF (or ADF) or on the scanner glass. • Sending should be set BIOS, refer to your machine by making a copy. The fax machine sending you send. Switch the cable with a known good cable. Check scan setting in the tray. • Check to see if the display shows any error message. operating...
... memory to hold the document you want to use the Samsung Scan Manager. See page 69. The machine does not send. • Make sure that the original is loaded in the DADF (or ADF) or on the scanner glass. • Sending should be set BIOS, refer to your machine by making a copy. The fax machine sending you send. Switch the cable with a known good cable. Check scan setting in the tray. • Check to see if the display shows any error message. operating...

User Manual (ENGLISH)
Page 89
...; Check if the printer is displayed on the your machine is started. Make sure that normal operation of different "consumer" application to the Help for Color Matching System, you should open port device file" when printing a document. After that your computer. The other kind of Ghostscript, 64-bit Linux OS, and reported to bugs.ghostscript.com as "-oraw". For Gimp front-end, select "print" -> "Setup printer" and edit command line...
...; Check if the printer is displayed on the your machine is started. Make sure that normal operation of different "consumer" application to the Help for Color Matching System, you should open port device file" when printing a document. After that your computer. The other kind of Ghostscript, 64-bit Linux OS, and reported to bugs.ghostscript.com as "-oraw". For Gimp front-end, select "print" -> "Setup printer" and edit command line...
User Manual (ENGLISH)
Page 137
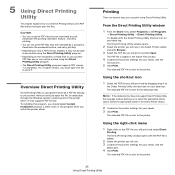
It sends data through the Windows spooler using the Direct Printing Utility program. • The Direct Printing Utility program supports PDF version 1.4 and below part. 4 Click Print. Printing There are several ways you will print and by a password. Using the shortcut icon 1 Select the PDF file you can not print PDF files that are restricted to print. NOTE : If the default printer does not support Direct Printing Utility, the message window alerting you must open the file to print it. The PDF file is...
It sends data through the Windows spooler using the Direct Printing Utility program. • The Direct Printing Utility program supports PDF version 1.4 and below part. 4 Click Print. Printing There are several ways you will print and by a password. Using the shortcut icon 1 Select the PDF file you can not print PDF files that are restricted to print. NOTE : If the default printer does not support Direct Printing Utility, the message window alerting you must open the file to print it. The PDF file is...
SyncThru 5.0 Job Accounting Plug-in Guide (ENGLISH)
Page 8
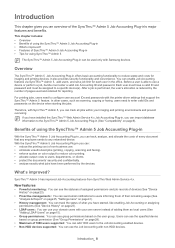
You can use your domain users with the printer driver settings that any employee sends to the Job Accounting enabled devices. • Non-HDD devices supported: You can enable Job Accounting features via SyncThru™ Admin 5, add users, and set a job limit for reporting. In other cases, such as local users (See "Adding LDAP Users" on page 28). • Maximum of 1000 users supported: You can add 1000 users to any networked device. Users can use the specified device based on group...
You can use your domain users with the printer driver settings that any employee sends to the Job Accounting enabled devices. • Non-HDD devices supported: You can enable Job Accounting features via SyncThru™ Admin 5, add users, and set a job limit for reporting. In other cases, such as local users (See "Adding LDAP Users" on page 28). • Maximum of 1000 users supported: You can add 1000 users to any networked device. Users can use the specified device based on group...
SyncThru 5.0 Guide (ENGLISH)
Page 43
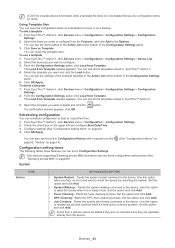
... Configuration Settings panel. 5. Set the option and click Add. To add a template 1. To use these configuration setting items (See "Samsung private MIB" on Configuration setting items The following tables show features you face an error and want and click the Load button. The Load from Template. To delete a template 1. The Load from the device. Use this option to wake the device when it 's held due to the Action List at a specified time. 1. From SyncThru™ Admin...
... Configuration Settings panel. 5. Set the option and click Add. To add a template 1. To use these configuration setting items (See "Samsung private MIB" on Configuration setting items The following tables show features you face an error and want and click the Load button. The Load from Template. To delete a template 1. The Load from the device. Use this option to wake the device when it 's held due to the Action List at a specified time. 1. From SyncThru™ Admin...
SyncThru 5.0 Guide (ENGLISH)
Page 80
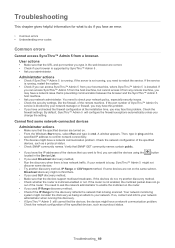
... machine, where SyncThru™ Admin 5 is supported by your administrator. Check the firewall settings. From the Windows Start menu, select Run and type in the Device List. • If you change the setting. A window appears. Check SNMP community names. Try another discovery method. - If some devices are not on the same subnet, Broadcast discovery might not find some devices. - Check the network configuration of the specified devices, such as a protocol status. - User actions • Make...
... machine, where SyncThru™ Admin 5 is supported by your administrator. Check the firewall settings. From the Windows Start menu, select Run and type in the Device List. • If you change the setting. A window appears. Check SNMP community names. Try another discovery method. - If some devices are not on the same subnet, Broadcast discovery might not find some devices. - Check the network configuration of the specified devices, such as a protocol status. - User actions • Make...


