
User Manual (user Manual) (ver.2.00) (English)
Page 2
... 1 1 Machine overview (CLX-3185/CLX-3185N/CLX-3185WK) 1 Front view 3 Control panel overview (CLX-3185/CLX-3185N/CLX-3185WK) 4 Machine overview (CLX-3185FN/CLX-3185FW) 4 Front view 5 Rear view 6 Control panel overview (CLX-3185FN/CLX-3185FW) 8 Understanding the Status LED 8 Introducing the useful buttons 8 Menu button 8 Power button 8 Print screen button (CLX-3185 only) 8 Eco Copy button (CLX-3185/CLX-3185N/CLX-3185FN only) 9 WPS button (CLX-3185WK/CLX-3185FW only) 9 Acknowledging the...
... 1 1 Machine overview (CLX-3185/CLX-3185N/CLX-3185WK) 1 Front view 3 Control panel overview (CLX-3185/CLX-3185N/CLX-3185WK) 4 Machine overview (CLX-3185FN/CLX-3185FW) 4 Front view 5 Rear view 6 Control panel overview (CLX-3185FN/CLX-3185FW) 8 Understanding the Status LED 8 Introducing the useful buttons 8 Menu button 8 Power button 8 Print screen button (CLX-3185 only) 8 Eco Copy button (CLX-3185/CLX-3185N/CLX-3185FN only) 9 WPS button (CLX-3185WK/CLX-3185FW only) 9 Acknowledging the...
User Manual (user Manual) (ver.2.00) (English)
Page 3
...CLX-3185FN/CLX-3185FW only) 1 Changing the clock mode (CLX-3185FN/CLX-3185FW only) 2 Changing the default mode (CLX-3185FN/CLX-3185FW only) 2 Setting sounds 2 Key sound and alarm sound (CLX-3185/CLX-3185N only) 2 Speaker, ringer, key sound, and alarm sound (CLX-3185FN/CLX-3185FW only) 2 Speaker volume (CLX-3185FN/CLX-3185FW only) 2 Entering characters using the number keypad (CLX-3185FN/CLX-3185FW...paper type 6 Using the output support _ 2 1 Introducing useful software program 1 Samsung AnyWeb Print 1 Samsung Easy Color Manager 1 Printer driver features 1 Printer driver 1 Basic printing 2 ...
...CLX-3185FN/CLX-3185FW only) 1 Changing the clock mode (CLX-3185FN/CLX-3185FW only) 2 Changing the default mode (CLX-3185FN/CLX-3185FW only) 2 Setting sounds 2 Key sound and alarm sound (CLX-3185/CLX-3185N only) 2 Speaker, ringer, key sound, and alarm sound (CLX-3185FN/CLX-3185FW only) 2 Speaker volume (CLX-3185FN/CLX-3185FW only) 2 Entering characters using the number keypad (CLX-3185FN/CLX-3185FW...paper type 6 Using the output support _ 2 1 Introducing useful software program 1 Samsung AnyWeb Print 1 Samsung Easy Color Manager 1 Printer driver features 1 Printer driver 1 Basic printing 2 ...

User Manual (user Manual) (ver.2.00) (English)
Page 4
... each scan job 3 Changing the default scan settings 3 Setting up Address Book (CLX-3185FN/CLX-3185FW only) 3 Registering speed email numbers 3 Grouping addresses in Groups Address Book 4 Using Address Book entries 4 Searching Address Book for an entry 4 Printing Address Book 4 Using Samsung Scan and Fax Manager 5 Set Scan Button tab 5 Change Port tab 6 Scanning...
... each scan job 3 Changing the default scan settings 3 Setting up Address Book (CLX-3185FN/CLX-3185FW only) 3 Registering speed email numbers 3 Grouping addresses in Groups Address Book 4 Using Address Book entries 4 Searching Address Book for an entry 4 Printing Address Book 4 Using Samsung Scan and Fax Manager 5 Set Scan Button tab 5 Change Port tab 6 Scanning...
User Manual (user Manual) (ver.2.00) (English)
Page 5
... unit 4 Storing the toner cartridge 4 Handling instructions 4 Use of non-Samsung and refilled toner cartridge 4 Estimated cartridge life 4 Maintenance parts 4 Checking replacables 4 Tips for moving & storing your machine TROUBLESHOOTING 1 1 Redistributing toner 1 Tips for avoiding paper jams 2 Clearing original document jams (CLX-3185FN/CLX-3185FW only) 2 Clearing paper jams 3 In the tray 3 In the fuser...
... unit 4 Storing the toner cartridge 4 Handling instructions 4 Use of non-Samsung and refilled toner cartridge 4 Estimated cartridge life 4 Maintenance parts 4 Checking replacables 4 Tips for moving & storing your machine TROUBLESHOOTING 1 1 Redistributing toner 1 Tips for avoiding paper jams 2 Clearing original document jams (CLX-3185FN/CLX-3185FW only) 2 Clearing paper jams 3 In the tray 3 In the fuser...

User Manual (user Manual) (ver.2.00) (English)
Page 24
...; After the transmission, the machine may be taped together to form a poster (See "Printing posters" on page 2). IPv6 (CLX-3185N/CLX-3185WK/CLX-3185FN/CLX-3185FW only) • The machine supports IPv6. See "Eco Copy button (CLX-3185/CLX-3185N/CLX-3185FN only)" on page 8 for the more information. In the color mode, your machine prints A4-sized or...
...; After the transmission, the machine may be taped together to form a poster (See "Printing posters" on page 2). IPv6 (CLX-3185N/CLX-3185WK/CLX-3185FN/CLX-3185FW only) • The machine supports IPv6. See "Eco Copy button (CLX-3185/CLX-3185N/CLX-3185FN only)" on page 8 for the more information. In the color mode, your machine prints A4-sized or...
User Manual (user Manual) (ver.2.00) (English)
Page 25
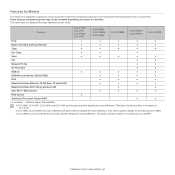
Features CLX-3180K CLX-3185 CLX-3185K CLX-3186 CLX-3185N CLX-3185NK CLX-3186N CLX-3185WK CLX-3185FN CLX-3186FN CLX-3185FW Print ● ● ● ● ● Duplex (2-sided) printing (manual) ● ● ● ● ● Copy ● ● ● ● ●...Models The machine is written on the basis of your document needs from printing and copying to support all of CLX-3185. •CLX-3185N, CLX-3185NK and CLX-3186N are the same machine despite the name difference. This User's Guide is designed to more advanced networking solutions...
Features CLX-3180K CLX-3185 CLX-3185K CLX-3186 CLX-3185N CLX-3185NK CLX-3186N CLX-3185WK CLX-3185FN CLX-3186FN CLX-3185FW Print ● ● ● ● ● Duplex (2-sided) printing (manual) ● ● ● ● ● Copy ● ● ● ● ●...Models The machine is written on the basis of your document needs from printing and copying to support all of CLX-3185. •CLX-3185N, CLX-3185NK and CLX-3186N are the same machine despite the name difference. This User's Guide is designed to more advanced networking solutions...
User Manual (user Manual) (ver.2.00) (English)
Page 26
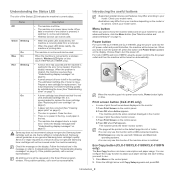
This chapter includes: • Machine overview (CLX-3185/CLX-3185N/CLX-3185WK) • Control panel overview (CLX-3185/CLX-3185N/CLX-3185WK) • Machine overview (CLX-3185FN/CLX-3185FW) • Control panel overview (CLX-3185FN/CLX-3185FW) • Understanding the Status LED • Introducing the useful buttons • Acknowledging the status of your machine depending on its model. 1 Scanner lid 5 Front door 2 ...
This chapter includes: • Machine overview (CLX-3185/CLX-3185N/CLX-3185WK) • Control panel overview (CLX-3185/CLX-3185N/CLX-3185WK) • Machine overview (CLX-3185FN/CLX-3185FW) • Control panel overview (CLX-3185FN/CLX-3185FW) • Understanding the Status LED • Introducing the useful buttons • Acknowledging the status of your machine depending on its model. 1 Scanner lid 5 Front door 2 ...

User Manual (user Manual) (ver.2.00) (English)
Page 28
... device when it is inserted into the USB memory port on the front of your machine (See "Using USB memory device (CLX-3185N/CLX-3185FN/CLX-3185WK/CLX-3185FW only)" on page 1). 3 ID Copy Allows you to coy both sides the ID card like a driver's license to directly... front of your machine (See "Using USB memory device (CLX-3185N/CLX-3185FN/CLX-3185WK/CLX-3185FW only)" on page 8). Print Screen (CLX-3185) Direct USB (CLX-3185N) 16 WPS (CLX-3185WK) Prints the displayed screen of your monitor (See "Print screen button (CLX-3185 only)" on page 1). Allows you can configure the machine ...
... device when it is inserted into the USB memory port on the front of your machine (See "Using USB memory device (CLX-3185N/CLX-3185FN/CLX-3185WK/CLX-3185FW only)" on page 1). 3 ID Copy Allows you to coy both sides the ID card like a driver's license to directly... front of your machine (See "Using USB memory device (CLX-3185N/CLX-3185FN/CLX-3185WK/CLX-3185FW only)" on page 8). Print Screen (CLX-3185) Direct USB (CLX-3185N) 16 WPS (CLX-3185WK) Prints the displayed screen of your monitor (See "Print screen button (CLX-3185 only)" on page 1). Allows you can configure the machine ...
User Manual (user Manual) (ver.2.00) (English)
Page 29
Machine overview (CLX-3185FN/CLX-3185FW) Front view 1 10 9 8 7 6 5 2 11 3 4 12 13 This illustration may differ from your machine depending on its model. 1 Document width guides 5 Tray 1 2 Document feeder input tray 6 Front door handle 3 Document feeder output tray 7 Front door 4 USB port 8 Document output tray 9 Control panel 10 Document feeder cover 11 Toner cartridges 12 Waste toner container 14 15 16 13 Imaging unit 14 Scanner lid 15 Scanner glass 16 Scan unit Introduction_ 4
Machine overview (CLX-3185FN/CLX-3185FW) Front view 1 10 9 8 7 6 5 2 11 3 4 12 13 This illustration may differ from your machine depending on its model. 1 Document width guides 5 Tray 1 2 Document feeder input tray 6 Front door handle 3 Document feeder output tray 7 Front door 4 USB port 8 Document output tray 9 Control panel 10 Document feeder cover 11 Toner cartridges 12 Waste toner container 14 15 16 13 Imaging unit 14 Scanner lid 15 Scanner glass 16 Scan unit Introduction_ 4
User Manual (user Manual) (ver.2.00) (English)
Page 31
Eco Copy (CLX-3185FN) 2 Direct USB (CLX-3185FW) Reduces toner consumption and paper usage (See "Eco Copy button (CLX-3185/CLX-3185N/CLX-3185FN only)" on page 8). Introduction_ 6 Allows you to directly print files stored on a USB memory device when it is inserted into a fax number in Edit ... last number in ready mode, or inserts a pause into the USB memory port on the front of your machine (See "Using USB memory device (CLX-3185N/CLX-3185FN/CLX-3185WK/CLX-3185FW only)" on page 1). 3 ID Copy Allows you to coy both sides the ID card like a driver's license to a single side of your machine...
Eco Copy (CLX-3185FN) 2 Direct USB (CLX-3185FW) Reduces toner consumption and paper usage (See "Eco Copy button (CLX-3185/CLX-3185N/CLX-3185FN only)" on page 8). Introduction_ 6 Allows you to directly print files stored on a USB memory device when it is inserted into a fax number in Edit ... last number in ready mode, or inserts a pause into the USB memory port on the front of your machine (See "Using USB memory device (CLX-3185N/CLX-3185FN/CLX-3185WK/CLX-3185FW only)" on page 1). 3 ID Copy Allows you to coy both sides the ID card like a driver's license to a single side of your machine...
User Manual (user Manual) (ver.2.00) (English)
Page 32
... is inserted into the USB port on the front of the toner cartridge" on page 1). If your machine (See "Using USB memory device (CLX-3185N/CLX-3185FN/CLX-3185WK/CLX-3185FW only)" on page 9). The toner colors shown below LCD display co-works with the display messages (See "Acknowledging the status of your wireless access... point supports Wi-Fi Protected Setup™(WPS), you can configure the machine easily without a computer (See "WPS button (CLX-3185WK/CLX-3185FW only)" on page 9). 20 Scan/Email 21 Toner Color Direct USB...
... is inserted into the USB port on the front of the toner cartridge" on page 1). If your machine (See "Using USB memory device (CLX-3185N/CLX-3185FN/CLX-3185WK/CLX-3185FW only)" on page 9). The toner colors shown below LCD display co-works with the display messages (See "Acknowledging the status of your wireless access... point supports Wi-Fi Protected Setup™(WPS), you can configure the machine easily without a computer (See "WPS button (CLX-3185WK/CLX-3185FW only)" on page 9). 20 Scan/Email 21 Toner Color Direct USB...
User Manual (user Manual) (ver.2.00) (English)
Page 33
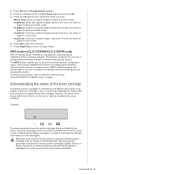
... close. Check the display message. The estimated cartridge life of the Status LED indicates the machine's current status. Samsung cannot guarantee a non-genuine Samsung toner cartridge's quality. Check the message on the control panel. 2. Check your machine to replace the toner cartridge...page 5). • A small amount of toner is printing data. Print screen button (CLX-3185 only) • In case of print the whole monitor screen. 1.Press Print Screen on blue (CLX-3185FW/CLX-3185WK only). • A minor error has occurred and the machine is waiting for...
... close. Check the display message. The estimated cartridge life of the Status LED indicates the machine's current status. Samsung cannot guarantee a non-genuine Samsung toner cartridge's quality. Check the message on the control panel. 2. Check your machine to replace the toner cartridge...page 5). • A small amount of toner is printing data. Print screen button (CLX-3185 only) • In case of print the whole monitor screen. 1.Press Print Screen on blue (CLX-3185FW/CLX-3185WK only). • A minor error has occurred and the machine is waiting for...
User Manual (user Manual) (ver.2.00) (English)
Page 34
...Eco Copy appears and press OK. 5. Press OK to fit onto one sheet of paper in color mode. 6. WPS button (CLX-3185WK/CLX-3185FW only) Wi-Fi Protected Setup™(WPS) is indicated by just pressing this function, refer to setup the wireless network configuration easily....mode. 3. Press the left /right arrow to select the mode you to "Wireless network setup (CLX-3185FW/CLX-3185WK only)" on page 1. This function simplifies the process of using non-genuine Samsung toner cartridge such as a network name (SSID), data encryption and authentication. If the toner cartridge ...
...Eco Copy appears and press OK. 5. Press OK to fit onto one sheet of paper in color mode. 6. WPS button (CLX-3185WK/CLX-3185FW only) Wi-Fi Protected Setup™(WPS) is indicated by just pressing this function, refer to setup the wireless network configuration easily....mode. 3. Press the left /right arrow to select the mode you to "Wireless network setup (CLX-3185FW/CLX-3185WK only)" on page 1. This function simplifies the process of using non-genuine Samsung toner cartridge such as a network name (SSID), data encryption and authentication. If the toner cartridge ...
User Manual (user Manual) (ver.2.00) (English)
Page 36
... and Fax Manager: You can find out about Samsung Scan and Fax Manager program information and installed scan driver's condition. • Fax Utilities: You can also open another image editor program such as Adobe Photoshop, from your computer without going to the machine. (CLX-3185FN/CLX-3185FW only) • SetIP: Use this program to...
... and Fax Manager: You can find out about Samsung Scan and Fax Manager program information and installed scan driver's condition. • Fax Utilities: You can also open another image editor program such as Adobe Photoshop, from your computer without going to the machine. (CLX-3185FN/CLX-3185FW only) • SetIP: Use this program to...
User Manual (user Manual) (ver.2.00) (English)
Page 38
...Make sure that all applications will close on your computer and powered on your machine is connected to the next step. •For CLX-3185FN/CLX-3185FW, select your CD-ROM drive. 3. If not, click No to the license agreement. Click Finish. Select Easy Install and click ... to install the printer software (http://www.samsung.com/printer). Click Continue. 8. Easy Install is connected to print a test page, click Print a test page. The Fax Queue Creator window appears during the installation process. •For CLX-3185/CLX-3185N/CLX-3185WK, click Cancel to go to uninstall the...
...Make sure that all applications will close on your computer and powered on your machine is connected to the next step. •For CLX-3185FN/CLX-3185FW, select your CD-ROM drive. 3. If not, click No to the license agreement. Click Finish. Select Easy Install and click ... to install the printer software (http://www.samsung.com/printer). Click Continue. 8. Easy Install is connected to print a test page, click Print a test page. The Fax Queue Creator window appears during the installation process. •For CLX-3185/CLX-3185N/CLX-3185WK, click Cancel to go to uninstall the...

User Manual (user Manual) (ver.2.00) (English)
Page 41
...network protocols on your network machine. You can customize machine settings. (See "Using SyncThru™ Web Service (CLX-3185N/CLX-3185WK/CLX-3185FN/CLX-3185FW only)" on page 2). SyncThru™ Web Admin Service provides you with an efficient way of managing network ...devices and lets you remotely monitor and troubleshoot network machines from http://solution.samsungprinter.com. Network setup (CLX-3185N/CLX-3185WK/CLX-3185FN/CLX-3185FW only)_ 1 This chapter includes: • Network environment • Introducing useful network programs • Using a wired ...
...network protocols on your network machine. You can customize machine settings. (See "Using SyncThru™ Web Service (CLX-3185N/CLX-3185WK/CLX-3185FN/CLX-3185FW only)" on page 2). SyncThru™ Web Admin Service provides you with an efficient way of managing network ...devices and lets you remotely monitor and troubleshoot network machines from http://solution.samsungprinter.com. Network setup (CLX-3185N/CLX-3185WK/CLX-3185FN/CLX-3185FW only)_ 1 This chapter includes: • Network environment • Introducing useful network programs • Using a wired ...
User Manual (user Manual) (ver.2.00) (English)
Page 42
...(Windows) This program is often required in the window and complete the installation. A MAC address is 192.168.1.150, Network setup (CLX-3185N/CLX-3185WK/CLX-3185FN/CLX-3185FW only)_ 2 Press the left /right arrow until Network Info. Using this program. 5.Select a language, then click Next. 6.Follow ... in the SetIP window to communicate with a network cable. 2.Turn on the machine. 3.From the Windows Start menu, select All Programs > Samsung Printers > SetIP > SetIP. 4.Click on your machine to the machine. In a corporate intranet, you may need to install this Network Configuration...
...(Windows) This program is often required in the window and complete the installation. A MAC address is 192.168.1.150, Network setup (CLX-3185N/CLX-3185WK/CLX-3185FN/CLX-3185FW only)_ 2 Press the left /right arrow until Network Info. Using this program. 5.Select a language, then click Next. 6.Follow ... in the SetIP window to communicate with a network cable. 2.Turn on the machine. 3.From the Windows Start menu, select All Programs > Samsung Printers > SetIP > SetIP. 4.Click on your machine to the machine. In a corporate intranet, you may need to install this Network Configuration...
User Manual (user Manual) (ver.2.00) (English)
Page 43
..., which is your machine's MAC address. 2.Open the /opt/Samsung/mfp/share/utils/. 3.Double-click the SetIPApplet.html file. 4.Click to apply settings. You may vary from the Network Configuration Report and enter it without the colons. Network setup (CLX-3185N/CLX-3185WK/CLX-3185FN/CLX-3185FW only)_ 3 For example, 00:15:99:29:51:A8...
..., which is your machine's MAC address. 2.Open the /opt/Samsung/mfp/share/utils/. 3.Double-click the SetIPApplet.html file. 4.Click to apply settings. You may vary from the Network Configuration Report and enter it without the colons. Network setup (CLX-3185N/CLX-3185WK/CLX-3185FN/CLX-3185FW only)_ 3 For example, 00:15:99:29:51:A8...
User Manual (user Manual) (ver.2.00) (English)
Page 44
...run and an installation window appears. •If the installation window does not appear, click Start and then Run. Network setup (CLX-3185N/CLX-3185WK/CLX-3185FN/CLX-3185FW only)_ 4 Type X:\Setup.exe, replacing "X" with USB cable" on the machine, you can access Wireless Setting and Installation ..., and inactivate this button, the firewall notice window appears. -Turn off the firewall from the drop-down list. •For CLX-3185WK/CLX-3185FW, you want to print a test page appears. The Wireless Setting and Installation allows you to install the supplied software such as Smart...
...run and an installation window appears. •If the installation window does not appear, click Start and then Run. Network setup (CLX-3185N/CLX-3185WK/CLX-3185FN/CLX-3185FW only)_ 4 Type X:\Setup.exe, replacing "X" with USB cable" on the machine, you can access Wireless Setting and Installation ..., and inactivate this button, the firewall notice window appears. -Turn off the firewall from the drop-down list. •For CLX-3185WK/CLX-3185FW, you want to print a test page appears. The Wireless Setting and Installation allows you to install the supplied software such as Smart...
User Manual (user Manual) (ver.2.00) (English)
Page 45
...;For Mac OS X 10.5~10.6, click the "+" icon. Network setup (CLX-3185N/CLX-3185WK/CLX-3185FN/CLX-3185FW only)_ 5 gives detailed information about the how to connect? Double-click the Installer OS X icon. 6. For Mac OS X 10.3, if Auto Select does not work properly, select Samsung in Printer Model and your machine name in Model Name...
...;For Mac OS X 10.5~10.6, click the "+" icon. Network setup (CLX-3185N/CLX-3185WK/CLX-3185FN/CLX-3185FW only)_ 5 gives detailed information about the how to connect? Double-click the Installer OS X icon. 6. For Mac OS X 10.3, if Auto Select does not work properly, select Samsung in Printer Model and your machine name in Model Name...


