User Manual (user Manual) (ver.2.00) (English)
Page 5
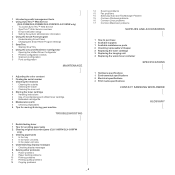
... problems 15 Fax problems 15 Samsung Scan and Fax Manager Problem 15 Common Windows problems 16 Common Linux problems 17 Common Macintosh problems SUPPLIES AND ACCESSORIES 1 1 How to purchase 1 Available supplies 1 Available maintenance parts 2 Checking replaceable's lifespan 2 Replacing the toner cartridge 3 Replacing the imaging unit 4 Replacing the waste toner container 1 Hardware specifications 1 Environmental specifications...
... problems 15 Fax problems 15 Samsung Scan and Fax Manager Problem 15 Common Windows problems 16 Common Linux problems 17 Common Macintosh problems SUPPLIES AND ACCESSORIES 1 1 How to purchase 1 Available supplies 1 Available maintenance parts 2 Checking replaceable's lifespan 2 Replacing the toner cartridge 3 Replacing the imaging unit 4 Replacing the waste toner container 1 Hardware specifications 1 Environmental specifications...
User Manual (user Manual) (ver.2.00) (English)
Page 26
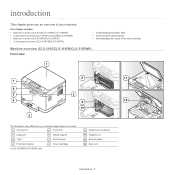
... 9 Waste toner container 10 Imaging unit 11 Scanner glass 12 Scan unit Introduction_ 1 This chapter gives you an overview of the toner cartridge Machine overview (CLX-3185/CLX-3185N/CLX-3185WK) Front view 1 7 6 5 4 3 8 11 2 9 12 10 This illustration may differ from your machine. This chapter includes: • Machine overview (CLX-3185/CLX-3185N/CLX-3185WK) • Control panel overview (CLX-3185/CLX-3185N/CLX-3185WK...
... 9 Waste toner container 10 Imaging unit 11 Scanner glass 12 Scan unit Introduction_ 1 This chapter gives you an overview of the toner cartridge Machine overview (CLX-3185/CLX-3185N/CLX-3185WK) Front view 1 7 6 5 4 3 8 11 2 9 12 10 This illustration may differ from your machine. This chapter includes: • Machine overview (CLX-3185/CLX-3185N/CLX-3185WK) • Control panel overview (CLX-3185/CLX-3185N/CLX-3185WK...
User Manual (user Manual) (ver.2.00) (English)
Page 29
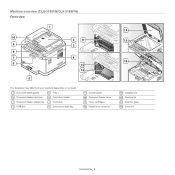
Machine overview (CLX-3185FN/CLX-3185FW) Front view 1 10 9 8 7 6 5 2 11 3 4 12 13 This illustration may differ from your machine depending on its model. 1 Document width guides 5 Tray 1 2 Document feeder input tray 6 Front door handle 3 Document feeder output tray 7 Front door 4 USB port 8 Document output tray 9 Control panel 10 Document feeder cover 11 Toner cartridges 12 Waste toner container 14 15 16 13 Imaging unit 14 Scanner lid 15 Scanner glass 16 Scan unit Introduction_ 4
Machine overview (CLX-3185FN/CLX-3185FW) Front view 1 10 9 8 7 6 5 2 11 3 4 12 13 This illustration may differ from your machine depending on its model. 1 Document width guides 5 Tray 1 2 Document feeder input tray 6 Front door handle 3 Document feeder output tray 7 Front door 4 USB port 8 Document output tray 9 Control panel 10 Document feeder cover 11 Toner cartridges 12 Waste toner container 14 15 16 13 Imaging unit 14 Scanner lid 15 Scanner glass 16 Scan unit Introduction_ 4
User Manual (user Manual) (ver.2.00) (English)
Page 113
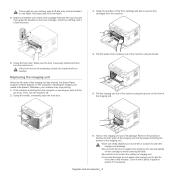
...Use the handle on the cartridge to clean. If you use a vacuum cleaner, toner blows into the machine and close the front door. Slide four toner cartridges back into the machine. 5. Plug in cold water. Insert the waste toner container into position and then push it to dry completely. 10. Maintenance_ 2 With...machine on the front of the imaging unit, push imaging unit into the machine. •If toner gets on the front of the drum located in the imaging unit. Pull the waste toner container out of the machine using the handle. 7. Pull the imaging unit out of the ...
...Use the handle on the cartridge to clean. If you use a vacuum cleaner, toner blows into the machine and close the front door. Slide four toner cartridges back into the machine. 5. Plug in cold water. Insert the waste toner container into position and then push it to dry completely. 10. Maintenance_ 2 With...machine on the front of the imaging unit, push imaging unit into the machine. •If toner gets on the front of the drum located in the imaging unit. Pull the waste toner container out of the machine using the handle. 7. Pull the imaging unit out of the ...
User Manual (user Manual) (ver.2.00) (English)
Page 121
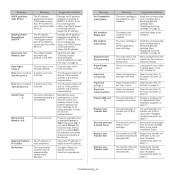
...it is close . Clear the jam (See "Clearing original document jams (CLX-3185FN/CLX-3185 FW only)" on page 2). If the problem persists, call a service representative. If the problem persists, the toner cartridge is operational. Press the left/right arrow to BOOTP or Static. ...estimated life of the fax job. If the problem persists, call a service representative. The waste toner container is full. Replace the transfer roller with a Samsung-genuine cartridge (See "Replacing the toner cartridge" on page 2). The memory is not installed. Change the IP address assignment method...
...it is close . Clear the jam (See "Clearing original document jams (CLX-3185FN/CLX-3185 FW only)" on page 2). If the problem persists, call a service representative. If the problem persists, the toner cartridge is operational. Press the left/right arrow to BOOTP or Static. ...estimated life of the fax job. If the problem persists, call a service representative. The waste toner container is full. Replace the transfer roller with a Samsung-genuine cartridge (See "Replacing the toner cartridge" on page 2). The memory is not installed. Change the IP address assignment method...
User Manual (user Manual) (ver.2.00) (English)
Page 133
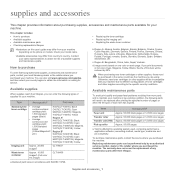
... you purchased the machine. You can also visit www.samsung.com/supplies, and then select your country/region to purchase To order Samsung-authorized supplies, accessories and maintenance parts, contact your machine. Otherwise, new toner cartridges or other supplies, these must be purchased in ... Black C4073(CLT-C4073S): Cyan M4073(CLT-M4073S): Magenta Y4073(CLT-Y4073S): Yellow Imaging unit Approx. 24,000 imagesd CLT-R407 Waste toner container Approx. 10,000 imagesd (Full color 5% image) CLT-W409 Available maintenance parts To avoid print quality and paper feed problems...
... you purchased the machine. You can also visit www.samsung.com/supplies, and then select your country/region to purchase To order Samsung-authorized supplies, accessories and maintenance parts, contact your machine. Otherwise, new toner cartridges or other supplies, these must be purchased in ... Black C4073(CLT-C4073S): Cyan M4073(CLT-M4073S): Magenta Y4073(CLT-Y4073S): Yellow Imaging unit Approx. 24,000 imagesd CLT-R407 Waste toner container Approx. 10,000 imagesd (Full color 5% image) CLT-W409 Available maintenance parts To avoid print quality and paper feed problems...
User Manual (user Manual) (ver.2.00) (English)
Page 135
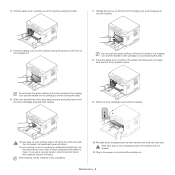
...unit. 6. Pull the imaging unit out of the machine using its package. Insert the cartridge until the job ends. Close the front door. Pull the waste toner container out of the machine using the groove on the computer, indicating the imaging unit needs to be placed. Grasp the handles on the cartridge... in the imaging unit. Using the handle, completely open the imaging unit package. •Do not touch the drum located in cold water. If toner gets on both sides of the imaging unit and the paper protecting the surface of the imaging unit. •Don't use sharp objects such as...
...unit. 6. Pull the imaging unit out of the machine using its package. Insert the cartridge until the job ends. Close the front door. Pull the waste toner container out of the machine using the groove on the computer, indicating the imaging unit needs to be placed. Grasp the handles on the cartridge... in the imaging unit. Using the handle, completely open the imaging unit package. •Do not touch the drum located in cold water. If toner gets on both sides of the imaging unit and the paper protecting the surface of the imaging unit. •Don't use sharp objects such as...
User Manual (user Manual) (ver.2.00) (English)
Page 136
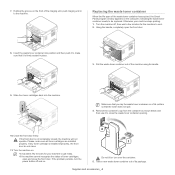
...may takes few minutes for your machine stops printing. 1. Turn the machine off and on the computer, indicating the waste toner container needs to the machine. Take a new waste toner container out of the imaging unit, push imaging unit in place. 3. Using the handle, completely open and close... the front door. Replacing the waste toner container When the life span of the waste toner container has expired, the Smart Panel program window appears on . 2 1 Do not tilt or turn over the container...
...may takes few minutes for your machine stops printing. 1. Turn the machine off and on the computer, indicating the waste toner container needs to the machine. Take a new waste toner container out of the imaging unit, push imaging unit in place. 3. Using the handle, completely open and close... the front door. Replacing the waste toner container When the life span of the waste toner container has expired, the Smart Panel program window appears on . 2 1 Do not tilt or turn over the container...


