
User Manual (ENGLISH)
Page 1
SyncMaster 743B/743BX/943B/943BX LCD Monitor User Manual imagine the possibilities
SyncMaster 743B/743BX/943B/943BX LCD Monitor User Manual imagine the possibilities
User Manual (ENGLISH)
Page 3
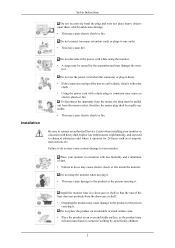
... clean it with a dry cloth. • Using the power cord with a dusty plug or connector may cause electric shock or fire inside the monitor. Place your monitor in a location with heavy dust, high or low temperatures, high humidity, and exposed to chemical substances and where it operates for 24 hours such... place heavy objects upon them, which could cause damage. • This may cause damage to the product or the person carrying it. Install the monitor base in a location with low humidity and a minimum of the base does not protrude from the mains socket, therefore the mains plug shall be...
... clean it with a dry cloth. • Using the power cord with a dusty plug or connector may cause electric shock or fire inside the monitor. Place your monitor in a location with heavy dust, high or low temperatures, high humidity, and exposed to chemical substances and where it operates for 24 hours such... place heavy objects upon them, which could cause damage. • This may cause damage to the product or the person carrying it. Install the monitor base in a location with low humidity and a minimum of the base does not protrude from the mains socket, therefore the mains plug shall be...
User Manual (ENGLISH)
Page 4
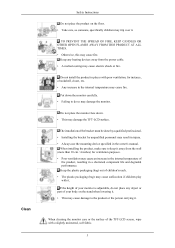
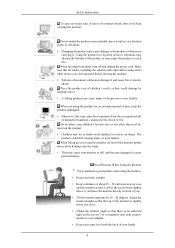
... product in the internal temperature may cause fire. When cleaning the monitor case or the surface of the TFT-LCD screen, wipe with poor ventilation, for ventilation purposes. • Poor ventilation may damage the monitor. Clean Safety Instructions Do not place the product on the stand ... for instance, a bookshelf, closet, etc. • Any increase in places with a slightly moistened, soft fabric. 3 If the height of your monitor is adjustable, do so may cause an increase in the internal temperature of the bracket must be done by a qualified professional. • Installing the ...
... product in the internal temperature may cause fire. When cleaning the monitor case or the surface of the TFT-LCD screen, wipe with poor ventilation, for ventilation purposes. • Poor ventilation may damage the monitor. Clean Safety Instructions Do not place the product on the stand ... for instance, a bookshelf, closet, etc. • Any increase in places with a slightly moistened, soft fabric. 3 If the height of your monitor is adjustable, do so may cause an increase in the internal temperature of the bracket must be done by a qualified professional. • Installing the ...
User Manual (ENGLISH)
Page 5
...; This may cause a malfunction, electric shock or fire. • In particular, avoid operating the monitor near water or outdoors where the monitor could be exposed to oil, smoke or moisture; If the monitor is dropped or the casing is any chemicals such as wax, benzene, alcohol, thinners, insecticide, air...or rain. do so may cause electric shock or fire. Then contact the Service Center. • The monitor may cause damage, electric shock or fire. Keep the product away from the monitor - Make sure to a qualified servicing company. Do not remove the cover (or back). • ...
...; This may cause a malfunction, electric shock or fire. • In particular, avoid operating the monitor near water or outdoors where the monitor could be exposed to oil, smoke or moisture; If the monitor is dropped or the casing is any chemicals such as wax, benzene, alcohol, thinners, insecticide, air...or rain. do so may cause electric shock or fire. Then contact the Service Center. • The monitor may cause damage, electric shock or fire. Keep the product away from the monitor - Make sure to a qualified servicing company. Do not remove the cover (or back). • ...
User Manual (ENGLISH)
Page 6
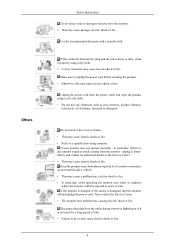
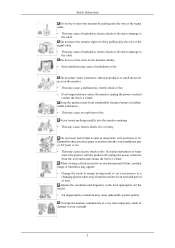
... the wire or the signal cable. • This may cause a breakdown, electric shock or fire due to damage to a changing picture when away from the monitor for an extended period of time, residual image or blurriness may appear. • Change the mode to energy saving mode or set a screensaver to the... contact the Service Center. Do not insert metal objects such as chopsticks, wire and tools or inflammable objects such as paper or matches into the monitor openings. • This may cause a breakdown, electric shock or fire due to damage to the cable. Do not move the...
... the wire or the signal cable. • This may cause a breakdown, electric shock or fire due to damage to a changing picture when away from the monitor for an extended period of time, residual image or blurriness may appear. • Change the mode to energy saving mode or set a screensaver to the... contact the Service Center. Do not insert metal objects such as chopsticks, wire and tools or inflammable objects such as paper or matches into the monitor openings. • This may cause a breakdown, electric shock or fire due to damage to the cable. Do not move the...
User Manual (ENGLISH)
Page 7
... cables may cause heat emission from slightly above it and cause fire or electric shock. When not using the monitor. When lifting up or moving the monitor, do not lift the monitor upside down while holding only the stand. • This may cause your children's favorite toys or any other... of using the product for an extended period of time, keep the product unplugged. • Otherwise, this may damage it , and have the monitor directly in a location prone to fall , causing injury or even fatality. Safety Instructions To ease eye strain, take at the screen from the accumulated...
... cables may cause heat emission from slightly above it and cause fire or electric shock. When not using the monitor. When lifting up or moving the monitor, do not lift the monitor upside down while holding only the stand. • This may cause your children's favorite toys or any other... of using the product for an extended period of time, keep the product unplugged. • Otherwise, this may damage it , and have the monitor directly in a location prone to fall , causing injury or even fatality. Safety Instructions To ease eye strain, take at the screen from the accumulated...
User Manual (ENGLISH)
Page 9
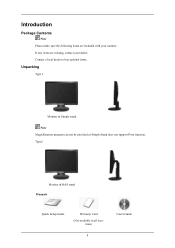
Contact a local dealer to buy optional items. Unpacking Type 1 Monitor & Simple stand Note MagicRotation program can not be provided as Simple Stand does not support Pivot function. Type2 Monitor & HAS stand Manuals Quick Setup Guide Warranty Card (Not available in all loca- tions) 8 User's Guide If any items are included with your dealer. Introduction Package Contents Note Please make sure the following items are missing, contact your monitor.
Contact a local dealer to buy optional items. Unpacking Type 1 Monitor & Simple stand Note MagicRotation program can not be provided as Simple Stand does not support Pivot function. Type2 Monitor & HAS stand Manuals Quick Setup Guide Warranty Card (Not available in all loca- tions) 8 User's Guide If any items are included with your dealer. Introduction Package Contents Note Please make sure the following items are missing, contact your monitor.

User Manual (ENGLISH)
Page 10
... resolution for this product. The displayed content will be displayed up or down key. Make sure to three (3) times. Note The resolution displayed on . Your Monitor Initial Settings Select the language using the up to adjust the resolution of your PC resolution so that it is only provided for highly polished...
... resolution for this product. The displayed content will be displayed up or down key. Make sure to three (3) times. Note The resolution displayed on . Your Monitor Initial Settings Select the language using the up to adjust the resolution of your PC resolution so that it is only provided for highly polished...
User Manual (ENGLISH)
Page 12
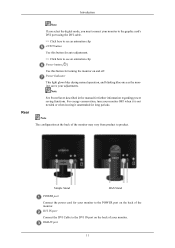
... and off. Power Indicator This light glows blue during normal operation, and blinking blue once as the monitor saves your adjustments. Introduction Rear Note If you select the digital mode, you must connect your monitor to the graphic card's DVI port using the DVI cable. >> Click here to see an animation ...clip AUTO button Use this button for auto adjustment. >> Click here to see an animation clip Power button [ ] Use this button for your monitor to the POWER port on the back of your monitor. DVI IN port Connect the DVI Cable to product. Note The configuration at the back of the...
... and off. Power Indicator This light glows blue during normal operation, and blinking blue once as the monitor saves your adjustments. Introduction Rear Note If you select the digital mode, you must connect your monitor to the graphic card's DVI port using the DVI cable. >> Click here to see an animation ...clip AUTO button Use this button for auto adjustment. >> Click here to see an animation clip Power button [ ] Use this button for your monitor to the POWER port on the back of your monitor. DVI IN port Connect the DVI Cable to product. Note The configuration at the back of the...
User Manual (ENGLISH)
Page 13
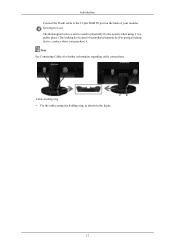
Note See Connecting Cables for further information regarding cable connections. Introduction Connect the D-sub cable to be purchased separately.) For using the holding ring • Fix the cables using a locking device, contact where you purchase it in the figure. 12 Kensington Lock The Kensington lock is a device used to physically fix the system when using it . Cable holding ring, as shown in a public place. (The locking device has to the 15-pin, RGB IN port on the back of your monitor.
Note See Connecting Cables for further information regarding cable connections. Introduction Connect the D-sub cable to be purchased separately.) For using the holding ring • Fix the cables using a locking device, contact where you purchase it in the figure. 12 Kensington Lock The Kensington lock is a device used to physically fix the system when using it . Cable holding ring, as shown in a public place. (The locking device has to the 15-pin, RGB IN port on the back of your monitor.
User Manual (ENGLISH)
Page 14
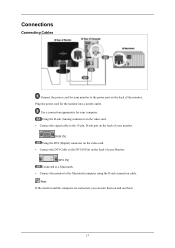
Using the D-sub (Analog) connector on the video card. • Connect the signal cable to the 15-pin, D-sub port on the back of your monitor. [RGB IN] Using the DVI (Digital) connector on the video card. • Connect the DVI Cable to the DVI IN Port on the back of ...your Monitor. [DVI IN] Connected to a Macintosh. • Connect the monitor to the power port on and use them. 13 Use a connection appropriate for the monitor into a nearby outlet. Note If the monitor and the computer are connected, you can turn them on the...
Using the D-sub (Analog) connector on the video card. • Connect the signal cable to the 15-pin, D-sub port on the back of your monitor. [RGB IN] Using the DVI (Digital) connector on the video card. • Connect the DVI Cable to the DVI IN Port on the back of ...your Monitor. [DVI IN] Connected to a Macintosh. • Connect the monitor to the power port on and use them. 13 Use a connection appropriate for the monitor into a nearby outlet. Note If the monitor and the computer are connected, you can turn them on the...

User Manual (ENGLISH)
Page 15
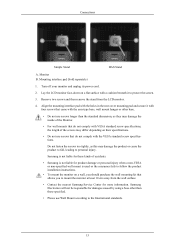
Stand Stopper Attaching a Base This monitor accepts a 75.0 mm x 75.0 mm VESA-compliant mounting interface pad. 14 Using the Stand Monitor Assembly Connections Simple Stand Monitor and Bottom HAS Stand HAS Stand A.
Stand Stopper Attaching a Base This monitor accepts a 75.0 mm x 75.0 mm VESA-compliant mounting interface pad. 14 Using the Stand Monitor Assembly Connections Simple Stand Monitor and Bottom HAS Stand HAS Stand A.
User Manual (ENGLISH)
Page 16
... the International standards. 15 Lay the LCD monitor face-down on their specifications. • Do not use Wall Mount according to personal injury. Mounting interface pad (Sold separately) 1. Samsung is not liable for these kinds of accidents. • Samsung is not liable for product damage or... purchase the wall mounting kit that allows you to mount the monitor at least 10 cm away from the LCD monitor. 4. Connections Simple Stand HAS Stand A. Turn off your monitor and unplug its power cord. 2. Samsung Electronics will not be responsible for more information. Remove two screws...
... the International standards. 15 Lay the LCD monitor face-down on their specifications. • Do not use Wall Mount according to personal injury. Mounting interface pad (Sold separately) 1. Samsung is not liable for these kinds of accidents. • Samsung is not liable for product damage or... purchase the wall mounting kit that allows you to mount the monitor at least 10 cm away from the LCD monitor. 4. Connections Simple Stand HAS Stand A. Turn off your monitor and unplug its power cord. 2. Samsung Electronics will not be responsible for more information. Remove two screws...
User Manual (ENGLISH)
Page 17
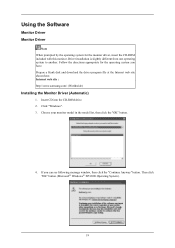
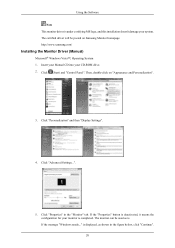
...the driver program file at the Internet web site shown here. Insert CD into the CD-ROM drive. 2. Using the Software Monitor Driver Monitor Driver Note When prompted by the operating system for the operating system you can see following message window, then click the "...Continue Anyway" button. Internet web site : http://www.samsung.com/ (Worldwide) Installing the Monitor Driver (Automatic) 1. Click "Windows". 3. If you have. Driver installation is slightly different from one operating system to another. ...
...the driver program file at the Internet web site shown here. Insert CD into the CD-ROM drive. 2. Using the Software Monitor Driver Monitor Driver Note When prompted by the operating system for the operating system you can see following message window, then click the "...Continue Anyway" button. Internet web site : http://www.samsung.com/ (Worldwide) Installing the Monitor Driver (Automatic) 1. Click "Windows". 3. If you have. Driver installation is slightly different from one operating system to another. ...
User Manual (ENGLISH)
Page 18
... (Start) and "Control Panel". Click "Personalization" and then "Display Settings". 4. Using the Software Note This monitor driver is . Click "Advanced Settings...". 5. The certified driver will be used as shown in the "Monitor" tab. Then, double-click on Samsung Monitor homepage. If the message "Windows needs..." is displayed, as is under certifying MS logo, and...
... (Start) and "Control Panel". Click "Personalization" and then "Display Settings". 4. Using the Software Note This monitor driver is . Click "Advanced Settings...". 5. The certified driver will be used as shown in the "Monitor" tab. Then, double-click on Samsung Monitor homepage. If the message "Windows needs..." is displayed, as is under certifying MS logo, and...
User Manual (ENGLISH)
Page 19
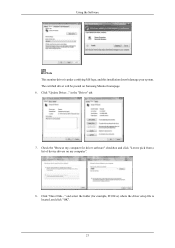
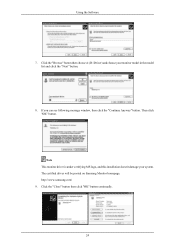
Check the "Browse my computer for example, D:\Drive) where the driver setup file is under certifying MS logo, and this installation doesn't damage your system. and select the folder (for driver software" checkbox and click "Let me pick from a list of device drivers on Samsung Monitor homepage. 6. in the "Driver" tab. 7. Using the Software Note This monitor driver is located, and click "OK". 21 Click "Have Disk..." Click "Update Driver..." The certified driver will be posted on my computer". 8.
Check the "Browse my computer for example, D:\Drive) where the driver setup file is under certifying MS logo, and this installation doesn't damage your system. and select the folder (for driver software" checkbox and click "Let me pick from a list of device drivers on Samsung Monitor homepage. 6. in the "Driver" tab. 7. Using the Software Note This monitor driver is located, and click "OK". 21 Click "Have Disk..." Click "Update Driver..." The certified driver will be posted on my computer". 8.
User Manual (ENGLISH)
Page 20
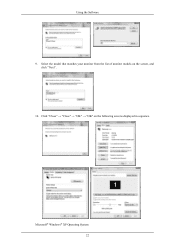
Microsoft® Windows® XP Operating System 22 Select the model that matches your monitor from the list of monitor models on the following screens displayed in sequence. Click "Close" → "Close" → "OK" → "OK" on the screen, and click "Next". 10. Using the Software 9.
Microsoft® Windows® XP Operating System 22 Select the model that matches your monitor from the list of monitor models on the following screens displayed in sequence. Click "Close" → "Close" → "OK" → "OK" on the screen, and click "Next". 10. Using the Software 9.
User Manual (ENGLISH)
Page 21
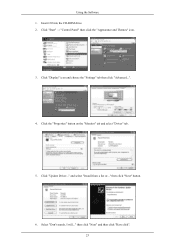
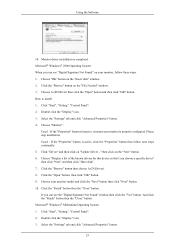
Click "Start" → "Control Panel" then click the "Appearance and Themes" icon. 3. Select "Don't search, I will..." Click the "Properties" button on the "Monitor" tab and select "Driver" tab. 5. then click "Next" and then click "Have disk". 23 Insert CD into the CD-ROM drive. 2. Click "Update Driver..." then click "Next" button. 6. Click "Display" icon and choose the "Settings" tab then click "Advanced...". 4. Using the Software 1. and select "Install from a list or..."
Click "Start" → "Control Panel" then click the "Appearance and Themes" icon. 3. Select "Don't search, I will..." Click the "Properties" button on the "Monitor" tab and select "Driver" tab. 5. then click "Next" and then click "Have disk". 23 Insert CD into the CD-ROM drive. 2. Click "Update Driver..." then click "Next" button. 6. Click "Display" icon and choose the "Settings" tab then click "Advanced...". 4. Using the Software 1. and select "Install from a list or..."
User Manual (ENGLISH)
Page 22
Note This monitor driver is under certifying MS logo, and this installation doesn't damage your monitor model in the model list and click the "Next" button. 8. Click the "Close" button then click "OK" button continually. 24 The certified driver will be posted on Samsung Monitor homepage. http://www.samsung.com/ 9. Using the Software 7. If you can see following message window, then click the "Continue Anyway" button. Then click "OK" button. Click the "Browse" button then choose A:(D:\Driver) and choose your system.
Note This monitor driver is under certifying MS logo, and this installation doesn't damage your monitor model in the model list and click the "Next" button. 8. Click the "Close" button then click "OK" button continually. 24 The certified driver will be posted on Samsung Monitor homepage. http://www.samsung.com/ 9. Using the Software 7. If you can see following message window, then click the "Continue Anyway" button. Then click "OK" button. Click the "Browse" button then choose A:(D:\Driver) and choose your system.
User Manual (ENGLISH)
Page 23
... on the "Insert disk" window. 2. And click the "Finish" button then the "Close" button. Double click the "Display" icon. 3. Monitor driver installation is active, click the "Properties" button then follow these steps. 1. Microsoft® Windows® 2000 Operating System When you can see... "Digital Signature Not Found" on your monitor, follow next steps continually. 5. Choose A:(D:\Driver) then click the "Open" button and then click "OK" button. Double click the "Display"...
... on the "Insert disk" window. 2. And click the "Finish" button then the "Close" button. Double click the "Display" icon. 3. Monitor driver installation is active, click the "Properties" button then follow these steps. 1. Microsoft® Windows® 2000 Operating System When you can see... "Digital Signature Not Found" on your monitor, follow next steps continually. 5. Choose A:(D:\Driver) then click the "Open" button and then click "OK" button. Double click the "Display"...


