User Manual (SPANISH)
Page 77
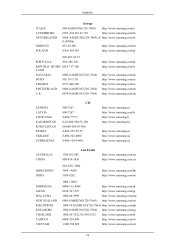
...SWEDEN 0771-400 200 SWITZERLAND 0800-SAMSUNG(726-7864) U.K 0870-SAMSUNG(726-7864) http://www.samsung.com/pt http://www.samsung.com/ie http://www.samsung.com/sk http://www.samsung.com/es http://www.samsung.com/se http://www.samsung.com/ch http://www.samsung.com/uk ESTONIA LATVIA LITHUANIA KAZAKHSTAN...800-555-55-55 8-800-502-0000 8-800-120-0-400 http://www.samsung.ee http://www.samsung.com/lv http://www.samsung.lt http://www.samsung.kz http://www.samsung.ru http://www.samsung.ua http://www.samsung.uz AUSTRALIA CHINA HONG KONG INDIA INDONESIA JAPAN MALAYSIA NEW ZEALAND PHILIPPINES SINGAPORE...
...SWEDEN 0771-400 200 SWITZERLAND 0800-SAMSUNG(726-7864) U.K 0870-SAMSUNG(726-7864) http://www.samsung.com/pt http://www.samsung.com/ie http://www.samsung.com/sk http://www.samsung.com/es http://www.samsung.com/se http://www.samsung.com/ch http://www.samsung.com/uk ESTONIA LATVIA LITHUANIA KAZAKHSTAN...800-555-55-55 8-800-502-0000 8-800-120-0-400 http://www.samsung.ee http://www.samsung.com/lv http://www.samsung.lt http://www.samsung.kz http://www.samsung.ru http://www.samsung.ua http://www.samsung.uz AUSTRALIA CHINA HONG KONG INDIA INDONESIA JAPAN MALAYSIA NEW ZEALAND PHILIPPINES SINGAPORE...

User Manual (ENGLISH)
Page 1
SyncMaster 743B/743BX/943B/943BX LCD Monitor User Manual imagine the possibilities
SyncMaster 743B/743BX/943B/943BX LCD Monitor User Manual imagine the possibilities
User Manual (ENGLISH)
Page 2
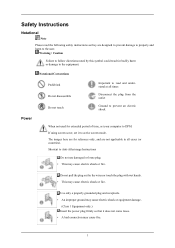
Safety Instructions Notational Note Please read and understand at all cases (or countries). If using screen saver, set your computer to the user. Do not pull the plug out by this symbol could result in all times Disconnect the plug from the outlet Ground to prevent an electric shock When not used for reference only, and are not applicable in bodily harm or damage to the equipment. The images here are designed to prevent damage to property and harm to DPM. Notational Conventions Power Prohibited Do not disassemble Do not touch Important to read the following safety ...
Safety Instructions Notational Note Please read and understand at all cases (or countries). If using screen saver, set your computer to the user. Do not pull the plug out by this symbol could result in all times Disconnect the plug from the outlet Ground to prevent an electric shock When not used for reference only, and are not applicable in bodily harm or damage to the equipment. The images here are designed to prevent damage to property and harm to DPM. Notational Conventions Power Prohibited Do not disassemble Do not touch Important to read the following safety ...
User Manual (ENGLISH)
Page 3
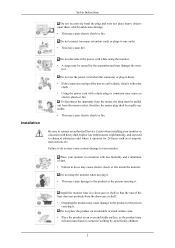
... temperatures, high humidity, and exposed to chemical substances and where it . • This may cause an electric shock or fire. Install the monitor base in a location with low humidity and a minimum of the base does not protrude from the mains socket, therefore the mains plug shall be...disconnect the apparatus from the mains, the plug must be caused by , specifically children. 2 Installation Do not disconnect the power cord while using the monitor. • A surge may be pulled out from the showcase or shelf. • Dropping the product may cause fire. Do not connect too many...
... temperatures, high humidity, and exposed to chemical substances and where it . • This may cause an electric shock or fire. Install the monitor base in a location with low humidity and a minimum of the base does not protrude from the mains socket, therefore the mains plug shall be...disconnect the apparatus from the mains, the plug must be caused by , specifically children. 2 Installation Do not disconnect the power cord while using the monitor. • A surge may be pulled out from the showcase or shelf. • Dropping the product may cause fire. Do not connect too many...
User Manual (ENGLISH)
Page 4
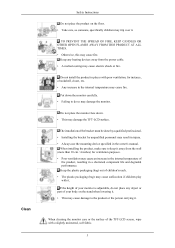
... must be done by a qualified professional. • Installing the bracket by unqualified personnel may damage the TFT-LCD surface. When cleaning the monitor case or the surface of the TFT-LCD screen, wipe with poor ventilation, for ventilation purposes. • Poor ventilation may cause an increase in the...specified in places with a slightly moistened, soft fabric. 3 If the height of the product, resulting in the internal temperature may damage the monitor. TO PREVENT THE SPREAD OF FIRE, KEEP CANDLES OR OTHER OPEN FLAMES AWAY FROM THIS PRODUCT AT ALL TIMES. • Otherwise, this may...
... must be done by a qualified professional. • Installing the bracket by unqualified personnel may damage the TFT-LCD surface. When cleaning the monitor case or the surface of the TFT-LCD screen, wipe with poor ventilation, for ventilation purposes. • Poor ventilation may cause an increase in the...specified in places with a slightly moistened, soft fabric. 3 If the height of the product, resulting in the internal temperature may damage the monitor. TO PREVENT THE SPREAD OF FIRE, KEEP CANDLES OR OTHER OPEN FLAMES AWAY FROM THIS PRODUCT AT ALL TIMES. • Otherwise, this may...
User Manual (ENGLISH)
Page 5
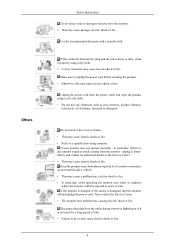
...connector between the plug and the pin is any chemicals such as wax, benzene, alcohol, thinners, insecticide, air freshener, lubricant or detergent. If your monitor does not operate normally - unplug it properly using a soft, dry cloth. • Do not use any unusual sound or smell coming from places exposed... or dirty, clean it immediately and contact an authorized dealer or the Service Center. • This may cause electric shock or fire. 4 If the monitor is dropped or the casing is not used for a long period of time. • Failure to do not install inside a vehicle. • This...
...connector between the plug and the pin is any chemicals such as wax, benzene, alcohol, thinners, insecticide, air freshener, lubricant or detergent. If your monitor does not operate normally - unplug it properly using a soft, dry cloth. • Do not use any unusual sound or smell coming from places exposed... or dirty, clean it immediately and contact an authorized dealer or the Service Center. • This may cause electric shock or fire. 4 If the monitor is dropped or the casing is not used for a long period of time. • Failure to do not install inside a vehicle. • This...
User Manual (ENGLISH)
Page 6
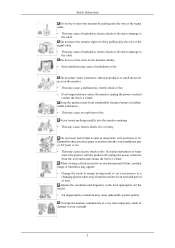
...left by pulling only the wire or the signal cable. • This may cause electric shock or fire. Do not cover the vents on the monitor. • This may cause a breakdown or fire. Do not insert metal objects such as chopsticks, wire and tools or inflammable objects such as ...paper or matches into the monitor openings. • This may cause electric shock, fire or injury. Viewing the monitor continuously at a too close angle may cause an explosion or fire. Keep the product away from the...
...left by pulling only the wire or the signal cable. • This may cause electric shock or fire. Do not cover the vents on the monitor. • This may cause a breakdown or fire. Do not insert metal objects such as chopsticks, wire and tools or inflammable objects such as ...paper or matches into the monitor openings. • This may cause electric shock, fire or injury. Viewing the monitor continuously at a too close angle may cause an explosion or fire. Keep the product away from the...
User Manual (ENGLISH)
Page 7
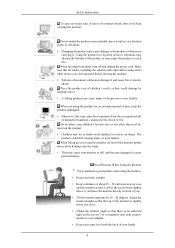
...; A falling product may cause injury to the person or even fatality. Make sure that there is slightly below eye level. • Adjust the monitor angle so that all cables, including the antenna cable and cables connected to other objects of time, keep the product unplugged. • Otherwise, this... may cause your hands. 6 When lifting up or moving the monitor, do not lift the monitor upside down while holding only the stand. • This may cause heat emission from slightly above it . Try to maintain your arms...
...; A falling product may cause injury to the person or even fatality. Make sure that there is slightly below eye level. • Adjust the monitor angle so that all cables, including the antenna cable and cables connected to other objects of time, keep the product unplugged. • Otherwise, this... may cause your hands. 6 When lifting up or moving the monitor, do not lift the monitor upside down while holding only the stand. • This may cause heat emission from slightly above it . Try to maintain your arms...

User Manual (ENGLISH)
Page 8
Do not let your feet fall up from the floor. Safety Instructions • Keep the angle of the elbow perpendicular. • Keep the angle of the knees at more than 90 degree. Adjust the arm position so that it is below the heart. 7
Do not let your feet fall up from the floor. Safety Instructions • Keep the angle of the elbow perpendicular. • Keep the angle of the knees at more than 90 degree. Adjust the arm position so that it is below the heart. 7
User Manual (ENGLISH)
Page 9
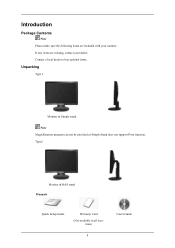
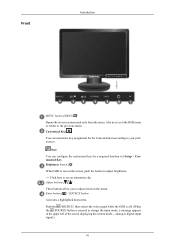
Contact a local dealer to buy optional items. Unpacking Type 1 Monitor & Simple stand Note MagicRotation program can not be provided as Simple Stand does not support Pivot function. Introduction Package Contents Note Please make sure the following items are missing, contact your monitor. tions) 8 User's Guide If any items are included with your dealer. Type2 Monitor & HAS stand Manuals Quick Setup Guide Warranty Card (Not available in all loca-
Contact a local dealer to buy optional items. Unpacking Type 1 Monitor & Simple stand Note MagicRotation program can not be provided as Simple Stand does not support Pivot function. Introduction Package Contents Note Please make sure the following items are missing, contact your monitor. tions) 8 User's Guide If any items are included with your dealer. Type2 Monitor & HAS stand Manuals Quick Setup Guide Warranty Card (Not available in all loca-

User Manual (ENGLISH)
Page 10
... resolution displayed on . Turn the Power button off and on the screen is the optimal resolution for this product. It can be displayed again. Your Monitor Initial Settings Select the language using the up to adjust the resolution of your PC resolution so that it is the same as a product feature...
... resolution displayed on . Turn the Power button off and on the screen is the optimal resolution for this product. It can be displayed again. Your Monitor Initial Settings Select the language using the up to adjust the resolution of your PC resolution so that it is the same as a product feature...
User Manual (ENGLISH)
Page 11
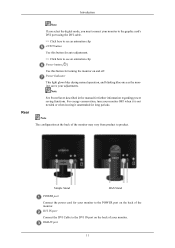
Customized Key[ ] You can configure the customized key for the Custom button according to adjust items in the upper left of the screen displaying the current mode -- analog or digital input signal.) 10 Brightness button [ ] When OSD is pressed to the previous menu. Push the ' /SOURCE', then selects the video signal while the OSD is off. (When the /SOURCE button is not on -screen menu and exits from the menu. Note You can customize key assignment for a required function via Setup > Customized Key. Front Introduction MENU button [MENU/ ] Opens the on the screen, push ...
Customized Key[ ] You can configure the customized key for the Custom button according to adjust items in the upper left of the screen displaying the current mode -- analog or digital input signal.) 10 Brightness button [ ] When OSD is pressed to the previous menu. Push the ' /SOURCE', then selects the video signal while the OSD is off. (When the /SOURCE button is not on -screen menu and exits from the menu. Note You can customize key assignment for a required function via Setup > Customized Key. Front Introduction MENU button [MENU/ ] Opens the on the screen, push ...
User Manual (ENGLISH)
Page 12
...RGB IN port 11 Power Indicator This light glows blue during normal operation, and blinking blue once as the monitor saves your monitor. For energy conservation, turn your monitor OFF when it is not needed or when leaving it unattended for further information regarding power saving functions. Introduction ...Rear Note If you select the digital mode, you must connect your monitor to the graphic card's DVI port using the DVI cable. >> Click here to see an animation clip AUTO button Use this ...
...RGB IN port 11 Power Indicator This light glows blue during normal operation, and blinking blue once as the monitor saves your monitor. For energy conservation, turn your monitor OFF when it is not needed or when leaving it unattended for further information regarding power saving functions. Introduction ...Rear Note If you select the digital mode, you must connect your monitor to the graphic card's DVI port using the DVI cable. >> Click here to see an animation clip AUTO button Use this ...
User Manual (ENGLISH)
Page 13
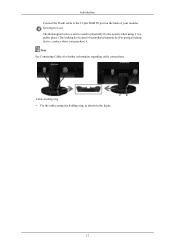
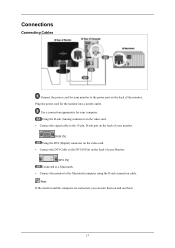
Introduction Connect the D-sub cable to be purchased separately.) For using it . Kensington Lock The Kensington lock is a device used to physically fix the system when using a locking device, contact where you purchase it in the figure. 12 Cable holding ring • Fix the cables using the holding ring, as shown in a public place. (The locking device has to the 15-pin, RGB IN port on the back of your monitor. Note See Connecting Cables for further information regarding cable connections.
Introduction Connect the D-sub cable to be purchased separately.) For using it . Kensington Lock The Kensington lock is a device used to physically fix the system when using a locking device, contact where you purchase it in the figure. 12 Cable holding ring • Fix the cables using the holding ring, as shown in a public place. (The locking device has to the 15-pin, RGB IN port on the back of your monitor. Note See Connecting Cables for further information regarding cable connections.
User Manual (ENGLISH)
Page 14
Using the D-sub (Analog) connector on the video card. • Connect the signal cable to the 15-pin, D-sub port on the back of your monitor. [RGB IN] Using the DVI (Digital) connector on the video card. • Connect the DVI Cable to the DVI IN Port on the back of ...your Monitor. [DVI IN] Connected to a Macintosh. • Connect the monitor to the power port on and use them on the back of the monitor. Note If the monitor and the computer are connected, you can turn them . 13 Plug the power...
Using the D-sub (Analog) connector on the video card. • Connect the signal cable to the 15-pin, D-sub port on the back of your monitor. [RGB IN] Using the DVI (Digital) connector on the video card. • Connect the DVI Cable to the DVI IN Port on the back of ...your Monitor. [DVI IN] Connected to a Macintosh. • Connect the monitor to the power port on and use them on the back of the monitor. Note If the monitor and the computer are connected, you can turn them . 13 Plug the power...

User Manual (ENGLISH)
Page 15
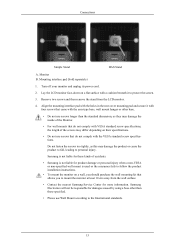
Using the Stand Monitor Assembly Connections Simple Stand Monitor and Bottom HAS Stand HAS Stand A. Stand Stopper Attaching a Base This monitor accepts a 75.0 mm x 75.0 mm VESA-compliant mounting interface pad. 14
Using the Stand Monitor Assembly Connections Simple Stand Monitor and Bottom HAS Stand HAS Stand A. Stand Stopper Attaching a Base This monitor accepts a 75.0 mm x 75.0 mm VESA-compliant mounting interface pad. 14
User Manual (ENGLISH)
Page 16
Lay the LCD monitor face-down on a flat surface with the arm-type base, wall mount hanger or other than the standard dimension, as this may differ depending on a wall, you to protect the screen. 3. Turn off your monitor and unplug its power cord. 2. Samsung Electronics will not be responsible for more ...information. Do not fasten the screws too tightly, as they may damage the inside of the Monitor. • For wall mounts that do not comply with the VESA standard screw specifications. Samsung is not liable for these kinds of the screws may damage the product or cause the product...
Lay the LCD monitor face-down on a flat surface with the arm-type base, wall mount hanger or other than the standard dimension, as this may differ depending on a wall, you to protect the screen. 3. Turn off your monitor and unplug its power cord. 2. Samsung Electronics will not be responsible for more ...information. Do not fasten the screws too tightly, as they may damage the inside of the Monitor. • For wall mounts that do not comply with the VESA standard screw specifications. Samsung is not liable for these kinds of the screws may damage the product or cause the product...
User Manual (ENGLISH)
Page 17
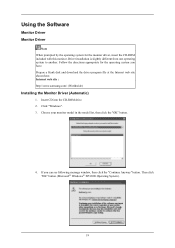
.... 4. Then click "OK" button (Microsoft® Windows® XP/2000 Operating System). 19 Internet web site : http://www.samsung.com/ (Worldwide) Installing the Monitor Driver (Automatic) 1. Follow the directions appropriate for the monitor driver, insert the CD-ROM included with this monitor. Insert CD into the CD-ROM drive. 2. If you have. Driver installation is...
.... 4. Then click "OK" button (Microsoft® Windows® XP/2000 Operating System). 19 Internet web site : http://www.samsung.com/ (Worldwide) Installing the Monitor Driver (Automatic) 1. Follow the directions appropriate for the monitor driver, insert the CD-ROM included with this monitor. Insert CD into the CD-ROM drive. 2. If you have. Driver installation is...
User Manual (ENGLISH)
Page 18
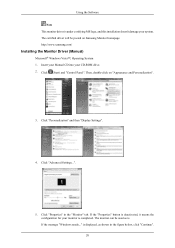
... CD into your system. Click "Advanced Settings...". 5. Click (Start) and "Control Panel". Then, double-click on Samsung Monitor homepage. Click "Properties" in the figure below, click "Continue". 20 If the "Properties" button is deactivated, it means the configuration ... 2. The certified driver will be used as shown in the "Monitor" tab. http://www.samsung.com/ Installing the Monitor Driver (Manual) Microsoft® Windows Vista™, Operating System 1. Using the Software Note This monitor driver is completed. Click "Personalization" and then "Display Settings". 4....
... CD into your system. Click "Advanced Settings...". 5. Click (Start) and "Control Panel". Then, double-click on Samsung Monitor homepage. Click "Properties" in the figure below, click "Continue". 20 If the "Properties" button is deactivated, it means the configuration ... 2. The certified driver will be used as shown in the "Monitor" tab. http://www.samsung.com/ Installing the Monitor Driver (Manual) Microsoft® Windows Vista™, Operating System 1. Using the Software Note This monitor driver is completed. Click "Personalization" and then "Display Settings". 4....
User Manual (ENGLISH)
Page 19
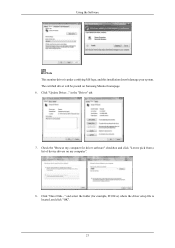
Click "Update Driver..." Click "Have Disk..." in the "Driver" tab. 7. Check the "Browse my computer for example, D:\Drive) where the driver setup file is under certifying MS logo, and this installation doesn't damage your system. and select the folder (for driver software" checkbox and click "Let me pick from a list of device drivers on Samsung Monitor homepage. 6. Using the Software Note This monitor driver is located, and click "OK". 21 The certified driver will be posted on my computer". 8.
Click "Update Driver..." Click "Have Disk..." in the "Driver" tab. 7. Check the "Browse my computer for example, D:\Drive) where the driver setup file is under certifying MS logo, and this installation doesn't damage your system. and select the folder (for driver software" checkbox and click "Let me pick from a list of device drivers on Samsung Monitor homepage. 6. Using the Software Note This monitor driver is located, and click "OK". 21 The certified driver will be posted on my computer". 8.
