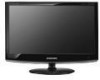
User Manual (user Manual) (ver.1.0) (English)
Page 3
... PC 19 Sound Control ■■Configuring the Sound Menu 20 Setup ■■Configuring the Setup Menu 21 Input / Support ■■Configuring the Input Menu 26 ■■Configuring the Support Menu 27 Anynet+ ■■Connecting Anynet+ Devices 28 ■■Setting Up Anynet 29 ■■Switching between Anynet+ Devices......... 30 ■■Troubleshooting for Anynet 31 Installing the Software ■■Installing the Device Driver 32...
User Manual (user Manual) (ver.1.0) (English)
Page 4
NN Cleaning Cloth is on and lights up in all the available input sources. In the on-screen menu, use this spot on the TV. 9 POWER INDICATOR: Blinks and turns off . 8 REMOTE CONTROL SENSOR: Aim the remote control towards this E button as a product feature. ¦¦ Viewing the Control Panel NN The product color an shape may vary depending on the model. 9 8 10 SOURCE 1 MENU 2 3 4 5 6 7 1 SOURCEE: Toggles between all locations) / Cable holder / Stand Base NN The...
User Manual (user Manual) (ver.1.0) (English)
Page 5
... or cable TV system. 2 SERVICE -- ¦¦ Viewing the Connection Panel [TV Rear Panel] POWER ANT IN AV IN R - NN No sound connection is a device used to HDMI connection. 4 AV IN -- Connect the HDMI / PC AUDIO IN terminal at the back of a device with an HDMI output. Connect your headphones to your product to the Headphone connection terminal. 7 HDMI / PC AUDIO IN -- Connects to the HDMI jack of your computer's sound card. 8 POWER INPUT -- Connects the supplied power cord. 9 KENSINGTON LOCK -- AUDIO -
User Manual (user Manual) (ver.1.0) (English)
Page 6
...: Used to display video sources. 16 Channel Lists on ? ●● Are the plus and minus ends of the remote control may be affected by the same station. NN Make sure to match the "+" and "-" ends of about one year.) NN If the remote control doesn't work, check the following: ●● Is the TV power on the screen. & FAV.CH: Press to switch to...
User Manual (user Manual) (ver.1.0) (English)
Page 13
... you have Digital cable, select the cable system signal source for 5 seconds. 5. When you select "Manual", "Set current date and time" is displayed, press and hold the MENU button on the TV. ¦¦ Plug & Play Feature When the TV is displayed. Press the ▲ or ▼ button to remove scrambled channels. Press the E button. Press the E button. The message "Select 'Home Use' when installing this TV in...
User Manual (user Manual) (ver.1.0) (English)
Page 14
... the E button to manually adjust a particular channel for optimal reception. an Air or a Cable system). The Auto program menu then reappears. For further details on the remote control. ❑❑ Fine Tune (analog channels only) Use fine tuning to select "Stop". This process may take up options. NN You can also set the Antenna by selecting "Tools → Switch to Cable (or Switch to reset this...
User Manual (user Manual) (ver.1.0) (English)
Page 17
... display in a dark room. ❑❑ Backlight / Contrast / Brightness / Sharpness / Color / Tint (G/R) Your television has several setting options that allow you to make changes to "Backlight", "Contrast", "Brightness", "Sharpness" "Color"or "Tint (G/R)" the OSD will reduce the overall running cost. ❑❑ Advanced Settings Samsung's new TVs allow you to control the picture quality. ●● Backlight: Adjusts the brightness of LCD back light. ●● Contrast: Adjusts the contrast level of the picture. ●● Brightness: Adjusts...
User Manual (user Manual) (ver.1.0) (English)
Page 18
Picture Options Color Tone : Normal ► Size : 16:9 Digital NR : Auto HDMI Black Level : Normal Film Mode : Off Size U Move E Enter R Return Occasionally, you can press the P.SIZE button on the remote control repeatedly to change the size of the image on the screen. ●● Zoom2: Magnifies the size of the picture more natural picture colors. ●● R-Offset / G-Offset / B-Offset / R-Gain / G-Gain / B-Gain: You can adjust the Color 'temperature' in...
User Manual (user Manual) (ver.1.0) (English)
Page 19
... the screen to adjust the screen depth. Input Source TV, AV Picture Size 16:9, Zoom1, Zoom2, 4:3 DTV(1080i), HDMI (720p, 1080i, 1080P) 16:9, 4:3, Wide Fit, Screen Fit Digital NR → Off / Low / Medium / High / Auto If the broadcast signal received by your TV is connected to default settings. NN HD (High Definition): 16:9 - 1080i/1080p (1920x1080), 720p (1280x720) NN Settings can initialize the setting. The "HDMI Black Level...
User Manual (user Manual) (ver.1.0) (English)
Page 21
... viewing environment depending on the center of the image you can replace all picture settings to adjusting the Vertical-Position. If the noise is not removed by fine tuning alone, then make the vertical frequency adjustments on the remote control repeatedly to change the picture size. NN Reset Picture Mode: Current picture values return to remove or reduce picture noise. Press the ▲ or ▼ button to the default values. NN 4:3 : Sets the picture to 4:3 normal mode. ❑❑ Reset : Reset Picture Mode...
User Manual (user Manual) (ver.1.0) (English)
Page 23
... Mode" is set the time manually. NN The Antenna or cable must be set the month, day, year, hour and minute directly by selecting "Tools → Sleep Timer". You can set correctly. Manual: Set the current time to display "Tools" menu. NN You can also set the sleep timer by pressing the number buttons on the broadcast station and signal, the auto time may not be connected in...
User Manual (user Manual) (ver.1.0) (English)
Page 24
... in Game mode, the screen shakes slightly. NN Restrictions on the remote control. Set Game Mode to a game console such as PlayStationTM or XboxTM, you display the TV menu in timer On mode and prevents overheating, which resets the pin to "Activate".) ●● Volume: Set the required volume level. ●● Antenna: View antenna type. (Air or Cable) NN You can be changed. NN "V-Chip...
User Manual (user Manual) (ver.1.0) (English)
Page 28
... to make your choice. Use to view an external signal source. Configuring the Support Menu.Configuring the Support Menu BN59-00905F_eng.indd 26 English - 26 2009-11-10 9:30:43 When the TV is powered On or Off. OO Press the SOURCE button on when the TV is turned off by Sleep Timer function. ❑❑ Energy Saving → Off / Low / Medium / High / Auto This feature adjusts the brightness...
User Manual (user Manual) (ver.1.0) (English)
Page 29
... TV will turn off and turn on the TV. Please check the firmware version after completing the firmware upgrade. L VIDEO SERVICE AV IN Signal Strength (digital channels only) Unlike analog channels, which can , however, adjust your TV. HDMI / PC AUDIO IN ❑❑ Software Upgrade Samsung may be a problem with the strongest signal. appears on your antenna to adjust the antenna until you find the best position with the TV...
User Manual (user Manual) (ver.1.0) (English)
Page 33
... using the HDMI 1.3 cable only. The Anynet+ system supports Anynet+ devices only. ●● Connect only one receiver (home theater). ●● Check if the Anynet+ device power cord is properly connected. ●● Check the Anynet+ device's Video/Audio/HDMI 1.3 cable connections. ●● Check whether Anynet+ (HDMI-CEC) is set to On in the Anynet+ setup menu. ●● Check whether the TV remote control is in TV mode. ●● Check whether...
User Manual (user Manual) (ver.1.0) (English)
Page 34
.../consumer/learningresources/monitor/naturalcolorexpert/pop_ download.html BN59-00905F_eng.indd 32 English - 32 2009-11-10 9:30:45 The device driver isincluded on the screen. 5. Check if the appropriate resolution and screen refresh rate are displayed in the Control Panel settings. For more information, refer to the online help of your product from the website below and install; You can set up the appropriate resolution and frequency for Samsung products...
User Manual (user Manual) (ver.1.0) (English)
Page 35
... pop-up screen for the software installation does not appear on the main screen, find and double-click the MultiScreen setup file on the hard disk drive ❑❑ Removing the Software Click [Start], select [Settings]/[Control Panel], and then double-click [Add or Remove Programs]. Select MultiScreen from the program list and click the [Add/Delete] button. Select the MultiScreen setup program. When...
User Manual (user Manual) (ver.1.0) (English)
Page 36
..., check the volume of possible problems and solutions. The TV operates erratically. Check the maximum resolution and connected device's Video frequency. The image is working . Try another channel. / Adjust the antenna. / Check all wire connections. Clean the upper edge of these values with the PC and the connection. ¦¦ Troubleshooting If the TV seems to the PC and DVI source. 'Not Supported Mode' message. Digital broadcasting screen problem. Appendix ¦¦ TV Monitor...
User Manual (user Manual) (ver.1.0) (English)
Page 37
... Cable company. Horizontal frequency (kHz):30 ~ 81 kHz - PC Maximum refresh rate (at 60 Hz): 1360 X 768 Image is selected with a digital signal. This symptom is High Definition (HD). These pixels will have a computer connected to change the display settings. Closed Captioning not working. Snowy picture. Vertical frequency (Hz): 56 ~ 75 Hz - If you are reset to produce. light blinks steadily. Your TV supports multiscan display functions within the following frequency domain: - The screen position...
User Manual (user Manual) (ver.1.0) (English)
Page 42
... power saving function. However, the power saving function only works when the product is a Class B digital apparatus. ¦¦ Specifications Model Name Screen Size Diagonal Display area Pixel Pitch Display Color Maximum Pixel Clock Power Supply PC Resolution Sound Output Dimensions (WxDxH) Body With stand Weight With Stand Environmental Considerations Operating Temperature Operating Humidity Storage Temperature Storage Humidity VESA Mounting Interface 933HD Plus 18.5 inches (47 cm) 409.8 mm (H) x 230.4 mm(V) (16.13 inches X 9.07 inches) 0.3 mm (H) x 0.3 mm (V) (0.01 inches...