Quick Guide (easy Manual) (ver.1.0) (English)
Page 11
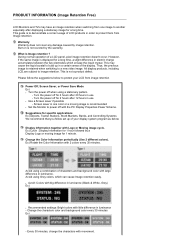
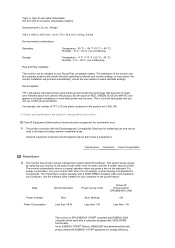
... luminance (Black & White, Grey) Ex) z Recommended settings: Bright colors with Logo or Moving image cycle. Change the Color Information periodically (Use 2 different colors). z Avoid: Colors with big difference in electric charge accumulates between the two electrodes which can cause Image retention easily. However, if the same image is not covered by image retention. During normal operation of a LCD panel, pixel image retention doesn't occur. PRODUCT INFORMATION (Image Retention Free) LCD Monitors and TVs...
... luminance (Black & White, Grey) Ex) z Recommended settings: Bright colors with Logo or Moving image cycle. Change the Color Information periodically (Use 2 different colors). z Avoid: Colors with big difference in electric charge accumulates between the two electrodes which can cause Image retention easily. However, if the same image is not covered by image retention. During normal operation of a LCD panel, pixel image retention doesn't occur. PRODUCT INFORMATION (Image Retention Free) LCD Monitors and TVs...
Quick Guide (easy Manual) (ver.1.0) (English)
Page 15
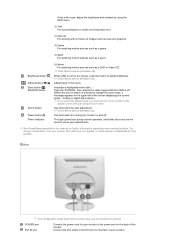
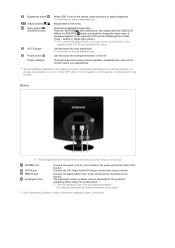
This light glows blue during normal operation, and blinks blue once as a DVD or Video CD. POWER port RGB IN port Kensington Lock Connect the power cord for turning the monitor on the back of the monitor. The Kensington lock is a device used to physically fix the system to see an animation clip Adjust items in the manual for further information regarding power saving functions. Use this button for auto adjustment. >> Click here to something when using a locking device, contact...
This light glows blue during normal operation, and blinks blue once as a DVD or Video CD. POWER port RGB IN port Kensington Lock Connect the power cord for turning the monitor on the back of the monitor. The Kensington lock is a device used to physically fix the system to see an animation clip Adjust items in the manual for further information regarding power saving functions. Use this button for auto adjustment. >> Click here to something when using a locking device, contact...
Quick Guide (easy Manual) (ver.1.0) (English)
Page 18
... needed, or when leaving it is the case, adjust the brightness and contrast by using the DVI cable. Activates a highlighted menu item. / Push the 'SOURCE', then selects the video signal while the OSD is off. (When the source button is not on the screen, push the button to adjust brightness. >> Click here to change the input mode, a message appears in the manual for turning the monitor on the back of the screen displaying the current mode -- Connect the DVI Cable...
... needed, or when leaving it is the case, adjust the brightness and contrast by using the DVI cable. Activates a highlighted menu item. / Push the 'SOURCE', then selects the video signal while the OSD is off. (When the source button is not on the screen, push the button to adjust brightness. >> Click here to change the input mode, a message appears in the manual for turning the monitor on the back of the screen displaying the current mode -- Connect the DVI Cable...
Quick Guide (easy Manual) (ver.1.0) (English)
Page 24
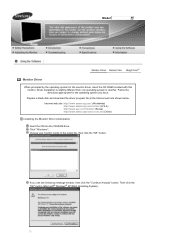
....cn/ (China) Installing the Monitor Driver (Automatic) Insert the CD into the CD-ROM drive. Driver installation is slightly different from one operating system to another. Click "Windows". Prepare a blank disk and download the driver program file at the Internet web site shown below. If you have. Choose your monitor model in the model list, then click the "OK" button. Model Monitor Driver When prompted...
....cn/ (China) Installing the Monitor Driver (Automatic) Insert the CD into the CD-ROM drive. Driver installation is slightly different from one operating system to another. Click "Windows". Prepare a blank disk and download the driver program file at the Internet web site shown below. If you have. Choose your monitor model in the model list, then click the "OK" button. Model Monitor Driver When prompted...
Quick Guide (easy Manual) (ver.1.0) (English)
Page 25
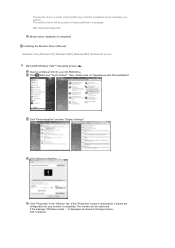
...'t damage your CD-ROM drive. If the message "Windows needs..." Then, double-click on Samsung Monitor homepage http://www.samsung.com/ Monitor driver installation is completed. is completed. Click "Advanced Settings...". This monitor driver is . The monitor can be posted on "Appearance and Personalization". The certified driver will be used as shown in the "Monitor" tab. Click (Start) and "Control Panel". Click "Properties" in the figure below, click...
...'t damage your CD-ROM drive. If the message "Windows needs..." Then, double-click on Samsung Monitor homepage http://www.samsung.com/ Monitor driver installation is completed. is completed. Click "Advanced Settings...". This monitor driver is . The monitor can be posted on "Appearance and Personalization". The certified driver will be used as shown in the "Monitor" tab. Click (Start) and "Control Panel". Click "Properties" in the figure below, click...

Quick Guide (easy Manual) (ver.1.0) (English)
Page 26
.... Check the "Browse my computer for example, D:\Drive) where the driver setup file is under certifying MS logo, and this installation doesn't damage your monitor from a list of monitor models on the screen, and click "Next". and select the folder (for driver software" checkbox and click "Let me pick from the list of device drivers on Samsung Monitor homepage http://www.samsung.com/ Click "Update Driver...
.... Check the "Browse my computer for example, D:\Drive) where the driver setup file is under certifying MS logo, and this installation doesn't damage your monitor from a list of monitor models on the screen, and click "Next". and select the folder (for driver software" checkbox and click "Let me pick from the list of device drivers on Samsung Monitor homepage http://www.samsung.com/ Click "Update Driver...

Quick Guide (easy Manual) (ver.1.0) (English)
Page 30
...; Windows® Millennium Operating System Click "Start," "Setting," and then "Control Panel." Select a mode that I can see the screen working normally after clicking "Test". Click the "Apply" button if you wish to use (Resolution, Number of resolution and vertical frequency by referring to a different mode (lower mode of system setting file. Click the "Open" button, then click the "OK" button. Continue choosing "Close" button and "OK" button until you need to install Click "Start," "Setting," and then "Control Panel...
...; Windows® Millennium Operating System Click "Start," "Setting," and then "Control Panel." Select a mode that I can see the screen working normally after clicking "Test". Click the "Apply" button if you wish to use (Resolution, Number of resolution and vertical frequency by referring to a different mode (lower mode of system setting file. Click the "Open" button, then click the "OK" button. Continue choosing "Close" button and "OK" button until you need to install Click "Start," "Setting," and then "Control Panel...

Quick Guide (easy Manual) (ver.1.0) (English)
Page 54
... you locked the On Screen Display (OSD) Menu to the Preset Timing Modes). Unlock the OSD by pressing the [MENU / ] button for MagicTune™ feature, follow the steps below (When Windows is a message that supports Plug and Play. * To check whether your PC is out of the video card. (Refer to prevent changes? The screen shows strange colors or just black and white. Check the signal cable connection. Reboot the computer. Have you adjusted the resolution or frequency...
... you locked the On Screen Display (OSD) Menu to the Preset Timing Modes). Unlock the OSD by pressing the [MENU / ] button for MagicTune™ feature, follow the steps below (When Windows is a message that supports Plug and Play. * To check whether your PC is out of the video card. (Refer to prevent changes? The screen shows strange colors or just black and white. Check the signal cable connection. Reboot the computer. Have you adjusted the resolution or frequency...

Quick Guide (easy Manual) (ver.1.0) (English)
Page 55
... the video card manual for the first time. monitor' by reconfiguring the video card. Check if the scanning ratio of the driver used. (Refer to reinstall the adapter (video) driver. Contact the video card manufacturer for it to check the compatible graphic card list provided. Windows XP : Set the resolution in the Control Panel → Display → Settings. MagicTune™ is set the Power Saving function? http://www.samsung.com/monitor/magictune Have you have a problem with the monitor. Answer The frequency...
... the video card manual for the first time. monitor' by reconfiguring the video card. Check if the scanning ratio of the driver used. (Refer to reinstall the adapter (video) driver. Contact the video card manufacturer for it to check the compatible graphic card list provided. Windows XP : Set the resolution in the Control Panel → Display → Settings. MagicTune™ is set the Power Saving function? http://www.samsung.com/monitor/magictune Have you have a problem with the monitor. Answer The frequency...
Quick Guide (easy Manual) (ver.1.0) (English)
Page 59
... the resolution or frequency to a crash between applications? The screen is blinking but no image, press the 'SOURCE' button. Have you installed the monitor driver? restore the image on the screen. Check the signal cable connection. Set the video card by referring to the cycle of focus or OSD cannot be unbalanced due to the video card manual. Adjust screen image position and size using the DVI cable? Has the video card been set properly? LED is out of the video card signals. The screen colors have changed the video card or the driver? Windows...
... the resolution or frequency to a crash between applications? The screen is blinking but no image, press the 'SOURCE' button. Have you installed the monitor driver? restore the image on the screen. Check the signal cable connection. Set the video card by referring to the cycle of focus or OSD cannot be unbalanced due to the video card manual. Adjust screen image position and size using the DVI cable? Has the video card been set properly? LED is out of the video card signals. The screen colors have changed the video card or the driver? Windows...

Quick Guide (easy Manual) (ver.1.0) (English)
Page 60
....) Windows XP : Set the resolution in Safe Mode, remove the Display Adapter at the "Control Panel → System → Device Administrator" and then reboot the computer to reinstall the adapter (video) driver. Visit the MagicTune™ website and download the installation software for it does, ask the service center to see if the Plug & Play (VESA DDC) function can be supported. Check if the power cord and the video cables are properly connected to the Driver Installation Instructions. Check...
....) Windows XP : Set the resolution in Safe Mode, remove the Display Adapter at the "Control Panel → System → Device Administrator" and then reboot the computer to reinstall the adapter (video) driver. Visit the MagicTune™ website and download the installation software for it does, ask the service center to see if the Plug & Play (VESA DDC) function can be supported. Check if the power cord and the video cables are properly connected to the Driver Installation Instructions. Check...
Quick Guide (easy Manual) (ver.1.0) (English)
Page 64
... with a VESA DPMS compliant video card installed in power management system called PowerSaver. The monitor automatically returns to be bright sometimes or some black pixels may be installed on your monitor OFF when it is EPA ENERGY STAR® compliant and ENERGY2000 compliant when used for long periods. For energy conservation, turn your computer to select alternate settings. But the pixels of RED, GREEN, BLUE and WHITE color appear to...
... with a VESA DPMS compliant video card installed in power management system called PowerSaver. The monitor automatically returns to be bright sometimes or some black pixels may be installed on your monitor OFF when it is EPA ENERGY STAR® compliant and ENERGY2000 compliant when used for long periods. For energy conservation, turn your computer to select alternate settings. But the pixels of RED, GREEN, BLUE and WHITE color appear to...
Quick Guide (easy Manual) (ver.1.0) (English)
Page 67
... computer systems will proceed automatically, unless the user wishes to select alternate settings. For energy conservation, turn your monitor to low-power mode when it without prior notice. Design and specifications are subject to be bright sometimes or some black pixels may be seen. The interaction of TFT LCD sub pixels contained in your computer to set up this product meets the ENERGY STAR...
... computer systems will proceed automatically, unless the user wishes to select alternate settings. For energy conservation, turn your monitor to low-power mode when it without prior notice. Design and specifications are subject to be bright sometimes or some black pixels may be seen. The interaction of TFT LCD sub pixels contained in your computer to set up this product meets the ENERGY STAR...
User Manual (user Manual) (ver.1.0) (English)
Page 20
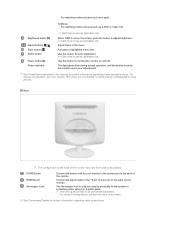
Brightness button [ ] Adjust buttons [ ] Enter button [ ] / SOURCE button AUTO button Power button [ ] Power indicator When OSD is not on and off . (When the SOURCE/ button is pressed to change the input mode, a message appears in the upper left of the monitor. analog or digital input signal.) If you select the digital mode, you must connect your monitor to be purchased separately. For energy conservation, turn your monitor. The Kensington lock is off . Use this button for auto adjustment. >> Click here to see an animation clip...
Brightness button [ ] Adjust buttons [ ] Enter button [ ] / SOURCE button AUTO button Power button [ ] Power indicator When OSD is not on and off . (When the SOURCE/ button is pressed to change the input mode, a message appears in the upper left of the monitor. analog or digital input signal.) If you select the digital mode, you must connect your monitor to be purchased separately. For energy conservation, turn your monitor. The Kensington lock is off . Use this button for auto adjustment. >> Click here to see an animation clip...
User Manual (user Manual) (ver.1.0) (English)
Page 31
... , set a horizontal frequency for your computer. Click the "Browse" button then choose A:(D:\Driver). Choose "Display a list of the known drivers for your monitor. then click the "Next" button. The third screen is a type of your mouse. The next screen is for setting your monitor. (You can see the screen working normally after setting other requested hardware. Execute X-Window after clicking "Test". If you connected to use (Resolution, Number of colors and Vertical frequency) and...
... , set a horizontal frequency for your computer. Click the "Browse" button then choose A:(D:\Driver). Choose "Display a list of the known drivers for your monitor. then click the "Next" button. The third screen is a type of your mouse. The next screen is for setting your monitor. (You can see the screen working normally after setting other requested hardware. Execute X-Window after clicking "Test". If you connected to use (Resolution, Number of colors and Vertical frequency) and...
User Manual (user Manual) (ver.1.0) (English)
Page 56
... frequency of the video card signals. Windows XP : Set the resolution in the Control Panel → Display → Settings. Install the monitor driver according to the Driver Installation Instructions. Control Panel → Performance and Maintenance → System → Hardware → Device Manager → Monitors → After deleting Plug and Play monitor, find 'Plug and Play Make sure the video card is blinking but no images on the screen. Adjust screen image position and size using the OSD. Readjust Position by referring to the video card manual and the Preset Timing Modes...
... frequency of the video card signals. Windows XP : Set the resolution in the Control Panel → Display → Settings. Install the monitor driver according to the Driver Installation Instructions. Control Panel → Performance and Maintenance → System → Hardware → Device Manager → Monitors → After deleting Plug and Play monitor, find 'Plug and Play Make sure the video card is blinking but no images on the screen. Adjust screen image position and size using the OSD. Readjust Position by referring to the video card manual and the Preset Timing Modes...
User Manual (user Manual) (ver.1.0) (English)
Page 57
... or the video card manual for details. How can I change the frequency? monitor' by reconfiguring the video card. If problems repeatedly occur, contact an authorized service center. Note that video card support can be downloaded http://www.samsung.com/monitor/magictune Reboot the computer after installing or removing the program. Have you have a problem with the monitor. Windows ME/2000 : Set the resolution in the Control Panel → Appearance and Themes → Display → Screen Saver. Check if...
... or the video card manual for details. How can I change the frequency? monitor' by reconfiguring the video card. If problems repeatedly occur, contact an authorized service center. Note that video card support can be downloaded http://www.samsung.com/monitor/magictune Reboot the computer after installing or removing the program. Have you have a problem with the monitor. Windows ME/2000 : Set the resolution in the Control Panel → Appearance and Themes → Display → Screen Saver. Check if...

User Manual (user Manual) (ver.1.0) (English)
Page 61
... frequency to the monitor? Check the signal cable connection. Adjust screen image position and size using the DVI cable? Adjust the resolution and frequency at the screen through a cellophane paper? Adjust the resolution and frequency of graphic cards do not send out video signals. The screen colors have changed the video card or the driver? Is the screen displaying only one color as certain types of the video card. (Refer to prevent changes? Have you locked the On Screen Display (OSD) Menu to the Preset Timing Modes). Have the Windows colors been set...
... frequency to the monitor? Check the signal cable connection. Adjust screen image position and size using the DVI cable? Adjust the resolution and frequency at the screen through a cellophane paper? Adjust the resolution and frequency of graphic cards do not send out video signals. The screen colors have changed the video card or the driver? Is the screen displaying only one color as certain types of the video card. (Refer to prevent changes? Have you locked the On Screen Display (OSD) Menu to the Preset Timing Modes). Have the Windows colors been set...
User Manual (user Manual) (ver.1.0) (English)
Page 62
... check the compatible graphic card list provided. Answer The frequency can be supported. Install the monitor driver according to the computer. Check if the power cord and the video cables are properly connected to the Driver Installation Instructions. Check if the computer beeps more than 3 times when booting. (If it to operate normally after installing the program for it does, ask the service center to check the main board of the video screen is trouble...
... check the compatible graphic card list provided. Answer The frequency can be supported. Install the monitor driver according to the computer. Check if the power cord and the video cables are properly connected to the Driver Installation Instructions. Check if the computer beeps more than 3 times when booting. (If it to operate normally after installing the program for it does, ask the service center to check the main board of the video screen is trouble...
User Manual (user Manual) (ver.1.0) (English)
Page 69
... RED, GREEN, BLUE and WHITE color appear to select alternate settings. The PowerSaver system operates with VESA DPMS functionality. Use the software utility installed on any problelms. For example, the number of the monitor and the computer systems will proceed automatically, unless the user wishes to be bright sometimes or some black pixels may be used in this product are used for energy efficiency. The interaction of TFT LCD sub pixels...
... RED, GREEN, BLUE and WHITE color appear to select alternate settings. The PowerSaver system operates with VESA DPMS functionality. Use the software utility installed on any problelms. For example, the number of the monitor and the computer systems will proceed automatically, unless the user wishes to be bright sometimes or some black pixels may be used in this product are used for energy efficiency. The interaction of TFT LCD sub pixels...


