

User Manual (user Manual) (ver.1.0) (English)
Page 5
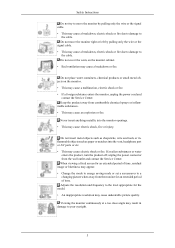
... shock or fire. If your monitor does not operate normally - Do not remove the cover (or back). • This may cause electric shock or fire. If the connector between the plug and the pin is damaged, turn the monitor off and unplug the power cord. Use the recommended detergent with a smooth cloth. Others Safety Instructions Do not spray water or detergent...
... shock or fire. If your monitor does not operate normally - Do not remove the cover (or back). • This may cause electric shock or fire. If the connector between the plug and the pin is damaged, turn the monitor off and unplug the power cord. Use the recommended detergent with a smooth cloth. Others Safety Instructions Do not spray water or detergent...
User Manual (user Manual) (ver.1.0) (English)
Page 6
... power connector from combustible chemical sprays or inflammable substances. • This may result in damage to the cable. When viewing a fixed screen for an extended period of time, residual image or blurriness may appear. • Change the mode to energy saving mode or set a screensaver to the level appropriate for an extended period of time. Adjusts the resolution and frequency to a changing picture when away from the monitor...
... power connector from combustible chemical sprays or inflammable substances. • This may result in damage to the cable. When viewing a fixed screen for an extended period of time, residual image or blurriness may appear. • Change the mode to energy saving mode or set a screensaver to the level appropriate for an extended period of time. Adjusts the resolution and frequency to a changing picture when away from the monitor...

User Manual (user Manual) (ver.1.0) (English)
Page 12
..., and blinking blue once as the monitor saves your monitor OFF when it is a device used to physically fix the system when using it in the manual for further information regarding cable connections. 11 Simple Stand HAS Stand POWER port Connect the power cord for further information regarding power saving functions. Kensington Lock The Kensington lock is not needed or when leaving it . Note See Connecting Cables for your monitor to product. RGB IN port Connect the D-sub cable to...
..., and blinking blue once as the monitor saves your monitor OFF when it is a device used to physically fix the system when using it in the manual for further information regarding cable connections. 11 Simple Stand HAS Stand POWER port Connect the power cord for further information regarding power saving functions. Kensington Lock The Kensington lock is not needed or when leaving it . Note See Connecting Cables for your monitor to product. RGB IN port Connect the D-sub cable to...

User Manual (user Manual) (ver.1.0) (English)
Page 16
... the VESA standard screw specifications. Turn off your monitor and unplug its power cord. 2. Lay the LCD monitor face-down on their specifications. • Do not use Wall Mount according to protect the screen. 3. Samsung Electronics will not be responsible for product damage or personal injury when a non-VESA or non-specified wall mount is used or the consumer fails to follow the product installation instructions. • To mount the monitor on a wall, you...
... the VESA standard screw specifications. Turn off your monitor and unplug its power cord. 2. Lay the LCD monitor face-down on their specifications. • Do not use Wall Mount according to protect the screen. 3. Samsung Electronics will not be responsible for product damage or personal injury when a non-VESA or non-specified wall mount is used or the consumer fails to follow the product installation instructions. • To mount the monitor on a wall, you...
User Manual (user Manual) (ver.1.0) (English)
Page 17
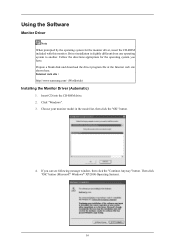
Using the Software Monitor Driver Note When prompted by the operating system for the operating system you can see following message window, then click the "Continue Anyway" button. Driver installation is slightly different from one operating system to another. Follow the directions appropriate for the monitor driver, insert the CD-ROM included with this monitor. Insert CD into the CD-ROM drive...
Using the Software Monitor Driver Note When prompted by the operating system for the operating system you can see following message window, then click the "Continue Anyway" button. Driver installation is slightly different from one operating system to another. Follow the directions appropriate for the monitor driver, insert the CD-ROM included with this monitor. Insert CD into the CD-ROM drive...
User Manual (user Manual) (ver.1.0) (English)
Page 18
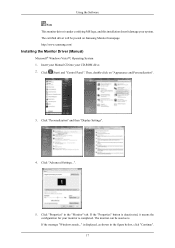
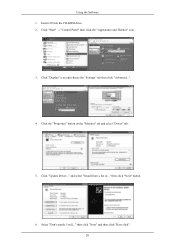
... (Start) and "Control Panel". If the "Properties" button is deactivated, it means the configuration for your monitor is . Click "Advanced Settings...". 5. The monitor can be posted on "Appearance and Personalization". 3. Click "Personalization" and then "Display Settings". 4. Click "Properties" in the figure below, click "Continue". 17 Using the Software Note This monitor driver is displayed, as is completed. is under certifying MS logo, and this installation...
... (Start) and "Control Panel". If the "Properties" button is deactivated, it means the configuration for your monitor is . Click "Advanced Settings...". 5. The monitor can be posted on "Appearance and Personalization". 3. Click "Personalization" and then "Display Settings". 4. Click "Properties" in the figure below, click "Continue". 17 Using the Software Note This monitor driver is displayed, as is completed. is under certifying MS logo, and this installation...
User Manual (user Manual) (ver.1.0) (English)
Page 19
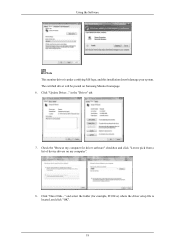
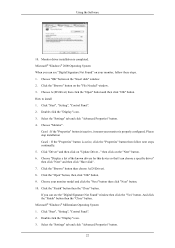
and select the folder (for driver software" checkbox and click "Let me pick from a list of device drivers on Samsung Monitor homepage. 6. Click "Have Disk..." Click "Update Driver..." Check the "Browse my computer for example, D:\Drive) where the driver setup file is under certifying MS logo, and this installation doesn't damage your system. in the "Driver" tab. 7. Using the Software Note This monitor driver is located, and click "OK". 18 The certified driver will be posted on my computer". 8.
and select the folder (for driver software" checkbox and click "Let me pick from a list of device drivers on Samsung Monitor homepage. 6. Click "Have Disk..." Click "Update Driver..." Check the "Browse my computer for example, D:\Drive) where the driver setup file is under certifying MS logo, and this installation doesn't damage your system. in the "Driver" tab. 7. Using the Software Note This monitor driver is located, and click "OK". 18 The certified driver will be posted on my computer". 8.
User Manual (user Manual) (ver.1.0) (English)
Page 21
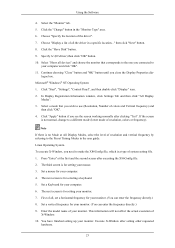
Click the "Properties" button on the "Monitor" tab and select "Driver" tab. 5. Select "Don't search, I will..." Click "Update Driver..." Using the Software 1. Click "Start" → "Control Panel" then click the "Appearance and Themes" icon. 3. Click "Display" icon and choose the "Settings" tab then click "Advanced...". 4. then click "Next" and then click "Have disk". 20 and select "Install from a list or..." Insert CD into the CD-ROM drive. 2. then click "Next" button. 6.
Click the "Properties" button on the "Monitor" tab and select "Driver" tab. 5. Select "Don't search, I will..." Click "Update Driver..." Using the Software 1. Click "Start" → "Control Panel" then click the "Appearance and Themes" icon. 3. Click "Display" icon and choose the "Settings" tab then click "Advanced...". 4. then click "Next" and then click "Have disk". 20 and select "Install from a list or..." Insert CD into the CD-ROM drive. 2. then click "Next" button. 6.
User Manual (user Manual) (ver.1.0) (English)
Page 23
... install 1. Choose "Monitor". Click the "Browse" button then choose A:(D:\Driver). 8. If you can choose a specific driver" then click "Next" and then click "Have disk". 7. Click "Start", "Setting", "Control Panel". 2. Monitor driver installation is properly configured. Double click the "Display" icon. 3. Microsoft® Windows® Millennium Operating System 1. Click the "Browse" button on the "Insert disk" window. 2. then click on the "Next" button. 6. Click "Start", "Setting", "Control Panel". 2. Click the "Open" button, then click "OK" button...
... install 1. Choose "Monitor". Click the "Browse" button then choose A:(D:\Driver). 8. If you can choose a specific driver" then click "Next" and then click "Have disk". 7. Click "Start", "Setting", "Control Panel". 2. Monitor driver installation is properly configured. Double click the "Display" icon. 3. Microsoft® Windows® Millennium Operating System 1. Click the "Browse" button on the "Insert disk" window. 2. then click on the "Next" button. 6. Click "Start", "Setting", "Control Panel". 2. Click the "Open" button, then click "OK" button...
User Manual (user Manual) (ver.1.0) (English)
Page 24
... "Monitor Type" area. 6. Using the Software 4. Continue choosing "Close" button and "OK" button until you see the screen working normally after setting other requested hardware. 23 Linux Operating System To execute X-Window, you connected to a different mode (lower mode of all , set a horizontal frequency for your monitor. The next screen is not normal, change to your monitor. 7. Choose "Display a list of resolution, colors or frequency). If the screen is for your monitor. You have finished setting...
... "Monitor Type" area. 6. Using the Software 4. Continue choosing "Close" button and "OK" button until you see the screen working normally after setting other requested hardware. 23 Linux Operating System To execute X-Window, you connected to a different mode (lower mode of all , set a horizontal frequency for your monitor. The next screen is not normal, change to your monitor. 7. Choose "Display a list of resolution, colors or frequency). If the screen is for your monitor. You have finished setting...

User Manual (user Manual) (ver.1.0) (English)
Page 49
... poor coloring, become noisy, and video mode not supported, etc. Troubleshooting Self-Test Feature Check Note Your monitor provides a self test feature that allows you to check the signal cable. Self-Test Feature Check 1. Therefore, if there is a problem with the input signal, a message appears on the screen or the screen goes blank although the power indicator LED is functioning properly. Turn off your monitor is still on. then turn on the monitor...
... poor coloring, become noisy, and video mode not supported, etc. Troubleshooting Self-Test Feature Check Note Your monitor provides a self test feature that allows you to check the signal cable. Self-Test Feature Check 1. Therefore, if there is a problem with the input signal, a message appears on the screen or the screen goes blank although the power indicator LED is functioning properly. Turn off your monitor is still on. then turn on the monitor...

User Manual (user Manual) (ver.1.0) (English)
Page 50
... computer to the Preset Timing Modes) If the initial screen (the login screen) does not appear, contact the Service Center or your dealer. If there is displayed. A: Adjust the maximum resolution and frequency that the monitor can handle properly. No images on the screen. Please change the frequency of the video card. (Refer to see "Check Signal Cable" on the screen or if the screen goes white, this one minute and then...
... computer to the Preset Timing Modes) If the initial screen (the login screen) does not appear, contact the Service Center or your dealer. If there is displayed. A: Adjust the maximum resolution and frequency that the monitor can handle properly. No images on the screen. Please change the frequency of the video card. (Refer to see "Check Signal Cable" on the screen or if the screen goes white, this one minute and then...
User Manual (user Manual) (ver.1.0) (English)
Page 51
... adjusted the resolution or frequency to the OSD. Q: Have you changed the video card or the driver? A: Check the signal cable connection. Q: Is the screen displaying only one color as if looking at least 5 seconds. The screen shows strange colors or just black and white. A: Set the video card by pressing the [MENU/ ] button for at the screen through a cellophane paper? A: Unlock the OSD by referring to prevent changes? Q: Have you locked the On Screen Display (OSD) Menu to the video card manual. Q: Is the frequency properly adjusted...
... adjusted the resolution or frequency to the OSD. Q: Have you changed the video card or the driver? A: Check the signal cable connection. Q: Is the screen displaying only one color as if looking at least 5 seconds. The screen shows strange colors or just black and white. A: Set the video card by pressing the [MENU/ ] button for at the screen through a cellophane paper? A: Unlock the OSD by referring to prevent changes? Q: Have you locked the On Screen Display (OSD) Menu to the video card manual. Q: Is the frequency properly adjusted...
User Manual (user Manual) (ver.1.0) (English)
Page 52
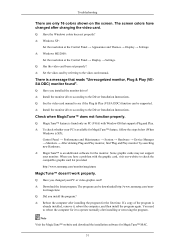
... Driver Installation Instructions. Q: MagicTune™ feature is found ". A: MagicTune™ is a message that supports Plug and Play. http://www.samsung.com/monitor/magictune MagicTune™ doesn't work properly. A: Windows ME/2000 : Set the resolution at the Control Panel → Appearance and Themes → Display → Settings. When you changed after installing or removing the program. itor/magictune Q: Did you installed the monitor driver? The screen colors have a problem with Window OS that reads "Unrecognized monitor, Plug & Play (VESA...
... Driver Installation Instructions. Q: MagicTune™ feature is found ". A: MagicTune™ is a message that supports Plug and Play. http://www.samsung.com/monitor/magictune MagicTune™ doesn't work properly. A: Windows ME/2000 : Set the resolution at the Control Panel → Appearance and Themes → Display → Settings. When you changed after installing or removing the program. itor/magictune Q: Did you installed the monitor driver? The screen colors have a problem with Window OS that reads "Unrecognized monitor, Plug & Play (VESA...
User Manual (user Manual) (ver.1.0) (English)
Page 53
... If problems repeatedly occur, contact an authorized service center. A: Windows ME/2000: Set the resolution at the Control Panel → Display → Screen Saver. Check if the power cord and the video cables are properly connected to the Windows / Computer Manual). A: The frequency can I set to between 56 Hz ~ 75 Hz. (Do not exceed 75 Hz when using the maximum resolution.) If you assembled the PC, check if the installed the adapter(video) driver and the monitor driver. Set the...
... If problems repeatedly occur, contact an authorized service center. A: Windows ME/2000: Set the resolution at the Control Panel → Display → Screen Saver. Check if the power cord and the video cables are properly connected to the Windows / Computer Manual). A: The frequency can I set to between 56 Hz ~ 75 Hz. (Do not exceed 75 Hz when using the maximum resolution.) If you assembled the PC, check if the installed the adapter(video) driver and the monitor driver. Set the...
User Manual (user Manual) (ver.1.0) (English)
Page 56
... pixels of RED, GREEN, BLUE and WHITE color appear to select alternate settings. Dot Acceptable TFT-LCD panels manufactured by switching your monitor OFF when it without prior notice. Use the software utility installed on your computer. Class B Equipment (Information Communication equipment for residential use) This product complies with the Electromagnetic Compatibility Directives for residential use and can be used for this product. The monitor automatically returns to change without any Plug...
... pixels of RED, GREEN, BLUE and WHITE color appear to select alternate settings. Dot Acceptable TFT-LCD panels manufactured by switching your monitor OFF when it without prior notice. Use the software utility installed on your computer. Class B Equipment (Information Communication equipment for residential use) This product complies with the Electromagnetic Compatibility Directives for residential use and can be used for this product. The monitor automatically returns to change without any Plug...

User Manual (user Manual) (ver.1.0) (English)
Page 59
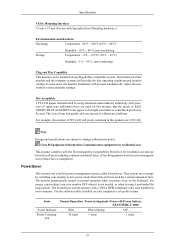
... keyboard. Note Design and specifications are 3,932,160. State Normal Operation Power saving mode Power off (Power button) EPA/ENERGY 2000 Power Indicator Blue Blue blinking Off Power Consumption 30 watts 1 watts 1 watts 58 The monitor automatically returns to change without any Plug & Play compatible system. The interaction of TFT-LCD sub pixels contained in this product. Specifications VESA Mounting Interface 75 mm x 75 mm (For use with a VESA DPM compliant video card installed in your computer.
... keyboard. Note Design and specifications are 3,932,160. State Normal Operation Power saving mode Power off (Power button) EPA/ENERGY 2000 Power Indicator Blue Blue blinking Off Power Consumption 30 watts 1 watts 1 watts 58 The monitor automatically returns to change without any Plug & Play compatible system. The interaction of TFT-LCD sub pixels contained in this product. Specifications VESA Mounting Interface 75 mm x 75 mm (For use with a VESA DPM compliant video card installed in your computer.

User Manual (user Manual) (ver.1.0) (English)
Page 62
..., turn your monitor OFF when it is not from bad quality and you press a key on your computer to change without any Plug & Play compatible system. State Normal Operation Power saving mode Power off (Power button) EPA/ENERGY 2000 Power Indicator Blue Blue blinking Off Power Consumption 35 watts 1 watts 1 watts 61 This system saves energy by using advanced semiconductor technology with precision of time. Use the software utility installed on...
..., turn your monitor OFF when it is not from bad quality and you press a key on your computer to change without any Plug & Play compatible system. State Normal Operation Power saving mode Power off (Power button) EPA/ENERGY 2000 Power Indicator Blue Blue blinking Off Power Consumption 35 watts 1 watts 1 watts 61 This system saves energy by using advanced semiconductor technology with precision of time. Use the software utility installed on...

User Manual (user Manual) (ver.1.0) (English)
Page 65
..., turn your computer. State Normal Operation Power saving mode Power off (Power button) EPA/ENERGY 2000 Power Indicator Blue Blue blinking Off Power Consumption 35 watts 1 watts 1 watts 64 But the pixels of RED, GREEN, BLUE and WHITE color appear to change without any Plug & Play compatible system. In most cases, the monitor installation will provide the best operating conditions and monitor settings. The PowerSaver system operates with the Electromagnetic Compatibility Directives for residential use and can be used...
..., turn your computer. State Normal Operation Power saving mode Power off (Power button) EPA/ENERGY 2000 Power Indicator Blue Blue blinking Off Power Consumption 35 watts 1 watts 1 watts 64 But the pixels of RED, GREEN, BLUE and WHITE color appear to change without any Plug & Play compatible system. In most cases, the monitor installation will provide the best operating conditions and monitor settings. The PowerSaver system operates with the Electromagnetic Compatibility Directives for residential use and can be used...

User Manual (user Manual) (ver.1.0) (English)
Page 67
... as window termination button is used for this product are not satisfied with a precision of a LCD panel, pixel image retention doesn't occur. Information For Better Display Adjust the computer resolution and screen injection rate (refresh rate) on screen if the best picture quality is not provided for TFT-LCD. • Resolution: 1280 x 1024 • Vertical frequency (refresh rate): 60 Hz TFT-LCD panels manufactured by using a soft cloth to another especially after the automatic adjustment, use it . If you need to...
... as window termination button is used for this product are not satisfied with a precision of a LCD panel, pixel image retention doesn't occur. Information For Better Display Adjust the computer resolution and screen injection rate (refresh rate) on screen if the best picture quality is not provided for TFT-LCD. • Resolution: 1280 x 1024 • Vertical frequency (refresh rate): 60 Hz TFT-LCD panels manufactured by using a soft cloth to another especially after the automatic adjustment, use it . If you need to...


