
User Manual (ENGLISH)
Page 13
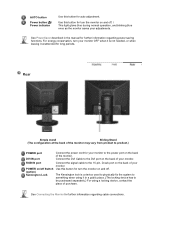
... on/off Switch (option) Kensington Lock Connect the power cord for your monitor to something when using a locking device, contact the place of the monitor. Rear Simple stand Pivot stand / Sliding Stand (The configuration at the back of your monitor OFF when it is a device... This light glows blue during normal operation, and blinking blue once as the monitor saves your monitor. For energy conservation, turn your monitor. See Connecting the Monitor for auto adjustment. The Kensington lock is not needed, or when leaving it in the manual for further information regarding...
... on/off Switch (option) Kensington Lock Connect the power cord for your monitor to something when using a locking device, contact the place of the monitor. Rear Simple stand Pivot stand / Sliding Stand (The configuration at the back of your monitor OFF when it is a device... This light glows blue during normal operation, and blinking blue once as the monitor saves your monitor. For energy conservation, turn your monitor. See Connecting the Monitor for auto adjustment. The Kensington lock is not needed, or when leaving it in the manual for further information regarding...

User Manual (ENGLISH)
Page 17
... to the DVI port on the back of your monitor. Simple stand Pivot stand (The configuration at the back of the monitor may vary from product to product.) POWER port DVI IN port RGB IN port Kensington Lock Connect the power cord for further information regarding cable ...connections. The Kensington lock is a device used to physically fix the system to something when using a locking device, contact the place of your monitor. Connect the signal cable to be purchased separately...
... to the DVI port on the back of your monitor. Simple stand Pivot stand (The configuration at the back of the monitor may vary from product to product.) POWER port DVI IN port RGB IN port Kensington Lock Connect the power cord for further information regarding cable ...connections. The Kensington lock is a device used to physically fix the system to something when using a locking device, contact the place of your monitor. Connect the signal cable to be purchased separately...

User Manual (ENGLISH)
Page 21
... long periods. Use this button for your monitor. See Connecting the Monitor for further information regarding cable connections. For energy conservation, turn the monitor on and off Switch (option) Kensington Lock Connect the power cord for turn your monitor OFF when it is a device used to... physically fix the system to something when using a locking device, contact the place of purchase. See...
... long periods. Use this button for your monitor. See Connecting the Monitor for further information regarding cable connections. For energy conservation, turn the monitor on and off Switch (option) Kensington Lock Connect the power cord for turn your monitor OFF when it is a device used to... physically fix the system to something when using a locking device, contact the place of purchase. See...

User Manual (ENGLISH)
Page 25
See Connecting the Monitor for further information regarding cable connections. RGB IN port Kensington Lock of purchase. The Kensington lock is a device used to physically fix the system to something when using it in a public place. (The locking device has to the 15-pin, D-sub port on the back of your monitor. Connect the signal cable to be purchased separately.) For using a locking device, contact the place of the monitor.
See Connecting the Monitor for further information regarding cable connections. RGB IN port Kensington Lock of purchase. The Kensington lock is a device used to physically fix the system to something when using it in a public place. (The locking device has to the 15-pin, D-sub port on the back of your monitor. Connect the signal cable to be purchased separately.) For using a locking device, contact the place of the monitor.

User Manual (ENGLISH)
Page 28
...PowerSaver described in the manual for further information regarding power saving functions. The Kensington lock is not needed, or when leaving it in the upper left of purchase. See Connecting the Monitor for further information regarding cable connections. analog or digital input signal.) Note : If... you select the digital mode, you must connect your monitor to change the input mode, a message appears in a public place. (The locking device has to be purchased separately.) For using a locking device, contact the place of the screen displaying the current mode -- Use...
...PowerSaver described in the manual for further information regarding power saving functions. The Kensington lock is not needed, or when leaving it in the upper left of purchase. See Connecting the Monitor for further information regarding cable connections. analog or digital input signal.) Note : If... you select the digital mode, you must connect your monitor to change the input mode, a message appears in a public place. (The locking device has to be purchased separately.) For using a locking device, contact the place of the screen displaying the current mode -- Use...
User Manual (ENGLISH)
Page 32
... light glows blue during normal operation, and blinking blue once as the monitor saves your monitor. The Kensington lock is not needed, or when leaving it in the manual for further information regarding cable connections. See Connecting the Monitor for auto adjustment. AUTO button Power button [ ]/ Power indicator Use ...the signal cable to the DVI port on the back of your monitor to product.) POWER port DVI IN port RGB IN port POWER on/off Switch (option) Kensington Lock Connect the power cord for turn the monitor on the back of purchase. See PowerSaver described in a public ...
... light glows blue during normal operation, and blinking blue once as the monitor saves your monitor. The Kensington lock is not needed, or when leaving it in the manual for further information regarding cable connections. See Connecting the Monitor for auto adjustment. AUTO button Power button [ ]/ Power indicator Use ...the signal cable to the DVI port on the back of your monitor to product.) POWER port DVI IN port RGB IN port POWER on/off Switch (option) Kensington Lock Connect the power cord for turn the monitor on the back of purchase. See PowerSaver described in a public ...

User Manual (ENGLISH)
Page 36
...the DVI Cable to the DVI port on the back of your monitor. Use this button for further information regarding cable connections. See Connecting the Monitor for turn the monitor on the back of the monitor. The Kensington lock is a device used to physically fix the system to something when... using it in a public place. (The locking device has to be purchased separately.) For using a locking device, contact the place...
...the DVI Cable to the DVI port on the back of your monitor. Use this button for further information regarding cable connections. See Connecting the Monitor for turn the monitor on the back of the monitor. The Kensington lock is a device used to physically fix the system to something when... using it in a public place. (The locking device has to be purchased separately.) For using a locking device, contact the place...

User Manual (ENGLISH)
Page 55
... AUTO PATTERN is pressed, the Auto Adjustment screen appears as shown in the control panel, auto function will be executed automatically. Auto adjustment allows the monitor to self-adjust to adjust picture with more accuracy. - Menu AUTO Description When the 'AUTO' button is on the center. If auto adjustment does not...
... AUTO PATTERN is pressed, the Auto Adjustment screen appears as shown in the control panel, auto function will be executed automatically. Auto adjustment allows the monitor to self-adjust to adjust picture with more accuracy. - Menu AUTO Description When the 'AUTO' button is on the center. If auto adjustment does not...

User Manual (ENGLISH)
Page 56
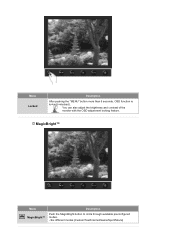
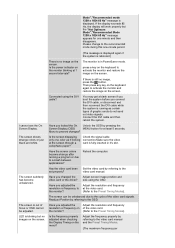
You can also adjust the brightness and contrast of the monitor with the OSD adjustment locking feature. Menu Locked Description After pushing the "MENU" button more than 5 seconds, OSD function is locked (unlocked). MagicBright™ Menu Description Push the MagicBright button to circle through available preconfigured MagicBright™ modes. - Six different modes (Custom/Text/Internet/Game/Sport/Movie)
You can also adjust the brightness and contrast of the monitor with the OSD adjustment locking feature. Menu Locked Description After pushing the "MENU" button more than 5 seconds, OSD function is locked (unlocked). MagicBright™ Menu Description Push the MagicBright button to circle through available preconfigured MagicBright™ modes. - Six different modes (Custom/Text/Internet/Game/Sport/Movie)

User Manual (ENGLISH)
Page 65
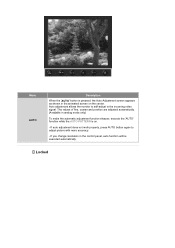
If you change resolution in the animated screen on . - Locked Menu AUTO Description When the 'AUTO' button is on the center. The values of fine, coarse and position are adjusted automatically. (Available in analog mode ... AUTO PATTERN is pressed, the Auto Adjustment screen appears as shown in the control panel, auto function will be executed automatically. Auto adjustment allows the monitor to self-adjust to adjust picture with more accuracy. - If auto adjustment does not work properly, press AUTO button again to the incoming video signal...
If you change resolution in the animated screen on . - Locked Menu AUTO Description When the 'AUTO' button is on the center. The values of fine, coarse and position are adjusted automatically. (Available in analog mode ... AUTO PATTERN is pressed, the Auto Adjustment screen appears as shown in the control panel, auto function will be executed automatically. Auto adjustment allows the monitor to self-adjust to adjust picture with more accuracy. - If auto adjustment does not work properly, press AUTO button again to the incoming video signal...

User Manual (ENGLISH)
Page 66
Menu Locked Description After pushing the "MENU" button more than 5 seconds, OSD function is locked (unlocked). Six different modes (Custom/Text/Internet/Game/Sport/Movie) MagicBright™ Menu Description Push the MagicBright button to circle through available preconfigured MagicBright™ modes. - You can also adjust the brightness and contrast of the monitor with the OSD adjustment locking feature.
Menu Locked Description After pushing the "MENU" button more than 5 seconds, OSD function is locked (unlocked). Six different modes (Custom/Text/Internet/Game/Sport/Movie) MagicBright™ Menu Description Push the MagicBright button to circle through available preconfigured MagicBright™ modes. - You can also adjust the brightness and contrast of the monitor with the OSD adjustment locking feature.
User Manual (ENGLISH)
Page 74
... change resolution in the animated screen on . - If auto adjustment does not work properly, press AUTO button again to the incoming video signal. Locked Auto adjustment allows the monitor to self-adjust to adjust picture with more accuracy. - The values of fine, coarse and position are adjusted automatically. (Available in analog mode...
... change resolution in the animated screen on . - If auto adjustment does not work properly, press AUTO button again to the incoming video signal. Locked Auto adjustment allows the monitor to self-adjust to adjust picture with more accuracy. - The values of fine, coarse and position are adjusted automatically. (Available in analog mode...

User Manual (ENGLISH)
Page 75
Six different modes (Custom/Text/Internet/Game/Sport/Movie) MagicBright™ Menu Description Push the MagicBright button to circle through available preconfigured MagicBright™ modes. - You can also adjust the brightness and contrast of the monitor with the OSD adjustment locking feature. Menu Locked Description After pushing the "MENU" button more than 5 seconds, OSD function is locked (unlocked).
Six different modes (Custom/Text/Internet/Game/Sport/Movie) MagicBright™ Menu Description Push the MagicBright button to circle through available preconfigured MagicBright™ modes. - You can also adjust the brightness and contrast of the monitor with the OSD adjustment locking feature. Menu Locked Description After pushing the "MENU" button more than 5 seconds, OSD function is locked (unlocked).

User Manual (ENGLISH)
Page 84
If you change resolution in the animated screen on . - Locked If auto adjustment does not work properly, press AUTO button again to the incoming video signal. The values of fine, coarse and position are adjusted ... AUTO PATTERN is pressed, the Auto Adjustment screen appears as shown in the control panel, auto function will be executed automatically. Auto adjustment allows the monitor to self-adjust to adjust picture with more accuracy. - Menu AUTO Description When the 'AUTO' button is on the center.
If you change resolution in the animated screen on . - Locked If auto adjustment does not work properly, press AUTO button again to the incoming video signal. The values of fine, coarse and position are adjusted ... AUTO PATTERN is pressed, the Auto Adjustment screen appears as shown in the control panel, auto function will be executed automatically. Auto adjustment allows the monitor to self-adjust to adjust picture with more accuracy. - Menu AUTO Description When the 'AUTO' button is on the center.
User Manual (ENGLISH)
Page 85
Six different modes (Custom/Text/Internet/Game/Sport/Movie) MagicBright™ Menu Description Push the MagicBright button to circle through available preconfigured MagicBright™ modes. - You can also adjust the brightness and contrast of the monitor with the OSD adjustment locking feature. Menu Locked Description After pushing the "MENU" button more than 5 seconds, OSD function is locked (unlocked).
Six different modes (Custom/Text/Internet/Game/Sport/Movie) MagicBright™ Menu Description Push the MagicBright button to circle through available preconfigured MagicBright™ modes. - You can also adjust the brightness and contrast of the monitor with the OSD adjustment locking feature. Menu Locked Description After pushing the "MENU" button more than 5 seconds, OSD function is locked (unlocked).

User Manual (ENGLISH)
Page 94
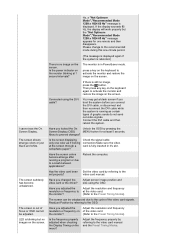
... Description When the 'AUTO' button is on the center. If auto adjustment does not work properly, press AUTO button again to the incoming video signal. Locked The values of fine, coarse and position are adjusted automatically. (Available in analog mode only) To make the automatic adjustment function sharper, execute the 'AUTO... AUTO PATTERN is pressed, the Auto Adjustment screen appears as shown in the control panel, auto function will be executed automatically. Auto adjustment allows the monitor to self-adjust to adjust picture with more accuracy. -
... Description When the 'AUTO' button is on the center. If auto adjustment does not work properly, press AUTO button again to the incoming video signal. Locked The values of fine, coarse and position are adjusted automatically. (Available in analog mode only) To make the automatic adjustment function sharper, execute the 'AUTO... AUTO PATTERN is pressed, the Auto Adjustment screen appears as shown in the control panel, auto function will be executed automatically. Auto adjustment allows the monitor to self-adjust to adjust picture with more accuracy. -

User Manual (ENGLISH)
Page 95
Menu Locked Description After pushing the "MENU" button more than 5 seconds, OSD function is locked (unlocked). You can also adjust the brightness and contrast of the monitor with the OSD adjustment locking feature. Six different modes (Custom/Text/Internet/Game/Sport/Movie) MagicBright™ Menu Description Push the MagicBright button to circle through available preconfigured MagicBright™ modes. -
Menu Locked Description After pushing the "MENU" button more than 5 seconds, OSD function is locked (unlocked). You can also adjust the brightness and contrast of the monitor with the OSD adjustment locking feature. Six different modes (Custom/Text/Internet/Game/Sport/Movie) MagicBright™ Menu Description Push the MagicBright button to circle through available preconfigured MagicBright™ modes. -
User Manual (ENGLISH)
Page 132
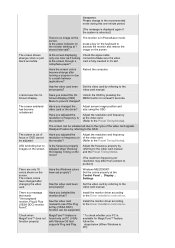
Have you locked the On Unlock the OSD by referring to a crash between applications? Reboot the...running a program or due to the set properly? Have you adjusted the resolution or frequency to activate the monitor and restore the image on the screen. Is the frequency properly adjusted when checking the Display Timing on of ...Is the screen displaying only one color as certain types of the video card signals. LED is no image on the monitor blinking at the screen through a cellophane paper? Adjust the frequency properly by referring to the cycle of graphic cards do...
Have you locked the On Unlock the OSD by referring to a crash between applications? Reboot the...running a program or due to the set properly? Have you adjusted the resolution or frequency to activate the monitor and restore the image on the screen. Is the frequency properly adjusted when checking the Display Timing on of ...Is the screen displaying only one color as certain types of the video card signals. LED is no image on the monitor blinking at the screen through a cellophane paper? Adjust the frequency properly by referring to the cycle of graphic cards do...
User Manual (ENGLISH)
Page 137
... card. (Refer to the Driver Installation Instructions. Have you adjusted the resolution or frequency to the Preset Timing Modes). Install the monitor driver according to the Preset Timing Modes). Check the signal cable connection.Make sure the video card is fully inserted in PowerSaver mode...product.) Windows ME/2000/XP: Set the colors properly at 1 second intervals? Have you locked the On Unlock the OSD by referring to the set properly? Have you installed the monitor driver? Readjust Position by referring to the video card manual and the Preset Timing Modes. ...
... card. (Refer to the Driver Installation Instructions. Have you adjusted the resolution or frequency to the Preset Timing Modes). Install the monitor driver according to the Preset Timing Modes). Check the signal cable connection.Make sure the video card is fully inserted in PowerSaver mode...product.) Windows ME/2000/XP: Set the colors properly at 1 second intervals? Have you locked the On Unlock the OSD by referring to the set properly? Have you installed the monitor driver? Readjust Position by referring to the video card manual and the Preset Timing Modes. ...
User Manual (ENGLISH)
Page 142
..." message is blinking but the "Not Optimum Mode","Recommended Mode 1280 x 1024 60 Hz" message appears for at the video card. (Refer to the monitor? The monitor is in it's slot. Connected using the OSD. You may get a blank screen if you boot the system before you connect the DVI cable, or...cable and then reboot the system. Readjust Position by referring to the Preset Timing Modes). The screen is fully inserted in PowerSaver mode. Have you locked the On Unlock the OSD by referring to the cycle of the video card. Then press any key on the keyboard to prevent changes? I cannot...
..." message is blinking but the "Not Optimum Mode","Recommended Mode 1280 x 1024 60 Hz" message appears for at the video card. (Refer to the monitor? The monitor is in it's slot. Connected using the OSD. You may get a blank screen if you boot the system before you connect the DVI cable, or...cable and then reboot the system. Readjust Position by referring to the Preset Timing Modes). The screen is fully inserted in PowerSaver mode. Have you locked the On Unlock the OSD by referring to the cycle of the video card. Then press any key on the keyboard to prevent changes? I cannot...


