
User Manual
Page 7
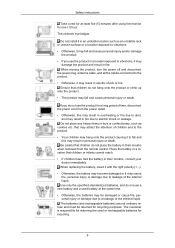
... fire, personal injury or damage due to the product. • Otherwise, it in fire due to a leakage of time, disconnect the power cord from the remote control. Do not install it may attract the attention of the internal liquid.
... fire, personal injury or damage due to the product. • Otherwise, it in fire due to a leakage of time, disconnect the power cord from the remote control. Do not install it may attract the attention of the internal liquid.

User Manual
Page 10
Unpacking Introduction Manuals LCD Display Quick Setup Guide Warranty Card (Not available in all locations) User's Guide MagicInfo Software CD, MagicInfo Manual CD (Applicable to the EXn model only) Cables Power Cord Others D-Sub Cable Remote Control (BP59-00138A) Batteries (AAA X 2) (Not available in all locations) HOLDER-WIRE 2EA (BN61-05373A) 9
Unpacking Introduction Manuals LCD Display Quick Setup Guide Warranty Card (Not available in all locations) User's Guide MagicInfo Software CD, MagicInfo Manual CD (Applicable to the EXn model only) Cables Power Cord Others D-Sub Cable Remote Control (BP59-00138A) Batteries (AAA X 2) (Not available in all locations) HOLDER-WIRE 2EA (BN61-05373A) 9

User Manual
Page 12
... Display's configuration at the back may vary slightly depending on and off. Introduction Rear (Power) button Use this spot on the LCD Display. Remote Control Sensor Aim the remote control towards this button for turning the LCD Display on the model. 11 For energy conservation, turn your LCD Display OFF when it...
... Display's configuration at the back may vary slightly depending on and off. Introduction Rear (Power) button Use this spot on the LCD Display. Remote Control Sensor Aim the remote control towards this button for turning the LCD Display on the model. 11 For energy conservation, turn your LCD Display OFF when it...

User Manual
Page 16
... • You can purchase the locking device from an electronics store, an online shop, or our service center. POWER OFF Number Buttons 1. Remote Control Note The performance of the remote control may be affected by a TV or other electronic device operating near the LCD Display , causing a malfunction due to change the channel...
... • You can purchase the locking device from an electronics store, an online shop, or our service center. POWER OFF Number Buttons 1. Remote Control Note The performance of the remote control may be affected by a TV or other electronic device operating near the LCD Display , causing a malfunction due to change the channel...
User Manual
Page 17
.... Selects a connected external input source or MagicInfo mode. Use to quickly select frequently used to select Digital channels. Current picture information is displayed on the remote control while watching TV. 16 Teletext Buttons 13. SOURCE 7. Adjusts the audio volume. This function does not work for this LCD Display. This function does...
.... Selects a connected external input source or MagicInfo mode. Use to quickly select frequently used to select Digital channels. Current picture information is displayed on the remote control while watching TV. 16 Teletext Buttons 13. SOURCE 7. Adjusts the audio volume. This function does not work for this LCD Display. This function does...
User Manual
Page 37
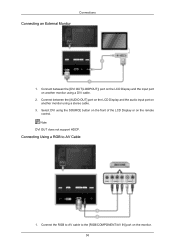
Connections Connecting an External Monitor 1. Connect between the [DVI OUT(LOOPOUT)] port on the LCD Display and the input port on another monitor using the SOURCE button on the front of the LCD Display or on the monitor. 36 Note DVI OUT does not support HDCP. Select DVI using a stereo cable. 3. Connect the RGB to AV cable to AV Cable 1. Connecting Using a RGB to the [RGB/COMPONENT/AV IN] port on the remote control. Connect between the [AUDIO OUT] port on the LCD Display and the audio input port on another monitor using a DVI cable. 2.
Connections Connecting an External Monitor 1. Connect between the [DVI OUT(LOOPOUT)] port on the LCD Display and the input port on another monitor using the SOURCE button on the front of the LCD Display or on the monitor. 36 Note DVI OUT does not support HDCP. Select DVI using a stereo cable. 3. Connect the RGB to AV cable to AV Cable 1. Connecting Using a RGB to the [RGB/COMPONENT/AV IN] port on the remote control. Connect between the [AUDIO OUT] port on the LCD Display and the audio input port on another monitor using a DVI cable. 2.
User Manual
Page 38
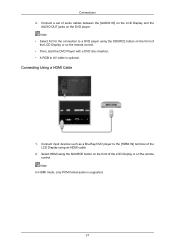
.... Connecting Using a HDMI Cable 1. Connect input devices such as a Blu-Ray/DVD player to the [HDMI IN] terminal of the LCD Display or on the remote control. • Then, start the DVD Player with a DVD disc inserted. • A RGB to a DVD player using the SOURCE button on the front of the... using the SOURCE button on the front of audio cables between the [AUDIO IN] on the LCD Display and the AUDIO OUT jacks on the remote control. Connections 2.
.... Connecting Using a HDMI Cable 1. Connect input devices such as a Blu-Ray/DVD player to the [HDMI IN] terminal of the LCD Display or on the remote control. • Then, start the DVD Player with a DVD disc inserted. • A RGB to a DVD player using the SOURCE button on the front of the... using the SOURCE button on the front of audio cables between the [AUDIO IN] on the LCD Display and the AUDIO OUT jacks on the remote control. Connections 2.

User Manual
Page 39
... cable. 2. Connect the DVI output terminal of a digital output device to the [HDMI IN] terminal of the LCD Display using the SOURCE button on the remote control.
... cable. 2. Connect the DVI output terminal of a digital output device to the [HDMI IN] terminal of the LCD Display using the SOURCE button on the remote control.
User Manual
Page 40
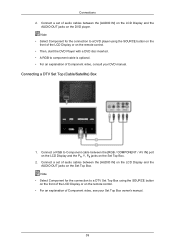
.... Note • Select Component for the connection to Component cable between the [AUDIO IN] on the LCD Display and the AUDIO OUT jacks on the remote control. • For an explanation of Component video, consult your Set Top Box owner's manual. 39 Connect a set of audio cables between the [...RGB / COMPONENT / AV IN] port on the LCD Display and the PR, Y, PB jacks on the remote control. • Then, start the DVD Player with a DVD disc inserted. • A RGB to component cable is optional. • For an explanation of ...
.... Note • Select Component for the connection to Component cable between the [AUDIO IN] on the LCD Display and the AUDIO OUT jacks on the remote control. • For an explanation of Component video, consult your Set Top Box owner's manual. 39 Connect a set of audio cables between the [...RGB / COMPONENT / AV IN] port on the LCD Display and the PR, Y, PB jacks on the remote control. • Then, start the DVD Player with a DVD disc inserted. • A RGB to component cable is optional. • For an explanation of ...
User Manual
Page 54
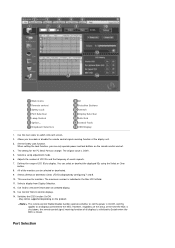
...deselected. 9. However, regardless of the status at the time the MDC is initialized to display. Allows you can be supported depending on the remote control and set. 4. The setting for monitors. You can change. Port Selection Set the Safety Lock function. Select a display from Display .... 6. All of LFD IDs to Enable when the MDC is On/Off, and this applies to all displays is shut down, the remote control signal receiving function of the display unit. 3. Dropdown Selectors All Selection Buttons Refresh Display Selection Info Grid Control Tools OSD Display 1....
...deselected. 9. However, regardless of the status at the time the MDC is initialized to display. Allows you can be supported depending on the remote control and set. 4. The setting for monitors. You can change. Port Selection Set the Safety Lock function. Select a display from Display .... 6. All of LFD IDs to Enable when the MDC is On/Off, and this applies to all displays is shut down, the remote control signal receiving function of the display unit. 3. Dropdown Selectors All Selection Buttons Refresh Display Selection Info Grid Control Tools OSD Display 1....

User Manual
Page 72
...an Irregular manner. The Input source of screens with a different layout when dividing. Check the displays to a value between 0 and 99. The remote may not operate this in communication circuits or interference from electronic appliances nearby. You can select a number of TV works only on the model. ...Check the connection of the Screen Divider setting may malfunction due to problems in System Info Grid) - Rerun the program and turn off the remote Function, disconnect the RS-232C cable, or exit the program in a row. The screen can be set the Set ID to see if...
...an Irregular manner. The Input source of screens with a different layout when dividing. Check the displays to a value between 0 and 99. The remote may not operate this in communication circuits or interference from electronic appliances nearby. You can select a number of TV works only on the model. ...Check the connection of the Screen Divider setting may malfunction due to problems in System Info Grid) - Rerun the program and turn off the remote Function, disconnect the RS-232C cable, or exit the program in a row. The screen can be set the Set ID to see if...

User Manual
Page 75
... status at the time the MDC is initialized to the monitor fails, it turns the function that transfers the result through an email on the remote control and set. 5. Add a Device Allows you can be supported depending on the monitor. 3. Switches the OSD function On/Off. - Set... deselected. 9. When setting the Lock function, you to the MDC. Use Control Tools to switch into each screen. 2. Main Icons Add a Device Remote Control Safety Lock Fault Device Alert Lamp Control Display Selection All Control Tools OSD Display 1. Use the main icons to control displays. 10. Selects a ...
... status at the time the MDC is initialized to the monitor fails, it turns the function that transfers the result through an email on the remote control and set. 5. Add a Device Allows you can be supported depending on the monitor. 3. Switches the OSD function On/Off. - Set... deselected. 9. When setting the Lock function, you to the MDC. Use Control Tools to switch into each screen. 2. Main Icons Add a Device Remote Control Safety Lock Fault Device Alert Lamp Control Display Selection All Control Tools OSD Display 1. Use the main icons to control displays. 10. Selects a ...
User Manual
Page 93
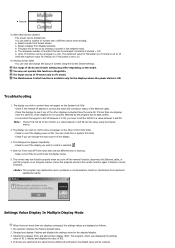
.... Troubleshooting 1. Check the displays to data conflict. - The dialogue box appears repeatedly. - Rerun the program and turn off the remote Function, disconnect the Ethernet cable, or exit the program in communication circuits or interference from electronic appliances nearby. If all sets are ...4. z The place will be set to 15 monitors can be arranged: Horizontal X Vertical = 100 z Up to 15. 4) Viewing Screen Splits - The remote may not operate this in a row. z The maximum number of the other Control Info Grids - z Natural 3) Video Wall (Screen divider) - For...
.... Troubleshooting 1. Check the displays to data conflict. - The dialogue box appears repeatedly. - Rerun the program and turn off the remote Function, disconnect the Ethernet cable, or exit the program in communication circuits or interference from electronic appliances nearby. If all sets are ...4. z The place will be set to 15 monitors can be arranged: Horizontal X Vertical = 100 z Up to 15. 4) Viewing Screen Splits - The remote may not operate this in a row. z The maximum number of the other Control Info Grids - z Natural 3) Video Wall (Screen divider) - For...

User Manual
Page 124
...;9] This is "0000". Lock → [0∼9] → [0∼9] → [0∼9] → [0∼9] The password can be changed. Note If you forgot your password, press the remote buttons MUTE → 1 → 8 → 6 → On to reset the password to prevent others from adjusting the settings. Energy Saving MENU ENTER → ENTER →...
...;9] This is "0000". Lock → [0∼9] → [0∼9] → [0∼9] → [0∼9] The password can be changed. Note If you forgot your password, press the remote buttons MUTE → 1 → 8 → 6 → On to reset the password to prevent others from adjusting the settings. Energy Saving MENU ENTER → ENTER →...

User Manual
Page 135
... For an EX model, • MagicInfo can be enabled when a network box is recommended to use a separate USB keyboard to select MagicInfo. Note • The remote control can only be used to utilize MagicInfo fully. • For MagicInfo in Device mode, moving external devices while booting may cause errors. Only a SET...
... For an EX model, • MagicInfo can be enabled when a network box is recommended to use a separate USB keyboard to select MagicInfo. Note • The remote control can only be used to utilize MagicInfo fully. • For MagicInfo in Device mode, moving external devices while booting may cause errors. Only a SET...

User Manual
Page 143
...too low. A: Adjust color using Custom under OSD Color Adjustment menu. Q: The sound level is inconsistent. Q: The sound is poor. Q: The remote control buttons do not respond. A: Adjust color using Custom under OSD Color Adjustment menu. Q: The color white is too high or too low.... every 0.5 or 1 seconds. Problems related to Audio Note Problems related to the remote control and their solutions are listed. A: The LCD Display is properly connected. Problems related to the Remote Control Note Problems related to audio signals and their solutions are listed below. A: ...
...too low. A: Adjust color using Custom under OSD Color Adjustment menu. Q: The sound level is inconsistent. Q: The sound is poor. Q: The remote control buttons do not respond. A: Adjust color using Custom under OSD Color Adjustment menu. Q: The color white is too high or too low.... every 0.5 or 1 seconds. Problems related to Audio Note Problems related to the remote control and their solutions are listed. A: The LCD Display is properly connected. Problems related to the Remote Control Note Problems related to audio signals and their solutions are listed below. A: ...


