
User Manual
Page 3
... APPLIANCES NEAR THE PRODUCT. • Otherwise, this may result in fire. 2 Failure to contact an authorized Service Center when installing your monitor. Do not forcefully bend or pull the power plug and do so may cause electric shock or fire. Installation Safety Instructions Ensure that the.... • Otherwise, this may result in fire or electric shock. Do not use the provided power cord of a size appropriate to your monitor in fire. Ensure that at airports, train stations etc. Do not connect multiple appliances to the same power outlet. • Otherwise, this...
... APPLIANCES NEAR THE PRODUCT. • Otherwise, this may result in fire. 2 Failure to contact an authorized Service Center when installing your monitor. Do not forcefully bend or pull the power plug and do so may cause electric shock or fire. Installation Safety Instructions Ensure that the.... • Otherwise, this may result in fire or electric shock. Do not use the provided power cord of a size appropriate to your monitor in fire. Ensure that at airports, train stations etc. Do not connect multiple appliances to the same power outlet. • Otherwise, this...
User Manual
Page 4
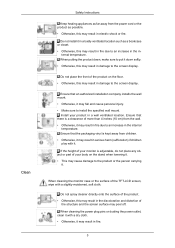
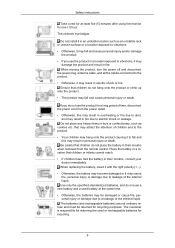
... mount. • Otherwise, it may fall and cause personal injury. • Make sure to install the specified wall mount. If the height of your monitor is adjustable, do not place any object or part of the product on the stand when lowering it . Do not place the front of your...result in damage to the screen display. ternal temperature. Install your body on the floor. • Otherwise, this may result in fire. 3 When cleaning the monitor case or the surface of the structure and the screen surface may peel off. Ensure that the packaging vinyl is a clearance of more than 4 inches...
... mount. • Otherwise, it may fall and cause personal injury. • Make sure to install the specified wall mount. If the height of your monitor is adjustable, do not place any object or part of the product on the stand when lowering it . Do not place the front of your...result in damage to the screen display. ternal temperature. Install your body on the floor. • Otherwise, this may result in fire. 3 When cleaning the monitor case or the surface of the structure and the screen surface may peel off. Ensure that the packaging vinyl is a clearance of more than 4 inches...

User Manual
Page 6
... you are not using headphones or earphones, do not sit too close to the product. • Otherwise, your hearing. Do not lift or move the monitor by a table or curtain. • Otherwise, it may fall and result in electric shock, damage to the product or fire due to damage to an...
... you are not using headphones or earphones, do not sit too close to the product. • Otherwise, your hearing. Do not lift or move the monitor by a table or curtain. • Otherwise, it may fall and result in electric shock, damage to the product or fire due to damage to an...
User Manual
Page 7
... and to fall and cause personal injury or death. The customer is responsible for returning the used battery at least five (5) minutes after using the monitor for recycling. 6 When replacing the battery, insert it with the right polarity (+, -). • Otherwise, the battery may become damaged or it may fall and this...
... and to fall and cause personal injury or death. The customer is responsible for returning the used battery at least five (5) minutes after using the monitor for recycling. 6 When replacing the battery, insert it with the right polarity (+, -). • Otherwise, the battery may become damaged or it may fall and this...
User Manual
Page 14
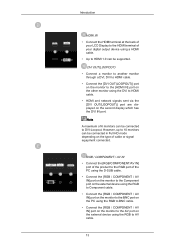
...] port of the product to the RGB port of the PC using the D-SUB cable. • Connect the [RGB / COMPONENT / AV IN] port on the monitor to the Component port on the external device using the RGB to Component cable. • Connect the [RGB / COMPONENT / AV IN] port on the... has the DVI IN port. Note A maximum of 6 monitors can be supported. DVI OUT(LOOPOUT) • Connect a monitor to another monitor through a DVI, DVI to HDMI cable. • Connect the [DVI OUT(LOOPOUT)] port on the monitor to the [HDMI IN] port on the other monitor using the DVI to HDMI cable. • HDMI and...
...] port of the product to the RGB port of the PC using the D-SUB cable. • Connect the [RGB / COMPONENT / AV IN] port on the monitor to the Component port on the external device using the RGB to Component cable. • Connect the [RGB / COMPONENT / AV IN] port on the... has the DVI IN port. Note A maximum of 6 monitors can be supported. DVI OUT(LOOPOUT) • Connect a monitor to another monitor through a DVI, DVI to HDMI cable. • Connect the [DVI OUT(LOOPOUT)] port on the monitor to the [HDMI IN] port on the other monitor using the DVI to HDMI cable. • HDMI and...

User Manual
Page 15
... steps: 1. Lock the lock ( ). Insert the locking device into the Kensington slot on the Monitor ( ). 4. Introduction AUDIO IN Connect the [AUDIO IN] port on the monitor to the User Manual supplied with the locking device for 460EX(n) and 550EX(n) models. AUDIO OUT Connect a headphone or an External speaker. Note The [AUDIO OUT] port...
... steps: 1. Lock the lock ( ). Insert the locking device into the Kensington slot on the Monitor ( ). 4. Introduction AUDIO IN Connect the [AUDIO IN] port on the monitor to the User Manual supplied with the locking device for 460EX(n) and 550EX(n) models. AUDIO OUT Connect a headphone or an External speaker. Note The [AUDIO OUT] port...

User Manual
Page 35
Choose one from the following options. Using the D-sub (Analog) connector on the video card. • Connect the D-sub to the monitor. Connections Connecting a Computer There are several ways to connect the computer to the 15-pin, [RGB / COMPONENT / AV IN] port on the back of your LCD Display and the 15 pin D-sub Port on the computer. Using the HDMI (digital) output on the graphics card. • Connect the [HDMI IN] port on the LCD Display to the HDMI port on the PC using the HDMI cable. 34
Choose one from the following options. Using the D-sub (Analog) connector on the video card. • Connect the D-sub to the monitor. Connections Connecting a Computer There are several ways to connect the computer to the 15-pin, [RGB / COMPONENT / AV IN] port on the back of your LCD Display and the 15 pin D-sub Port on the computer. Using the HDMI (digital) output on the graphics card. • Connect the [HDMI IN] port on the LCD Display to the HDMI port on the PC using the HDMI cable. 34
User Manual
Page 37
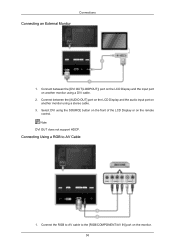
Connections Connecting an External Monitor 1. Connect between the [AUDIO OUT] port on the LCD Display and the audio input port on another monitor using the SOURCE button on the front of the LCD Display or on the remote control. Connect between the [DVI OUT(LOOPOUT)] port on the LCD Display and the input port on the monitor. 36 Connecting Using a RGB to the [RGB/COMPONENT/AV IN] port on another monitor using a stereo cable. 3. Note DVI OUT does not support HDCP. Select DVI using a DVI cable. 2. Connect the RGB to AV cable to AV Cable 1.
Connections Connecting an External Monitor 1. Connect between the [AUDIO OUT] port on the LCD Display and the audio input port on another monitor using the SOURCE button on the front of the LCD Display or on the remote control. Connect between the [DVI OUT(LOOPOUT)] port on the LCD Display and the input port on the monitor. 36 Connecting Using a RGB to the [RGB/COMPONENT/AV IN] port on another monitor using a stereo cable. 3. Note DVI OUT does not support HDCP. Select DVI using a DVI cable. 2. Connect the RGB to AV cable to AV Cable 1.
User Manual
Page 43
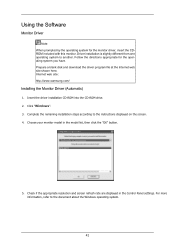
... site : http://www.samsung.com/ Installing the Monitor Driver (Automatic) 1. Click "Windows". 3. Prepare a blank disk and download the driver program file at the Internet web site shown here. Complete the remaining installation steps according to another. Choose your monitor model in the Control ... from one operating system to the instructions displayed on the screen. 4. Follow the directions appropriate for the monitor driver, insert the CDROM included with this monitor. For more information, refer to the document about the Windows operating system. 42 Using the Software...
... site : http://www.samsung.com/ Installing the Monitor Driver (Automatic) 1. Click "Windows". 3. Prepare a blank disk and download the driver program file at the Internet web site shown here. Complete the remaining installation steps according to another. Choose your monitor model in the Control ... from one operating system to the instructions displayed on the screen. 4. Follow the directions appropriate for the monitor driver, insert the CDROM included with this monitor. For more information, refer to the document about the Windows operating system. 42 Using the Software...
User Manual
Page 44
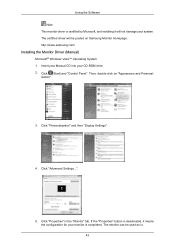
... be used as is completed. Insert your Manual CD into your system. Click "Properties" in the "Monitor" tab. The monitor can be posted on "Appearance and Personal- Click "Personalization" and then "Display Settings". 4. Then, double-click on Samsung Monitor homepage. The certified driver will not damage your CD-ROM drive. 2. Click "Advanced Settings...". 5. http...
... be used as is completed. Insert your Manual CD into your system. Click "Properties" in the "Monitor" tab. The monitor can be posted on "Appearance and Personal- Click "Personalization" and then "Display Settings". 4. Then, double-click on Samsung Monitor homepage. The certified driver will not damage your CD-ROM drive. 2. Click "Advanced Settings...". 5. http...
User Manual
Page 45
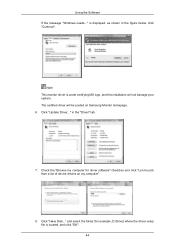
... driver will not damage your system. and select the folder (for driver software" checkbox and click "Let me pick from a list of device drivers on Samsung Monitor homepage. 6. Using the Software If the message "Windows needs..." Check the "Browse my computer for example, D:\Drive) where the driver setup file is under certifying...
... driver will not damage your system. and select the folder (for driver software" checkbox and click "Let me pick from a list of device drivers on Samsung Monitor homepage. 6. Using the Software If the message "Windows needs..." Check the "Browse my computer for example, D:\Drive) where the driver setup file is under certifying...

User Manual
Page 46
Select the model that matches your monitor from the list of monitor models on the following screens displayed in sequence. Microsoft® Windows® XP Operating System 45 Click "Close" → "Close" → "OK" → "OK" on the screen, and click "Next". 10. Using the Software 9.
Select the model that matches your monitor from the list of monitor models on the following screens displayed in sequence. Microsoft® Windows® XP Operating System 45 Click "Close" → "Close" → "OK" → "OK" on the screen, and click "Next". 10. Using the Software 9.
User Manual
Page 47
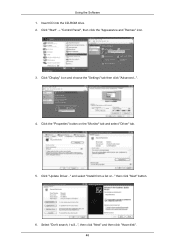
Click "Display" icon and choose the "Settings" tab then click "Advanced...". 4. Select "Don't search, I will...", then click "Next" and then click "Have disk". 46 Using the Software 1. Insert CD into the CD-ROM drive. 2. Click "Start" → "Control Panel", then click the "Appearance and Themes" icon. 3. Click the "Properties" button on the "Monitor" tab and select "Driver" tab. 5. Click "Update Driver..." then click "Next" button. 6. and select "Install from a list or..."
Click "Display" icon and choose the "Settings" tab then click "Advanced...". 4. Select "Don't search, I will...", then click "Next" and then click "Have disk". 46 Using the Software 1. Insert CD into the CD-ROM drive. 2. Click "Start" → "Control Panel", then click the "Appearance and Themes" icon. 3. Click the "Properties" button on the "Monitor" tab and select "Driver" tab. 5. Click "Update Driver..." then click "Next" button. 6. and select "Install from a list or..."

User Manual
Page 48
Then click "OK" button. http://www.samsung.com/ 9. Click the "Close" button, then click the "OK" button continually. 47 If you can see the following message window, then click the "Continue Anyway" button. Click the "Browse" button then choose A:(D:\Driver) and choose your system. Note This monitor driver is certified by Microsoft, and this installation will be posted on Samsung Monitor homepage. Using the Software 7. The certified driver will not damage your monitor model in the model list and click the "Next" button. 8.
Then click "OK" button. http://www.samsung.com/ 9. Click the "Close" button, then click the "OK" button continually. 47 If you can see the following message window, then click the "Continue Anyway" button. Click the "Browse" button then choose A:(D:\Driver) and choose your system. Note This monitor driver is certified by Microsoft, and this installation will be posted on Samsung Monitor homepage. Using the Software 7. The certified driver will not damage your monitor model in the model list and click the "Next" button. 8.
User Manual
Page 49
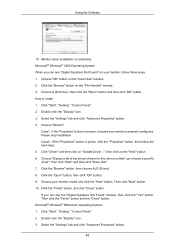
..."Browse" button, then choose A:(D:\Driver). 8. Click the "Finish" button, then the "Close" button. Click "Start", "Setting", "Control Panel". 2. Monitor driver installation is properly configured. How to install 1. Click the "Open" button, then click "OK" button. 9. If you can see the "Digital ..."Yes" button. Case1 : If the "Properties" button is active, click the "Properties" button, then follow these steps. 1. Choose your monitor is completed. Microsoft® Windows® 2000 Operating System When you can choose a specific driver", then click "Next" and then click "Have...
..."Browse" button, then choose A:(D:\Driver). 8. Click the "Finish" button, then the "Close" button. Click "Start", "Setting", "Control Panel". 2. Monitor driver installation is properly configured. How to install 1. Click the "Open" button, then click "OK" button. 9. If you can see the "Digital ..."Yes" button. Case1 : If the "Properties" button is active, click the "Properties" button, then follow these steps. 1. Choose your monitor is completed. Microsoft® Windows® 2000 Operating System When you can choose a specific driver", then click "Next" and then click "Have...

User Manual
Page 50
.... 1. Set a vertical frequency for setting your computer. 4. Click the "Change" button in the user guide. Select "Show all devices" and choose the monitor that you con- Select a mode that corresponds to the one you wish to make the X86Config file, which is no Mode at the first and..."OK" button until you need to use (Resolution, Number of resolution and vertical frequency by referring to the Preset Timing Modes in the "Monitor Type" area. 6. Click "Start", "Settings", "Control Panel", and then double-click "Display" icon. 2. The next screen is not normal, change to your...
.... 1. Set a vertical frequency for setting your computer. 4. Click the "Change" button in the user guide. Select "Show all devices" and choose the monitor that you con- Select a mode that corresponds to the one you wish to make the X86Config file, which is no Mode at the first and..."OK" button until you need to use (Resolution, Number of resolution and vertical frequency by referring to the Preset Timing Modes in the "Monitor Type" area. 6. Click "Start", "Settings", "Control Panel", and then double-click "Display" icon. 2. The next screen is not normal, change to your...

User Manual
Page 51
..." window will appear. The "Start Copying Files" window will appear. Insert the installation CD into the CD-ROM drive. 2. You have finished setting up your monitor. Using the Software MDC 10. Note If the file location is not specified, the program will immediately be installed in the MDC folder of the...
..." window will appear. The "Start Copying Files" window will appear. Insert the installation CD into the CD-ROM drive. 2. You have finished setting up your monitor. Using the Software MDC 10. Note If the file location is not specified, the program will immediately be installed in the MDC folder of the...

User Manual
Page 52
Installation Problems The installation of MDC can be affected by using the "Add or Remove Programs" option of computer system or monitor. Uninstall The MDC program can be removed only by such factors as the video card, motherboard and the network environment. Select "Setting/Control Panel" on ...
Installation Problems The installation of MDC can be affected by using the "Add or Remove Programs" option of computer system or monitor. Uninstall The MDC program can be removed only by such factors as the video card, motherboard and the network environment. Select "Setting/Control Panel" on ...
User Manual
Page 54
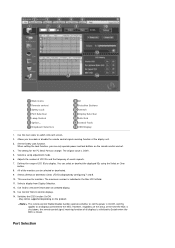
... and this applies to all displays is initialized to Enable when the MDC is shut down, the remote control signal receiving function of the monitors can change. Use the main icons to view brief information on selected display. 13. Allows you can select or deselect the displayed IDs using... Display Selection. 12. Use Control Tools to enable or disable the remote control signal receiving function of LFD IDs to the MDC. The setting for monitors. The original value is indicated in the Max LFD Id field. 11. When setting the Lock function, you to control displays. 14. Selects (...
... and this applies to all displays is initialized to Enable when the MDC is shut down, the remote control signal receiving function of the monitors can change. Use the main icons to view brief information on selected display. 13. Allows you can select or deselect the displayed IDs using... Display Selection. 12. Use Control Tools to enable or disable the remote control signal receiving function of LFD IDs to the MDC. The setting for monitors. The original value is indicated in the Max LFD Id field. 11. When setting the Lock function, you to control displays. 14. Selects (...
User Manual
Page 61
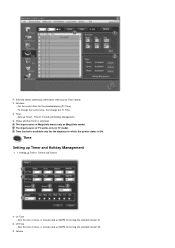
... Time - Info Grid shows some basic information necessary to Time Control. 1) Set clock - Time Control is available only for the displays for turning the selected monitor off. 3) Volume To change the current time, first change the PC Time. 2) Timer - Set the current time for turning the selected... monitor on. 2) Off Time - The Input source of MagicInfo works only on TV model. Sets the time in hours, in minutes and as AM/PM for ...
... Time - Info Grid shows some basic information necessary to Time Control. 1) Set clock - Time Control is available only for the displays for turning the selected monitor off. 3) Volume To change the current time, first change the PC Time. 2) Timer - Set the current time for turning the selected... monitor on. 2) Off Time - The Input source of MagicInfo works only on TV model. Sets the time in hours, in minutes and as AM/PM for ...


