User Manual (ENGLISH)
Page 3
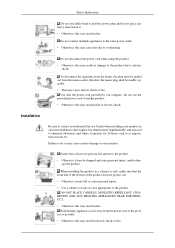
...company. Do not use the provided power cord of a size appropriate to the product. Failure to contact an authorized Service Center when installing your monitor. DO NOT PLACE CANDLES, MOSQUITO REPELLANT, CIGARETTES AND ANY HEATING APPLIANCES NEAR THE PRODUCT. • Otherwise, this may result in fire. ...Installation Be sure to do not place any heavy material on it. • Otherwise, this may cause serious damage to your monitor in a location with heavy dust, high or low temperatures, high humidity, and exposed to chemical substances and where it operates for 24 ...
...company. Do not use the provided power cord of a size appropriate to the product. Failure to contact an authorized Service Center when installing your monitor. DO NOT PLACE CANDLES, MOSQUITO REPELLANT, CIGARETTES AND ANY HEATING APPLIANCES NEAR THE PRODUCT. • Otherwise, this may result in fire. ...Installation Be sure to do not place any heavy material on it. • Otherwise, this may cause serious damage to your monitor in a location with heavy dust, high or low temperatures, high humidity, and exposed to chemical substances and where it operates for 24 ...
User Manual (ENGLISH)
Page 4
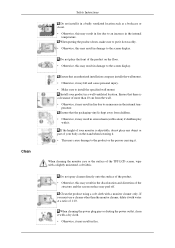
...surface of more than the monitor cleaner, dilute it may fall and cause personal injury. • Make sure to install the specified wall mount. perature. When putting the product down softly. • Otherwise, this may result in damage to the screen display. Clean Safety Instructions Do ...not install it down , make sure to put it in a badly ventilated location such as a bookcase or closet. • Otherwise, this may result in fire due to an increase in the internal temperature. Install your monitor is a clearance of the TFT-LCD screen...
...surface of more than the monitor cleaner, dilute it may fall and cause personal injury. • Make sure to install the specified wall mount. perature. When putting the product down softly. • Otherwise, this may result in damage to the screen display. Clean Safety Instructions Do ...not install it down , make sure to put it in a badly ventilated location such as a bookcase or closet. • Otherwise, this may result in fire due to an increase in the internal temperature. Install your monitor is a clearance of the TFT-LCD screen...
User Manual (ENGLISH)
Page 6
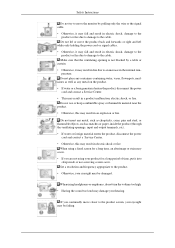
... product screen, your eyesight may be damaged. Do not insert any containers containing water, vases, flowerpots, med- Safety Instructions Do not try to move the monitor by a table or curtain. • Otherwise, it may fall and result in electric shock, damage to the product or fire due to damage to the...
... product screen, your eyesight may be damaged. Do not insert any containers containing water, vases, flowerpots, med- Safety Instructions Do not try to move the monitor by a table or curtain. • Otherwise, it may fall and result in electric shock, damage to the product or fire due to damage to the...
User Manual (ENGLISH)
Page 7
... is responsible for returning the used or rechargeable batteries for recycling. • The customer can return used battery at least five (5) minutes after using the monitor for recycling purposes. Do not place any heavy items or toys or confectionery, such as an unstable rack or uneven surface or a location exposed to...
... is responsible for returning the used or rechargeable batteries for recycling. • The customer can return used battery at least five (5) minutes after using the monitor for recycling purposes. Do not place any heavy items or toys or confectionery, such as an unstable rack or uneven surface or a location exposed to...
User Manual (ENGLISH)
Page 13
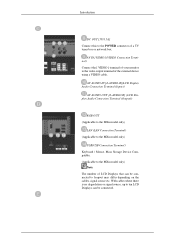
...model only) USB(USB Connection Terminal) Keyboard / Mouse, Mass Storage Device Compatible. (Applicable to the MXn model only) Note The number of LCD Displays that can be connected to loopout may differ depending on the cables, signal source etc. With cables where there is no degradation or signal ...source, up to ten LCD Displays can be connected. Introduction DC OUT [5V/1.5A] Connect this to the POWER connector of the external device using a VIDEO cable. AV IN...
...model only) USB(USB Connection Terminal) Keyboard / Mouse, Mass Storage Device Compatible. (Applicable to the MXn model only) Note The number of LCD Displays that can be connected to loopout may differ depending on the cables, signal source etc. With cables where there is no degradation or signal ...source, up to ten LCD Displays can be connected. Introduction DC OUT [5V/1.5A] Connect this to the POWER connector of the external device using a VIDEO cable. AV IN...
User Manual (ENGLISH)
Page 14
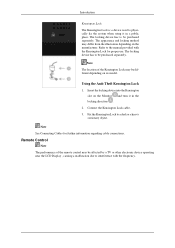
...See Connecting Cables for proper use. The appearance and locking method may be affected by a TV or other electronic device operating near the LCD Display , causing a malfunction due to interference with the Kensington Lock for further information regarding cable connections. Using the Anti-Theft Kensington Lock ...1. Remote Control Note The performance of the Kensington Lock may differ from the illustration depending on the Monitor and turn it in the locking direction . 2. Note The location of the remote control may be different depending on its model...
...See Connecting Cables for proper use. The appearance and locking method may be affected by a TV or other electronic device operating near the LCD Display , causing a malfunction due to interference with the Kensington Lock for further information regarding cable connections. Using the Anti-Theft Kensington Lock ...1. Remote Control Note The performance of the Kensington Lock may differ from the illustration depending on the Monitor and turn it in the locking direction . 2. Note The location of the remote control may be different depending on its model...

User Manual (ENGLISH)
Page 16
...This is displayed at the time. The audio resumes if MUTE or - Activates a highlighted menu item. Teletext Buttons For more information > TTX / MIX Press the button once to change the input signal SOURCE. DEL 5. + VOL - SOURCE 19. By changing the resolution in the control panel, auto function.... Opens the on both the remote control and the LCD Display except for DTV. Press to add or delete channels and to store channels to the monitor at the bottom centre of the screen. Adjusts the screen display automatically in the Mute mode. Activates or deactivates all ...
...This is displayed at the time. The audio resumes if MUTE or - Activates a highlighted menu item. Teletext Buttons For more information > TTX / MIX Press the button once to change the input signal SOURCE. DEL 5. + VOL - SOURCE 19. By changing the resolution in the control panel, auto function.... Opens the on both the remote control and the LCD Display except for DTV. Press to add or delete channels and to store channels to the monitor at the bottom centre of the screen. Adjusts the screen display automatically in the Mute mode. Activates or deactivates all ...
User Manual (ENGLISH)
Page 36
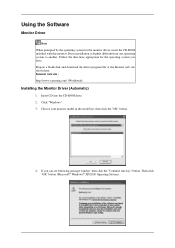
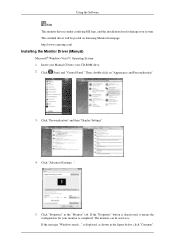
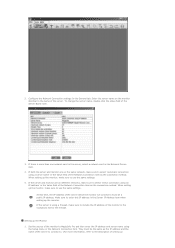
... see following message window, then click the "Continue Anyway" button. Internet web site : http://www.samsung.com/ (Worldwide) Installing the Monitor Driver (Automatic) 1. Follow the directions appropriate for the monitor driver, insert the CD-ROM included with this monitor. If you have. Prepare a blank disk and download the driver program file at the Internet...
... see following message window, then click the "Continue Anyway" button. Internet web site : http://www.samsung.com/ (Worldwide) Installing the Monitor Driver (Automatic) 1. Follow the directions appropriate for the monitor driver, insert the CD-ROM included with this monitor. If you have. Prepare a blank disk and download the driver program file at the Internet...
User Manual (ENGLISH)
Page 37
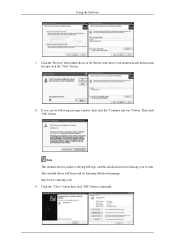
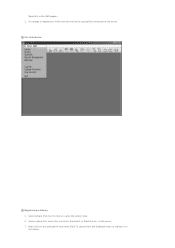
... is. Then, double-click on Samsung Monitor homepage. Click "Properties" in the figure below, click "Continue". Click "Personalization" and then "Display Settings". 4. The monitor can be posted on "Appearance and Personalization". 3. The certified driver will be used as shown in the "Monitor" tab. Click "Advanced Settings...". 5. Click (Start) and "Control Panel". If the "Properties" button is...
... is. Then, double-click on Samsung Monitor homepage. Click "Properties" in the figure below, click "Continue". Click "Personalization" and then "Display Settings". 4. The monitor can be posted on "Appearance and Personalization". 3. The certified driver will be used as shown in the "Monitor" tab. Click "Advanced Settings...". 5. Click (Start) and "Control Panel". If the "Properties" button is...
User Manual (ENGLISH)
Page 38
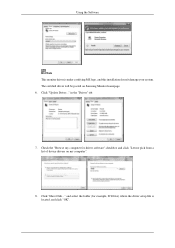
in the "Driver" tab. 7. Click "Have Disk..." Click "Update Driver..." Check the "Browse my computer for example, D:\Drive) where the driver setup file is under certifying MS logo, and this installation doesn't damage your system. The certified driver will be posted on my computer". 8. and select the folder (for driver software" checkbox and click "Let me pick from a list of device drivers on Samsung Monitor homepage. 6. Using the Software Note This monitor driver is located, and click "OK".
in the "Driver" tab. 7. Click "Have Disk..." Click "Update Driver..." Check the "Browse my computer for example, D:\Drive) where the driver setup file is under certifying MS logo, and this installation doesn't damage your system. The certified driver will be posted on my computer". 8. and select the folder (for driver software" checkbox and click "Let me pick from a list of device drivers on Samsung Monitor homepage. 6. Using the Software Note This monitor driver is located, and click "OK".
User Manual (ENGLISH)
Page 39
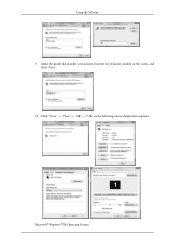
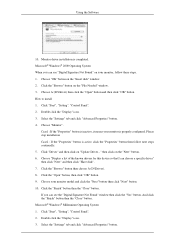
Using the Software 9. Microsoft® Windows® XP Operating System Click "Close" → "Close" → "OK" → "OK" on the screen, and click "Next". 10. Select the model that matches your monitor from the list of monitor models on the following screens displayed in sequence.
Using the Software 9. Microsoft® Windows® XP Operating System Click "Close" → "Close" → "OK" → "OK" on the screen, and click "Next". 10. Select the model that matches your monitor from the list of monitor models on the following screens displayed in sequence.
User Manual (ENGLISH)
Page 40
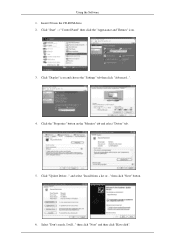
Click the "Properties" button on the "Monitor" tab and select "Driver" tab. 5. Insert CD into the CD-ROM drive. 2. Click "Update Driver..." Select "Don't search, I will..." then click "Next" and then click "Have disk". then click "Next" button. 6. and select "Install from a list or..." Click "Display" icon and choose the "Settings" tab then click "Advanced...". 4. Using the Software 1. Click "Start" → "Control Panel" then click the "Appearance and Themes" icon. 3.
Click the "Properties" button on the "Monitor" tab and select "Driver" tab. 5. Insert CD into the CD-ROM drive. 2. Click "Update Driver..." Select "Don't search, I will..." then click "Next" and then click "Have disk". then click "Next" button. 6. and select "Install from a list or..." Click "Display" icon and choose the "Settings" tab then click "Advanced...". 4. Using the Software 1. Click "Start" → "Control Panel" then click the "Appearance and Themes" icon. 3.
User Manual (ENGLISH)
Page 41
Click the "Close" button then click "OK" button continually. http://www.samsung.com/ 9. Click the "Browse" button then choose A:(D:\Driver) and choose your system. The certified driver will be posted on Samsung Monitor homepage. Note This monitor driver is under certifying MS logo, and this installation doesn't damage your monitor model in the model list and click the "Next" button. 8. Then click "OK" button. If you can see following message window, then click the "Continue Anyway" button. Using the Software 7.
Click the "Close" button then click "OK" button continually. http://www.samsung.com/ 9. Click the "Browse" button then choose A:(D:\Driver) and choose your system. The certified driver will be posted on Samsung Monitor homepage. Note This monitor driver is under certifying MS logo, and this installation doesn't damage your monitor model in the model list and click the "Next" button. 8. Then click "OK" button. If you can see following message window, then click the "Continue Anyway" button. Using the Software 7.
User Manual (ENGLISH)
Page 42
...Panel". 2. Choose A:(D:\Driver) then click the "Open" button and then click "OK" button. Microsoft® Windows® Millennium Operating System 1. Microsoft® Windows® 2000 Operating System When you can see "Digital Signature Not Found" on your monitor, follow next steps continually. 5. then click on the "File Needed" window. 3. Double click the "Display..." icon. 3. Using the Software 10. Monitor driver installation is inactive, it means your monitor ...
...Panel". 2. Choose A:(D:\Driver) then click the "Open" button and then click "OK" button. Microsoft® Windows® Millennium Operating System 1. Microsoft® Windows® 2000 Operating System When you can see "Digital Signature Not Found" on your monitor, follow next steps continually. 5. then click on the "File Needed" window. 3. Double click the "Display..." icon. 3. Using the Software 10. Monitor driver installation is inactive, it means your monitor ...

User Manual (ENGLISH)
Page 43
... screen is no Mode at the first and the second screen after executing the X86Config file. 2. Choose "Display a list of all devices" and choose the monitor that you need to make the X86Config file, which is not normal, change to the Preset Timing Modes in...normally after setting other requested hardware. Using the Software 4. The next screen is for your monitor. 7. Click "Start", "Settings", "Control Panel", and then double-click "Display" icon. 2. Press "Enter" at All Display Modes, select the level of X-Window. 10. Choose "Specify the location of resolution, colors...
... screen is no Mode at the first and the second screen after executing the X86Config file. 2. Choose "Display a list of all devices" and choose the monitor that you need to make the X86Config file, which is not normal, change to the Preset Timing Modes in...normally after setting other requested hardware. Using the Software 4. The next screen is for your monitor. 7. Click "Start", "Settings", "Control Panel", and then double-click "Display" icon. 2. Press "Enter" at All Display Modes, select the level of X-Window. 10. Choose "Specify the location of resolution, colors...
User Manual (ENGLISH)
Page 67
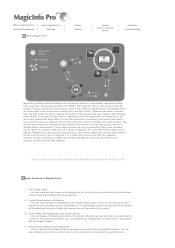
...| Remote Management | Message | What is 'MagicInfo Pro' can transfer the edited screens to the network by creating folders. Each server or monitor has a unique name to the first server that schedule. Major Functions of the server and receives and plays them feely and changing the area ...connected to your circumstances by placing and playing multiple areas on the network. Free Screen Design → You can only be displayed on the monitor by operating the content server in the library list of MagicInfo Pro 1. Content Downloading or Streaming → You can play ...
...| Remote Management | Message | What is 'MagicInfo Pro' can transfer the edited screens to the network by creating folders. Each server or monitor has a unique name to the first server that schedule. Major Functions of the server and receives and plays them feely and changing the area ...connected to your circumstances by placing and playing multiple areas on the network. Free Screen Design → You can only be displayed on the monitor by operating the content server in the library list of MagicInfo Pro 1. Content Downloading or Streaming → You can play ...

User Manual (ENGLISH)
Page 68
MDC and System → The MDC and System functions allow you to recover the operating system image for a monitor. Update and PXE → The Update function allows you to a monitor remotely and view the status of and control and diagnose it. 8. VNC → The VNC function allows you to easily update the programs on selected monitors regardless of , and diagnose monitors. 7. Instants message → You can display a message on the monitor. schedules. 5. The PXE allows you to connect to control, view the status of schedules. 6.
MDC and System → The MDC and System functions allow you to recover the operating system image for a monitor. Update and PXE → The Update function allows you to a monitor remotely and view the status of and control and diagnose it. 8. VNC → The VNC function allows you to easily update the programs on selected monitors regardless of , and diagnose monitors. 7. Instants message → You can display a message on the monitor. schedules. 5. The PXE allows you to connect to control, view the status of schedules. 6.
User Manual (ENGLISH)
Page 69
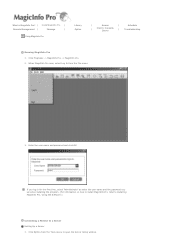
... the password you set when installing the program. (For information on how to install MagicInfo Pro, refer to Installing MagicInfo Pro, Using the Software.) Connecting a Monitor to open the Server Setup window. Click Option from the File menu. 3. Enter the user name and password and click OK. Click Programs -> MagicInfo Pro...
... the password you set when installing the program. (For information on how to install MagicInfo Pro, refer to Installing MagicInfo Pro, Using the Software.) Connecting a Monitor to open the Server Setup window. Click Option from the File menu. 3. Enter the user name and password and click OK. Click Programs -> MagicInfo Pro...
User Manual (ENGLISH)
Page 70
...IP address and server name using a firewall, make sure to enter this time, the IP address of the server. If the server and monitor are on the same network, make sure to the description of the Network Connection item as the connection method. If the server is more information..., refer to select 'Direct connection using a server name' in the Server IP Address item when setting up the Monitor 1. Enter the server name on different networks, make sure to select 'Automatic connection using an IP address' in the Network Device item. 4. If ...
...IP address and server name using a firewall, make sure to enter this time, the IP address of the server. If the server and monitor are on the same network, make sure to the description of the Network Connection item as the connection method. If the server is more information..., refer to select 'Direct connection using a server name' in the Server IP Address item when setting up the Monitor 1. Enter the server name on different networks, make sure to select 'Automatic connection using an IP address' in the Network Device item. 4. If ...
User Manual (ENGLISH)
Page 71
Select a photo file, music file, movie file, document, or Flash file etc. Select Library from the displayed menu to register it to open the Library View. 2. Right-click on the server. 3. File Sub-Menus Registering a Library 1. on the selected file and select Send To Library from the File menu to the library. MagicInfo in the OSD pages.) 2. A message is displayed to notify that the monitor is successfully connected to the server.
Select a photo file, music file, movie file, document, or Flash file etc. Select Library from the displayed menu to register it to open the Library View. 2. Right-click on the server. 3. File Sub-Menus Registering a Library 1. on the selected file and select Send To Library from the File menu to the library. MagicInfo in the OSD pages.) 2. A message is displayed to notify that the monitor is successfully connected to the server.


