
User Manual (ENGLISH)
Page 16
... the Power and LOCK buttons. Adjusts the audio volume. Activates a highlighted menu item. Activates or deactivates all function keys on -screen menu and exits from the menu or closes the adjustment menu. Changing the SOURCE is displayed at the time. Opens the on both the remote control and the LCD Display except for DTV. DTV menu display Electronic Program Guide (EPG) display. button 6. ENTER/PRE-CH 20. Selects the TV and DTV mode directly. SOURCE 19. The audio...
... the Power and LOCK buttons. Adjusts the audio volume. Activates a highlighted menu item. Activates or deactivates all function keys on -screen menu and exits from the menu or closes the adjustment menu. Changing the SOURCE is displayed at the time. Opens the on both the remote control and the LCD Display except for DTV. DTV menu display Electronic Program Guide (EPG) display. button 6. ENTER/PRE-CH 20. Selects the TV and DTV mode directly. SOURCE 19. The audio...

User Manual (ENGLISH)
Page 17
... Audio Type Mono Stereo SAP MTS/S_Mode Mono Mono ↔ Stereo Mono ↔ SAP Default Manual Change Mono 30. Up-Down Left-Right but- P.MODE When you press this LCD Display. This fuction does not work for this LCD Display. 31.SWAP Swaps the contents of the screen. EXIT Exits from one menu item to another horizontally, vertically or tons adjusts selected menu values. 25. AV / HDMI...
... Audio Type Mono Stereo SAP MTS/S_Mode Mono Mono ↔ Stereo Mono ↔ SAP Default Manual Change Mono 30. Up-Down Left-Right but- P.MODE When you press this LCD Display. This fuction does not work for this LCD Display. 31.SWAP Swaps the contents of the screen. EXIT Exits from one menu item to another horizontally, vertically or tons adjusts selected menu values. 25. AV / HDMI...
User Manual (ENGLISH)
Page 36
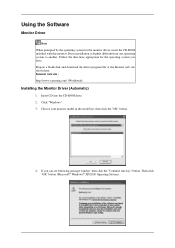
... and download the driver program file at the Internet web site shown here. Insert CD into the CD-ROM drive. 2. Driver installation is slightly different from one operating system to another. Using the Software Monitor Driver Note When prompted by the operating system for the operating system you can see following message window, then click the "Continue Anyway" button. Follow...
... and download the driver program file at the Internet web site shown here. Insert CD into the CD-ROM drive. 2. Driver installation is slightly different from one operating system to another. Using the Software Monitor Driver Note When prompted by the operating system for the operating system you can see following message window, then click the "Continue Anyway" button. Follow...
User Manual (ENGLISH)
Page 37
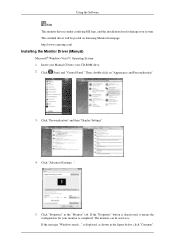
... for your monitor is under certifying MS logo, and this installation doesn't damage your CD-ROM drive. 2. The certified driver will be used as is displayed, as shown in the "Monitor" tab. Then, double-click on Samsung Monitor homepage. Using the Software Note This monitor driver is completed. Click "Personalization" and then "Display Settings". 4. Click (Start) and "Control Panel". http://www.samsung.com/ Installing the Monitor Driver (Manual) Microsoft® Windows Vista™...
... for your monitor is under certifying MS logo, and this installation doesn't damage your CD-ROM drive. 2. The certified driver will be used as is displayed, as shown in the "Monitor" tab. Then, double-click on Samsung Monitor homepage. Using the Software Note This monitor driver is completed. Click "Personalization" and then "Display Settings". 4. Click (Start) and "Control Panel". http://www.samsung.com/ Installing the Monitor Driver (Manual) Microsoft® Windows Vista™...
User Manual (ENGLISH)
Page 38
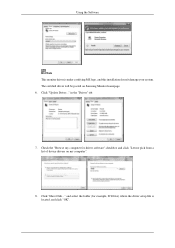
The certified driver will be posted on my computer". 8. Click "Have Disk..." Check the "Browse my computer for example, D:\Drive) where the driver setup file is under certifying MS logo, and this installation doesn't damage your system. in the "Driver" tab. 7. and select the folder (for driver software" checkbox and click "Let me pick from a list of device drivers on Samsung Monitor homepage. 6. Click "Update Driver..." Using the Software Note This monitor driver is located, and click "OK".
The certified driver will be posted on my computer". 8. Click "Have Disk..." Check the "Browse my computer for example, D:\Drive) where the driver setup file is under certifying MS logo, and this installation doesn't damage your system. in the "Driver" tab. 7. and select the folder (for driver software" checkbox and click "Let me pick from a list of device drivers on Samsung Monitor homepage. 6. Click "Update Driver..." Using the Software Note This monitor driver is located, and click "OK".
User Manual (ENGLISH)
Page 40
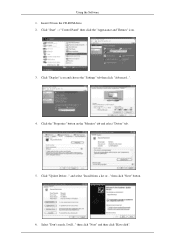
Insert CD into the CD-ROM drive. 2. Click "Start" → "Control Panel" then click the "Appearance and Themes" icon. 3. Click "Display" icon and choose the "Settings" tab then click "Advanced...". 4. Click "Update Driver..." Select "Don't search, I will..." then click "Next" and then click "Have disk". Click the "Properties" button on the "Monitor" tab and select "Driver" tab. 5. then click "Next" button. 6. Using the Software 1. and select "Install from a list or..."
Insert CD into the CD-ROM drive. 2. Click "Start" → "Control Panel" then click the "Appearance and Themes" icon. 3. Click "Display" icon and choose the "Settings" tab then click "Advanced...". 4. Click "Update Driver..." Select "Don't search, I will..." then click "Next" and then click "Have disk". Click the "Properties" button on the "Monitor" tab and select "Driver" tab. 5. then click "Next" button. 6. Using the Software 1. and select "Install from a list or..."
User Manual (ENGLISH)
Page 42
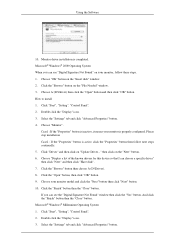
..." button on "Update Driver..." How to install 1. Click "Start", "Setting", "Control Panel". 2. Please stop installation Case2 : If the "Properties" button is inactive, it means your monitor model and click the "Next" button then click "Next" button. 10. Choose "Display a list of the known drivers for this device so that I can see "Digital Signature Not Found" on your monitor, follow next steps continually. 5. Click the "Open" button, then click "OK" button. 9. Using the Software...
..." button on "Update Driver..." How to install 1. Click "Start", "Setting", "Control Panel". 2. Please stop installation Case2 : If the "Properties" button is inactive, it means your monitor model and click the "Next" button then click "Next" button. 10. Choose "Display a list of the known drivers for this device so that I can see "Digital Signature Not Found" on your monitor, follow next steps continually. 5. Click the "Open" button, then click "OK" button. 9. Using the Software...

User Manual (ENGLISH)
Page 43
... X-Window after setting other requested hardware. Click "Start", "Settings", "Control Panel", and then double-click "Display" icon. 2. If the screen is for your computer. 4. Set a mouse for setting your mouse. 3. The next screen is for your monitor. (You can enter the frequency directly.) 8. The next screen is not normal, change to the Preset Timing Modes in the user guide. Set a Keyboard for selecting a keyboard. 5. Using the Software 4. Specify A:\(D:\driver) then click "OK" button...
... X-Window after setting other requested hardware. Click "Start", "Settings", "Control Panel", and then double-click "Display" icon. 2. If the screen is for your computer. 4. Set a mouse for setting your mouse. 3. The next screen is for your monitor. (You can enter the frequency directly.) 8. The next screen is not normal, change to the Preset Timing Modes in the user guide. Set a Keyboard for selecting a keyboard. 5. Using the Software 4. Specify A:\(D:\driver) then click "OK" button...

User Manual (ENGLISH)
Page 65
... supplied by Samsung supports up by pressing a number in MagicInfo. Turns on TV model. z Full z Natural You may not operate this function in the selected mode. Troubleshooting 1. The Maintenance Control function is available only for the displays where the power status is properly connected to see a divided screen. The screen can be divided into. z Select a display from Screen divider. The Input source of TV works only on /off the Video Wall...
... supplied by Samsung supports up by pressing a number in MagicInfo. Turns on TV model. z Full z Natural You may not operate this function in the selected mode. Troubleshooting 1. The Maintenance Control function is available only for the displays where the power status is properly connected to see a divided screen. The screen can be divided into. z Select a display from Screen divider. The Input source of TV works only on /off the Video Wall...

User Manual (ENGLISH)
Page 127
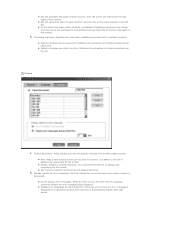
z The Auto Wide option for monitors that support TV.) Picture PC: Displays the current state of MagicBright, contrast, brightness, color tone, red, green, blue, color temp, and size. You can control each item by clicking it and changing the setting in Custom mode. Time: Configures the current time and displays the state of the PIP, and Swap by clicking it and changing the setting in the list view. Their existing settings cannot be read...
z The Auto Wide option for monitors that support TV.) Picture PC: Displays the current state of MagicBright, contrast, brightness, color tone, red, green, blue, color temp, and size. You can control each item by clicking it and changing the setting in Custom mode. Time: Configures the current time and displays the state of the PIP, and Swap by clicking it and changing the setting in the list view. Their existing settings cannot be read...
User Manual (ENGLISH)
Page 137
... the total size of the schedules to be used in the edit box. z Do not check disk space when schedule is displayed for errors that period. It is performed for a newly created screen. Publishing sequence: Specifies the order when publishing is removed from the list of the monitor. Screen Default Resolution: Adds, deletes and sets the default resolution for multiple monitors. z Do not display error messages: When...
... the total size of the schedules to be used in the edit box. z Do not check disk space when schedule is displayed for errors that period. It is performed for a newly created screen. Publishing sequence: Specifies the order when publishing is removed from the list of the monitor. Screen Default Resolution: Adds, deletes and sets the default resolution for multiple monitors. z Do not display error messages: When...

User Manual (ENGLISH)
Page 166
... in the black level, a low contrast, or discoloration, etc., depending on the external device connected. Normal 2. MENU ENTER → [Setup ENTER → [Video Wall ] Note When Video Wall is On, you can adjust the Video Wall screen setting. On Note If you want to On. However, when Energy Saving is running, the Auto Adjustment, Image Lock, and Size functions are not available. Adjusting the LCD Display → , → ENTER This feature adjusts the power consumption...
... in the black level, a low contrast, or discoloration, etc., depending on the external device connected. Normal 2. MENU ENTER → [Setup ENTER → [Video Wall ] Note When Video Wall is On, you can adjust the Video Wall screen setting. On Note If you want to On. However, when Energy Saving is running, the Auto Adjustment, Image Lock, and Size functions are not available. Adjusting the LCD Display → , → ENTER This feature adjusts the power consumption...
User Manual (ENGLISH)
Page 176
... the LCD Display. • In the OSD image of Setup have been changed when EWF is in the Enable state, to turn off the AC power during an operation. • For pivoted LCD Displays, ticker transparency is not supported. • For pivoted LCD Displays, a screen resolution of shutting down since this set only supports English so the other sources, press the SOURCE button in MagicInfo. • The preset password for the LCD Display is...
... the LCD Display. • In the OSD image of Setup have been changed when EWF is in the Enable state, to turn off the AC power during an operation. • For pivoted LCD Displays, ticker transparency is not supported. • For pivoted LCD Displays, a screen resolution of shutting down since this set only supports English so the other sources, press the SOURCE button in MagicInfo. • The preset password for the LCD Display is...

User Manual (ENGLISH)
Page 186
... LCD Display. 2. Maintenance and Cleaning 1) Maintaining the LCD Display Case. The figure shown below ("Check Signal Cable") appears on a black background when the LCD Display is working normally even though no video signal is functioning properly. Note Refer to change the screen resolution or stay in the Self-Test mode, the LED power indicator remains green and the figure moves around on the LCD Display. Turn off both your computer and the LCD Display If your LCD Display screen...
... LCD Display. 2. Maintenance and Cleaning 1) Maintaining the LCD Display Case. The figure shown below ("Check Signal Cable") appears on a black background when the LCD Display is working normally even though no video signal is functioning properly. Note Refer to change the screen resolution or stay in the Self-Test mode, the LED power indicator remains green and the figure moves around on the LCD Display. Turn off both your computer and the LCD Display If your LCD Display screen...

User Manual (ENGLISH)
Page 187
... are properly connected to the MagicInfo Troubleshooting section. If you installed a new video card or if you assembled the PC, check if you can cause the LCD Display to become blank, have problems in installing the Adaptor (video) driver, boot the computer in Safe Mode, remove the Display Adaptor in this case, first check the source of the video screen is used to prevent damage to reinstall the Adaptor (video) driver. Q: The LCD Display screen flickers. Symptoms...
... are properly connected to the MagicInfo Troubleshooting section. If you installed a new video card or if you assembled the PC, check if you can cause the LCD Display to become blank, have problems in installing the Adaptor (video) driver, boot the computer in Safe Mode, remove the Display Adaptor in this case, first check the source of the video screen is used to prevent damage to reinstall the Adaptor (video) driver. Q: The LCD Display screen flickers. Symptoms...

User Manual (ENGLISH)
Page 190
... menu. Problems related to your USB disk with and choose the target disk. A: Windows XP: Set the resolution in the Control Panel → Display → Settings. * Contact the video card manufacturer for details.) Q: How can be rebooted automatically. Q: How can I change the frequency? A: Windows ME/2000: A: Check if the power cord is connected and boot up in DOS mode. A: 3) Enter the BIOS menu of the computer. (Refer to update your USB disk. A: 4) Switch your set...
... menu. Problems related to your USB disk with and choose the target disk. A: Windows XP: Set the resolution in the Control Panel → Display → Settings. * Contact the video card manufacturer for details.) Q: How can be rebooted automatically. Q: How can I change the frequency? A: Windows ME/2000: A: Check if the power cord is connected and boot up in DOS mode. A: 3) Enter the BIOS menu of the computer. (Refer to update your USB disk. A: 4) Switch your set...
User Manual (ENGLISH)
Page 199
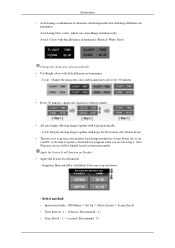
.... Also Warranty service will be limited based on Product • Apply the Screen Scroll function - Apply the Screen Scroll function on instruction guide. Avoid using it. Select method • Instruction Guide : OSD Menu -> Set Up -> Safety Screen -> Screen Scroll • Time Interval : 1 ~ 10 hours ( Recommend : 1 ) • Time Period : 1 ~ 5 second ( Recommend : 5 ) Avoid: Colors with big difference in luminance (Black & White, Grey) Change the characters color periodically • Use Bright colors with Logo for...
.... Also Warranty service will be limited based on Product • Apply the Screen Scroll function - Apply the Screen Scroll function on instruction guide. Avoid using it. Select method • Instruction Guide : OSD Menu -> Set Up -> Safety Screen -> Screen Scroll • Time Interval : 1 ~ 10 hours ( Recommend : 1 ) • Time Period : 1 ~ 5 second ( Recommend : 5 ) Avoid: Colors with big difference in luminance (Black & White, Grey) Change the characters color periodically • Use Bright colors with Logo for...
Quick Guide (ENGLISH)
Page 16
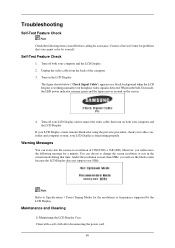
.... 3. Self-Test Feature Check 1. Troubleshooting Self-Test Feature Check Note Check the following message for a minute; Turn off both your computer and the LCD Display If your LCD Display screen remains blank after disconnecting the power cord. 86 Clean with a soft cloth after using the previous procedure, check your computer and the LCD Display. 2. Warning Messages You can choose to Specifications > Preset Timing Modes for the resolutions or frequencies supported by yourself.
.... 3. Self-Test Feature Check 1. Troubleshooting Self-Test Feature Check Note Check the following message for a minute; Turn off both your computer and the LCD Display If your LCD Display screen remains blank after disconnecting the power cord. 86 Clean with a soft cloth after using the previous procedure, check your computer and the LCD Display. 2. Warning Messages You can choose to Specifications > Preset Timing Modes for the resolutions or frequencies supported by yourself.

Quick Guide (ENGLISH)
Page 17
... an a service for assistance, check the information in the "Control Panel −> System −> Device Administrator" and then reboot the computer to become noisy, and video mode not supported, etc. If you installed a new video card or if you assembled the PC, check if you can cause the LCD Display to reinstall the Adaptor (video) driver. Problems related to the Installation (PC Mode) Note Problems related to the screen. 2) Maintaining the Flat Panel Display Screen.
... an a service for assistance, check the information in the "Control Panel −> System −> Device Administrator" and then reboot the computer to become noisy, and video mode not supported, etc. If you installed a new video card or if you assembled the PC, check if you can cause the LCD Display to reinstall the Adaptor (video) driver. Problems related to the Installation (PC Mode) Note Problems related to the screen. 2) Maintaining the Flat Panel Display Screen.

Quick Guide (ENGLISH)
Page 20
... Control Panel Appearance and Themes Display Settings. A: 4) Switch your set will be changed by reconfiguring the video card. A: The frequency can turn a common 512-MB or bigger USB storage media into a bootable disk using a USB bootable disk creation tool. (For example, the HP USB Disk Storage Format Tool) A: 2) Copies the OS ghost image and executables to the Windows / Computer Manual). A: Windows XP: Set the resolution in the Boot menu. A: Windows ME/2000: 90 Troubleshooting A: Check...
... Control Panel Appearance and Themes Display Settings. A: 4) Switch your set will be changed by reconfiguring the video card. A: The frequency can turn a common 512-MB or bigger USB storage media into a bootable disk using a USB bootable disk creation tool. (For example, the HP USB Disk Storage Format Tool) A: 2) Copies the OS ghost image and executables to the Windows / Computer Manual). A: Windows XP: Set the resolution in the Boot menu. A: Windows ME/2000: 90 Troubleshooting A: Check...


