User Manual
Page 1
SyncMaster 320TSn-3 LCD Display User Manual The color and the appearance may differ depending on the product, and the specifications are subject to change without prior notice to improve the performance.
SyncMaster 320TSn-3 LCD Display User Manual The color and the appearance may differ depending on the product, and the specifications are subject to change without prior notice to improve the performance.
User Manual
Page 10
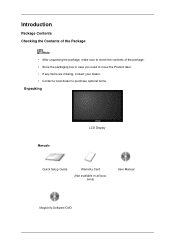
Introduction Package Contents Checking the Contents of the Package Note • After unpacking the package, make sure to check the contents of the package. • Store the packaging box in case you need to move the Product later. • If any items are missing, contact your dealer. • Contact a local dealer to purchase optional items. Unpacking Manuals LCD Display Quick Setup Guide Warranty Card (Not available in all locations) User Manual MagicInfo Software DVD
Introduction Package Contents Checking the Contents of the Package Note • After unpacking the package, make sure to check the contents of the package. • Store the packaging box in case you need to move the Product later. • If any items are missing, contact your dealer. • Contact a local dealer to purchase optional items. Unpacking Manuals LCD Display Quick Setup Guide Warranty Card (Not available in all locations) User Manual MagicInfo Software DVD

User Manual
Page 13
...product a network box specified by blinking green Note See PowerSaver described in the manual for further information regarding power saving functions. Note See the "Connections" section for turning the LCD Display on the product. Remote Control Sensor Aim the remote control towards this button... for details about cable connections. D.MENU button Opens the on-screen D.MENU. Power indicator Shows PowerSaver mode by Samsung and connect the MagicInfo output...
...product a network box specified by blinking green Note See PowerSaver described in the manual for further information regarding power saving functions. Note See the "Connections" section for turning the LCD Display on the product. Remote Control Sensor Aim the remote control towards this button... for details about cable connections. D.MENU button Opens the on-screen D.MENU. Power indicator Shows PowerSaver mode by Samsung and connect the MagicInfo output...
User Manual
Page 17
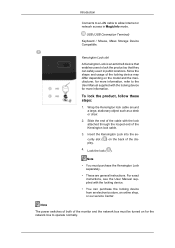
...in public locations. To lock the product, follow these steps: 1. Lock the lock ( ). For exact instructions, see the User Manual supplied with the locking device. • You can safely use it in MagicInfo mode. Slide the end of the cable with ... slot ( ) on the back of the locking device may differ depending on for the network box to the User Manual supplied with the lock attached through the looped end of the monitor and the network box must purchase the Kensington Lock separately... store, an online shop, or our service Center. Since the shape and usage of the display. 4.
...in public locations. To lock the product, follow these steps: 1. Lock the lock ( ). For exact instructions, see the User Manual supplied with the locking device. • You can safely use it in MagicInfo mode. Slide the end of the cable with ... slot ( ) on the back of the locking device may differ depending on for the network box to the User Manual supplied with the lock attached through the looped end of the monitor and the network box must purchase the Kensington Lock separately... store, an online shop, or our service Center. Since the shape and usage of the display. 4.
User Manual
Page 19
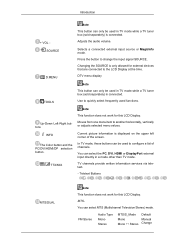
...these buttons can be used functions. MTS- Press the button to configure a list of the screen. Changing the SOURCE is connected. Use to the LCD Display at the time. TV channels provide written information services via teletext. - Moves from one menu item to another horizontally, vertically or adjusts selected menu... the upper left corner of channels. FM Stereo Audio Type Mono Stereo MTS/S_Mode Mono Mono Stereo Default Manual Change DTV menu display Note This button can select the PC, DVI, HDMI or DisplayPort external input directly in TV mode while a TV tuner box (sold ...
...these buttons can be used functions. MTS- Press the button to configure a list of the screen. Changing the SOURCE is connected. Use to the LCD Display at the time. TV channels provide written information services via teletext. - Moves from one menu item to another horizontally, vertically or adjusts selected menu... the upper left corner of channels. FM Stereo Audio Type Mono Stereo MTS/S_Mode Mono Mono Stereo Default Manual Change DTV menu display Note This button can select the PC, DVI, HDMI or DisplayPort external input directly in TV mode while a TV tuner box (sold ...
User Manual
Page 42
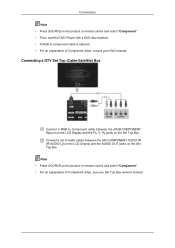
...SOURCE on the product or remote control and select "Component". • For an explanation of audio cables between the [RGB/COMPONENT IN] port on the LCD Display and the PR, Y, PB jacks on the Set Top Box. Connecting a DTV Set Top (Cable/Satellite) Box Connect a RGB to component cable is... optional. • For an explanation of Component video, consult your Set Top Box owner's manual. Connections Note • Press SOURCE on the product or remote control and select "Component". • Then, start the DVD Player with a DVD disc ...
...SOURCE on the product or remote control and select "Component". • For an explanation of audio cables between the [RGB/COMPONENT IN] port on the LCD Display and the PR, Y, PB jacks on the Set Top Box. Connecting a DTV Set Top (Cable/Satellite) Box Connect a RGB to component cable is... optional. • For an explanation of Component video, consult your Set Top Box owner's manual. Connections Note • Press SOURCE on the product or remote control and select "Component". • Then, start the DVD Player with a DVD disc ...
User Manual
Page 46
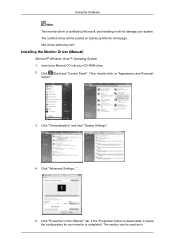
...® Windows Vista™, Operating System 1. Click (Start) and "Control Panel". Click "Personalization" and then "Display Settings". 4. The certified driver will not damage your system. Then, double-click on Samsung Monitor homepage. Insert your Manual CD into your CD-ROM drive. 2. Click "Properties" in the "Monitor" tab. The monitor can be posted on "Appearance...
...® Windows Vista™, Operating System 1. Click (Start) and "Control Panel". Click "Personalization" and then "Display Settings". 4. The certified driver will not damage your system. Then, double-click on Samsung Monitor homepage. Insert your Manual CD into your CD-ROM drive. 2. Click "Properties" in the "Monitor" tab. The monitor can be posted on "Appearance...
User Manual
Page 69
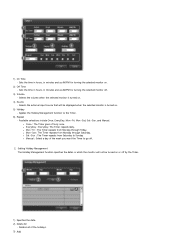
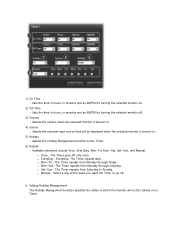
1) On Time - z Once : The Timer goes off . 2. z Sat~Sun : The Timer repeats from Saturday to Sunday z Manual : Select a day of the holidays. 3) Add Sets the time in hours, in minutes and as AM/PM for turning the selected monitor on or off . 3)... the monitor will be turned on . 2) Off Time - Available selections include Once, EveryDay, Mon~Fri, Mon~Sat, Sat~Sun, and Manual. Selects the external input source that will not be displayed when the selected monitor is turned on . 5) Holiday - Setting Holiday Management The Holiday Management function specifies the dates in minutes and...
1) On Time - z Once : The Timer goes off . 2. z Sat~Sun : The Timer repeats from Saturday to Sunday z Manual : Select a day of the holidays. 3) Add Sets the time in hours, in minutes and as AM/PM for turning the selected monitor on or off . 3)... the monitor will be turned on . 2) Off Time - Available selections include Once, EveryDay, Mon~Fri, Mon~Sat, Sat~Sun, and Manual. Selects the external input source that will not be displayed when the selected monitor is turned on . 5) Holiday - Setting Holiday Management The Holiday Management function specifies the dates in minutes and...

User Manual
Page 76
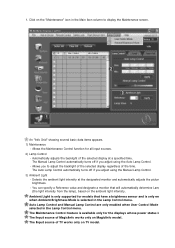
... Lamp Control and Manual Lamp Control are only enabled when User Control Mode is ON. The Input source of TV works only on the "Maintenance" icon in the Main Icon column to adjust the backlight of the selected display regardless of the selected display at the designated ... from the lamp), based on MagicInfo model. Ambient Light is available only for all input sources. 2) Lamp Control - Allows you adjust using the Manual Lamp Control. 3) Ambient Light - Maintenance Lamp Control 1. An "Info Grid" showing several basic data items appears. 1) Maintenance - The Auto Lamp...
... Lamp Control and Manual Lamp Control are only enabled when User Control Mode is ON. The Input source of TV works only on the "Maintenance" icon in the Main Icon column to adjust the backlight of the selected display regardless of the selected display at the designated ... from the lamp), based on MagicInfo model. Ambient Light is available only for all input sources. 2) Lamp Control - Allows you adjust using the Manual Lamp Control. 3) Ambient Light - Maintenance Lamp Control 1. An "Info Grid" showing several basic data items appears. 1) Maintenance - The Auto Lamp...

User Manual
Page 87
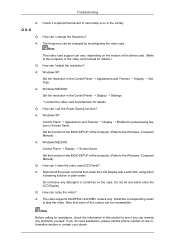
Selects displays you want to adjust using the Select All button or checkboxes. • TV Mode or refresh or delete selected devices. 2) The IP Address, ID (Ethernet or Serial), Mac Address and connection status of the connected monito 3) It can automatically check whether DHCP IP is set and then set the IP address. 4) It can automatically or manually set and then apply the IP Address, Subnet and Gateway of the sele Input Source 1) Click Input Source of the main icons and the Input Source control screen appears. 1) Select or clear all the added devices;
Selects displays you want to adjust using the Select All button or checkboxes. • TV Mode or refresh or delete selected devices. 2) The IP Address, ID (Ethernet or Serial), Mac Address and connection status of the connected monito 3) It can automatically check whether DHCP IP is set and then set the IP address. 4) It can automatically or manually set and then apply the IP Address, Subnet and Gateway of the sele Input Source 1) Click Input Source of the main icons and the Input Source control screen appears. 1) Select or clear all the added devices;
User Manual
Page 94
...and as AM/PM for turning the selected monitor on . 5) Holiday - Available selections include Once, EveryDay, Mon~Fri, Mon~Sat, Sat~Sun, and Manual. z Sat~Sun : The Timer repeats from Monday through Friday. z Once : The Timer goes off . 2. z Mon~Sat : The Timer repeats from... Saturday to Sunday. Selects the external input source that will not be displayed when the selected monitor is turned on or o Timer. z EveryDay : EveryDay: The Timer repeats daily. z Manual : Select a day of the week you want the Timer to the Timer. 6) Repeat - Applies...
...and as AM/PM for turning the selected monitor on . 5) Holiday - Available selections include Once, EveryDay, Mon~Fri, Mon~Sat, Sat~Sun, and Manual. z Sat~Sun : The Timer repeats from Monday through Friday. z Once : The Timer goes off . 2. z Mon~Sat : The Timer repeats from... Saturday to Sunday. Selects the external input source that will not be displayed when the selected monitor is turned on or o Timer. z EveryDay : EveryDay: The Timer repeats daily. z Manual : Select a day of the week you want the Timer to the Timer. 6) Repeat - Applies...
User Manual
Page 104
...Ambient Brightness Mode is The Input source of the selected display at the designated monitor and automatically adjusts the picture brightness. - Detects the ambient light intensity at a specified time. Auto Lamp Control and Manual Lamp Control are only enabled when User Control Mode selected... in the Lamp Control menu. 1. Allows the Maintenance Control function for the displays whose power status is selected in the Lamp Control menu. Click ...
...Ambient Brightness Mode is The Input source of the selected display at the designated monitor and automatically adjusts the picture brightness. - Detects the ambient light intensity at a specified time. Auto Lamp Control and Manual Lamp Control are only enabled when User Control Mode selected... in the Lamp Control menu. 1. Allows the Maintenance Control function for the displays whose power status is selected in the Lamp Control menu. Click ...

User Manual
Page 109
...\ENG\BN59-01122D-02\BN59-01122D-02\manual... 2011-06-17 Selected one display (ID1) and add another display (ID3): The program, which was displaying the se value of ID 1, fetches and displays the value of ID3. 4. Settings Value Display In Multiple Display Mode When there are more than one displays connected, the settings values are selected at...
...\ENG\BN59-01122D-02\BN59-01122D-02\manual... 2011-06-17 Selected one display (ID1) and add another display (ID3): The program, which was displaying the se value of ID 1, fetches and displays the value of ID3. 4. Settings Value Display In Multiple Display Mode When there are more than one displays connected, the settings values are selected at...

User Manual
Page 132
Note • Only enabled when the clock is set the LCD display to select a day of the week. Clock Set Adjusting the LCD Display Current Time Setting. Sleep Timer Turns the LCD Display off at certain times. 1. Off 2. 30 3. 60 4. 90 5. 120 6. 150 7. 180 Timer1 / Timer2 / Timer3 You can set using the Clock Set menu. • The Manual option allows you to automatically turn on or off automatically at a specified time.
Note • Only enabled when the clock is set the LCD display to select a day of the week. Clock Set Adjusting the LCD Display Current Time Setting. Sleep Timer Turns the LCD Display off at certain times. 1. Off 2. 30 3. 60 4. 90 5. 120 6. 150 7. 180 Timer1 / Timer2 / Timer3 You can set using the Clock Set menu. • The Manual option allows you to automatically turn on or off automatically at a specified time.

User Manual
Page 142
... is set to use the product at temperatures 75 - 80°C (based on ambient temperature of 0 and 100. Adjusting the LCD Display Fan & Temperature Protects the product by default. Temperature Control Detects the product's internal temperature and specifies the desired temperature. Fan Control Selects ...auto or manual for the fan speed settings. • Auto • Manual Fan Speed Setting Sets the fan speed within a range of 40°C). Note Enabled when Fan Control ...
... is set to use the product at temperatures 75 - 80°C (based on ambient temperature of 0 and 100. Adjusting the LCD Display Fan & Temperature Protects the product by default. Temperature Control Detects the product's internal temperature and specifies the desired temperature. Fan Control Selects ...auto or manual for the fan speed settings. • Auto • Manual Fan Speed Setting Sets the fan speed within a range of 40°C). Note Enabled when Fan Control ...
User Manual
Page 148
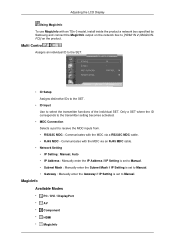
...• Component • HDMI • MagicInfo Adjusting the LCD Display Using MagicInfo To use MagicInfo with an TSn-3 model, install inside the product a network box specified by Samsung and connect the MagicInfo output on the network box to Manual. Communicates with the MDC via an RJ45 MDC cable. ...• Network Setting • IP Setting : Manual, Auto • IP Address : Manually enter the IP Address if IP Setting...
...• Component • HDMI • MagicInfo Adjusting the LCD Display Using MagicInfo To use MagicInfo with an TSn-3 model, install inside the product a network box specified by Samsung and connect the MagicInfo output on the network box to Manual. Communicates with the MDC via an RJ45 MDC cable. ...• Network Setting • IP Setting : Manual, Auto • IP Address : Manually enter the IP Address if IP Setting...
User Manual
Page 157
... some of the driver used. (Refer to the Windows / Computer Manual). A: Windows XP: Set the resolution in the Control Panel Display Settings. * Contact the video card manufacturer for details. Q: How can I clean the outer case/LCD Panel? A: The video supports the MPEG1 and WMV codecs only. A: ...on in the BIOS-SETUP of the computer. (Refer to the computer or the video card manual for assistance, check the information in Screen Saver. A: Windows ME/2000: Control Panel Display Screen Saver. Q: How can remedy any problems yourself. If you can I change the frequency?...
... some of the driver used. (Refer to the Windows / Computer Manual). A: Windows XP: Set the resolution in the Control Panel Display Settings. * Contact the video card manufacturer for details. Q: How can I clean the outer case/LCD Panel? A: The video supports the MPEG1 and WMV codecs only. A: ...on in the BIOS-SETUP of the computer. (Refer to the computer or the video card manual for assistance, check the information in Screen Saver. A: Windows ME/2000: Control Panel Display Screen Saver. Q: How can remedy any problems yourself. If you can I change the frequency?...

User Manual
Page 160
... from home for many hours. State Power Indicator Power Consumption (Typical) Specifications Normal Op- However, if the signal differs, the screen may be adjusted automatically. Display Mode IBM, 640 x 350 IBM, 640 x 480 IBM, 720 x 400 MAC, 640 x 480 MAC, 832 x 624 MAC, 1152 x 870 VESA, 640 x 480 VESA, 640 x 480... +/+ 75.000 60.000 162.000 +/+ 67.500 60.000 148.500 +/+ Be sure to disconnect the power if you intend to the video card manual and adjusts the screen as the following Preset Timing Modes, the screen will be different from the computer is on the back.
... from home for many hours. State Power Indicator Power Consumption (Typical) Specifications Normal Op- However, if the signal differs, the screen may be adjusted automatically. Display Mode IBM, 640 x 350 IBM, 640 x 480 IBM, 720 x 400 MAC, 640 x 480 MAC, 832 x 624 MAC, 1152 x 870 VESA, 640 x 480 VESA, 640 x 480... +/+ 75.000 60.000 162.000 +/+ 67.500 60.000 148.500 +/+ Be sure to disconnect the power if you intend to the video card manual and adjusts the screen as the following Preset Timing Modes, the screen will be different from the computer is on the back.
User Manual
Page 170
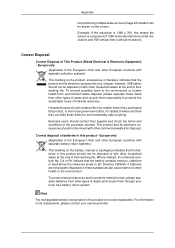
Note The rechargeable battery incorporated in EC Directive 2006/66. Correct Disposal Correct Disposal of the purchase contract. For information on the battery, manual or packaging indicates that the battery contains mercury, cadmium or lead above the reference levels in this means the screen is not user replaceable. Example: ...
Note The rechargeable battery incorporated in EC Directive 2006/66. Correct Disposal Correct Disposal of the purchase contract. For information on the battery, manual or packaging indicates that the battery contains mercury, cadmium or lead above the reference levels in this means the screen is not user replaceable. Example: ...

