
User Manual
Page 13
...-3 model, install inside the product a network box specified by blinking green Note See PowerSaver described in the manual for long periods. Power button [ ] Use this spot on the model. Remote Control Sensor Aim the remote control towards this button for details about cable connections. PIP button Push the PIP button to [HDMI IN 2 (MAGICINFO)] on and off. For energy conservation, turn the PIP screen On / Off. The LCD Display's configuration at the back may display abnormally if the connected external input signal is not needed...
...-3 model, install inside the product a network box specified by blinking green Note See PowerSaver described in the manual for long periods. Power button [ ] Use this spot on the model. Remote Control Sensor Aim the remote control towards this button for details about cable connections. PIP button Push the PIP button to [HDMI IN 2 (MAGICINFO)] on and off. For energy conservation, turn the PIP screen On / Off. The LCD Display's configuration at the back may display abnormally if the connected external input signal is not needed...

User Manual
Page 14
... COMPONENT port on the external device using the RGB to COMPONENT cable. • Connect the [RGB/COMPONENT IN] port on the monitor to the DVI port on the PC using a stereo cable (sold separately). DVI IN (PC Video Connection Terminal) Connect the [DVI IN] port on the monitor to the BNC port on the PC using the DVI cable. DP IN POWER The power cord plugs into the LCD Display and the wall outlet. Introduction POWER S/W ON [ ] / OFF Switches the LCD Display...
... COMPONENT port on the external device using the RGB to COMPONENT cable. • Connect the [RGB/COMPONENT IN] port on the monitor to the DVI port on the PC using a stereo cable (sold separately). DVI IN (PC Video Connection Terminal) Connect the [DVI IN] port on the monitor to the BNC port on the PC using the DVI cable. DP IN POWER The power cord plugs into the LCD Display and the wall outlet. Introduction POWER S/W ON [ ] / OFF Switches the LCD Display...
User Manual
Page 20
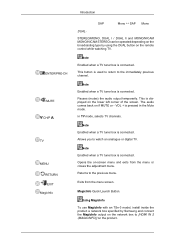
... - VOL + is displayed on the remote control while watching TV. Exits from the menu or closes the adjustment menu. Using MagicInfo To use MagicInfo with an TSn-3 model, install inside the product a network box specified by using the DUAL button on the lower left corner of the screen. Pauses (mutes) the audio output temporarily. The audio comes back on the product. In TV mode, selects TV channels. MagicInfo Quick Launch Button. ENTER/PRE...
... - VOL + is displayed on the remote control while watching TV. Exits from the menu or closes the adjustment menu. Using MagicInfo To use MagicInfo with an TSn-3 model, install inside the product a network box specified by using the DUAL button on the lower left corner of the screen. Pauses (mutes) the audio output temporarily. The audio comes back on the product. In TV mode, selects TV channels. MagicInfo Quick Launch Button. ENTER/PRE...

User Manual
Page 38
... the LCD Display. To obtain normal picture and audio from the PC, HDMI2 or HDMI1 must be connected to the LCD Display. Connect the power cord for your computer can be selected before PC is selected, be sure to establish the connection using the HDMI cable. Note Contact a local SAMSUNG Electronics Service Center to buy optional items. Connecting to Other devices Note • AV input devices such as DVD players...
... the LCD Display. To obtain normal picture and audio from the PC, HDMI2 or HDMI1 must be connected to the LCD Display. Connect the power cord for your computer can be selected before PC is selected, be sure to establish the connection using the HDMI cable. Note Contact a local SAMSUNG Electronics Service Center to buy optional items. Connecting to Other devices Note • AV input devices such as DVD players...
User Manual
Page 42
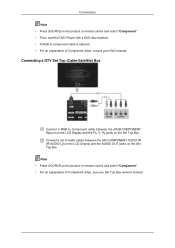
Connecting a DTV Set Top (Cable/Satellite) Box Connect a RGB to component cable is optional. • For an explanation of Component video, consult your Set Top Box owner's manual. Connect a set of Component video, see your DVD manual. Note • Press SOURCE on the product or remote control and select "Component". • For an explanation of audio cables between the [RGB/COMPONENT IN] port on the LCD Display and the PR, Y, PB jacks on the Set Top Box. Connections Note • Press SOURCE on the...
Connecting a DTV Set Top (Cable/Satellite) Box Connect a RGB to component cable is optional. • For an explanation of Component video, consult your Set Top Box owner's manual. Connect a set of Component video, see your DVD manual. Note • Press SOURCE on the product or remote control and select "Component". • For an explanation of audio cables between the [RGB/COMPONENT IN] port on the LCD Display and the PR, Y, PB jacks on the Set Top Box. Connections Note • Press SOURCE on the...
User Manual
Page 45
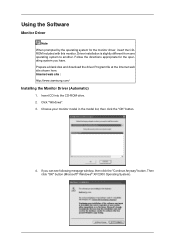
... for the monitor driver, insert the CDROM included with this monitor. Internet web site : http://www.samsung.com/ Installing the Monitor Driver (Automatic) 1. If you have. Prepare a blank disk and download the driver Program file at the Internet web site shown here. Then click "OK" button (Microsoft® Windows® XP/2000 Operating System). Driver installation is slightly different from one operating system to another. Using the Software Monitor Driver Note...
... for the monitor driver, insert the CDROM included with this monitor. Internet web site : http://www.samsung.com/ Installing the Monitor Driver (Automatic) 1. If you have. Prepare a blank disk and download the driver Program file at the Internet web site shown here. Then click "OK" button (Microsoft® Windows® XP/2000 Operating System). Driver installation is slightly different from one operating system to another. Using the Software Monitor Driver Note...
User Manual
Page 46
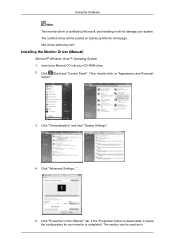
... then "Display Settings". 4. http://www.samsung.com/ Installing the Monitor Driver (Manual) Microsoft® Windows Vista™, Operating System 1. Click "Properties" in the "Monitor" tab. The monitor can be used as is deactivated, it will be posted on "Appearance and Personal- The certified driver will not damage your CD-ROM drive. 2. Then, double-click on Samsung Monitor homepage. Click (Start) and "Control Panel". Insert your Manual CD...
... then "Display Settings". 4. http://www.samsung.com/ Installing the Monitor Driver (Manual) Microsoft® Windows Vista™, Operating System 1. Click "Properties" in the "Monitor" tab. The monitor can be used as is deactivated, it will be posted on "Appearance and Personal- The certified driver will not damage your CD-ROM drive. 2. Then, double-click on Samsung Monitor homepage. Click (Start) and "Control Panel". Insert your Manual CD...
User Manual
Page 49
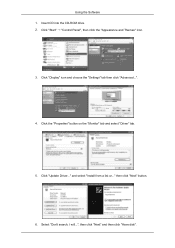
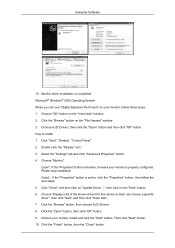
Insert CD into the CD-ROM drive. 2. Click "Update Driver..." and select "Install from a list or..." Select "Don't search, I will...", then click "Next" and then click "Have disk". Using the Software 1. Click "Start" "Control Panel", then click the "Appearance and Themes" icon. 3. Click "Display" icon and choose the "Settings" tab then click "Advanced...". 4. then click "Next" button. 6. Click the "Properties" button on the "Monitor" tab and select "Driver" tab. 5.
Insert CD into the CD-ROM drive. 2. Click "Update Driver..." and select "Install from a list or..." Select "Don't search, I will...", then click "Next" and then click "Have disk". Using the Software 1. Click "Start" "Control Panel", then click the "Appearance and Themes" icon. 3. Click "Display" icon and choose the "Settings" tab then click "Advanced...". 4. then click "Next" button. 6. Click the "Properties" button on the "Monitor" tab and select "Driver" tab. 5.
User Manual
Page 51
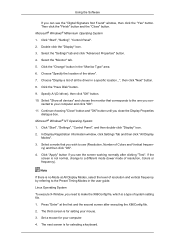
... "Next" button. 10. Click "Start", "Setting", "Control Panel". 2. Choose your monitor, follow the next steps. 5. Microsoft® Windows® 2000 Operating System When you can choose a specific driver", then click "Next" and then click "Have disk". 7. Click "Driver" and then click on "Update Driver...", then click on the "File Needed" window. 3. Choose "OK" button on your monitor model and click the "Next" button. How to install 1. Case1...
... "Next" button. 10. Click "Start", "Setting", "Control Panel". 2. Choose your monitor, follow the next steps. 5. Microsoft® Windows® 2000 Operating System When you can choose a specific driver", then click "Next" and then click "Have disk". 7. Click "Driver" and then click on "Update Driver...", then click on the "File Needed" window. 3. Choose "OK" button on your monitor model and click the "Next" button. How to install 1. Case1...
User Manual
Page 52
... mode (lower mode of resolution, Colors or frequency). The next screen is not normal, change to your computer. 4. Select the "Monitor" tab. 5. Choose "Display a list of all devices" and choose the monitor that you wish to use (Resolution, Number of resolution and vertical frequency by referring to make the X86Config file, which is a type of the driver". 7. Continue choosing "Close" button and "OK" button until you close the Display Properties dialogue box. Set...
... mode (lower mode of resolution, Colors or frequency). The next screen is not normal, change to your computer. 4. Select the "Monitor" tab. 5. Choose "Display a list of all devices" and choose the monitor that you wish to use (Resolution, Number of resolution and vertical frequency by referring to make the X86Config file, which is a type of the driver". 7. Continue choosing "Close" button and "OK" button until you close the Display Properties dialogue box. Set...
User Manual
Page 59
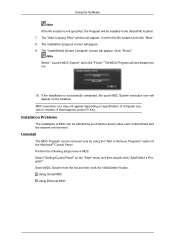
... the network environment. Using Serial MDC Using Ethernet MDC Select "Setting/Control Panel" on specification of MDC can be affected by using the "Add or Remove Programs" option of the Windows® Control Panel. Note Select " Launch MDC System" and click "Finish." The installation progress screen will appear. Select MDC System from the list and then click the "Add/Delete" button. The MDC Program will appear. Installation Problems The installation of...
... the network environment. Using Serial MDC Using Ethernet MDC Select "Setting/Control Panel" on specification of MDC can be affected by using the "Add or Remove Programs" option of the Windows® Control Panel. Note Select " Launch MDC System" and click "Finish." The installation progress screen will appear. Select MDC System from the list and then click the "Add/Delete" button. The MDC Program will appear. Installation Problems The installation of...

User Manual
Page 73
... switch to adjust settings is displayed. Adjusts Brightness for NTSC. 5) Green - The Input source of TV works only on the product. Settings Picture PC 1. Available only for the selected display. 4) Red - Adjusts the Dynamic Contrast for the displays whose power status is ON and if no selection is made, the factory default is displayed. Basic information required to custom mode. 1) Picture PC - Adjusts blue Color of the selected display. 3) Brightness - HDMI2 may not be supported...
... switch to adjust settings is displayed. Adjusts Brightness for NTSC. 5) Green - The Input source of TV works only on the product. Settings Picture PC 1. Available only for the selected display. 4) Red - Adjusts the Dynamic Contrast for the displays whose power status is ON and if no selection is made, the factory default is displayed. Basic information required to custom mode. 1) Picture PC - Adjusts blue Color of the selected display. 3) Brightness - HDMI2 may not be supported...
User Manual
Page 79
... function properly when you wish to control does not appear on TV model. The screen can change the layout of TV works only on the other displays connected have the same ID, those displays are not properly detected by pressing a number in System Info Grid) - z Select a mode from Screen divider. The Input source of screens using the Display menu). 2. The Maintenance Control function is available only for Vertical...
... function properly when you wish to control does not appear on TV model. The screen can change the layout of TV works only on the other displays connected have the same ID, those displays are not properly detected by pressing a number in System Info Grid) - z Select a mode from Screen divider. The Input source of screens using the Display menu). 2. The Maintenance Control function is available only for Vertical...

User Manual
Page 99
... is displayed in this screen, t mode will automatically switch to Off. The Input source of the selected display. 5) Color - Available only for the selected display. 8) Color Temp - Setting Picture PC 1. Basic information required to adjust the Picture is set to custom mode. 1) Picture - Settings for the displays whose power status is ON and if no selectio made, the factory default is changed in the main menu. Adjusts Sharpness of TV works only on the product. Adjusts the Color...
... is displayed in this screen, t mode will automatically switch to Off. The Input source of the selected display. 5) Color - Available only for the selected display. 8) Color Temp - Setting Picture PC 1. Basic information required to adjust the Picture is set to custom mode. 1) Picture - Settings for the displays whose power status is ON and if no selectio made, the factory default is changed in the main menu. Adjusts Sharpness of TV works only on the product. Adjusts the Color...
User Manual
Page 122
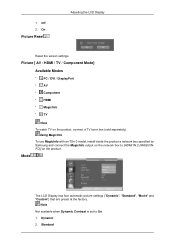
... LCD Display has four automatic picture settings ("Dynamic", "Standard", "Movie" and "Custom") that are preset at the factory. Standard Picture [ AV / HDMI / TV / Component Mode] Available Modes • PC / DVI / DisplayPort • AV • Component • HDMI • MagicInfo • TV Mode Note To watch TV on the network box to On. 1. Using MagicInfo To use MagicInfo with an TSn-3 model, install inside the product a network box specified by Samsung and connect the...
... LCD Display has four automatic picture settings ("Dynamic", "Standard", "Movie" and "Custom") that are preset at the factory. Standard Picture [ AV / HDMI / TV / Component Mode] Available Modes • PC / DVI / DisplayPort • AV • Component • HDMI • MagicInfo • TV Mode Note To watch TV on the network box to On. 1. Using MagicInfo To use MagicInfo with an TSn-3 model, install inside the product a network box specified by Samsung and connect the...
User Manual
Page 147
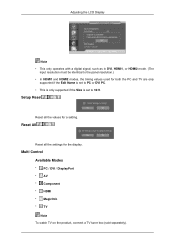
... product, connect a TV tuner box (sold separately). Reset All Reset all the values for a setting. Setup Reset Reset all the settings for both the PC and TV are only supported if the Edit Name is set to PC or DVI PC. • This is only supported if the Size is set to the panel resolution.) • In HDMI1 and HDMI2 modes, the timing values used for the display. Adjusting the LCD Display Note •...
... product, connect a TV tuner box (sold separately). Reset All Reset all the values for a setting. Setup Reset Reset all the settings for both the PC and TV are only supported if the Edit Name is set to PC or DVI PC. • This is only supported if the Size is set to the panel resolution.) • In HDMI1 and HDMI2 modes, the timing values used for the display. Adjusting the LCD Display Note •...
User Manual
Page 149
... Network mode. • When using MagicInfo with an TSn-3 model, install inside the product a network box specified by an USB device (ex: video display). pletely shut off the AC power during an operation. • For pivoted LCD Displays, ticker transparency is not supported. • For pivoted LCD Displays, a screen resolution of shutting down since this may stop . • To access other sources, press the SOURCE button in MagicInfo. • The preset password for the LCD Display...
... Network mode. • When using MagicInfo with an TSn-3 model, install inside the product a network box specified by an USB device (ex: video display). pletely shut off the AC power during an operation. • For pivoted LCD Displays, ticker transparency is not supported. • For pivoted LCD Displays, a screen resolution of shutting down since this may stop . • To access other sources, press the SOURCE button in MagicInfo. • The preset password for the LCD Display...
User Manual
Page 153
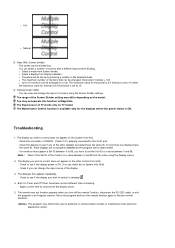
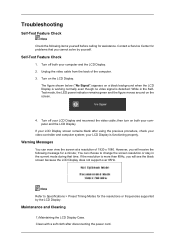
... a black background when the LCD Display is working normally even though no video signal is detected: While in the current mode during that you cannot solve by the LCD Display. Turn off both your computer and the LCD Display If your LCD Display screen remains blank after disconnecting the power cord. your video controller and computer system; Note Refer to change the screen resolution or stay in the SelfTest mode, the LED power indicator remains green...
... a black background when the LCD Display is working normally even though no video signal is detected: While in the current mode during that you cannot solve by the LCD Display. Turn off both your computer and the LCD Display If your LCD Display screen remains blank after disconnecting the power cord. your video controller and computer system; Note Refer to change the screen resolution or stay in the SelfTest mode, the LED power indicator remains green...
User Manual
Page 154
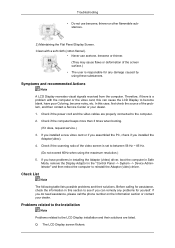
... video card or if you assembled the PC, check if you have poor Coloring, become blank, have problems in installing the Adaptor (video) driver, boot the computer in Safe Mode, remove the Display Adaptor in this can remedy any damage caused by using the maximum resolution.) 5. Q: The LCD Display screen flickers. Check List Note The following table lists possible problems and their solutions are properly connected to reinstall the Adaptor (video) driver...
... video card or if you assembled the PC, check if you have poor Coloring, become blank, have problems in installing the Adaptor (video) driver, boot the computer in Safe Mode, remove the Display Adaptor in this can remedy any damage caused by using the maximum resolution.) 5. Q: The LCD Display screen flickers. Check List Note The following table lists possible problems and their solutions are properly connected to reinstall the Adaptor (video) driver...
User Manual
Page 159
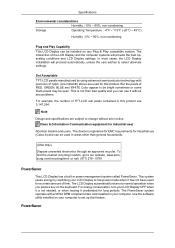
..., turn your LCD Display to low-power mode when it without prior notice. The PowerSaver system operates with precision of time. PowerSaver Class A (Information Communication equipment for industrial use (Class A) and can use ) Attention dealers and users. This system saves energy by using advanced semiconductor technology with a VESA DPM compliant video card installed in this product. Use the software utility installed on any problems. For example, the number of...
..., turn your LCD Display to low-power mode when it without prior notice. The PowerSaver system operates with precision of time. PowerSaver Class A (Information Communication equipment for industrial use (Class A) and can use ) Attention dealers and users. This system saves energy by using advanced semiconductor technology with a VESA DPM compliant video card installed in this product. Use the software utility installed on any problems. For example, the number of...


