
User Manual (user Manual) (ver.1.0) (English)
Page 3
... be caused by the wire nor touch the plug with a dry cloth. Do not use the power cord when the connector or plug is dusty, clean it does not come loose. Do not connect too many extension cords or plugs to contact an authorized the Service Center, when installing your monitor in a z This may damage the monitor. Use only a properly grounded plug and receptacle. z This may cause...
... be caused by the wire nor touch the plug with a dry cloth. Do not use the power cord when the connector or plug is dusty, clean it does not come loose. Do not connect too many extension cords or plugs to contact an authorized the Service Center, when installing your monitor in a z This may damage the monitor. Use only a properly grounded plug and receptacle. z This may cause...

User Manual (user Manual) (ver.1.0) (English)
Page 6
...operating the monitor near water or outdoors where the monitor could be exposed to a qualified servicing company. z The monitor may cause electric shock or fire. Unplug the power cord from the monitor - z Keep the product's interior clean. Others Do not remove the cover (or ...turn the monitor off and unplug the power cord. in the interior over an extended period of time may cause electric shock or fire. Then contact the Service Center. Make sure to oil, smoke or moisture; do not install inside a vehicle. z Do not use any unusual sound or smell coming from the power...
...operating the monitor near water or outdoors where the monitor could be exposed to a qualified servicing company. z The monitor may cause electric shock or fire. Unplug the power cord from the monitor - z Keep the product's interior clean. Others Do not remove the cover (or ...turn the monitor off and unplug the power cord. in the interior over an extended period of time may cause electric shock or fire. Then contact the Service Center. Make sure to oil, smoke or moisture; do not install inside a vehicle. z Do not use any unusual sound or smell coming from the power...

User Manual (user Manual) (ver.1.0) (English)
Page 8
... disconnect cables may try to climb on the product. Make sure there are disconnected before moving the monitor. Do not install the product on an unstable, uneven surface or a location prone to vibrations. When moving the product. Make sure that the children Adjust the resolution and frequency to the level appropriate for an extended period of time, keep the...
... disconnect cables may try to climb on the product. Make sure there are disconnected before moving the monitor. Do not install the product on an unstable, uneven surface or a location prone to vibrations. When moving the product. Make sure that the children Adjust the resolution and frequency to the level appropriate for an extended period of time, keep the...

User Manual (user Manual) (ver.1.0) (English)
Page 14
Component Connection : connecting the PR, Y, PB ports 7. AV IN [VIDEO](VIDEO Connection Terminal) (Input) 11. BNC (Analog PC) Connection : connecting the R, G, H, V ports. - EXT SPEAKER(8 Ω) (EXT Speaker Connection Terminal) 14. Kensington Lock AV AUDIO IN [L-AUDIO-R](Monitor Audio Connection Terminal (Input)) 9. With cables where there is terminal for the PC sound output. AV IN [S-VIDEO](S-Video Connection Terminal) (Input) 13. POWER S/W : Switches the monitor On/Off. 16. MONITOR OUT is no degradation or signal source, up to ten monitors can be connected. 15....
Component Connection : connecting the PR, Y, PB ports 7. AV IN [VIDEO](VIDEO Connection Terminal) (Input) 11. BNC (Analog PC) Connection : connecting the R, G, H, V ports. - EXT SPEAKER(8 Ω) (EXT Speaker Connection Terminal) 14. Kensington Lock AV AUDIO IN [L-AUDIO-R](Monitor Audio Connection Terminal (Input)) 9. With cables where there is terminal for the PC sound output. AV IN [S-VIDEO](S-Video Connection Terminal) (Input) 13. POWER S/W : Switches the monitor On/Off. 16. MONITOR OUT is no degradation or signal source, up to ten monitors can be connected. 15....

User Manual (user Manual) (ver.1.0) (English)
Page 16
... of the screen. CH/PAGE Selects channels or page. - AUTO Adjusts the screen display automatically. 1. ENTER Activates a highlighted menu item. 12. ON / OFF Turns the monitor On/Off. 2. MDC MDC Quick Launch Button. 4. VOL Adjusts the audio volume. >>Click here to enter the symbols (.O_-:/). z DEL : Functions as the backspace. By changing the resolution in the Mute mode. 9. MENU Opens the on both the remote control and the monitor except for...
... of the screen. CH/PAGE Selects channels or page. - AUTO Adjusts the screen display automatically. 1. ENTER Activates a highlighted menu item. 12. ON / OFF Turns the monitor On/Off. 2. MDC MDC Quick Launch Button. 4. VOL Adjusts the audio volume. >>Click here to enter the symbols (.O_-:/). z DEL : Functions as the backspace. By changing the resolution in the Mute mode. 9. MENU Opens the on both the remote control and the monitor except for...

User Manual (user Manual) (ver.1.0) (English)
Page 17
... PIP window signal. 24. Rewind 27. Fast forward BBE Recreates the natural sound and improves sound clarity through available preconfigured modes. (Entertain Internet Text Custom ) 19. SAP Default Manual Change Mono 22. STILL When pressing this button, STILL is displayed at the factory. Audio Type MTS/S_Mode Mono Mono FM Stereo Stereo Mono Stereo SAP Mono - SOURCE Changes the source of the PIP and main image...
... PIP window signal. 24. Rewind 27. Fast forward BBE Recreates the natural sound and improves sound clarity through available preconfigured modes. (Entertain Internet Text Custom ) 19. SAP Default Manual Change Mono 22. STILL When pressing this button, STILL is displayed at the factory. Audio Type MTS/S_Mode Mono Mono FM Stereo Stereo Mono Stereo SAP Mono - SOURCE Changes the source of the PIP and main image...

User Manual (user Manual) (ver.1.0) (English)
Page 27
Connecting Speakers 1. Do not move the SET while the SET is connected to a DTV Set Top Box using the screws. * Mount the speaker set of Component video, see your Set Top Box owner's manual. 6. Select Component for connecting the SET speaker my become damaged. Fasten the SET and the speaker using the Source button on the front of the monitor or on the Set Top Box. 2. PR, Y, PB port on the Monitor and the PR, Y, PB jacks on...
Connecting Speakers 1. Do not move the SET while the SET is connected to a DTV Set Top Box using the screws. * Mount the speaker set of Component video, see your Set Top Box owner's manual. 6. Select Component for connecting the SET speaker my become damaged. Fasten the SET and the speaker using the Source button on the front of the monitor or on the Set Top Box. 2. PR, Y, PB port on the Monitor and the PR, Y, PB jacks on...

User Manual (user Manual) (ver.1.0) (English)
Page 28
Input Source Control 5. PIP Control : PIP Size | PIP Source 8. Lamp Control 10. Beginning : Main Screen | Port Selection | 3. Power Control 4. Image Size Control : PC, BNC, DVI | AV, S-Video, Component, DVI(HDCP) 1. Time Control 7. Maintenance Control - Settings Value Display In Multiple Display Mode Troubleshooting 13. Introduction 6. Scroll 11. Maintenance Control - Connecting to an Audio System 1. Settings Control : Picture | Picture PC | Audio | Image Lock | 9. Introduction 2. 7. Connect a set of audio cables between the AUX L, R jacks on the AUDIO ...
Input Source Control 5. PIP Control : PIP Size | PIP Source 8. Lamp Control 10. Beginning : Main Screen | Port Selection | 3. Power Control 4. Image Size Control : PC, BNC, DVI | AV, S-Video, Component, DVI(HDCP) 1. Time Control 7. Maintenance Control - Settings Value Display In Multiple Display Mode Troubleshooting 13. Introduction 6. Scroll 11. Maintenance Control - Connecting to an Audio System 1. Settings Control : Picture | Picture PC | Audio | Image Lock | 9. Introduction 2. 7. Connect a set of audio cables between the AUX L, R jacks on the AUDIO ...
User Manual (user Manual) (ver.1.0) (English)
Page 34
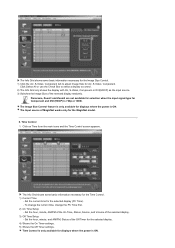
... DVI (HDCP) is ON. Time Control is only available for displays where the power is 720p or 1080i. The Input source of the selected display. 3) Off Time Setup - Click on Time from the main icons and the Time Control screen appears. Time Control 1. Set the hour, minute, AM/PM of the On Time, Status, Source, and Volume of MagicNet works only for the MagicNet model. 6. The Image Size Control...
... DVI (HDCP) is ON. Time Control is only available for displays where the power is 720p or 1080i. The Input source of the selected display. 3) Off Time Setup - Click on Time from the main icons and the Time Control screen appears. Time Control 1. Set the hour, minute, AM/PM of the On Time, Status, Source, and Volume of MagicNet works only for the MagicNet model. 6. The Image Size Control...
User Manual (user Manual) (ver.1.0) (English)
Page 42
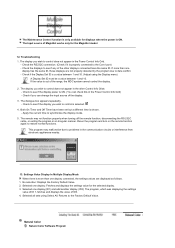
... display. 3. If more than one display connected, the settings values are not properly detected by the program due to data conflict. - Check to see if any of the range, the MDC system cannot control the display. 2. No selection: Displays the Factory Default Value. 2. Natural Color Natural Color Software Program Rerun the program and turn on the remote function again to synchronize the display clocks. 5. The Input source of ID3. 4. Check...
... display. 3. If more than one display connected, the settings values are not properly detected by the program due to data conflict. - Check to see if any of the range, the MDC system cannot control the display. 2. No selection: Displays the Factory Default Value. 2. Natural Color Natural Color Software Program Rerun the program and turn on the remote function again to synchronize the display clocks. 5. The Input source of ID3. 4. Check...

User Manual (user Manual) (ver.1.0) (English)
Page 47
... the control panel, the auto function is used to Custom mode. 1) Red 2) Green 3) Blue If you adjust picture using Color Control function, Color Tone will turn to make up for the weak RGB signal transmitted by removing noise that creates unstable images with the signal control. 2) Signal Control Adjusts the R Phase, G Phase, B Phase, Gain and Sharpness manually. The Size can be switched. 1) 16:9 2) 4:3 Adjusts the PIP Screen Settings. 1) Contrast : Adjusts the Contrast of the PIP window on the screen. 2) Brightness : Adjusts the Brightness of the PIP window on the screen. 3) Sharpness...
... the control panel, the auto function is used to Custom mode. 1) Red 2) Green 3) Blue If you adjust picture using Color Control function, Color Tone will turn to make up for the weak RGB signal transmitted by removing noise that creates unstable images with the signal control. 2) Signal Control Adjusts the R Phase, G Phase, B Phase, Gain and Sharpness manually. The Size can be switched. 1) 16:9 2) 4:3 Adjusts the PIP Screen Settings. 1) Contrast : Adjusts the Contrast of the PIP window on the screen. 2) Brightness : Adjusts the Brightness of the PIP window on the screen. 3) Sharpness...

User Manual (user Manual) (ver.1.0) (English)
Page 52
... of time. - z The selection will switch PIP Off. Launching Video Wall while PIP is running , the PIP, Auto Adjustment, Image Lock, and Size functions are not available. Off 1024 X 768 1280 X 768 1360 X 768 1366 X 768 Screen Scroll Selecting the menu is only allowed when the graphics resolution is set to see a divided screen. By default, the time is set to 10 hours. 1~10 Hours...
... of time. - z The selection will switch PIP Off. Launching Video Wall while PIP is running , the PIP, Auto Adjustment, Image Lock, and Size functions are not available. Off 1024 X 768 1280 X 768 1360 X 768 1366 X 768 Screen Scroll Selecting the menu is only allowed when the graphics resolution is set to see a divided screen. By default, the time is set to 10 hours. 1~10 Hours...
User Manual (user Manual) (ver.1.0) (English)
Page 55
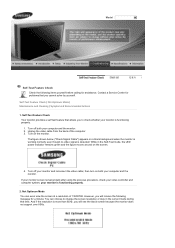
... after using the previous procedure, check your monitor and reconnect the video cable; Contact a Service Center for assistance. The figure shown below ("Check Signal Cable") appears on a black background when the monitor is working normally even though no video signal is functioning properly. 2. Self-Test Feature Check Your monitor provides a self test feature that you to change the screen resolution or stay in the Self-Test mode, the LED power indicator remains green...
... after using the previous procedure, check your monitor and reconnect the video cable; Contact a Service Center for assistance. The figure shown below ("Check Signal Cable") appears on a black background when the monitor is working normally even though no video signal is functioning properly. 2. Self-Test Feature Check Your monitor provides a self test feature that you to change the screen resolution or stay in the Self-Test mode, the LED power indicator remains green...
User Manual (user Manual) (ver.1.0) (English)
Page 56
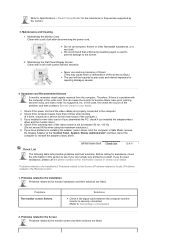
... the adapter (video) driver. Check if the power cord and the video cables are listed. Problems related to the Installation Problems related to the monitor installation and their solutions are properly connected to the computer. 2. z Never use benzene, thinner or other flammable substances, or a wet cloth. Therefore, if there is used to prevent damage to the screen. 2. Problems The monitor screen flickers. Maintenance and Cleaning 1. z We recommend that a Samsung cleansing agent is a problem with...
... the adapter (video) driver. Check if the power cord and the video cables are listed. Problems related to the Installation Problems related to the monitor installation and their solutions are properly connected to the computer. 2. z Never use benzene, thinner or other flammable substances, or a wet cloth. Therefore, if there is used to prevent damage to the screen. 2. Problems The monitor screen flickers. Maintenance and Cleaning 1. z We recommend that a Samsung cleansing agent is a problem with...
User Manual (user Manual) (ver.1.0) (English)
Page 57
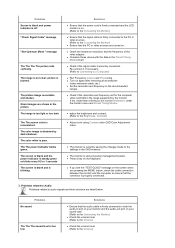
... images are turned on your sound card. (Refer to the Connecting the Monitor) z Check the volume level. (Refer to the Volume) z Check the volume level. (Refer to the Volume) The color white is too low. z Check if the resolution and frequency set for the computer video card falls in port on your monitor and the audio-out port on . z adjust the brightness and contrast. (Refer to ensure that the audio cable is using Custom under the monitor menu and Preset Timing Modes. z The monitor...
... images are turned on your sound card. (Refer to the Connecting the Monitor) z Check the volume level. (Refer to the Volume) z Check the volume level. (Refer to the Volume) The color white is too low. z Check if the resolution and frequency set for the computer video card falls in port on your monitor and the audio-out port on . z adjust the brightness and contrast. (Refer to ensure that the audio cable is using Custom under the monitor menu and Preset Timing Modes. z The monitor...
User Manual (user Manual) (ver.1.0) (English)
Page 58
...;Display→Screen Saver . Problems The remote control buttons do not respond. z Check if the batteries are listed. z Check if the power cord is on the computer sound card or software program. z Windows ME/2000 : Set the resolution at the Control Panel→Display→Screen Saver. Disconnect the power cord and then clean the monitor with a soft cloth, using either a cleaning solution or plain water. Sound is too high pitched or too low pitched z If the volume...
...;Display→Screen Saver . Problems The remote control buttons do not respond. z Check if the batteries are listed. z Check if the power cord is on the computer sound card or software program. z Windows ME/2000 : Set the resolution at the Control Panel→Display→Screen Saver. Disconnect the power cord and then clean the monitor with a soft cloth, using either a cleaning solution or plain water. Sound is too high pitched or too low pitched z If the volume...

User Manual (user Manual) (ver.1.0) (English)
Page 60
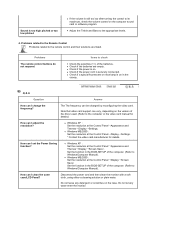
..., unless the user wishes to change without any Plug & Play compatible system. Use the software utility installed on the keyboard. But the pixels of RED, GREEN, BLUE and WHITE color seem to low-power mode when it without prior notice. Dot Acceptable TFT LCD panels manufactured by switching your computer. Class B Equipment (Information Communication equipment for residential use with a precision of 1ppm (one millionth) and above is not needed, or when...
..., unless the user wishes to change without any Plug & Play compatible system. Use the software utility installed on the keyboard. But the pixels of RED, GREEN, BLUE and WHITE color seem to low-power mode when it without prior notice. Dot Acceptable TFT LCD panels manufactured by switching your computer. Class B Equipment (Information Communication equipment for residential use with a precision of 1ppm (one millionth) and above is not needed, or when...

User Manual (user Manual) (ver.1.0) (English)
Page 65
... in TFT-LCD. { Resolution: 1360 x 768 { Vertical frequency (refresh rate): 60 Hz 2. If you may be liable for errors contained herein or for this product are registered trademarks of Samsung Electronics Co., Ltd.; Samsung is not provided in any problelms. { For example, the number of their respective owners. Change the mode to energy save or set a screensaver to a move the picture when you need to polish. For Better Display 1. TFT LCD panels...
... in TFT-LCD. { Resolution: 1360 x 768 { Vertical frequency (refresh rate): 60 Hz 2. If you may be liable for errors contained herein or for this product are registered trademarks of Samsung Electronics Co., Ltd.; Samsung is not provided in any problelms. { For example, the number of their respective owners. Change the mode to energy save or set a screensaver to a move the picture when you need to polish. For Better Display 1. TFT LCD panels...
User Manual (user Manual) (ver.1.0) (English)
Page 68
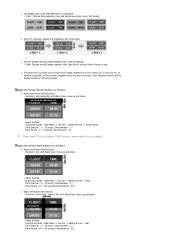
... monitor from Image retention is to turn Power off, or set your PC, or System to operate a Screen Saver program when you are not using it. Apply the Screen Scroll function on instruction guide. Select method . Time Interval : 1 ~ 10 hours ( Recommend : 1 ) . Symptom: Horizontal / Vertical Bar with Black Color move up and down. - Select method . Symptom: Dot with Black Color move up and down . - z All area display Moving image...
... monitor from Image retention is to turn Power off, or set your PC, or System to operate a Screen Saver program when you are not using it. Apply the Screen Scroll function on instruction guide. Select method . Time Interval : 1 ~ 10 hours ( Recommend : 1 ) . Symptom: Horizontal / Vertical Bar with Black Color move up and down. - Select method . Symptom: Dot with Black Color move up and down . - z All area display Moving image...
User Manual (user Manual) (ver.1.0) (English)
Page 69
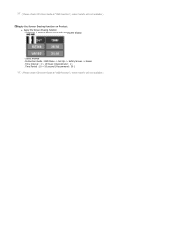
Symptom: 2 Vertical blocks move with erasing the display - Time Period : 10 ~ 50 second ( Recommend : 50 ) ( Please check CD's User Guide at "OSD Function", some model's will not available ) Apply the Screen Erasing function on Product z Apply the Screen Erasing function - Instruction Guide : OSD Menu -> Set Up -> Safety Screen -> Eraser . Time Interval : 1 ~ 10 hours ( Recommend : 1 ) . ( Please check CD's User Guide at "OSD Function", some model's will not available ) Select method .
Symptom: 2 Vertical blocks move with erasing the display - Time Period : 10 ~ 50 second ( Recommend : 50 ) ( Please check CD's User Guide at "OSD Function", some model's will not available ) Apply the Screen Erasing function on Product z Apply the Screen Erasing function - Instruction Guide : OSD Menu -> Set Up -> Safety Screen -> Eraser . Time Interval : 1 ~ 10 hours ( Recommend : 1 ) . ( Please check CD's User Guide at "OSD Function", some model's will not available ) Select method .


