User Manual (ENGLISH)
Page 6
... and left while only holding the power cord or signal cables. • Otherwise, it into sleep mode or use or keep combustible spray or flammable material near the product. • Otherwise, this may be damaged. Make sure that the ventilating opening is occurring, do not turn the volume too high. • Having the sound too loud may result in electric...
... and left while only holding the power cord or signal cables. • Otherwise, it into sleep mode or use or keep combustible spray or flammable material near the product. • Otherwise, this may be damaged. Make sure that the ventilating opening is occurring, do not turn the volume too high. • Having the sound too loud may result in electric...
User Manual (ENGLISH)
Page 11
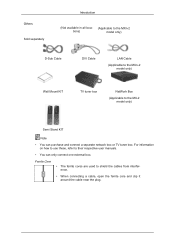
... MXn-2 tions) model only) D-Sub Cable DVI Cable LAN Cable (Applicable to the MXn-2 model only) Wall Mount KIT TV tuner box NetWork Box (Applicable to shield the cables from interference. • When connecting a cable, open the ferrite core and clip it around the cable near the plug. For information on how to use these, refer to their respective user manuals. • You can purchase and connect a separate network box or TV tuner box.
... MXn-2 tions) model only) D-Sub Cable DVI Cable LAN Cable (Applicable to the MXn-2 model only) Wall Mount KIT TV tuner box NetWork Box (Applicable to shield the cables from interference. • When connecting a cable, open the ferrite core and clip it around the cable near the plug. For information on how to use these, refer to their respective user manuals. • You can purchase and connect a separate network box or TV tuner box.
User Manual (ENGLISH)
Page 13
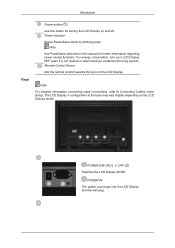
... to Connecting Cables under Setup. Introduction Rear Power button [ ] Use this spot on the LCD Display. Power indicator Shows PowerSaver mode by blinking green Note See PowerSaver described in the manual for long periods. For energy conservation, turn your LCD Display OFF when it is not needed or when leaving it unattended for further information regarding power saving functions. Remote Control Sensor Aim the remote control towards this button for turning the LCD Display on the LCD Display model. POWER IN The power cord plugs...
... to Connecting Cables under Setup. Introduction Rear Power button [ ] Use this spot on the LCD Display. Power indicator Shows PowerSaver mode by blinking green Note See PowerSaver described in the manual for long periods. For energy conservation, turn your LCD Display OFF when it is not needed or when leaving it unattended for further information regarding power saving functions. Remote Control Sensor Aim the remote control towards this button for turning the LCD Display on the LCD Display model. POWER IN The power cord plugs...

User Manual (ENGLISH)
Page 17
... menu item. Adjusts the screen display automatically in the "Channel List" menu. TTX/MIX 13.STILL 14.AUTO 15. The "-" button operates only for the Power and LOCK buttons. VOL + is pressed in the control panel, auto function is performed. By changing the resolution in the Mute mode. Activates or deactivates all function keys on the upper left corner of the screen. Pauses (mutes) the audio output temporarily. Current picture information is displayed on -screen menu...
... menu item. Adjusts the screen display automatically in the "Channel List" menu. TTX/MIX 13.STILL 14.AUTO 15. The "-" button operates only for the Power and LOCK buttons. VOL + is pressed in the control panel, auto function is performed. By changing the resolution in the Mute mode. Activates or deactivates all function keys on the upper left corner of the screen. Pauses (mutes) the audio output temporarily. Current picture information is displayed on -screen menu...
User Manual (ENGLISH)
Page 26
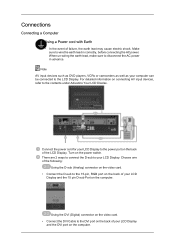
... as DVD players, VCRs or camcorders as well as your LCD Display. Connect the power cord for your LCD Display to the power port on the back of your LCD Display and the DVI port on the computer. Turn on connecting AV input devices, refer to the DVI port on the back of the LCD Display. Using the DVI (Digital) connector on the video card. • Connect the DVI Cable to the contents under Adjusting Your LCD Display...
... as DVD players, VCRs or camcorders as well as your LCD Display. Connect the power cord for your LCD Display to the power port on the back of your LCD Display and the DVI port on the computer. Turn on connecting AV input devices, refer to the DVI port on the back of the LCD Display. Using the DVI (Digital) connector on the video card. • Connect the DVI Cable to the contents under Adjusting Your LCD Display...
User Manual (ENGLISH)
Page 28
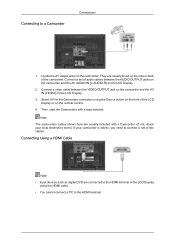
.... Connecting Using a HDMI Cable Note • Input devices such as digital DVD are usually included with a tape inserted. Connect a video cable between the AUDIO OUTPUT jacks on the camcorder and the AV AUDIO IN [L-AUDIO-R] on the LCD Display . 3. Note The audio-video cables shown here are connected to connect a set of two cables. Select AV for the Camcorder connection using the HDMI cable. • You cannot connect a PC to a Camcorder Connections 1. Locate the AV output jacks on the remote control. 4. Connecting to the HDMI...
.... Connecting Using a HDMI Cable Note • Input devices such as digital DVD are usually included with a tape inserted. Connect a video cable between the AUDIO OUTPUT jacks on the camcorder and the AV AUDIO IN [L-AUDIO-R] on the LCD Display . 3. Note The audio-video cables shown here are connected to connect a set of two cables. Select AV for the Camcorder connection using the HDMI cable. • You cannot connect a PC to a Camcorder Connections 1. Locate the AV output jacks on the remote control. 4. Connecting to the HDMI...
User Manual (ENGLISH)
Page 31
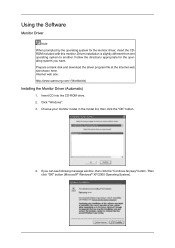
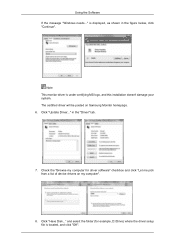
...://www.samsung.com/ (Worldwide) Installing the Monitor Driver (Automatic) 1. If you have. Click "Windows". 3. Choose your monitor model in the model list, then click the "OK" button. 4. Follow the directions appropriate for the monitor driver, insert the CDROM included with this monitor. Driver installation is slightly different from one operating system to another. Then click "OK" button (Microsoft® Windows® XP/2000 Operating System). Using the Software Monitor Driver Note...
...://www.samsung.com/ (Worldwide) Installing the Monitor Driver (Automatic) 1. If you have. Click "Windows". 3. Choose your monitor model in the model list, then click the "OK" button. 4. Follow the directions appropriate for the monitor driver, insert the CDROM included with this monitor. Driver installation is slightly different from one operating system to another. Then click "OK" button (Microsoft® Windows® XP/2000 Operating System). Using the Software Monitor Driver Note...
User Manual (ENGLISH)
Page 32
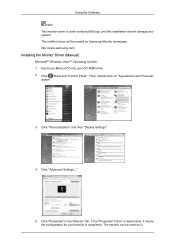
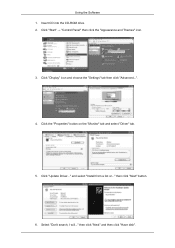
Click (Start) and "Control Panel". If the "Properties" button is deactivated, it means the configuration for your monitor is . http://www.samsung.com/ Installing the Monitor Driver (Manual) Microsoft® Windows Vista™, Operating System 1. ization". 3. The monitor can be posted on "Appearance and Personal- Insert your Manual CD into your system. Click "Personalization" and then "Display Settings". 4. The certified driver will be used as is completed...
Click (Start) and "Control Panel". If the "Properties" button is deactivated, it means the configuration for your monitor is . http://www.samsung.com/ Installing the Monitor Driver (Manual) Microsoft® Windows Vista™, Operating System 1. ization". 3. The monitor can be posted on "Appearance and Personal- Insert your Manual CD into your system. Click "Personalization" and then "Display Settings". 4. The certified driver will be used as is completed...
User Manual (ENGLISH)
Page 33
..., and this installation doesn't damage your system. The certified driver will be posted on my computer". 8. Using the Software If the message "Windows needs..." in the figure below, click "Continue". and select the folder (for driver software" checkbox and click "Let me pick from a list of device drivers on Samsung Monitor homepage. 6. is displayed, as shown in the "Driver" tab. 7. Click "Update Driver..." Click "Have...
..., and this installation doesn't damage your system. The certified driver will be posted on my computer". 8. Using the Software If the message "Windows needs..." in the figure below, click "Continue". and select the folder (for driver software" checkbox and click "Let me pick from a list of device drivers on Samsung Monitor homepage. 6. is displayed, as shown in the "Driver" tab. 7. Click "Update Driver..." Click "Have...
User Manual (ENGLISH)
Page 35
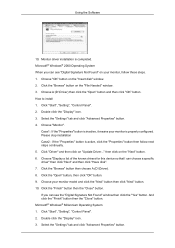
Insert CD into the CD-ROM drive. 2. and select "Install from a list or..." then click "Next" and then click "Have disk". Click the "Properties" button on the "Monitor" tab and select "Driver" tab. 5. Click "Update Driver..." then click "Next" button. 6. Click "Start" → "Control Panel" then click the "Appearance and Themes" icon. 3. Select "Don't search, I will..." Click "Display" icon and choose the "Settings" tab then click "Advanced...". 4. Using the Software 1.
Insert CD into the CD-ROM drive. 2. and select "Install from a list or..." then click "Next" and then click "Have disk". Click the "Properties" button on the "Monitor" tab and select "Driver" tab. 5. Click "Update Driver..." then click "Next" button. 6. Click "Start" → "Control Panel" then click the "Appearance and Themes" icon. 3. Select "Don't search, I will..." Click "Display" icon and choose the "Settings" tab then click "Advanced...". 4. Using the Software 1.
User Manual (ENGLISH)
Page 37
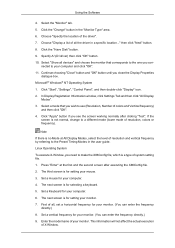
..." on your monitor, follow next steps continually. 5. And click the "Finish" button then the "Close" button. Please stop installation Case2 : If the "Properties" button is completed. If you can see the "Digital Signature Not Found" window then click the "Yes" button. Using the Software 10. Click "Driver" and then click on the "File Needed" window. 3. Click "Start", "Setting", "Control Panel". 2. Click the "Browse" button on "Update Driver..." Case1...
..." on your monitor, follow next steps continually. 5. And click the "Finish" button then the "Close" button. Please stop installation Case2 : If the "Properties" button is completed. If you can see the "Digital Signature Not Found" window then click the "Yes" button. Using the Software 10. Click "Driver" and then click on the "File Needed" window. 3. Click "Start", "Setting", "Control Panel". 2. Click the "Browse" button on "Update Driver..." Case1...
User Manual (ENGLISH)
Page 38
... setting file. 1. If the screen is a type of all the driver in a specific location..." Linux Operating System To execute X-Window, you need to make the X86Config file, which is not normal, change to use (Resolution, Number of all , set a horizontal frequency for setting your monitor. (You can enter the frequency directly.) 9. The next screen is no Mode at the first and the second screen after clicking "Test". In Display...
... setting file. 1. If the screen is a type of all the driver in a specific location..." Linux Operating System To execute X-Window, you need to make the X86Config file, which is not normal, change to use (Resolution, Number of all , set a horizontal frequency for setting your monitor. (You can enter the frequency directly.) 9. The next screen is no Mode at the first and the second screen after clicking "Test". In Display...

User Manual (ENGLISH)
Page 51
..., the default value is displayed in this screen will automatically change the mode to "CUSTOM." 1) Picture - Adjusts Brightness of the selected display. 6) Tint - Adjusts the Color Temp for the displays whose power status is ON and if no selection is made, the factory default is displayed. The Input source of the selected function is displayed. This feature is set and displays it on MagicInfo model. Available only for the selected display. 10...
..., the default value is displayed in this screen will automatically change the mode to "CUSTOM." 1) Picture - Adjusts Brightness of the selected display. 6) Tint - Adjusts the Color Temp for the displays whose power status is ON and if no selection is made, the factory default is displayed. The Input source of the selected function is displayed. This feature is set and displays it on MagicInfo model. Available only for the selected display. 10...
User Manual (ENGLISH)
Page 60
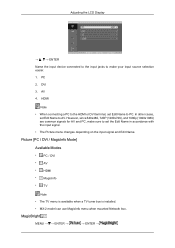
... Modes • PC / DVI • AV • HDMI • MagicInfo • TV Note • The TV menu is available when a TV tuner box is installed. • MX-2 model can use MagicInfo menu when mounted Network box. Adjusting the LCD Display → , → ENTER Name the input device connected to the input jacks to make sure to set the Edit Name in accordance with the input signal. • The Picture menu changes depending on the input signal...
... Modes • PC / DVI • AV • HDMI • MagicInfo • TV Note • The TV menu is available when a TV tuner box is installed. • MX-2 model can use MagicInfo menu when mounted Network box. Adjusting the LCD Display → , → ENTER Name the input device connected to the input jacks to make sure to set the Edit Name in accordance with the input signal. • The Picture menu changes depending on the input signal...
User Manual (ENGLISH)
Page 89
... the LAN cable used by an USB device (ex: video display). z The preset password for MagicInfo. z The server program's Power-On option works only if the LCD Display's power is supported for the network (ex: video display). z When using MagicInfo with the device directly connected to turn off . z To setup MagicInfo on a Windows screen, a keyboard and mouse are required. z When using a separate USB keyboard. z To setup MagicInfo on a Windows screen, refer to use MagicInfo menu when mounted Network box. However...
... the LAN cable used by an USB device (ex: video display). z The preset password for MagicInfo. z The server program's Power-On option works only if the LCD Display's power is supported for the network (ex: video display). z When using MagicInfo with the device directly connected to turn off . z To setup MagicInfo on a Windows screen, a keyboard and mouse are required. z When using a separate USB keyboard. z To setup MagicInfo on a Windows screen, refer to use MagicInfo menu when mounted Network box. However...
User Manual (ENGLISH)
Page 91
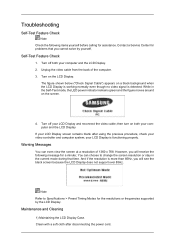
... LCD Display screen remains blank after disconnecting the power cord. You can even view the screen at a resolution of the computer. 3. Contact a Service Center for a minute; Self-Test Feature Check 1. Note Refer to change the screen resolution or stay in the Self-Test mode, the LED power indicator remains green and the figure moves around on the screen. 4. your video controller and computer system; The figure shown below ("Check Signal Cable...
... LCD Display screen remains blank after disconnecting the power cord. You can even view the screen at a resolution of the computer. 3. Contact a Service Center for a minute; Self-Test Feature Check 1. Note Refer to change the screen resolution or stay in the Self-Test mode, the LED power indicator remains green and the figure moves around on the screen. 4. your video controller and computer system; The figure shown below ("Check Signal Cable...
User Manual (ENGLISH)
Page 92
... there is used to prevent damage to the screen. 2) Maintaining the Flat Panel Display Screen. If you installed a new video card or if you assembled the PC, check if you have poor coloring, become blank, have problems in installing the Adaptor (video) driver, boot the computer in Safe Mode, remove the Display Adaptor in this case, first check the source of the problem, and then contact a Service Center or your...
... there is used to prevent damage to the screen. 2) Maintaining the Flat Panel Display Screen. If you installed a new video card or if you assembled the PC, check if you have poor coloring, become blank, have problems in installing the Adaptor (video) driver, boot the computer in Safe Mode, remove the Display Adaptor in this case, first check the source of the problem, and then contact a Service Center or your...
User Manual (ENGLISH)
Page 98
... notice. But the pixels of RED, GREEN, BLUE and WHITE color appear to be bright sometimes or some black pixels may be installed on any problems. For example, the number of the LCD Display and the computer systems will proceed automatically, unless the user wishes to change without any Plug & Play compatible system. lbs 320MXn-2 780.0 x 482.0 x 109.0 mm / 30.7 x 19.0 x 4.3 inch (Without Stand) 780.0 x 545 x 311.0 mm...
... notice. But the pixels of RED, GREEN, BLUE and WHITE color appear to be bright sometimes or some black pixels may be installed on any problems. For example, the number of the LCD Display and the computer systems will proceed automatically, unless the user wishes to change without any Plug & Play compatible system. lbs 320MXn-2 780.0 x 482.0 x 109.0 mm / 30.7 x 19.0 x 4.3 inch (Without Stand) 780.0 x 545 x 311.0 mm...
User Manual (ENGLISH)
Page 104
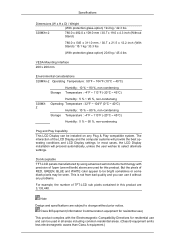
... big difference in luminance (Black & White, Grey) Change the characters color periodically • Use Bright colors with little difference in use. • The best way to protect your monitor from Image retention is to turn Power off, or set your PC, or System to operate a Screen Saver program when you are not using it. Apply the Screen Scroll function on instruction guide. Also Warranty service will be limited based on Product •...
... big difference in luminance (Black & White, Grey) Change the characters color periodically • Use Bright colors with little difference in use. • The best way to protect your monitor from Image retention is to turn Power off, or set your PC, or System to operate a Screen Saver program when you are not using it. Apply the Screen Scroll function on instruction guide. Also Warranty service will be limited based on Product •...

User Manual (ENGLISH)
Page 105
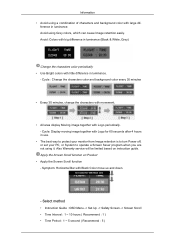
... . - Information Note ( Please check CD's User Guide at "OSD Function", some model's will not available. ) Apply the Screen Erasing function on Product • Apply the Screen Pixel function - Symptom: Horizontal / Vertical Bar with Black Color move up and down . - Select method • Instruction Guide : OSD Menu -> Set Up -> Safety Screen -> Pixel • Time Interval : 1 ~ 10 hours ( Recommend : 1 ) • Time Period : 10 ~ 50 second ( Recommend...
... . - Information Note ( Please check CD's User Guide at "OSD Function", some model's will not available. ) Apply the Screen Erasing function on Product • Apply the Screen Pixel function - Symptom: Horizontal / Vertical Bar with Black Color move up and down . - Select method • Instruction Guide : OSD Menu -> Set Up -> Safety Screen -> Pixel • Time Interval : 1 ~ 10 hours ( Recommend : 1 ) • Time Period : 10 ~ 50 second ( Recommend...


