User Manual (ENGLISH)
Page 21
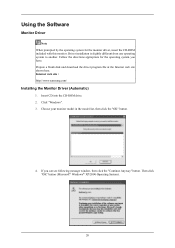
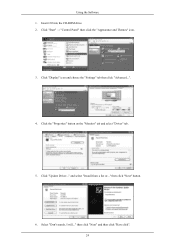
...click "OK" button (Microsoft® Windows® XP/2000 Operating System). 20 Internet web site : http://www.samsung.com/ Installing the Monitor Driver (Automatic) 1. Using the Software Monitor Driver Note When prompted by the operating system for the operating system you can see following message window, then click the "...Continue Anyway" button. Follow the directions appropriate for the monitor driver, insert the CD-ROM included with this monitor. Insert CD into the CD-ROM drive. 2. If you have. Prepare a blank disk and download the...
...click "OK" button (Microsoft® Windows® XP/2000 Operating System). 20 Internet web site : http://www.samsung.com/ Installing the Monitor Driver (Automatic) 1. Using the Software Monitor Driver Note When prompted by the operating system for the operating system you can see following message window, then click the "...Continue Anyway" button. Follow the directions appropriate for the monitor driver, insert the CD-ROM included with this monitor. Insert CD into the CD-ROM drive. 2. If you have. Prepare a blank disk and download the...
User Manual (ENGLISH)
Page 22
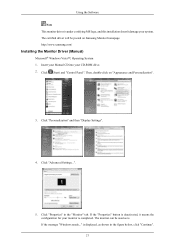
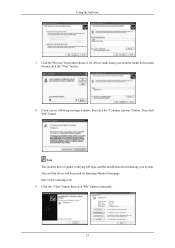
... under certifying MS logo, and this installation doesn't damage your monitor is completed. http://www.samsung.com/ Installing the Monitor Driver (Manual) Microsoft® Windows Vista™, Operating System 1. Then, double-click on Samsung Monitor homepage. Click "Personalization" and then "Display Settings". 4. If the "Properties" button is deactivated, it means the configuration for your system. is...
... under certifying MS logo, and this installation doesn't damage your monitor is completed. http://www.samsung.com/ Installing the Monitor Driver (Manual) Microsoft® Windows Vista™, Operating System 1. Then, double-click on Samsung Monitor homepage. Click "Personalization" and then "Display Settings". 4. If the "Properties" button is deactivated, it means the configuration for your system. is...
User Manual (ENGLISH)
Page 23
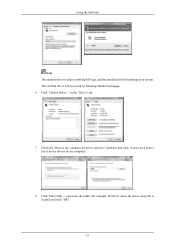
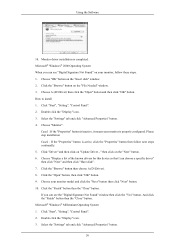
Click "Have Disk..." and select the folder (for driver software" checkbox and click "Let me pick from a list of device drivers on Samsung Monitor homepage. 6. Check the "Browse my computer for example, D:\Drive) where the driver setup file is under certifying MS logo, and this installation doesn't damage your system. in the "Driver" tab. 7. Using the Software Note This monitor driver is located, and click "OK". 22 The certified driver will be posted on my computer". 8. Click "Update Driver..."
Click "Have Disk..." and select the folder (for driver software" checkbox and click "Let me pick from a list of device drivers on Samsung Monitor homepage. 6. Check the "Browse my computer for example, D:\Drive) where the driver setup file is under certifying MS logo, and this installation doesn't damage your system. in the "Driver" tab. 7. Using the Software Note This monitor driver is located, and click "OK". 22 The certified driver will be posted on my computer". 8. Click "Update Driver..."
User Manual (ENGLISH)
Page 25
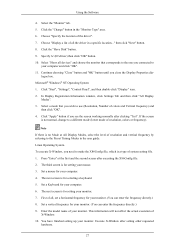
Click "Update Driver..." Select "Don't search, I will..." then click "Next" button. 6. Click the "Properties" button on the "Monitor" tab and select "Driver" tab. 5. then click "Next" and then click "Have disk". 24 Insert CD into the CD-ROM drive. 2. Click "Display" icon and choose the "Settings" tab then click "Advanced...". 4. Click "Start" → "Control Panel" then click the "Appearance and Themes" icon. 3. and select "Install from a list or..." Using the Software 1.
Click "Update Driver..." Select "Don't search, I will..." then click "Next" button. 6. Click the "Properties" button on the "Monitor" tab and select "Driver" tab. 5. then click "Next" and then click "Have disk". 24 Insert CD into the CD-ROM drive. 2. Click "Display" icon and choose the "Settings" tab then click "Advanced...". 4. Click "Start" → "Control Panel" then click the "Appearance and Themes" icon. 3. and select "Install from a list or..." Using the Software 1.
User Manual (ENGLISH)
Page 26
If you can see following message window, then click the "Continue Anyway" button. http://www.samsung.com/ 9. Click the "Browse" button then choose A:(D:\Driver) and choose your system. The certified driver will be posted on Samsung Monitor homepage. Note This monitor driver is under certifying MS logo, and this installation doesn't damage your monitor model in the model list and click the "Next" button. 8. Then click "OK" button. Click the "Close" button then click "OK" button continually. 25 Using the Software 7.
If you can see following message window, then click the "Continue Anyway" button. http://www.samsung.com/ 9. Click the "Browse" button then choose A:(D:\Driver) and choose your system. The certified driver will be posted on Samsung Monitor homepage. Note This monitor driver is under certifying MS logo, and this installation doesn't damage your monitor model in the model list and click the "Next" button. 8. Then click "OK" button. Click the "Close" button then click "OK" button continually. 25 Using the Software 7.
User Manual (ENGLISH)
Page 27
..." icon. 3. Case1 : If the "Properties" button is inactive, it means your monitor model and click the "Next" button then click "Next" button. 10. Click "Driver" and then click on the "Insert disk" window. 2. Click the "Browse" button then choose A:(D:\Driver). 8. Choose your monitor is properly configured. Click the "Finish" button then the "Close" button...
..." icon. 3. Case1 : If the "Properties" button is inactive, it means your monitor model and click the "Next" button then click "Next" button. 10. Click "Driver" and then click on the "Insert disk" window. 2. Click the "Browse" button then choose A:(D:\Driver). 8. Choose your monitor is properly configured. Click the "Finish" button then the "Close" button...
User Manual (ENGLISH)
Page 28
.... 6. Linux Operating System To execute X-Window, you close the Display Properties dia- Choose "Specify the location of your monitor. Specify A:\(D:\driver) then click "OK" button. 10. In Display Registration Information window, click Settings Tab and then click "All Display Modes...The next screen is for selecting a keyboard. 5. Enter the model name of the driver". 7. The third screen is for setting your computer and click "OK". 11. You have finished setting up your monitor. (You can enter the frequency directly.) 8. Continue choosing "Close" button and "...
.... 6. Linux Operating System To execute X-Window, you close the Display Properties dia- Choose "Specify the location of your monitor. Specify A:\(D:\driver) then click "OK" button. 10. In Display Registration Information window, click Settings Tab and then click "All Display Modes...The next screen is for selecting a keyboard. 5. Enter the model name of the driver". 7. The third screen is for setting your computer and click "OK". 11. You have finished setting up your monitor. (You can enter the frequency directly.) 8. Continue choosing "Close" button and "...
User Manual (ENGLISH)
Page 31
The installed "Display Driver" should be properly loaded for 24 bits per the orientation mode selected (90, 180, 270). DOS based applications in Full Screen Mode will not function as per the orientation mode selected (... • 128 MB Memory above (recommended) • 25 MB Hard disk space above with Active Desktop component. In most cases this should be the latest driver supplied by the vendor. 2. MagicRotation does not provide support for the MagicRotation to work properly. e.g. 3D games 4. User Applications using OpenGL and DirectDraw (3D drawing...
The installed "Display Driver" should be properly loaded for 24 bits per the orientation mode selected (90, 180, 270). DOS based applications in Full Screen Mode will not function as per the orientation mode selected (... • 128 MB Memory above (recommended) • 25 MB Hard disk space above with Active Desktop component. In most cases this should be the latest driver supplied by the vendor. 2. MagicRotation does not provide support for the MagicRotation to work properly. e.g. 3D games 4. User Applications using OpenGL and DirectDraw (3D drawing...

User Manual (ENGLISH)
Page 78
...at the screen through a cellophane paper? A: You may get a blank screen if you boot the system before you changed the video card or the driver? plications? A: Reboot the computer. A: Adjust the resolution and frequency at 1 second intervals? Please change to the video card manual. A: If there...The message is displayed again if the system is rebooted.) Q: There is displayed. Q: Has the video card been set properly? A: The monitor is fully inserted in PowerSaver mode. Connect the DVI cable and then reboot the system. Q: Have you adjusted the resolution or frequency to the...
...at the screen through a cellophane paper? A: You may get a blank screen if you boot the system before you changed the video card or the driver? plications? A: Reboot the computer. A: Adjust the resolution and frequency at 1 second intervals? Please change to the video card manual. A: If there...The message is displayed again if the system is rebooted.) Q: There is displayed. Q: Has the video card been set properly? A: The monitor is fully inserted in PowerSaver mode. Connect the DVI cable and then reboot the system. Q: Have you adjusted the resolution or frequency to the...
User Manual (ENGLISH)
Page 79
... or frequency on the menu? A: Install the monitor driver according to Connecting Cables) Check the volume level. Problems related to Audio Q: No sound A: Ensure that reads "Unrecognized monitor, Plug & Play (VESA DDC) monitor found". Q: Have you installed the monitor driver? A: Windows XP : Set the resolution at ...the Control Panel → Display → Settings. A: Set the video card by referring to the Driver Installation Instructions. A: Install the monitor driver according to the video card manual. Q: See the video card manual to see if the Plug & Play (VESA...
... or frequency on the menu? A: Install the monitor driver according to Connecting Cables) Check the volume level. Problems related to Audio Q: No sound A: Ensure that reads "Unrecognized monitor, Plug & Play (VESA DDC) monitor found". Q: Have you installed the monitor driver? A: Windows XP : Set the resolution at ...the Control Panel → Display → Settings. A: Set the video card by referring to the Driver Installation Instructions. A: Install the monitor driver according to the video card manual. Q: See the video card manual to see if the Plug & Play (VESA...
User Manual (ENGLISH)
Page 80
... Hz. (Do not exceed 75 Hz when using the maximum resolution.) If you assembled the PC, check if the installed the adapter(video) driver and the monitor driver. http://www.samsung.com/monitor/magictune MagicTune™ doesn't work properly. Q: Have you install the program? Check the following items if there is found only on the...
... Hz. (Do not exceed 75 Hz when using the maximum resolution.) If you assembled the PC, check if the installed the adapter(video) driver and the monitor driver. http://www.samsung.com/monitor/magictune MagicTune™ doesn't work properly. Q: Have you install the program? Check the following items if there is found only on the...
User Manual (ENGLISH)
Page 81
...). Do not leave any water enter the monitor. Q: How can be changed by reconfiguring the video card. A: Disconnect the power cord and then clean the monitor with a soft cloth, using either a ... Contact the video card manufacturer for details.) Q: How can vary, depending on the version of the driver used. (Refer to see if you do need assistance, please call the phone number on the case...frequency can I adjusts the resolution? A: Note that video card support can I clean the outer case/LCD Panel? A: Windows ME/2000: Set the resolution in the Control Panel → Appearance and Themes ...
...). Do not leave any water enter the monitor. Q: How can be changed by reconfiguring the video card. A: Disconnect the power cord and then clean the monitor with a soft cloth, using either a ... Contact the video card manufacturer for details.) Q: How can vary, depending on the version of the driver used. (Refer to see if you do need assistance, please call the phone number on the case...frequency can I adjusts the resolution? A: Note that video card support can I clean the outer case/LCD Panel? A: Windows ME/2000: Set the resolution in the Control Panel → Appearance and Themes ...


