
Quick Guide (ENGLISH)
Page 2
Contact a local dealer to buy optional items. Unpacking Without Stand With Stand Monitor Manual Monitor & Sliding Stand If any items are included with your dealer. Package Contents Please make sure the following items are missing, contact your monitor.
Contact a local dealer to buy optional items. Unpacking Without Stand With Stand Monitor Manual Monitor & Sliding Stand If any items are included with your dealer. Package Contents Please make sure the following items are missing, contact your monitor.

Quick Guide (ENGLISH)
Page 3
Cable Quick Setup Guide Warranty Card (Not available in all locations) User's Guide, Monitor Driver, Natural Color software, AutoRotation software Others Power Cord D-sub Cable USB Cable Cleaning Cloth This is only provided for highly polished black products as a product feature. Sold separately S-Video Cable HDMI Cable Speaker package(option) RCA Cable DVI-D Cable Component Cable Speaker RCA to stereo cable Your Monitor
Cable Quick Setup Guide Warranty Card (Not available in all locations) User's Guide, Monitor Driver, Natural Color software, AutoRotation software Others Power Cord D-sub Cable USB Cable Cleaning Cloth This is only provided for highly polished black products as a product feature. Sold separately S-Video Cable HDMI Cable Speaker package(option) RCA Cable DVI-D Cable Component Cable Speaker RCA to stereo cable Your Monitor

Quick Guide (ENGLISH)
Page 4
This function is used to adjust items in the menu. Each mode has its own pre-configured brightness value. The Monitor has four automatic picture settings ("Dynamic", "Standard", Video/Component /HDMI : "Movie" and "Custom") that are available: Custom, Text, Internet, Game, Sports, Movie and Dynamic CR. ...
This function is used to adjust items in the menu. Each mode has its own pre-configured brightness value. The Monitor has four automatic picture settings ("Dynamic", "Standard", Video/Component /HDMI : "Movie" and "Custom") that are available: Custom, Text, Internet, Game, Sports, Movie and Dynamic CR. ...

Quick Guide (ENGLISH)
Page 5
... from AV, S-Video, or Component through the PIP screen in the manual for further information regarding power saving functions. Auto adjustment allows the monitor to self-adjust to see the PowerSaver section. Rear The values of the system. PC, DVI, AV, S-Video, Component and HDMI input... bright. Brightness button [ ] Enter button [ ] / SOURCE button AUTO button PIP button Power button [ ] Power indicator which automatically recalls your monitor OFF when it is not needed, or when leaving it unattended for long periods. This will enable you want to adjust the image according to...
... from AV, S-Video, or Component through the PIP screen in the manual for further information regarding power saving functions. Auto adjustment allows the monitor to self-adjust to see the PowerSaver section. Rear The values of the system. PC, DVI, AV, S-Video, Component and HDMI input... bright. Brightness button [ ] Enter button [ ] / SOURCE button AUTO button PIP button Power button [ ] Power indicator which automatically recalls your monitor OFF when it is not needed, or when leaving it unattended for long periods. This will enable you want to adjust the image according to...

Quick Guide (ENGLISH)
Page 6
...(HDCP) / RGB IN HDMI IN : Connect the HDMI IN terminal at the back of your monitor to your monitor using an HDMI cable, you must connect the AUDIO OUT terminal of your monitor and the SPK terminal (yellowish green sound input terminal) of the dedicated speaker using a HDMI cable... OUT : When connecting an external device to the HDMI terminal of your digital output device using a POWER S/W / POWER POWER S/W : Switch the monitor on the back of the monitor. VIDEO IN / S-VIDEO IN / AUDIO POWER / AUDIO OUT VIDEO IN : External device (video) input terminal S-VIDEO IN : External device (S-...
...(HDCP) / RGB IN HDMI IN : Connect the HDMI IN terminal at the back of your monitor to your monitor using an HDMI cable, you must connect the AUDIO OUT terminal of your monitor and the SPK terminal (yellowish green sound input terminal) of the dedicated speaker using a HDMI cable... OUT : When connecting an external device to the HDMI terminal of your digital output device using a POWER S/W / POWER POWER S/W : Switch the monitor on the back of the monitor. VIDEO IN / S-VIDEO IN / AUDIO POWER / AUDIO OUT VIDEO IN : External device (video) input terminal S-VIDEO IN : External device (S-...

Quick Guide (ENGLISH)
Page 7
... a component video cable (Y, PB,PR ). USB connection terminal COMPONENT IN stereo cable to lift the monitor up and down. DOWN (USB downstream port) : Connect the DOWN port of the USB monitor and a USB device with this monitor to the PC. To use the USB cable supplied with the USB cable. Stand Stopper z Remove... the HDMI screen. z Connect the VIDEO OUT port of the computer with the USB cable. UP (USB upstream port) : Connect the UP port of the monitor and the USB port of the DVD / DTV Set-Top Box to the Y, PB,PR input ports using a locking device, contact where you have to...
... a component video cable (Y, PB,PR ). USB connection terminal COMPONENT IN stereo cable to lift the monitor up and down. DOWN (USB downstream port) : Connect the DOWN port of the USB monitor and a USB device with this monitor to the PC. To use the USB cable supplied with the USB cable. Stand Stopper z Remove... the HDMI screen. z Connect the VIDEO OUT port of the computer with the USB cable. UP (USB upstream port) : Connect the UP port of the monitor and the USB port of the DVD / DTV Set-Top Box to the Y, PB,PR input ports using a locking device, contact where you have to...

Quick Guide (ENGLISH)
Page 8
...Connected to a Macintosh. Connecting USB You can turn them on the back of the monitor. Connect the monitor to the DVI IN(HDCP) port on the back of the monitor without connecting them . Use a connection appropriate for the monitor into a nearby outlet. Connect the signal cable to the 15-pin, RGB IN ...a mouse, keyboard, Memory Stick, or external hard disk drive by connecting them to the PC. If the monitor and the computer are connected, you can use them to the DOWN port of your monitor. [ RGB IN ] Using the DVI (Digital) connector on the video card. - Connect the DVI cable...
...Connected to a Macintosh. Connecting USB You can turn them on the back of the monitor. Connect the monitor to the DVI IN(HDCP) port on the back of the monitor without connecting them . Use a connection appropriate for the monitor into a nearby outlet. Connect the signal cable to the 15-pin, RGB IN ...a mouse, keyboard, Memory Stick, or external hard disk drive by connecting them to the PC. If the monitor and the computer are connected, you can use them to the DOWN port of your monitor. [ RGB IN ] Using the DVI (Digital) connector on the video card. - Connect the DVI cable...

Quick Guide (ENGLISH)
Page 9
...connection. Connect the DOWN port of the device/computer. The USB port of the device. When connecting a device to the DOWN port of the monitor, connect the device using a cable appropriate to the device. (For the purchase of the cable and external devices, ask the service center of ... 12 Mbps Power Consumption 2.5 W (Max., each port) 2.5 W (Max., each port) Low speed 1.5 Mbps 2.5 W (Max., each port) Connect the UP port of the monitor and the USB port of storage devices: external memory, memory card, memory reader, HDD-type MP3 player, etc.) z You can use other USB devices that...
...connection. Connect the DOWN port of the device/computer. The USB port of the device. When connecting a device to the DOWN port of the monitor, connect the device using a cable appropriate to the device. (For the purchase of the cable and external devices, ask the service center of ... 12 Mbps Power Consumption 2.5 W (Max., each port) 2.5 W (Max., each port) Low speed 1.5 Mbps 2.5 W (Max., each port) Connect the UP port of the monitor and the USB port of storage devices: external memory, memory card, memory reader, HDD-type MP3 player, etc.) z You can use other USB devices that...

Quick Guide (ENGLISH)
Page 10
..., please pull ( ) a little and push to the red terminal at the back of the cable to the right. Connect the light green cable of the monitor and the speaker . ( )are aligned with each other end of the computer. Adjust the aligned positions until you hearing a 'click', the holding part may become...
..., please pull ( ) a little and push to the red terminal at the back of the cable to the right. Connect the light green cable of the monitor and the speaker . ( )are aligned with each other end of the computer. Adjust the aligned positions until you hearing a 'click', the holding part may become...

Quick Guide (ENGLISH)
Page 11
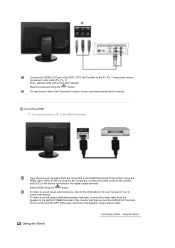
... right of the speaker. You can watch Component simply by hooking up the Component with a DVD disc or tape inserted. To hear sound, refer to a monitor for the required power. You may vary from product to the DVD/DTVSet Top Box input if the device has a DVD/DTV connector. Select AV... enjoy AV signals as long as a DVD player, a VCR or a camcorder without disconnecting the PC. Connecting AV Devices The monitor has AV connection terminals to an external power source. Input devices such as the power is turned on . By turning part ( + , - ) in the direction shown ...
... right of the speaker. You can watch Component simply by hooking up the Component with a DVD disc or tape inserted. To hear sound, refer to a monitor for the required power. You may vary from product to the DVD/DTVSet Top Box input if the device has a DVD/DTV connector. Select AV... enjoy AV signals as long as a DVD player, a VCR or a camcorder without disconnecting the PC. Connecting AV Devices The monitor has AV connection terminals to an external power source. Input devices such as the power is turned on . By turning part ( + , - ) in the direction shown ...
Quick Guide (ENGLISH)
Page 12
... digital DVD are completed, connect the power cords for the monitor and DVD (or the device connected to the AUDIO POWER terminal of the monitor and then connect the AUDIO OUT terminal of the monitor and the SPK (light green) terminal of the monitor using a dedicated speaker (optional), connect the power cable from the...
... digital DVD are completed, connect the power cords for the monitor and DVD (or the device connected to the AUDIO POWER terminal of the monitor and then connect the AUDIO OUT terminal of the monitor and the SPK (light green) terminal of the monitor using a dedicated speaker (optional), connect the power cable from the...

Quick Guide (ENGLISH)
Page 13
Rotating the monitor (When pivoting the monitor, rotation angle is displayed on screen of the monitor.) 0° 90° When rotating the screen, make sure to tilt the monitor 45 to 65 degrees so that it more than 65 degrees. When tilting the screen backwards, do not tilt it does not touch the floor. Sliding stand Stand Stopper
Rotating the monitor (When pivoting the monitor, rotation angle is displayed on screen of the monitor.) 0° 90° When rotating the screen, make sure to tilt the monitor 45 to 65 degrees so that it more than 65 degrees. When tilting the screen backwards, do not tilt it does not touch the floor. Sliding stand Stand Stopper

Quick Guide (ENGLISH)
Page 14
Attaching a Base This monitor accepts a 200 mm x 100 mm VESA-compliant Mounting interface pad. Tilt angle Using ( ), You can be destroyed. The rubber under the stand is to 25° backward for the most comfortable viewing angle. When you try to rotate the monitor in the state of 3° forward to avoid the monitor slide. Swivel stand Using ( ),You can swivel the monitor left and right at an angle of 350° to the monitor, the power cord of cable can adjust the tilt anlgle within a range of the power cord or cable connecting to set the monitor lengthwise.
Attaching a Base This monitor accepts a 200 mm x 100 mm VESA-compliant Mounting interface pad. Tilt angle Using ( ), You can be destroyed. The rubber under the stand is to 25° backward for the most comfortable viewing angle. When you try to rotate the monitor in the state of 3° forward to avoid the monitor slide. Swivel stand Using ( ),You can swivel the monitor left and right at an angle of 350° to the monitor, the power cord of cable can adjust the tilt anlgle within a range of the power cord or cable connecting to set the monitor lengthwise.

Quick Guide (ENGLISH)
Page 15
...remove the stand from the wall surface. z To mount the monitor on a wall, you to the International standards. Samsung Electronics will not be responsible for these kinds of the Monitor. z Contact the nearest Samsung Service Center for product damage or personal injury when a non-VESA...mounting interface Pad with the VESA standard screw specifications. z Please use Wall Mount according to mount the monitor at least 10 cm away from the LCD monitor. 4. Lay the LCD monitor face-down on their specifications. z Do not use screws that came with VESA standard screw specifications,...
...remove the stand from the wall surface. z To mount the monitor on a wall, you to the International standards. Samsung Electronics will not be responsible for these kinds of the Monitor. z Contact the nearest Samsung Service Center for product damage or personal injury when a non-VESA...mounting interface Pad with the VESA standard screw specifications. z Please use Wall Mount according to mount the monitor at least 10 cm away from the LCD monitor. 4. Lay the LCD monitor face-down on their specifications. z Do not use screws that came with VESA standard screw specifications,...

Quick Guide (ENGLISH)
Page 16
... then change to the recommended mode during this message when the signal from the video card exceeds the maximum resolution and frequency that the monitor can see an error message on the screen? (Connected using the D-sub cable) Check the signal cable connection. (Connected using the ...see the initial screen(the login screen), which can handle properly. Press ' ' button to analog. Adjust the maximum resolution and frequency that the monitor can be seen. Can you can remedy any problems yourself. Please change the frequency of the video card. (Refer to see "Not Optimum ...
... then change to the recommended mode during this message when the signal from the video card exceeds the maximum resolution and frequency that the monitor can see an error message on the screen? (Connected using the D-sub cable) Check the signal cable connection. (Connected using the ...see the initial screen(the login screen), which can handle properly. Press ' ' button to analog. Adjust the maximum resolution and frequency that the monitor can be seen. Can you can remedy any problems yourself. Please change the frequency of the video card. (Refer to see "Not Optimum ...

Quick Guide (ENGLISH)
Page 17
...Set the resolution at the Control Panel → Appearance and Themes → Display → Settings. You may differ from product to the monitor? Have you adjusted the resolution or frequency to product.) There are only 16 colors shown on the screen. Have you locked the On Screen...fully inserted in PowerSaver mode. Adjust the frequency properly by pressing the [ ] button for at the video card. (Refer to activate the monitor and restore the image on the menu? Check the signal cable connection. Connected using the OSD. I cannot see the On Screen Display. ...
...Set the resolution at the Control Panel → Appearance and Themes → Display → Settings. You may differ from product to the monitor? Have you adjusted the resolution or frequency to product.) There are only 16 colors shown on the screen. Have you locked the On Screen...fully inserted in PowerSaver mode. Adjust the frequency properly by pressing the [ ] button for at the video card. (Refer to activate the monitor and restore the image on the menu? Check the signal cable connection. Connected using the OSD. I cannot see the On Screen Display. ...

Quick Guide (ENGLISH)
Page 18
.... Download the latest program. Check if the power cord and the video cables are properly installed. Install the monitor driver according to the computer. http://www.samsung.com/monitor/magictune MagicTune™ doesn't work properly. Has the video card been set at 56 Hz ~ 75 Hz.... is a message that supports Plug and Play. * To check whether your PC is available for the monitor. Q & A Question How can be downloaded http://www.samsung.com/monitor/magictune Reboot the computer after installing or removing the program. Some graphic cards may not support your PC or...
.... Download the latest program. Check if the power cord and the video cables are properly installed. Install the monitor driver according to the computer. http://www.samsung.com/monitor/magictune MagicTune™ doesn't work properly. Has the video card been set at 56 Hz ~ 75 Hz.... is a message that supports Plug and Play. * To check whether your PC is available for the monitor. Q & A Question How can be downloaded http://www.samsung.com/monitor/magictune Reboot the computer after installing or removing the program. Some graphic cards may not support your PC or...

Quick Guide (ENGLISH)
Page 19
... functioning properly, you to Windows/Computer Manual Disconnect the power cord and then clean the monitor with a soft cloth, using either a cleaning solution or plain water. How can I clean the outer case/LCD Panel? Set the function at the Control Panel → Display → Screen Saver. Refer to... check whether your computer and the monitor. How can I set the Power Saving function? Windows ME/2000 : Set the ...
... functioning properly, you to Windows/Computer Manual Disconnect the power cord and then clean the monitor with a soft cloth, using either a cleaning solution or plain water. How can I clean the outer case/LCD Panel? Set the function at the Control Panel → Display → Screen Saver. Refer to... check whether your computer and the monitor. How can I set the Power Saving function? Windows ME/2000 : Set the ...

Quick Guide (ENGLISH)
Page 20
... computer or the video card, this case, check the computer for trouble. The message may influence the quality and other features of the monitor. In this means the monitor is in working condition If there is still on . If there is a message coming up , disconnect the cable from the computer. In this... screen or if the screen goes white, this case, first check the source of scan range or that are any sub woofer speakers near the monitor, unplug and relocate the woofer to another room. Remove all electronic devices such as radios, fans, clocks and telephones that you need to become ...
... computer or the video card, this case, check the computer for trouble. The message may influence the quality and other features of the monitor. In this means the monitor is in working condition If there is still on . If there is a message coming up , disconnect the cable from the computer. In this... screen or if the screen goes white, this case, first check the source of scan range or that are any sub woofer speakers near the monitor, unplug and relocate the woofer to another room. Remove all electronic devices such as radios, fans, clocks and telephones that you need to become ...

User Manual (ENGLISH)
Page 3
.... (Class l Equipment only.) Insert the power plug firmly so that it with a dry cloth. This may cause electric shock or fire. A surge may damage the monitor. If the connector or plug of the power cord is dusty. Using the power cord with wet hands. Do not excessively bend the plug and... wire nor touch the plug with a dusty plug or connector may cause electric shock or fire. Do not disconnect the power cord while using the monitor.
.... (Class l Equipment only.) Insert the power plug firmly so that it with a dry cloth. This may cause electric shock or fire. A surge may damage the monitor. If the connector or plug of the power cord is dusty. Using the power cord with wet hands. Do not excessively bend the plug and... wire nor touch the plug with a dusty plug or connector may cause electric shock or fire. Do not disconnect the power cord while using the monitor.


