
User Guide
Page 8
... product, turn the product off, unplug the power connector from combustible chemical sprays or inflammable substances. An inappropriate resolution may cause undesirable picture quality. 24 inch (61 cm) - 1920 x 1200 Viewing the monitor continuously at least a five-minute break after every hour of using the monitor. If a foreign substance enters the monitor, unplug the power cord and contact the Service Center. Adjust the resolution and frequency to...
... product, turn the product off, unplug the power connector from combustible chemical sprays or inflammable substances. An inappropriate resolution may cause undesirable picture quality. 24 inch (61 cm) - 1920 x 1200 Viewing the monitor continuously at least a five-minute break after every hour of using the monitor. If a foreign substance enters the monitor, unplug the power cord and contact the Service Center. Adjust the resolution and frequency to...
User Guide
Page 11
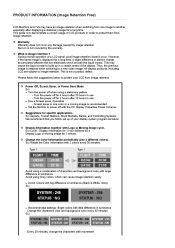
... charge accumulates between the two electrodes which can cause Image retention easily. Screen saver in luminance (Black & White, Grey) Ex) ! Change the Color Information periodically (Use 2 different colors). Recommended settings: Bright colors with big difference in one image to another especially after displaying a stationary image for specific applications Ex) Airports, Transit Stations, Stock Markets, Banks, and Controlling Systems We recommend that you follow the suggestions below...
... charge accumulates between the two electrodes which can cause Image retention easily. Screen saver in luminance (Black & White, Grey) Ex) ! Change the Color Information periodically (Use 2 different colors). Recommended settings: Bright colors with big difference in one image to another especially after displaying a stationary image for specific applications Ex) Airports, Transit Stations, Stock Markets, Banks, and Controlling Systems We recommend that you follow the suggestions below...

User Guide
Page 16
... PC mode only) When the 'AUTO' button is pressed, the Auto Adjustment screen appears as shown in PIP Mode. POWER S/W / POWER PC, DVI, AV, S-Video, Component and HDMI input signal.) Changing the source is only allowed for further information regarding power saving functions. You can view a picture from product to product. 3) Movie Select this mode when you to see the overall power status of the screen displaying the current mode -- The values of the monitor may...
... PC mode only) When the 'AUTO' button is pressed, the Auto Adjustment screen appears as shown in PIP Mode. POWER S/W / POWER PC, DVI, AV, S-Video, Component and HDMI input signal.) Changing the source is only allowed for further information regarding power saving functions. You can view a picture from product to product. 3) Movie Select this mode when you to see the overall power status of the screen displaying the current mode -- The values of the monitor may...

User Guide
Page 17
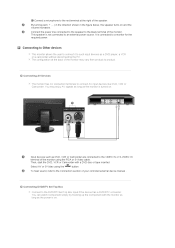
... ! Kensington Lock ! RGB IN : Connect the RGB IN terminal at the back of your monitor to the HDMI terminal of your digital output device using a stereo cable to connect the monitor's UP port and your monitor and the SPK terminal (yellowish green sound input terminal) of the DVD / DTV Set-Top Box to your monitor. Connect the VIDEO OUT port of the dedicated speaker using a HDMI cable. POWER : Connect the power cord for your monitor to the DVI IN(HDCP) port on...
... ! Kensington Lock ! RGB IN : Connect the RGB IN terminal at the back of your monitor to the HDMI terminal of your digital output device using a stereo cable to connect the monitor's UP port and your monitor and the SPK terminal (yellowish green sound input terminal) of the DVD / DTV Set-Top Box to your monitor. Connect the VIDEO OUT port of the dedicated speaker using a HDMI cable. POWER : Connect the power cord for your monitor to the DVI IN(HDCP) port on...
User Guide
Page 22
... AV or S-Video using the RCA or S-Video cable. You may vary from product to such input devices as the power is connected to the VIDEO IN or S-VIDEO IN terminal of the monitor using the ' ' button. Connecting DVD/DTV Set Top Box Connect to the Connection section of your conncted external device manual . Connecting to Other devices This monitor allows the user to connect it to product. To hear sound, refer...
... AV or S-Video using the RCA or S-Video cable. You may vary from product to such input devices as the power is connected to the VIDEO IN or S-VIDEO IN terminal of the monitor using the ' ' button. Connecting DVD/DTV Set Top Box Connect to the Connection section of your conncted external device manual . Connecting to Other devices This monitor allows the user to connect it to product. To hear sound, refer...
User Guide
Page 26
Align the mounting interface Pad with the VESA standard screw specifications. Samsung is not liable for more information. Turn off your monitor and unplug its power cord. Remove four screws and then remove the stand from the wall surface. Contact the nearest Samsung Service Center for product damage or personal injury when a non-VESA or non-specified wall mount is not liable for damages caused by using a base other base. ! ! ! ! ! ! ! Samsung Electronics will not...
Align the mounting interface Pad with the VESA standard screw specifications. Samsung is not liable for more information. Turn off your monitor and unplug its power cord. Remove four screws and then remove the stand from the wall surface. Contact the nearest Samsung Service Center for product damage or personal injury when a non-VESA or non-specified wall mount is not liable for damages caused by using a base other base. ! ! ! ! ! ! ! Samsung Electronics will not...
User Guide
Page 27
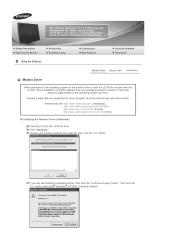
.... Internet web site :http://www.samsung.com/ (Worldwide) http://www.samsung.com/monitor (U.S.A) http://www.sec.co.kr/monitor (Korea) http://www.samsungmonitor.com.cn/ (China) Installing the Monitor Driver (Automatic) Insert the CD into the CD-ROM drive. Click "Windows". Then click the "OK" button (Microsoft® Windows® XP/2000 Operating System). Monitor Driver When prompted by the operating system...
.... Internet web site :http://www.samsung.com/ (Worldwide) http://www.samsung.com/monitor (U.S.A) http://www.sec.co.kr/monitor (Korea) http://www.samsungmonitor.com.cn/ (China) Installing the Monitor Driver (Automatic) Insert the CD into the CD-ROM drive. Click "Windows". Then click the "OK" button (Microsoft® Windows® XP/2000 Operating System). Monitor Driver When prompted by the operating system...

User Guide
Page 28
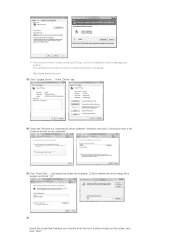
... used as shown in the "Monitor" tab. Click "Personalization" and then "Display Settings". Installing the Monitor Driver (Manual) Windows Vista | Windows XP | Windows 2000 | Windows ME | Windows NT | Linux Microsoft® Windows® Vista Operating System Insert your Manual CD into your monitor is deactivated, it means the configuration for your CD-ROM drive. If the "Properties" button is completed. Click (Start) and "Control Panel". This monitor driver is . Click "Advanced Settings...". The monitor...
... used as shown in the "Monitor" tab. Click "Personalization" and then "Display Settings". Installing the Monitor Driver (Manual) Windows Vista | Windows XP | Windows 2000 | Windows ME | Windows NT | Linux Microsoft® Windows® Vista Operating System Insert your Manual CD into your monitor is deactivated, it means the configuration for your CD-ROM drive. If the "Properties" button is completed. Click (Start) and "Control Panel". This monitor driver is . Click "Advanced Settings...". The monitor...
User Guide
Page 29
... list of device drivers on Samsung Monitor homepage http://www.samsung.com/ Click "Update Driver..." The certified driver will be posted on my computer". This monitor driver is located, and click "OK". Check the "Browse my computer for example, D:\Drive) where the driver setup file is under certifying MS logo, and this installation doesn't damage your monitor from a list of monitor models on the screen, and click...
... list of device drivers on Samsung Monitor homepage http://www.samsung.com/ Click "Update Driver..." The certified driver will be posted on my computer". This monitor driver is located, and click "OK". Check the "Browse my computer for example, D:\Drive) where the driver setup file is under certifying MS logo, and this installation doesn't damage your monitor from a list of monitor models on the screen, and click...
User Guide
Page 33
... "Digital Signature Not Found" window then click the "Yes" button. Click the "Apply" button if you close the Display Properties dialogue box. The next screen is a type of resolution and vertical frequency by referring to install Click "Start," "Setting," and then "Control Panel." How to the Preset Timing Modes in the user guide. And click the "Finish" button then the "Close" button. Select the "Monitor" tab. First of colors and Vertical frequency) and...
... "Digital Signature Not Found" window then click the "Yes" button. Click the "Apply" button if you close the Display Properties dialogue box. The next screen is a type of resolution and vertical frequency by referring to install Click "Start," "Setting," and then "Control Panel." How to the Preset Timing Modes in the user guide. And click the "Finish" button then the "Close" button. Select the "Monitor" tab. First of colors and Vertical frequency) and...

User Guide
Page 39
... deactivate the OSD adjustment lock function. Locked Unlock : Hold down the menu button for more than five (5) seconds to activate the OSD adjustment lock function. Though the OSD adjustment lock function is the function that locks the OSD in order to keep the current states of settings or prevent others from adjusting the current settings. When pressing the AUTO or PIP button after locking the OSD When pressing the MENU button after locking the OSD Menu Description This...
... deactivate the OSD adjustment lock function. Locked Unlock : Hold down the menu button for more than five (5) seconds to activate the OSD adjustment lock function. Though the OSD adjustment lock function is the function that locks the OSD in order to keep the current states of settings or prevent others from adjusting the current settings. When pressing the AUTO or PIP button after locking the OSD When pressing the MENU button after locking the OSD Menu Description This...

User Guide
Page 45
... Dynamic CR. Not available in PC mode only 1) Coarse : Adjust the screen so that creates unstable images with jitter and shimmer. By changing the resolution in MagicBright™ mode of Dynamic CR. 4) H-Position : Adjusts the screen location horizontally. 5) V-Position : Adjusts the screen location vertically. Available in AV/S-Video Mode Only MENU ! , Contrast Bightness Sharpness PIP Picture Color Tint ! ! , ! ! , ! ! , ! Available in PC mode only MENU ! , ! ! , ! Picture (AV/S-Video/Component/HDMI) Image Lock is performed. - If the noise persists even...
... Dynamic CR. Not available in PC mode only 1) Coarse : Adjust the screen so that creates unstable images with jitter and shimmer. By changing the resolution in MagicBright™ mode of Dynamic CR. 4) H-Position : Adjusts the screen location horizontally. 5) V-Position : Adjusts the screen location vertically. Available in AV/S-Video Mode Only MENU ! , Contrast Bightness Sharpness PIP Picture Color Tint ! ! , ! ! , ! ! , ! Available in PC mode only MENU ! , ! ! , ! Picture (AV/S-Video/Component/HDMI) Image Lock is performed. - If the noise persists even...

User Guide
Page 47
... Input Mode (input signal source selected in MagicBright™ mode of Dynamic CR. Play/Stop Color Innovation MENU ! , ! ! ! , ! In Component mode, film mode is the case, adjust the Picture and Color menu by using the OSD to view effectively with the screen when the Color Innovation function is enabled. 5) Custom The pre-configured values may different depending on your eyes. Not available in External Input List) and the selected resolution. Size ! MENU ! , ! ! , ! ! , ! Film Mode...
... Input Mode (input signal source selected in MagicBright™ mode of Dynamic CR. Play/Stop Color Innovation MENU ! , ! ! ! , ! In Component mode, film mode is the case, adjust the Picture and Color menu by using the OSD to view effectively with the screen when the Color Innovation function is enabled. 5) Custom The pre-configured values may different depending on your eyes. Not available in External Input List) and the selected resolution. Size ! MENU ! , ! ! , ! ! , ! Film Mode...

User Guide
Page 48
.../DVI(PC) Mode Only MENU ! , ! ! , ! ! , ! 6-Color 6 types: Red, Green, Blue, Cyan, Magenta and Yellow - Increased Mode number - Displays the full screen sharper and improves the bright scale. - Menu Description Turn the PIP Screen on the selected Input Mode (input signal source selected in External Input List) and the selected resolution. PIP (PC / DVI : PC) The default setting may different depending on or off. Can adjust each of them to the original screen mode. Saturation Hue Reset MENU ! , ! ! , ! ! , ! ! , ! ! , ! Displays the full screen...
.../DVI(PC) Mode Only MENU ! , ! ! , ! ! , ! 6-Color 6 types: Red, Green, Blue, Cyan, Magenta and Yellow - Increased Mode number - Displays the full screen sharper and improves the bright scale. - Menu Description Turn the PIP Screen on the selected Input Mode (input signal source selected in External Input List) and the selected resolution. PIP (PC / DVI : PC) The default setting may different depending on or off. Can adjust each of them to the original screen mode. Saturation Hue Reset MENU ! , ! ! , ! ! , ! ! , ! ! , ! Displays the full screen...

User Guide
Page 50
.... MENU ! , ! ! , ! ! , ! Audio Power When your TV via HDMI, it may appear when a still picture is calculated on the basis of your monitor. MENU ! , ! ! , ! ! , ! Operates only for AV, S-Video, Component and HDMI mode. If you must set a brightness level, the LED blinks and is not supplied to prevent afterimages that terminal. MPA MPA (Motion Picture Acceleration-Motion Picture Acceleration) This function is very weak, a blue screen automatically replaces the noisy picture background. LED Brightness Adjusts...
.... MENU ! , ! ! , ! ! , ! Audio Power When your TV via HDMI, it may appear when a still picture is calculated on the basis of your monitor. MENU ! , ! ! , ! ! , ! Operates only for AV, S-Video, Component and HDMI mode. If you must set a brightness level, the LED blinks and is not supplied to prevent afterimages that terminal. MPA MPA (Motion Picture Acceleration-Motion Picture Acceleration) This function is very weak, a blue screen automatically replaces the noisy picture background. LED Brightness Adjusts...

User Guide
Page 52
.... Symptom No images on the monitor. Solutions Check the power cord connection and supply. (Connected using the D-sub cable) Check the signal cable connection. (Connected using the DVI cable) If you still see an error message on the screen when the monitor is connected properly, check to see if the monitor status is on the screen? Check List Before calling for service, check the information in this section to analog. Can you can handle properly. If the display exceeds SXGA...
.... Symptom No images on the monitor. Solutions Check the power cord connection and supply. (Connected using the D-sub cable) Check the signal cable connection. (Connected using the DVI cable) If you still see an error message on the screen when the monitor is connected properly, check to see if the monitor status is on the screen? Check List Before calling for service, check the information in this section to analog. Can you can handle properly. If the display exceeds SXGA...
User Guide
Page 53
... the video card been set properly? Make sure the video card is still no images on the monitor? Have the Windows colors been set properly? Display ! Have you connect the DVI cable, or disconnect and then reconnect the DVI cable while the system is out of the video card signals. Adjust screen image position and size using the DVI cable? If there is fully inserted in its slot. Check the signal cable connection. Windows ME/2000 : Set the resolution at 1 second intervals? Is the power indicator...
... the video card been set properly? Make sure the video card is still no images on the monitor? Have the Windows colors been set properly? Display ! Have you connect the DVI cable, or disconnect and then reconnect the DVI cable while the system is out of the video card signals. Adjust screen image position and size using the DVI cable? If there is fully inserted in its slot. Check the signal cable connection. Windows ME/2000 : Set the resolution at 1 second intervals? Is the power indicator...
User Guide
Page 54
... Mode, remove the Display Adapter at 56 Hz ~ 75 Hz. (Do not exceed 60 Hz when using the maximum resolution.) If you installed a new video card or assembled the PC, please check if the adapter(video) driver and the monitor driver are properly connected to check the compatible graphic card list provided. There is a message that video card support can vary, depending on PC (VGA) with Window OS that supports Plug and Play. See the video card manual to the Driver Installation Instructions...
... Mode, remove the Display Adapter at 56 Hz ~ 75 Hz. (Do not exceed 60 Hz when using the maximum resolution.) If you installed a new video card or assembled the PC, please check if the adapter(video) driver and the monitor driver are properly connected to check the compatible graphic card list provided. There is a message that video card support can vary, depending on PC (VGA) with Window OS that supports Plug and Play. See the video card manual to the Driver Installation Instructions...

User Guide
Page 58
... with a VESA DPM compliant video card installed in power management system called PowerSaver. Dot Acceptable TFT LCD panel manufactured by switching your monitor OFF when it without prior notice. Use a software utility installed on your computer. Signal Cable 15pin-to-15pin D-sub cable, Detachable DVI-D to DVI-D connector, Detachable (Sold separately) Signal Connectors 15pin 3-row D-sub connector, 24pin 3-row DVI-D connector, Composite Video(RCA), S-Video, Component Dimensions (W x H x D) / Weight 560.5 X 369.0 X 91.0 mm / 22.1 x 14.5 x 3.6 inch (Without Stand) 560...
... with a VESA DPM compliant video card installed in power management system called PowerSaver. Dot Acceptable TFT LCD panel manufactured by switching your monitor OFF when it without prior notice. Use a software utility installed on your computer. Signal Cable 15pin-to-15pin D-sub cable, Detachable DVI-D to DVI-D connector, Detachable (Sold separately) Signal Connectors 15pin 3-row D-sub connector, 24pin 3-row DVI-D connector, Composite Video(RCA), S-Video, Component Dimensions (W x H x D) / Weight 560.5 X 369.0 X 91.0 mm / 22.1 x 14.5 x 3.6 inch (Without Stand) 560...

User Guide
Page 64
... change without uneasiness. shall not be bright sometimes or some of cleaner by using soft and dry cloth and polish it . For Better Display Adjust computer resolution and screen injection rate (refresh rate) oncomputer as window termination button is contained in TFT-LCD. Resolution : 1920 x 1200 Vertical frequency (refresh rate) : 60 Hz TFT LCD panel manufactured by using advanced semiconductor technology with the furnishing, performance, or use FINE/COARSE adjustment function. But the pixels of RED, GREEN, BLUE and WHITE color...
... change without uneasiness. shall not be bright sometimes or some of cleaner by using soft and dry cloth and polish it . For Better Display Adjust computer resolution and screen injection rate (refresh rate) oncomputer as window termination button is contained in TFT-LCD. Resolution : 1920 x 1200 Vertical frequency (refresh rate) : 60 Hz TFT LCD panel manufactured by using advanced semiconductor technology with the furnishing, performance, or use FINE/COARSE adjustment function. But the pixels of RED, GREEN, BLUE and WHITE color...


