
User Manual (ENGLISH)
Page 10
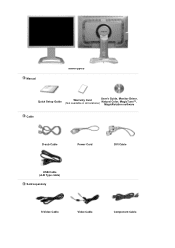
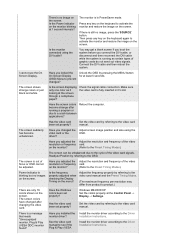
Manual Stand type B Quick Setup Guide Warranty Card (Not available in all locations) User's Guide, Monitor Driver, Natural Color, MagicTune™, MagicRotation software Cable D-sub Cable Power Cord DVI Cable USB Cable (A-B Type cable) Sold separately S-Video Cable Video Cable Component Cable
Manual Stand type B Quick Setup Guide Warranty Card (Not available in all locations) User's Guide, Monitor Driver, Natural Color, MagicTune™, MagicRotation software Cable D-sub Cable Power Cord DVI Cable USB Cable (A-B Type cable) Sold separately S-Video Cable Video Cable Component Cable

User Manual (ENGLISH)
Page 12
... PIP button Power button [ ] Power indicator ( Available in Analog/Digital(PC) Mode Only ) In Analog or Digital Mode, turns on the screen, push the button to adjust brightness. >>Click here to your monitor OFF when it is off . Use this mode when the surroundings are connected to see an animation clip Brightness button [ ] Enter button [ ] / SOURCE button AUTO button ( Available in Analog Mode Only ) When OSD is not on Video screens in "Standard" mode. 2) Standard Select this button for further information regarding power saving functions...
... PIP button Power button [ ] Power indicator ( Available in Analog/Digital(PC) Mode Only ) In Analog or Digital Mode, turns on the screen, push the button to adjust brightness. >>Click here to your monitor OFF when it is off . Use this mode when the surroundings are connected to see an animation clip Brightness button [ ] Enter button [ ] / SOURCE button AUTO button ( Available in Analog Mode Only ) When OSD is not on Video screens in "Standard" mode. 2) Standard Select this button for further information regarding power saving functions...

User Manual (ENGLISH)
Page 13
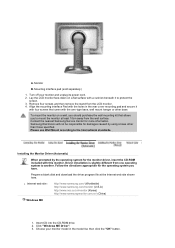
DVI IN (Source List : Digital) : Connect the DVI cable to the 15-pin, RGB IN port on the back of the monitor may vary from product to product.) Kensington Lock : The Kensington lock is a device used to physically fix the system when using it in a public place. (The locking device has to be purchased separately.) For using a locking device, contact where you purchase it. RGB IN (Source List : Analog) : Connect the signal cable to the DVI IN port on the back of your monitor. (The configuration at the back of your monitor.
DVI IN (Source List : Digital) : Connect the DVI cable to the 15-pin, RGB IN port on the back of the monitor may vary from product to product.) Kensington Lock : The Kensington lock is a device used to physically fix the system when using it in a public place. (The locking device has to be purchased separately.) For using a locking device, contact where you purchase it. RGB IN (Source List : Analog) : Connect the signal cable to the DVI IN port on the back of your monitor. (The configuration at the back of your monitor.

User Manual (ENGLISH)
Page 16
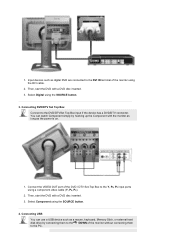
Cable Fix Ring. Connecting AV Devices The monitor has AV connection terminals to connect DVI input devices digital DVD. Connecting Digital DVD The monitor has DVI IN connection terminals to connect AV input devices like DVD, VCR or Camcorder. Input devices such as DVD, VCR or Camcorder are connected to product. Select Video or S-Video using the Video or S-Video cable. 2. To listen to audio, connect the audio cable to such input devices as the monitor is turned on. 1. Then, start the DVD...
Cable Fix Ring. Connecting AV Devices The monitor has AV connection terminals to connect DVI input devices digital DVD. Connecting Digital DVD The monitor has DVI IN connection terminals to connect AV input devices like DVD, VCR or Camcorder. Input devices such as DVD, VCR or Camcorder are connected to product. Select Video or S-Video using the Video or S-Video cable. 2. To listen to audio, connect the audio cable to such input devices as the monitor is turned on. 1. Then, start the DVD...
User Manual (ENGLISH)
Page 17
..., keyboard, Memory Stick, or external hard disk drive by hooking up the Component with a DVD disc inserted. 3. Select Digital using the SOURCE button. 4. Then, start the DVD with the monitor as long as digital DVD are connected to the PC. Select Component using the SOURCE button. 3. Connecting USB You can watch Component simply by connecting them to the DVI IN terminal of the monitor using a component video cable (Y, PB, PR). 2. 1.
..., keyboard, Memory Stick, or external hard disk drive by hooking up the Component with a DVD disc inserted. 3. Select Digital using the SOURCE button. 4. Then, start the DVD with the monitor as long as digital DVD are connected to the PC. Select Component using the SOURCE button. 3. Connecting USB You can watch Component simply by connecting them to the DVI IN terminal of the monitor using a component video cable (Y, PB, PR). 2. 1.
User Manual (ENGLISH)
Page 22
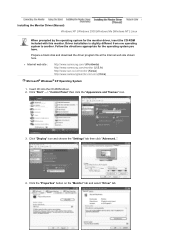
... more information. Click "Windows ME Driver". 3. Align the mounting interface Pad with the holes in the model list, then click the "OK" button. Choose your monitor and unplug its power cord. 2. Remove four screws and then remove the stand from one operating system to the International standards. To mount the monitor on a flat surface with this monitor. Driver installation is slightly different from the LCD monitor. 4. Please use Wall Mount according to another...
... more information. Click "Windows ME Driver". 3. Align the mounting interface Pad with the holes in the model list, then click the "OK" button. Choose your monitor and unplug its power cord. 2. Remove four screws and then remove the stand from one operating system to the International standards. To mount the monitor on a flat surface with this monitor. Driver installation is slightly different from the LCD monitor. 4. Please use Wall Mount according to another...
User Manual (ENGLISH)
Page 24
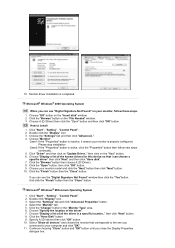
... "Settings" tab then click "Advanced..". 4. Click the "Properties" button on the "Monitor" tab and select "Driver" tab. z Internet web site : http://www.samsung.com/ (Worldwide) http://www.samsung.com/monitor (U.S.A) http://www.sec.co.kr/monitor (Korea) http://www.samsungmonitor.com.cn/ (China) Microsoft® Windows® XP Operating System 1. Insert CD into the CD-ROM driver. 2. Installing the Monitor Driver (Manual) Windows XP | Windows 2000 |Windows...
... "Settings" tab then click "Advanced..". 4. Click the "Properties" button on the "Monitor" tab and select "Driver" tab. z Internet web site : http://www.samsung.com/ (Worldwide) http://www.samsung.com/monitor (U.S.A) http://www.sec.co.kr/monitor (Korea) http://www.samsungmonitor.com.cn/ (China) Microsoft® Windows® XP Operating System 1. Insert CD into the CD-ROM driver. 2. Installing the Monitor Driver (Manual) Windows XP | Windows 2000 |Windows...
User Manual (ENGLISH)
Page 25
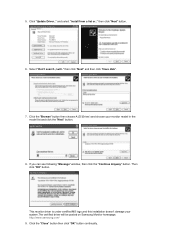
...://www.samsung.com/ 9. Then click "OK" button. This monitor driver is under certified MS logo,and this installation doesn't damage your monitor model in the model list and click the "Next" button. 8. Click "Update Driver.." then click "Next" button. 6. Select "Don't search ,I will be posted on Samsung Monitor homepage. then click "Next" and then click "Have disk". 7. If you can see following "Message" window, then...
...://www.samsung.com/ 9. Then click "OK" button. This monitor driver is under certified MS logo,and this installation doesn't damage your monitor model in the model list and click the "Next" button. 8. Click "Update Driver.." then click "Next" button. 6. Select "Don't search ,I will be posted on Samsung Monitor homepage. then click "Next" and then click "Have disk". 7. If you can see following "Message" window, then...
User Manual (ENGLISH)
Page 26
... you connected to install 1. Click "Driver" and then click on the "File Needed" window. 3. Choose "Display a list of the driver". 7. And click the "Finish" button then the "Close" button. Case1: If the "Properties" button is inactive, it means your monitor model and click the "Next" button then click "Next" button. 10. then click "Next" button. 8. Choose A:(D:\Driver) then click the "Open" button and then click "OK" button. Click "Start" , "Setting" , "Control Panel". 2. How...
... you connected to install 1. Click "Driver" and then click on the "File Needed" window. 3. Choose "Display a list of the driver". 7. And click the "Finish" button then the "Close" button. Case1: If the "Properties" button is inactive, it means your monitor model and click the "Next" button then click "Next" button. 10. then click "Next" button. 8. Choose A:(D:\Driver) then click the "Open" button and then click "OK" button. Click "Start" , "Setting" , "Control Panel". 2. How...

User Manual (ENGLISH)
Page 27
... Start, Settings, Control Panel, and then double-click Display icon. 2. Select a mode that the color of your monitor. Click Apply button if you see the screen working normally after setting other images scanned by a scanner or a digital camera are not the same as the printed or scanned images. The next screen is a color administration system developed by referring to the Preset Timing Modes in the software program. Enter the model...
... Start, Settings, Control Panel, and then double-click Display icon. 2. Select a mode that the color of your monitor. Click Apply button if you see the screen working normally after setting other images scanned by a scanner or a digital camera are not the same as the printed or scanned images. The next screen is a color administration system developed by referring to the Preset Timing Modes in the software program. Enter the model...

User Manual (ENGLISH)
Page 42
Color Overview | Installation | OSD Mode | | Uninstall | Troubleshooting Calibration Overview What is recommended using the Display Data Channel Command Interface (DDC/CI) protocol. Proper adjustment (tuning) requires an easy to use program that goes through the tuning process with easy to adjust it for your unique setting. The display settings for you. Monitor performance can vary due to obtain the best overall picture quality. In most cases even simple adjustments to...
Color Overview | Installation | OSD Mode | | Uninstall | Troubleshooting Calibration Overview What is recommended using the Display Data Channel Command Interface (DDC/CI) protocol. Proper adjustment (tuning) requires an easy to use program that goes through the tuning process with easy to adjust it for your unique setting. The display settings for you. Monitor performance can vary due to obtain the best overall picture quality. In most cases even simple adjustments to...

User Manual (ENGLISH)
Page 47
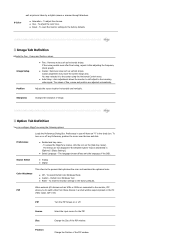
... on all display resolutions supported by simply pressing MagicBright control buttons. 1. Reset Restores the display settings to monitor models. Currently four different modes are best suited for you. OSD Mode The OSD mode makes the adjustment of images such as a DVD or VCD. If you are watching. Picture Tab Definition Allows the user to adjust the screen settings to easily save and use monitor configurations that are available: Text, Internet, Entertain and Custom. Adjust the brightness for adjustment. MagicBright™...
... on all display resolutions supported by simply pressing MagicBright control buttons. 1. Reset Restores the display settings to monitor models. Currently four different modes are best suited for you. OSD Mode The OSD mode makes the adjustment of images such as a DVD or VCD. If you are watching. Picture Tab Definition Allows the user to adjust the screen settings to easily save and use monitor configurations that are available: Text, Internet, Entertain and Custom. Adjust the brightness for adjustment. MagicBright™...
User Manual (ENGLISH)
Page 49
... after adjusting the frequency (clock speed). You may move the screen image area. To turn on the [task tray menu]. The menus are not displayed if the [Enable System Tray] is deselected in the check box. Partial Color Blindness Test z Reset - To reset the monitor settings to the center using the following options. Position Change the Position of the OSD. Position Adjusts the screen location horizontally and vertically. z Enable task tray menu . - z Select Language - Color Weakness...
... after adjusting the frequency (clock speed). You may move the screen image area. To turn on the [task tray menu]. The menus are not displayed if the [Enable System Tray] is deselected in the check box. Partial Color Blindness Test z Reset - To reset the monitor settings to the center using the following options. Position Change the Position of the OSD. Position Adjusts the screen location horizontally and vertically. z Enable task tray menu . - z Select Language - Color Weakness...
User Manual (ENGLISH)
Page 55
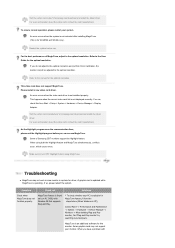
... User Guide for the optimal resolution. If you can check this from Start > Setup > System > Hardware > Device Manager > Display Adapter. Refer to the optimal condition. For the best performance of Samsung CDT monitors support the Highlight feature. As the Highlight program uses the communication lines, please exit the Highlight program before you do not adjust to the optimal resolution and perform Color Calibration, the monitor cannot be adjusted to the manual for the optimal resolution. Troubleshooting...
... User Guide for the optimal resolution. If you can check this from Start > Setup > System > Hardware > Device Manager > Display Adapter. Refer to the optimal condition. For the best performance of Samsung CDT monitors support the Highlight feature. As the Highlight program uses the communication lines, please exit the Highlight program before you do not adjust to the optimal resolution and perform Color Calibration, the monitor cannot be adjusted to the manual for the optimal resolution. Troubleshooting...
User Manual (ENGLISH)
Page 69
... the Plug & Play (VESA Install the monitor driver according to the Driver Installation Instructions. Set the video card by referring to the video card manual and the Preset Timing Modes. (The maximum frequency per resolution may get a blank screen if you boot the system before you changed after running as if looking at 1 second intervals? The screen is still no image on the monitor? (Refer to the video card manual. The screen colors have changed the Adjust screen image position and size using the DVI cable...
... the Plug & Play (VESA Install the monitor driver according to the Driver Installation Instructions. Set the video card by referring to the video card manual and the Preset Timing Modes. (The maximum frequency per resolution may get a blank screen if you boot the system before you changed after running as if looking at 1 second intervals? The screen is still no image on the monitor? (Refer to the video card manual. The screen colors have changed the Adjust screen image position and size using the DVI cable...

User Manual (ENGLISH)
Page 70
... cards may not support your PC or video graphic card? Check if the power cord and the video cables are properly connected to Windows/Computer Manual). If you assembled the PC, check if the installed the adapter (video) driver and the monitor driver. 4. Windows ME/XP/2000 : Set the resolution at the Control Panel→Display→Settings. * Contact the video card manufacturer for MagicTune™ MAC. How can vary, depending on PC (VGA) with the monitor. 1. Disconnect the power cord and then clean the monitor...
... cards may not support your PC or video graphic card? Check if the power cord and the video cables are properly connected to Windows/Computer Manual). If you assembled the PC, check if the installed the adapter (video) driver and the monitor driver. 4. Windows ME/XP/2000 : Set the resolution at the Control Panel→Display→Settings. * Contact the video card manufacturer for MagicTune™ MAC. How can vary, depending on PC (VGA) with the monitor. 1. Disconnect the power cord and then clean the monitor...

User Manual (ENGLISH)
Page 71
... of the problem, and Turn off your monitor is functioning properly, you need to go inside the monitor. Turn on the screen or the screen goes blank although the Power indicator LED is functioning properly. 1. This box appears during normal operation if the video cable becomes disconnected or damaged. 4. If your monitor screen remains blank after using the previous procedure, check your computer and the monitor. 2. Remove all electronic...
... of the problem, and Turn off your monitor is functioning properly, you need to go inside the monitor. Turn on the screen or the screen goes blank although the Power indicator LED is functioning properly. 1. This box appears during normal operation if the video cable becomes disconnected or damaged. 4. If your monitor screen remains blank after using the previous procedure, check your computer and the monitor. 2. Remove all electronic...
User Manual (ENGLISH)
Page 74
... black pixels could be installed on any Plug & Play compatible system. But the pixels of RED, GREEN, BLUE and WHITE color seem to be bright sometimes or some of stand installed) VESA Mounting Interface 100 mm x 100 mm (for this product are 6,912,000 Note: Design and specifications are subject to set up this feature. Dot Acceptable TFT LCD panel manufactured by switching your computer. Use a software utility installed on the keyboard. In most cases, monitor installation...
... black pixels could be installed on any Plug & Play compatible system. But the pixels of RED, GREEN, BLUE and WHITE color seem to be bright sometimes or some of stand installed) VESA Mounting Interface 100 mm x 100 mm (for this product are 6,912,000 Note: Design and specifications are subject to set up this feature. Dot Acceptable TFT LCD panel manufactured by switching your computer. Use a software utility installed on the keyboard. In most cases, monitor installation...

User Manual (ENGLISH)
Page 81
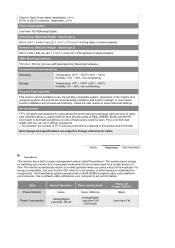
... consequential damages in TFT-LCD. { Resolution: 1920 X 1200 { Vertical frequency (refresh rate): 60 Hz 2. Class B This device is strictly forbidden. camcorders and DVD players, separate from the monitor for an extended period of black pixels could be scrubbed out softly. Adjust computer resolution and screen injection rate (refresh rate) oncomputer as window termination button is not provided in connection with the furnishing, performance, or use of picture. If you view a fixed screen for this...
... consequential damages in TFT-LCD. { Resolution: 1920 X 1200 { Vertical frequency (refresh rate): 60 Hz 2. Class B This device is strictly forbidden. camcorders and DVD players, separate from the monitor for an extended period of black pixels could be scrubbed out softly. Adjust computer resolution and screen injection rate (refresh rate) oncomputer as window termination button is not provided in connection with the furnishing, performance, or use of picture. If you view a fixed screen for this...
Brochure
Page 1
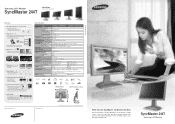
...) Height Swivel Tilt Pivot Functional Performance • Breakthrough in Power Saving : In power off all monitors when leaving the office. Professional monitors should be adjusted with SyncMaster 244T. Samsung LCD Monitor SyncMaster 244T Stylish Design - SyncMaster 244T Samsung LCD Monitor Specifications Class SyncMaster 244T(W/W) SyncMaster 244T(Europe) Panel Viewable Area Pixel Pitch Brightness (typ.) Contrast Ratio (typ.) Viewing Angle (H/V) Response Time (typ.) Frequency Horizontal Frequency Vertical Frequency Maximum Resolution Color Supported Signal Input...
...) Height Swivel Tilt Pivot Functional Performance • Breakthrough in Power Saving : In power off all monitors when leaving the office. Professional monitors should be adjusted with SyncMaster 244T. Samsung LCD Monitor SyncMaster 244T Stylish Design - SyncMaster 244T Samsung LCD Monitor Specifications Class SyncMaster 244T(W/W) SyncMaster 244T(Europe) Panel Viewable Area Pixel Pitch Brightness (typ.) Contrast Ratio (typ.) Viewing Angle (H/V) Response Time (typ.) Frequency Horizontal Frequency Vertical Frequency Maximum Resolution Color Supported Signal Input...


