
User Manual (user Manual) (ver.1.0) (English)
Page 6
.... z Failure to qualified service personnel. z Refer servicing to do not install inside a vehicle. Keep the product away from the power outlet and wipe the product using a soft, dry cloth. If the monitor is dropped or the casing is not used for interior cleaning once a year. unplug it is damaged, turn the monitor off and unplug the power cord. z The monitor may cause malfunction, an...
.... z Failure to qualified service personnel. z Refer servicing to do not install inside a vehicle. Keep the product away from the power outlet and wipe the product using a soft, dry cloth. If the monitor is dropped or the casing is not used for interior cleaning once a year. unplug it is damaged, turn the monitor off and unplug the power cord. z The monitor may cause malfunction, an...
User Manual (user Manual) (ver.1.0) (English)
Page 11
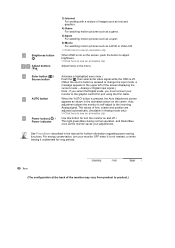
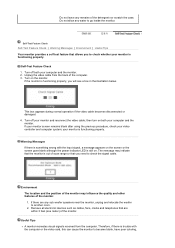
... animated screen on the screen, push the button to adjust brightness. >>Click here to see an animation clip Adjust items in the menu. Activates a highlighted menu item. / Push the ' ', then selects the video signal while the OSD is off . / This light glows Blue during normal operation, and blinks Blue once as the monitor saves your monitor to the graphic card's DVI port using the DVI cable. Brightness button [] Adjust buttons [] Enter button [ ] / Source button AUTO button Power button [ ] / Power indicator 3) Internet For working with a mixture of images such...
... animated screen on the screen, push the button to adjust brightness. >>Click here to see an animation clip Adjust items in the menu. Activates a highlighted menu item. / Push the ' ', then selects the video signal while the OSD is off . / This light glows Blue during normal operation, and blinks Blue once as the monitor saves your monitor to the graphic card's DVI port using the DVI cable. Brightness button [] Adjust buttons [] Enter button [ ] / Source button AUTO button Power button [ ] / Power indicator 3) Internet For working with a mixture of images such...
User Manual (user Manual) (ver.1.0) (English)
Page 12
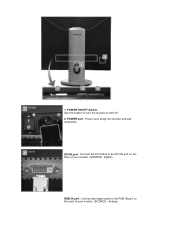
POWER ON/OFF Switch : Use this button for turn the monitor on the back of your monitor. (SOURCE : Analog) POWER port : Power cord, plugs into monitor and wall receptacle. DVI IN port : Connect the DVI Cable to the DVI IN port on the back of your monitor. (SOURCE : Digital) RGB IN port : Connect the signal cable to the RGB IN port on and off 2. 1.
POWER ON/OFF Switch : Use this button for turn the monitor on the back of your monitor. (SOURCE : Analog) POWER port : Power cord, plugs into monitor and wall receptacle. DVI IN port : Connect the DVI Cable to the DVI IN port on the back of your monitor. (SOURCE : Digital) RGB IN port : Connect the signal cable to the RGB IN port on and off 2. 1.
User Manual (user Manual) (ver.1.0) (English)
Page 16
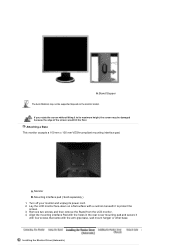
... its power cord. 2. Installing the Monitor Driver (Automatic) Turn off your monitor and unplug its maximum height, the screen may not be damaged because the edge of the screen would hit the floor. Attaching a Base This monitor accepts a 100 mm x 100 mm VESA-compliant mounting interface pad. A.Stand Stopper The Auto Ratation may be supported depend on a flat surface with the arm-type base, wall mount hanger or other base. Lay the LCD monitor...
... its power cord. 2. Installing the Monitor Driver (Automatic) Turn off your monitor and unplug its maximum height, the screen may not be damaged because the edge of the screen would hit the floor. Attaching a Base This monitor accepts a 100 mm x 100 mm VESA-compliant mounting interface pad. A.Stand Stopper The Auto Ratation may be supported depend on a flat surface with the arm-type base, wall mount hanger or other base. Lay the LCD monitor...
User Manual (user Manual) (ver.1.0) (English)
Page 18
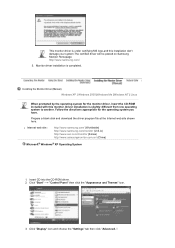
... "Start" -> "Control Panel" then click the "Appearance and Themes" icon. 3. Prepare a blank disk and download the driver program file at the Internet web site shown here. Installing the Monitor Driver (Manual) Windows XP | Windows 2000 |Windows Me |Windows NT | Linux When prompted by the operating system for the operating system you have. Click "Display" icon and choose the "Settings" tab then click "Advanced..". This monitor driver is...
... "Start" -> "Control Panel" then click the "Appearance and Themes" icon. 3. Prepare a blank disk and download the driver program file at the Internet web site shown here. Installing the Monitor Driver (Manual) Windows XP | Windows 2000 |Windows Me |Windows NT | Linux When prompted by the operating system for the operating system you have. Click "Display" icon and choose the "Settings" tab then click "Advanced..". This monitor driver is...
User Manual (user Manual) (ver.1.0) (English)
Page 20
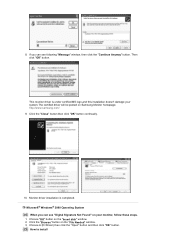
... "Open" button and then click "OK" button. Then click "OK" button. Click the "Browse" button on the "Insert disk" window. 2. Monitor driver installation is under certified MS logo,and this installation doesn't damage your monitor, follow these steps. 1. Click the "Close" button then click "OK" button continually. 10. How to install Choose "OK" button on the "File Needed" window. 3. 8. This monitor driver is completed. If you can see "Digital Signature...
... "Open" button and then click "OK" button. Then click "OK" button. Click the "Browse" button on the "Insert disk" window. 2. Monitor driver installation is under certified MS logo,and this installation doesn't damage your monitor, follow these steps. 1. Click the "Close" button then click "OK" button continually. 10. How to install Choose "OK" button on the "File Needed" window. 3. 8. This monitor driver is completed. If you can see "Digital Signature...

User Manual (user Manual) (ver.1.0) (English)
Page 21
... vertical frequency by referring to your computer and click "OK". 11. Click Start, Settings, Control Panel, and then double-click Display icon. 2. Press Enter at All Display Modes, select the level of resolution, colors or frequency). Set a mouse for your monitor. (You can enter the frequency directly.) 8. First of your monitor model and click the "Next" button then click "Next" button. 10. Enter the model name of all the driver in a specific...
... vertical frequency by referring to your computer and click "OK". 11. Click Start, Settings, Control Panel, and then double-click Display icon. 2. Press Enter at All Display Modes, select the level of resolution, colors or frequency). Set a mouse for your monitor. (You can enter the frequency directly.) 8. First of your monitor model and click the "Next" button then click "Next" button. 10. Enter the model name of all the driver in a specific...
User Manual (user Manual) (ver.1.0) (English)
Page 24
... and position are adjusted automatically. (Available in Analog mode only) To make the automatic adjustment function sharper, execute the 'AUTO' function while the AUTO PATTERN is pressed, the Auto Adjustment screen appears as shown in the animated screen on . - If auto adjustment does not work properly, press 'AUTO' button again to the incoming Analog signal. If you change resolution in the control panel, auto function will be executed automatically. OSD Lock & Unlock >> AUTO button Auto adjustment allows the monitor to self-adjust to adjust picture...
... and position are adjusted automatically. (Available in Analog mode only) To make the automatic adjustment function sharper, execute the 'AUTO' function while the AUTO PATTERN is pressed, the Auto Adjustment screen appears as shown in the animated screen on . - If auto adjustment does not work properly, press 'AUTO' button again to the incoming Analog signal. If you change resolution in the control panel, auto function will be executed automatically. OSD Lock & Unlock >> AUTO button Auto adjustment allows the monitor to self-adjust to adjust picture...

User Manual (user Manual) (ver.1.0) (English)
Page 33
... simple adjustments to Brightness, or Contrast require navigation of the display with the ability to use monitor configurations that guides you to the graphics card, host computer lighting conditions and other environmental factors. All adjustments to the display are best suited for your unique setting. You can access the desired menu item to set with easy to understand instructions and back ground patterns designed for each user...
... simple adjustments to Brightness, or Contrast require navigation of the display with the ability to use monitor configurations that guides you to the graphics card, host computer lighting conditions and other environmental factors. All adjustments to the display are best suited for your unique setting. You can access the desired menu item to set with easy to understand instructions and back ground patterns designed for each user...

User Manual (user Manual) (ver.1.0) (English)
Page 38
... tabs and sub-menu items. Button Tab Definition OK Reset Cancel Applies any changes z When Rotation is functioning, portion of the sub-menu items for adjustment. z MagicTune control mode will automatically rotate when the monitor is determined by the mTodel of the monitor settings, the OSD mode allows easy and convenient access to the factory settings. Color Overview | Installation | OSD Mode | | Uninstall | Troubleshooting Calibration MagicTune™ allows for quick accurate tuning of...
... tabs and sub-menu items. Button Tab Definition OK Reset Cancel Applies any changes z When Rotation is functioning, portion of the sub-menu items for adjustment. z MagicTune control mode will automatically rotate when the monitor is determined by the mTodel of the monitor settings, the OSD mode allows easy and convenient access to the factory settings. Color Overview | Installation | OSD Mode | | Uninstall | Troubleshooting Calibration MagicTune™ allows for quick accurate tuning of...

User Manual (user Manual) (ver.1.0) (English)
Page 39
... works involving heavy text. 2. MagicBright control mode will only support Four modes(Text, Internet, Entertain, Custom) Determines the crispness of the image you are watching. MagicBright™ is not adjusted to your eyes depending on the contents of the images. Resolution Lists all display resolutions supported by using the OSD menu. nmlkji Brightness nmlkj Contrast nmlkj Resolution nmlkj MagicBright Brightness Makes the entire screen brighter or darker. Movie: For watching motion pictures...
... works involving heavy text. 2. MagicBright control mode will only support Four modes(Text, Internet, Entertain, Custom) Determines the crispness of the image you are watching. MagicBright™ is not adjusted to your eyes depending on the contents of the images. Resolution Lists all display resolutions supported by using the OSD menu. nmlkji Brightness nmlkj Contrast nmlkj Resolution nmlkj MagicBright Brightness Makes the entire screen brighter or darker. Movie: For watching motion pictures...

User Manual (user Manual) (ver.1.0) (English)
Page 48
... the Troubleshooting section. Please visit our homepage to support this via Start > Setup > System > Hardware > Device Manager > Display Adapter. An error may occur when your monitor is manufactured by Samsung but the system has not been restarted. An error occurs when the video card driver is not in the list. You can check this feature. An error may occur even when your video/graphic card is not installed...
... the Troubleshooting section. Please visit our homepage to support this via Start > Setup > System > Hardware > Device Manager > Display Adapter. An error may occur when your monitor is manufactured by Samsung but the system has not been restarted. An error occurs when the video card driver is not in the list. You can check this feature. An error may occur even when your video/graphic card is not installed...
User Manual (user Manual) (ver.1.0) (English)
Page 49
... function properly. Control Panel -> Performance and Maintenance -> System -> Hardware -> Device Manager -> Monitors -> After deleting Plug and Play monitor, find 'Plug and Play monitor' by searching new Hardware. When you can check this from Start > Setup > System > Hardware > Device Manager > Display Adapter. If you do not adjust to the optimal resolution and perform Color Calibration, the monitor cannot be adjusted to the User Guide for the optimal resolution. This video card does not support MagicTune™. For...
... function properly. Control Panel -> Performance and Maintenance -> System -> Hardware -> Device Manager -> Monitors -> After deleting Plug and Play monitor, find 'Plug and Play monitor' by searching new Hardware. When you can check this from Start > Setup > System > Hardware > Device Manager > Display Adapter. If you do not adjust to the optimal resolution and perform Color Calibration, the monitor cannot be adjusted to the User Guide for the optimal resolution. This video card does not support MagicTune™. For...
User Manual (user Manual) (ver.1.0) (English)
Page 60
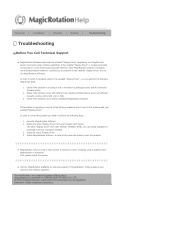
... problem is working incorrectly or has bugs in both 0 orientation (Landscape mode) and 90 orientation (Portarit mode). 2. Overview | Installation | Interface | Uninstall | Troubleshooting Troubleshooting Before You Call Technical Support z MagicRotation Software works with the installed "Display Driver" supplied by your Graphic Card Vendor to problems in the installed "Display Driver" are easily available for MagicRotation, FAQs (questions and answers) and software upgrades. Install the latest "Display Driver" 4. z Visit the MagicRotation website for technical support for download...
... problem is working incorrectly or has bugs in both 0 orientation (Landscape mode) and 90 orientation (Portarit mode). 2. Overview | Installation | Interface | Uninstall | Troubleshooting Troubleshooting Before You Call Technical Support z MagicRotation Software works with the installed "Display Driver" supplied by your Graphic Card Vendor to problems in the installed "Display Driver" are easily available for MagicRotation, FAQs (questions and answers) and software upgrades. Install the latest "Display Driver" 4. z Visit the MagicRotation website for technical support for download...
User Manual (user Manual) (ver.1.0) (English)
Page 61
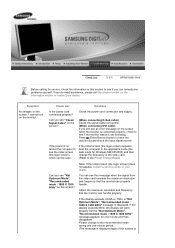
... the power cord connected properly? You can see this message when the signal from the video card exceeds the maximum resolution and frequency that the monitor can properly handle. Please change the frequency of the video card. (Refer to have the monitor double-check the input signal source. Symptom No images on the monitor. Can you see "Check Signal Cable" on the screen? (When connecting D-Sub cable) Check the signal cable connection. (When connecting DVI cable) If you see the initial screen (the login screen...
... the power cord connected properly? You can see this message when the signal from the video card exceeds the maximum resolution and frequency that the monitor can properly handle. Please change the frequency of the video card. (Refer to have the monitor double-check the input signal source. Symptom No images on the monitor. Can you see "Check Signal Cable" on the screen? (When connecting D-Sub cable) Check the signal cable connection. (When connecting DVI cable) If you see the initial screen (the login screen...
User Manual (user Manual) (ver.1.0) (English)
Page 62
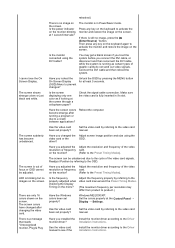
... Install the monitor driver according to activate the monitor and restore the image on the monitor? (Refer to the video card manual. The screen shows strange colors or just black and white. Have the screen colors become unbalanced. The screen suddenly has become strange after changing the video card. on the screen. The screen is out of graphic cards do not send out video signals. The screen colors have changed the Adjust screen image position and size using the DVI cable? Windows ME/2000/XP: Set the colors...
... Install the monitor driver according to activate the monitor and restore the image on the monitor? (Refer to the video card manual. The screen shows strange colors or just black and white. Have the screen colors become unbalanced. The screen suddenly has become strange after changing the video card. on the screen. The screen is out of graphic cards do not send out video signals. The screen colors have changed the Adjust screen image position and size using the DVI cable? Windows ME/2000/XP: Set the colors...
User Manual (user Manual) (ver.1.0) (English)
Page 63
... website and download the installation software for the main board of the computer.) 3. Check the following items if there is an additional software for the monitor. Check if the power cord and the video cables are properly connected to Windows/Computer Manual). If you installed a new video card or if you have problems in installing the adapter (video) driver, boot the computer in Safe Mode, remove the Display Adapter at the Control Panel→Display→Settings. * Contact the video card manufacturer for...
... website and download the installation software for the main board of the computer.) 3. Check the following items if there is an additional software for the monitor. Check if the power cord and the video cables are properly connected to Windows/Computer Manual). If you installed a new video card or if you have problems in installing the adapter (video) driver, boot the computer in Safe Mode, remove the Display Adapter at the Control Panel→Display→Settings. * Contact the video card manufacturer for...
User Manual (user Manual) (ver.1.0) (English)
Page 64
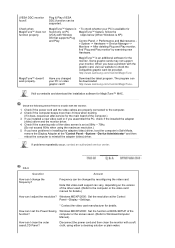
... poor coloring, Remove all electronic devices such as radios, fans, clocks and telephones that you need to check the signal cable. This box appears during normal operation if the video cable becomes disconnected or damaged. 4. Turn off both your monitor is functioning properly. If your monitor screen remains blank after using the previous procedure, check your computer and the monitor. 2. Environment The location and the position...
... poor coloring, Remove all electronic devices such as radios, fans, clocks and telephones that you need to check the signal cable. This box appears during normal operation if the video cable becomes disconnected or damaged. 4. Turn off both your monitor is functioning properly. If your monitor screen remains blank after using the previous procedure, check your computer and the monitor. 2. Environment The location and the position...
User Manual (user Manual) (ver.1.0) (English)
Page 67
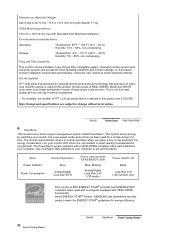
... the best operating conditions and monitor settings. This is not from bad quality and you press a key on the keyboard. Interaction of TFT LCD sub pixels that this feature. The monitor automatically returns to change without uneasiness. Use a software utility installed on any Plug & Play compatible system. State Power Indicator Power Consumption Normal Operation Blue Analog/Digital Less than 50 W Power saving mode EPA/ENERGY 2000 Blue, Blinking Analog/Digital Less than 2 W (Off-mode) Power Switch off Black Less...
... the best operating conditions and monitor settings. This is not from bad quality and you press a key on the keyboard. Interaction of TFT LCD sub pixels that this feature. The monitor automatically returns to change without uneasiness. Use a software utility installed on any Plug & Play compatible system. State Power Indicator Power Consumption Normal Operation Blue Analog/Digital Less than 50 W Power saving mode EPA/ENERGY 2000 Blue, Blinking Analog/Digital Less than 2 W (Off-mode) Power Switch off Black Less...
User Manual (user Manual) (ver.1.0) (English)
Page 73
..., the number of TFT LCD sub pixels that is subject to be away from the monitor for energy efficiency. You can get better quality of Microsoft Corporation; shall not be scrubbed out softly. As an ENERGY STAR® Partner, Samsung Electronics Co., Ltd. TFT LCD panel manufactured by executing "auto adjustment function" in TFT-LCD. { Resolution: 1600 X 1200 { Vertical frequency (refresh rate): 60 Hz 2. Change the mode to energy save or set...
..., the number of TFT LCD sub pixels that is subject to be away from the monitor for energy efficiency. You can get better quality of Microsoft Corporation; shall not be scrubbed out softly. As an ENERGY STAR® Partner, Samsung Electronics Co., Ltd. TFT LCD panel manufactured by executing "auto adjustment function" in TFT-LCD. { Resolution: 1600 X 1200 { Vertical frequency (refresh rate): 60 Hz 2. Change the mode to energy save or set...


