Quick Guide (ENGLISH)
Page 2
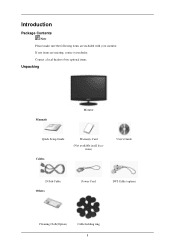
Contact a local dealer to buy optional items. Unpacking Manuals Monitor Quick Setup Guide Cables Warranty Card (Not available in all locations) User's Guide D-Sub Cable Others Power Cord DVI Cable (option) Cleaning Cloth(Option) Cable holding ring 8 If any items are included with your dealer. Introduction Package Contents Note Please make sure the following items are missing, contact your monitor.
Contact a local dealer to buy optional items. Unpacking Manuals Monitor Quick Setup Guide Cables Warranty Card (Not available in all locations) User's Guide D-Sub Cable Others Power Cord DVI Cable (option) Cleaning Cloth(Option) Cable holding ring 8 If any items are included with your dealer. Introduction Package Contents Note Please make sure the following items are missing, contact your monitor.

Quick Guide (ENGLISH)
Page 3
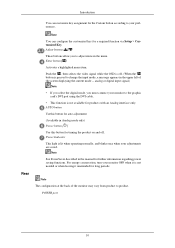
... polished black products as the optimal resolution for this product. Turn the Power button off and on -screen menu and exits from the menu. Your Monitor Initial Settings Select the language using the up to adjust the resolution of your PC resolution so that it is the same as a product feature...
... polished black products as the optimal resolution for this product. Turn the Power button off and on -screen menu and exits from the menu. Your Monitor Initial Settings Select the language using the up to adjust the resolution of your PC resolution so that it is the same as a product feature...
Quick Guide (ENGLISH)
Page 4
... If you select the digital mode, you to adjust items in the upper left of the monitor may vary from product to change the input mode, a message appears in the menu. For energy conservation, turn your... monitor OFF when it is not needed or when leaving it unattended for a required function via Setup > Customized Key.... operating normally, and blinks once when your preferences. Adjust buttons [ ] These buttons allow you must connect your monitor to your adjustments are saved.
... If you select the digital mode, you to adjust items in the upper left of the monitor may vary from product to change the input mode, a message appears in the menu. For energy conservation, turn your... monitor OFF when it is not needed or when leaving it unattended for a required function via Setup > Customized Key.... operating normally, and blinks once when your preferences. Adjust buttons [ ] These buttons allow you must connect your monitor to your adjustments are saved.
Quick Guide (ENGLISH)
Page 5
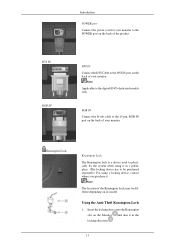
DVI IN RGB IN Introduction POWER port Connect the power cord for your monitor to the POWER port on the back of your monitor. Insert the locking device into the Kensington slot on its model. Using the Anti-Theft Kensington Lock 1. Note Applicable to the DVI IN port on ... using a locking device, contact where you purchase it in the locking direction . 11 RGB IN Connect the D-sub cable to be different depending on the Monitor and turn it . Note The location of your monitor. DVI IN Connect the DVI Cable to the digital (DVI)-dedicated models only.
DVI IN RGB IN Introduction POWER port Connect the power cord for your monitor to the POWER port on the back of your monitor. Insert the locking device into the Kensington slot on its model. Using the Anti-Theft Kensington Lock 1. Note Applicable to the DVI IN port on ... using a locking device, contact where you purchase it in the locking direction . 11 RGB IN Connect the D-sub cable to be different depending on the Monitor and turn it . Note The location of your monitor. DVI IN Connect the DVI Cable to the digital (DVI)-dedicated models only.
Quick Guide (ENGLISH)
Page 7
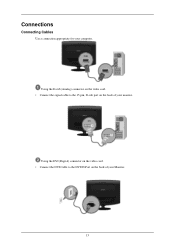
Connections Connecting Cables Use a connection appropriate for your monitor. Using the D-sub (Analog) connector on the video card. • Connect the signal cable to the DVI IN Port on the back of your Monitor. 13 Using the DVI (Digital) connector on the video card. • Connect the DVI Cable to the 15-pin, D-sub port on the back of your computer.
Connections Connecting Cables Use a connection appropriate for your monitor. Using the D-sub (Analog) connector on the video card. • Connect the signal cable to the DVI IN Port on the back of your Monitor. 13 Using the DVI (Digital) connector on the video card. • Connect the DVI Cable to the 15-pin, D-sub port on the back of your computer.
Quick Guide (ENGLISH)
Page 8
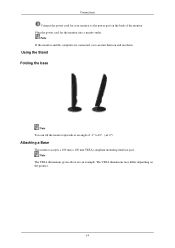
Using the Stand Folding the base Note You can turn them . Note The VESA dimensions given above are connected, you can tilt the monitor upwards at an angle of the monitor. The VESA dimensions may differ depending on and use them on the product. 14 Plug the power cord for your monitor to the power port on the back of -1° to 16°. ( ±1.0°) Attaching a Base This monitor accepts a 100 mm x 100 mm VESA-compliant mounting interface pad. Connections Connect the power cord for the monitor into a nearby outlet. Note If the monitor and the computer are an example.
Using the Stand Folding the base Note You can turn them . Note The VESA dimensions given above are connected, you can tilt the monitor upwards at an angle of the monitor. The VESA dimensions may differ depending on and use them on the product. 14 Plug the power cord for your monitor to the power port on the back of -1° to 16°. ( ±1.0°) Attaching a Base This monitor accepts a 100 mm x 100 mm VESA-compliant mounting interface pad. Connections Connect the power cord for the monitor into a nearby outlet. Note If the monitor and the computer are an example.
Quick Guide (ENGLISH)
Page 9
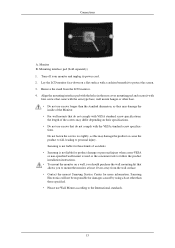
...-specified wall mount is not liable for more information. Lay the LCD monitor face-down on their specifications. • Do not use Wall Mount according to mount the monitor at least 10 cm away from the LCD monitor. 4. Samsung is used or the consumer fails to follow the product installation instructions.... • To mount the monitor on a wall, you should purchase the wall mounting kit that ...
...-specified wall mount is not liable for more information. Lay the LCD monitor face-down on their specifications. • Do not use Wall Mount according to mount the monitor at least 10 cm away from the LCD monitor. 4. Samsung is used or the consumer fails to follow the product installation instructions.... • To mount the monitor on a wall, you should purchase the wall mounting kit that ...
Quick Guide (ENGLISH)
Page 10
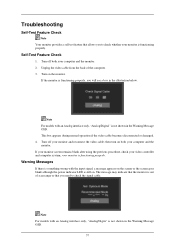
.... then turn on both your computer and the monitor. This box appears during normal operation if the video cable becomes disconnected or damaged. 4. If your monitor screen remains blank after using the previous procedure, check your monitor is functioning properly. your video controller and computer ...models with an Analog interface only, "Analog/Digita" is still on the monitor. Troubleshooting Self-Test Feature Check Note Your monitor provides a self test feature that you need to check whether your monitor and reconnect the video cable; Unplug the video cable from the back of ...
.... then turn on both your computer and the monitor. This box appears during normal operation if the video cable becomes disconnected or damaged. 4. If your monitor screen remains blank after using the previous procedure, check your monitor is functioning properly. your video controller and computer ...models with an Analog interface only, "Analog/Digita" is still on the monitor. Troubleshooting Self-Test Feature Check Note Your monitor provides a self test feature that you need to check whether your monitor and reconnect the video cable; Unplug the video cable from the back of ...
Quick Guide (ENGLISH)
Page 11
...the computer to become noisy, and video mode not supported, etc. Check List Note Before calling for assistance, check the information in this means the monitor is set to another room. Q: Can you do need assistance, please call the phone number on . A: (Connected using the D-sub cable) ... devices such as radios, fans, clocks and telephones that are any problems yourself. If you see "Check Signal Cable" on the screen when the monitor is still powered on the Information section or contact your dealer. Q: Is the power cord connected properly? If you can be seen. Press ' ...
...the computer to become noisy, and video mode not supported, etc. Check List Note Before calling for assistance, check the information in this means the monitor is set to another room. Q: Can you do need assistance, please call the phone number on . A: (Connected using the D-sub cable) ... devices such as radios, fans, clocks and telephones that are any problems yourself. If you see "Check Signal Cable" on the screen when the monitor is still powered on the Information section or contact your dealer. Q: Is the power cord connected properly? If you can be seen. Press ' ...
Quick Guide (ENGLISH)
Page 12
...Set the video card by pressing the [MENU/ ] button for one color as certain types of graphic cards do not send out video signals. A: The monitor is no image, press the ' ' button. Q: Is the screen displaying only one minute and then disappears. plications? A: Reboot the computer. Troubleshooting (... Please change to the recommended mode during this message when the signal from the video card exceeds the maximum resolution and frequency that the monitor can see this one-minute period. (The message is displayed again if the system is rebooted.) Q: There is in its slot. ...
...Set the video card by pressing the [MENU/ ] button for one color as certain types of graphic cards do not send out video signals. A: The monitor is no image, press the ' ' button. Q: Is the screen displaying only one minute and then disappears. plications? A: Reboot the computer. Troubleshooting (... Please change to the recommended mode during this message when the signal from the video card exceeds the maximum resolution and frequency that the monitor can see this one-minute period. (The message is displayed again if the system is rebooted.) Q: There is in its slot. ...
Quick Guide (ENGLISH)
Page 13
...The screen colors have changed the video card or the driver? A: Set the video card by referring to the OSD. A: Install the monitor driver according to the Driver Installation Instructions. A: Windows ME/2000 : Set the resolution at the Control Panel → Appearance and Themes ...→ Display → Settings. A: Install the monitor driver according to the Driver Installation Instructions. A: Adjust the resolution and frequency at the video card. (Refer to product.) There are only 16...
...The screen colors have changed the video card or the driver? A: Set the video card by referring to the OSD. A: Install the monitor driver according to the Driver Installation Instructions. A: Windows ME/2000 : Set the resolution at the Control Panel → Appearance and Themes ...→ Display → Settings. A: Install the monitor driver according to the Driver Installation Instructions. A: Adjust the resolution and frequency at the video card. (Refer to product.) There are only 16...
Quick Guide (ENGLISH)
Page 14
...after installing or removing the program. Check if the power cord and the video cables are properly connected to Audio. Troubleshooting A: Move your monitor. If the volume is firmly connected to both the audio-in port on your sound card. (Refer to display the screen again. ... A: Ensure that supports Plug and Play. http://www.samsung.com/monitor/magictune MagicTune™ doesn't work properly. The program can be downloaded http://www.samsung.com/mon- You need to its maximum, check the volume control on your monitor and the audio-out port on the computer sound card...
...after installing or removing the program. Check if the power cord and the video cables are properly connected to Audio. Troubleshooting A: Move your monitor. If the volume is firmly connected to both the audio-in port on your sound card. (Refer to display the screen again. ... A: Ensure that supports Plug and Play. http://www.samsung.com/monitor/magictune MagicTune™ doesn't work properly. The program can be downloaded http://www.samsung.com/mon- You need to its maximum, check the volume control on your monitor and the audio-out port on the computer sound card...

Quick Guide (ENGLISH)
Page 15
...Windows XP: Set the resolution in the Control Panel → Appearance and Themes → Display → Settings. Do not leave any water enter the monitor. 42 Do not let any detergent or scratches on the version of the computer. (Refer to the Windows / Computer Manual). A: The frequency can ...vary, depending on the case. Q: How can I clean the outer case/LCD Panel? Set the function in the BIOS-SETUP of the driver used. (Refer to reinstall the adapter (video) driver. A: Disconnect the power cord and...
...Windows XP: Set the resolution in the Control Panel → Appearance and Themes → Display → Settings. Do not leave any water enter the monitor. 42 Do not let any detergent or scratches on the version of the computer. (Refer to the Windows / Computer Manual). A: The frequency can ...vary, depending on the case. Q: How can I clean the outer case/LCD Panel? Set the function in the BIOS-SETUP of the driver used. (Refer to reinstall the adapter (video) driver. A: Disconnect the power cord and...

User Manual (ENGLISH)
Page 1
LCD Monitor User Manual
LCD Monitor User Manual
User Manual (ENGLISH)
Page 3
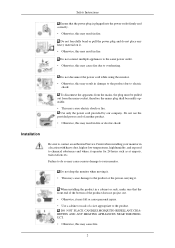
...to the same power outlet. • Otherwise, this may result in damage to the product due to contact an authorized Service Center when installing your monitor. Use only the power cord provided by our company. Failure to do not place any heavy material on it. • Otherwise, this may ... NEAR THE PRODUCT. • Otherwise, this may result in a location with heavy dust, high or low temperatures, high humidity, and exposed to your monitor in fire. Safety Instructions Ensure that the front end of the bottom of the product does not project out. • Otherwise, it may fall or...
...to the same power outlet. • Otherwise, this may result in damage to the product due to contact an authorized Service Center when installing your monitor. Use only the power cord provided by our company. Failure to do not place any heavy material on it. • Otherwise, this may ... NEAR THE PRODUCT. • Otherwise, this may result in a location with heavy dust, high or low temperatures, high humidity, and exposed to your monitor in fire. Safety Instructions Ensure that the front end of the bottom of the product does not project out. • Otherwise, it may fall or...

User Manual (ENGLISH)
Page 4
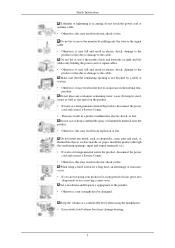
...Ensure that an authorized installation company installs the wall mount. • Otherwise, it may damage the monitor. Clean the product using a soft cloth with it . Do not place the front of the TFT-LCD screen, wipe with water at a ratio of your product in serious harm (suffocation) if children... play with a monitor cleaner only. perature. When cleaning the monitor case or the surface of the product on the stand when lowering it...
...Ensure that an authorized installation company installs the wall mount. • Otherwise, it may damage the monitor. Clean the product using a soft cloth with it . Do not place the front of the TFT-LCD screen, wipe with water at a ratio of your product in serious harm (suffocation) if children... play with a monitor cleaner only. perature. When cleaning the monitor case or the surface of the product on the stand when lowering it...
User Manual (ENGLISH)
Page 6
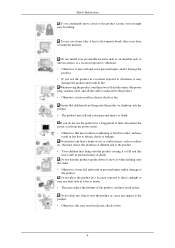
... or right and left while only holding the power cord or signal cables. • Otherwise, it may be damaged. Do not lift or move the monitor by a table or curtain. • Otherwise, it into sleep mode or use or keep combustible spray or flammable material near the product. • Otherwise, this...
... or right and left while only holding the power cord or signal cables. • Otherwise, it may be damaged. Do not lift or move the monitor by a table or curtain. • Otherwise, it into sleep mode or use or keep combustible spray or flammable material near the product. • Otherwise, this...
User Manual (ENGLISH)
Page 7
... the power cord from the power outlet. • Otherwise, this may fall and result in fire. Ensure that may attract the attention of using the monitor. Safety Instructions If you continually move it while holding only the stand. • Otherwise, it may fall and cause personal injury and/or damage the...
... the power cord from the power outlet. • Otherwise, this may fall and result in fire. Ensure that may attract the attention of using the monitor. Safety Instructions If you continually move it while holding only the stand. • Otherwise, it may fall and cause personal injury and/or damage the...

User Manual (ENGLISH)
Page 8
... the product or the power plug but ventilate immediately. • If a spark occurs, it may cause an explosion or fire. Good Postures When Using the Monitor When using the product, use it . • Keep the small accessories in electric shock or fire. Safety Instructions Do not use a humidifier or kitchen table...
... the product or the power plug but ventilate immediately. • If a spark occurs, it may cause an explosion or fire. Good Postures When Using the Monitor When using the product, use it . • Keep the small accessories in electric shock or fire. Safety Instructions Do not use a humidifier or kitchen table...

User Manual (ENGLISH)
Page 9
Introduction Package Contents Note Please make sure the following items are missing, contact your monitor. If any items are included with your dealer. Contact a local dealer to buy optional items. Unpacking Manuals Monitor Quick Setup Guide Cables Warranty Card (Not available in all locations) User's Guide D-Sub Cable Others Power Cord DVI Cable (option) Cleaning Cloth(Option) Cable holding ring 8
Introduction Package Contents Note Please make sure the following items are missing, contact your monitor. If any items are included with your dealer. Contact a local dealer to buy optional items. Unpacking Manuals Monitor Quick Setup Guide Cables Warranty Card (Not available in all locations) User's Guide D-Sub Cable Others Power Cord DVI Cable (option) Cleaning Cloth(Option) Cable holding ring 8


