
User Manual (user Manual) (ver.1.0) (English)
Page 2
Main Page Safety Instructions Notational Power Installation Cleaning Other Introduction Unpacking Front Rear Setup Connecting Your Monitor Installing the Monitor Driver Windows 2000 Other Operating System Installing VESA compliant mounting On-Screen Display Troubleshooting Check List Q & A Self-Test Feature Check Specifications General Specifications PowerSaver Preset Display Modes Information Service Terms Regulatory Natural Color For Better Display Authority
Main Page Safety Instructions Notational Power Installation Cleaning Other Introduction Unpacking Front Rear Setup Connecting Your Monitor Installing the Monitor Driver Windows 2000 Other Operating System Installing VESA compliant mounting On-Screen Display Troubleshooting Check List Q & A Self-Test Feature Check Specifications General Specifications PowerSaver Preset Display Modes Information Service Terms Regulatory Natural Color For Better Display Authority

User Manual (user Manual) (ver.1.0) (English)
Page 7
... user serviceable parts inside. Do not move the monitor by pulling only the wire or the signal cable. in particular, if there are any unusual sounds or smells coming from any heavy objects on the wire or the signal cable. z This may cause an electric shock or a fire. Never insert anything metallic into the monitor openings. Notational Power Installation Clean Other Do not remove cover(or...
... user serviceable parts inside. Do not move the monitor by pulling only the wire or the signal cable. in particular, if there are any unusual sounds or smells coming from any heavy objects on the wire or the signal cable. z This may cause an electric shock or a fire. Never insert anything metallic into the monitor openings. Notational Power Installation Clean Other Do not remove cover(or...
User Manual (user Manual) (ver.1.0) (English)
Page 13
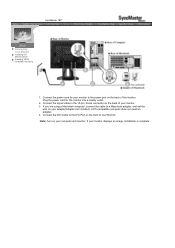
... DVI Cable to the power port on your adapter(Adapter not included). Note: Turn on the back of your computer and monitor. Connect the power cord for the monitor into a nearby outlet. 2. If you are using a Macintosh computer, connect the cable to the 15-pin, D-sub connector on the back of the monitor. SyncMaster 181T Connecting Your Monitor Installing the Monitor Driver Installing VESA compliant mounting 1. Connect the signal cable to a Macintosh adapter, and set the pins on the back of your monitor displays...
... DVI Cable to the power port on your adapter(Adapter not included). Note: Turn on the back of your computer and monitor. Connect the power cord for the monitor into a nearby outlet. 2. If you are using a Macintosh computer, connect the cable to the 15-pin, D-sub connector on the back of the monitor. SyncMaster 181T Connecting Your Monitor Installing the Monitor Driver Installing VESA compliant mounting 1. Connect the signal cable to a Macintosh adapter, and set the pins on the back of your monitor displays...
User Manual (user Manual) (ver.1.0) (English)
Page 14
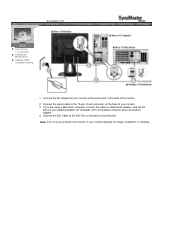
... signal cable to the power port on the back of your monitor displays an image, installation is complete. A PC-compatible computer does not need an adapter. 4. Connect the DC Adapter for your monitor to the 15-pin, D-sub connector on the back of the monitor. 2. If your Monitor. If you are using a Macintosh computer, connect the cable to the DVI Port on the back of your monitor. 3. Note: Turn on your computer and monitor. Connect the DVI Cable...
... signal cable to the power port on the back of your monitor displays an image, installation is complete. A PC-compatible computer does not need an adapter. 4. Connect the DC Adapter for your monitor to the 15-pin, D-sub connector on the back of the monitor. 2. If your Monitor. If you are using a Macintosh computer, connect the cable to the DVI Port on the back of your monitor. 3. Note: Turn on your computer and monitor. Connect the DVI Cable...
User Manual (user Manual) (ver.1.0) (English)
Page 15
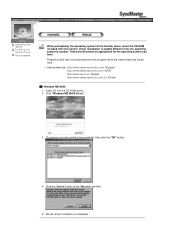
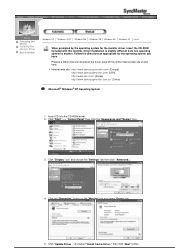
Connecting Your Monitor Installing the Monitor Driver Base Installation When prompted by the operating system for the operating system you have. Click "Windows ME/98/95 Driver". 3. Follow the directions as appropriate for the monitor driver, insert the CD-ROM included with this monitor. Prepare a blank disk and download the driver program file at the Internet web site shown here. Click the "Install" button in the model list...
Connecting Your Monitor Installing the Monitor Driver Base Installation When prompted by the operating system for the operating system you have. Click "Windows ME/98/95 Driver". 3. Follow the directions as appropriate for the monitor driver, insert the CD-ROM included with this monitor. Prepare a blank disk and download the driver program file at the Internet web site shown here. Click the "Install" button in the model list...
User Manual (user Manual) (ver.1.0) (English)
Page 17
..." button on the "Monitor" tab and select "Driver" tab. 5. Click "Display" icon and choose the "Settings" tab then click "Advanced..". 4. Connecting Your Monitor Installing the Monitor Driver Base Installation Windows XP | Windows 2000 | Windows Me | Windows 98 | Windows 95 | Windows NT | Linux When prompted by the operating system for the operating system you have. and select "Install from one operating system to another. Prepare a blank disk and download the driver program...
..." button on the "Monitor" tab and select "Driver" tab. 5. Click "Display" icon and choose the "Settings" tab then click "Advanced..". 4. Connecting Your Monitor Installing the Monitor Driver Base Installation Windows XP | Windows 2000 | Windows Me | Windows 98 | Windows 95 | Windows NT | Linux When prompted by the operating system for the operating system you have. and select "Install from one operating system to another. Prepare a blank disk and download the driver program...
User Manual (user Manual) (ver.1.0) (English)
Page 19
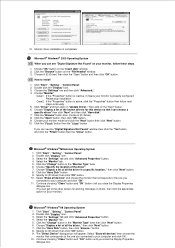
... the driver in a specific location.." Microsoft® Windows® 2000 Operating System When you connected to install 1. Choose A:(D:\Driver) then click the "Open" button and then click "OK" button. then click "Next" button. 8. Click the "Have Disk" button 9. Double click "Display" icon. 3. Click the "Have Disk" button, then click "browse.." Choose "Monitor". Click "Start" , "Setting" , "Control Panel". 2. Click "Start" , "Setting" , "Control Panel". 2. Continue choosing "Close" button and "O.K" button until you can see the "Digital Signature...
... the driver in a specific location.." Microsoft® Windows® 2000 Operating System When you connected to install 1. Choose A:(D:\Driver) then click the "Open" button and then click "OK" button. then click "Next" button. 8. Click the "Have Disk" button 9. Double click "Display" icon. 3. Click the "Have Disk" button, then click "browse.." Choose "Monitor". Click "Start" , "Setting" , "Control Panel". 2. Click "Start" , "Setting" , "Control Panel". 2. Continue choosing "Close" button and "O.K" button until you can see the "Digital Signature...

User Manual (user Manual) (ver.1.0) (English)
Page 20
...-click "Display" icon. 2. button and specify A:\(D:\driver) and click "OK". 6. Click Start, Settings, Control Panel, and then double-click Display icon. 2. Select a mode that you close the "Display Properties" dialogue box. Set a mouse for your monitor. (You can enter the frequency directly.) 8. Set a vertical frequency for your computer. 4. In the "Change Display Type" window, click "Change" and then click "Have Disk". 4. In the Select Device window, click the appropriate monitor model and then...
...-click "Display" icon. 2. button and specify A:\(D:\driver) and click "OK". 6. Click Start, Settings, Control Panel, and then double-click Display icon. 2. Select a mode that you close the "Display Properties" dialogue box. Set a mouse for your monitor. (You can enter the frequency directly.) 8. Set a vertical frequency for your computer. 4. In the "Change Display Type" window, click "Change" and then click "Have Disk". 4. In the Select Device window, click the appropriate monitor model and then...
User Manual (user Manual) (ver.1.0) (English)
Page 21
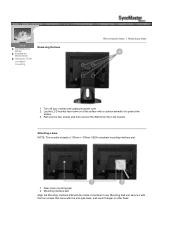
Connecting Your Monitor Installing the Monitor Driver Installing VESA compliant mounting Removing the base Removing the base | Attaching a base 1. Attaching a base NOTE: This monitor accepts a 100mm x 100mm VESA-compliant mounting interface pad. 1. Turn off your monitor and unplug its power cord. 2. Remove the four screws and then remove the Stand from the LCD monitor. Mounting interface pad Align the Mounting Interface Pad with the holes in the Rear Cover Mounting Pad and secure it with the four screws that came with a cushion beneath...
Connecting Your Monitor Installing the Monitor Driver Installing VESA compliant mounting Removing the base Removing the base | Attaching a base 1. Attaching a base NOTE: This monitor accepts a 100mm x 100mm VESA-compliant mounting interface pad. 1. Turn off your monitor and unplug its power cord. 2. Remove the four screws and then remove the Stand from the LCD monitor. Mounting interface pad Align the Mounting Interface Pad with the holes in the Rear Cover Mounting Pad and secure it with the four screws that came with a cushion beneath...
User Manual (user Manual) (ver.1.0) (English)
Page 33
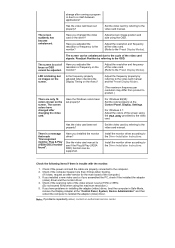
...'s main board. Check List Q & A Self-Test Feature Check Before calling for service, check the information in this message when the signal from the video card exceeds the maximum resolution and frequency that can create a strong magnetic field. Can you locked the On Screen Display (OSD) Menu to activate the monitor and restore the image on the monitor blinking at the screen through a cellophane paper? There is in PowerSaver mode. Check the power cord connection and supply...
...'s main board. Check List Q & A Self-Test Feature Check Before calling for service, check the information in this message when the signal from the video card exceeds the maximum resolution and frequency that can create a strong magnetic field. Can you locked the On Screen Display (OSD) Menu to activate the monitor and restore the image on the monitor blinking at the screen through a cellophane paper? There is in PowerSaver mode. Check the power cord connection and supply...
User Manual (user Manual) (ver.1.0) (English)
Page 34
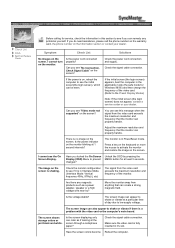
... resolution or frequency to the Preset Display Modes). Set the video card by the video card. Adjust the resolution and frequency of the video card. (Refer to the Driver Installation Instructions. LED is trouble with the monitor. 1. Have the Windows colors been set properly? There is set properly? Check if the scanning ratio of the video screen is a message that reads "Unrecognized monitor, Plug & Play (VESA DDC) monitor found". Have you assembled the PC, check if the installed the adapter (video) driver and the monitor driver. 4. The screen can be supported...
... resolution or frequency to the Preset Display Modes). Set the video card by the video card. Adjust the resolution and frequency of the video card. (Refer to the Driver Installation Instructions. LED is trouble with the monitor. 1. Have the Windows colors been set properly? There is set properly? Check if the scanning ratio of the video screen is a message that reads "Unrecognized monitor, Plug & Play (VESA DDC) monitor found". Have you assembled the PC, check if the installed the adapter (video) driver and the monitor driver. 4. The screen can be supported...

User Manual (user Manual) (ver.1.0) (English)
Page 35
... monitor. Check List Q & A Self-Test Feature Check Question How can I adjust the resolution? Windows 3.1: Set the function using either a cleaning solution or plain water. Disconnect the power cord and then clean the monitor with a soft cloth, using the VGA Utility provided by reconfiguring the video card. How can I change the frequency? Note that video card support can be changed by the video card. Answer Frequency can vary, depending on the version of the driver used. (Refer to Windows/Computer Manual...
... monitor. Check List Q & A Self-Test Feature Check Question How can I adjust the resolution? Windows 3.1: Set the function using either a cleaning solution or plain water. Disconnect the power cord and then clean the monitor with a soft cloth, using the VGA Utility provided by reconfiguring the video card. How can I change the frequency? Note that video card support can be changed by the video card. Answer Frequency can vary, depending on the version of the driver used. (Refer to Windows/Computer Manual...

User Manual (user Manual) (ver.1.0) (English)
Page 36
... telephones that are red, green and blue. The location and the position of the monitor may indicate that the monitor is out of the monitor. Turn on both your monitor and reconnect the video cable; If your monitor screen remains blank after using the previous procedure, check your monitor. Turn off your computer and the monitor. 2. This box also appears during normal operation if the video cable becomes disconnected or...
... telephones that are red, green and blue. The location and the position of the monitor may indicate that the monitor is out of the monitor. Turn on both your monitor and reconnect the video cable; If your monitor screen remains blank after using the previous procedure, check your monitor. Turn off your computer and the monitor. 2. This box also appears during normal operation if the video cable becomes disconnected or...

User Manual (user Manual) (ver.1.0) (English)
Page 38
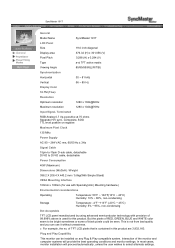
..., monitor installation will provide the best operating conditions and monitor settings. But the pixels of RED, GREEN, BLUE and WHITE color seem to be installed on any Plug & Play compatible system. SyncMaster 181T General PowerSaver Preset Timing Modes General Model Name SyncMaster 181T LCD Panel Size 18.1 inch diagonal Display area 359.04 (H) x 287.232 (V) Pixel Pitch 0.2805 (H) x 0.2805 (V) Type a-si TFT active matrix Viewing Angle 80/80/80/80(L/R/T/B),Typical Synchronization Horizontal 30 ~ 81 kHz Vertical 56 ~ 85 Hz Display Color...
..., monitor installation will provide the best operating conditions and monitor settings. But the pixels of RED, GREEN, BLUE and WHITE color seem to be installed on any Plug & Play compatible system. SyncMaster 181T General PowerSaver Preset Timing Modes General Model Name SyncMaster 181T LCD Panel Size 18.1 inch diagonal Display area 359.04 (H) x 287.232 (V) Pixel Pitch 0.2805 (H) x 0.2805 (V) Type a-si TFT active matrix Viewing Angle 80/80/80/80(L/R/T/B),Typical Synchronization Horizontal 30 ~ 81 kHz Vertical 56 ~ 85 Hz Display Color...
User Manual (user Manual) (ver.1.0) (English)
Page 39
... best operating conditions and monitor settings. General PowerSaver Preset Timing Modes SyncMaster 191T General Model Name SyncMaster 191T LCD Panel Size 19.0 inch diagonal Display area 376.32 (H) x 301.056 (V) Pixel Pitch 0.298 (H) x 0.294 (V) Type a-si TFT active matrix Viewing Angle 85/85/85/85(L/R/T/B) Synchronization Horizontal 30 ~ 81 kHz Vertical 56 ~ 85 Hz Display Color 16.7M (True) Resolution Optimum resolution 1280 x 1024@60Hz Maximum resolution 1280 x 1024@76Hz Input Signal, Terminated RGB Analog 0.7 Vp-p positive...
... best operating conditions and monitor settings. General PowerSaver Preset Timing Modes SyncMaster 191T General Model Name SyncMaster 191T LCD Panel Size 19.0 inch diagonal Display area 376.32 (H) x 301.056 (V) Pixel Pitch 0.298 (H) x 0.294 (V) Type a-si TFT active matrix Viewing Angle 85/85/85/85(L/R/T/B) Synchronization Horizontal 30 ~ 81 kHz Vertical 56 ~ 85 Hz Display Color 16.7M (True) Resolution Optimum resolution 1280 x 1024@60Hz Maximum resolution 1280 x 1024@76Hz Input Signal, Terminated RGB Analog 0.7 Vp-p positive...

User Manual (user Manual) (ver.1.0) (English)
Page 40
... this feature. State Power Indicator Power Consumption Normal Operation Green Less than 40W Power saving mode EPA/ENERGY 2000 Green, Blinking Less than 3W Power Switch off Black Less than 1W This monitor is not needed, or when leaving it has not been used with a computer equipped with a VESA DPMS compliant video card installed in power management system called PowerSaver. For energy conservation, turn your computer to set up this product...
... this feature. State Power Indicator Power Consumption Normal Operation Green Less than 40W Power saving mode EPA/ENERGY 2000 Green, Blinking Less than 3W Power Switch off Black Less than 1W This monitor is not needed, or when leaving it has not been used with a computer equipped with a VESA DPMS compliant video card installed in power management system called PowerSaver. For energy conservation, turn your computer to set up this product...

User Manual (user Manual) (ver.1.0) (English)
Page 46
... then even lines in turn is called Horizontal Frequency. The frequency of this repetition per second, this case, flickering of monitors to create and display an image for performing multiple tasks as 60 Hz. High resolution is a Flicker-free Mode using a vertical frequency over 70 Hz. To avoid this means the screen is used in order to ensure a clear image. This monitor follows the international standard VESA DDC for the...
... then even lines in turn is called Horizontal Frequency. The frequency of this repetition per second, this case, flickering of monitors to create and display an image for performing multiple tasks as 60 Hz. High resolution is a Flicker-free Mode using a vertical frequency over 70 Hz. To avoid this means the screen is used in order to ensure a clear image. This monitor follows the international standard VESA DDC for the...
User Manual (user Manual) (ver.1.0) (English)
Page 47
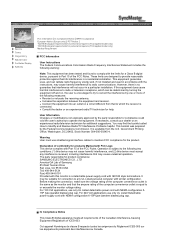
... party responsible for a Class B digital device, pursuant to Part 15 of the FCC Rules. For 120 Volt applications, use only UL Listed Detachable power supply cord with Part 15 of the FCC Rules. This booklet was prepared by turning the equipment off and on a circuit different from the U.S. Service Terms Regulatory Natural Color For Better Display Authority FCC Information | IC Compliance...
... party responsible for a Class B digital device, pursuant to Part 15 of the FCC Rules. For 120 Volt applications, use only UL Listed Detachable power supply cord with Part 15 of the FCC Rules. This booklet was prepared by turning the equipment off and on a circuit different from the U.S. Service Terms Regulatory Natural Color For Better Display Authority FCC Information | IC Compliance...

User Manual (user Manual) (ver.1.0) (English)
Page 51
... analog and digital interfaces must be found in batteries, relays and switches. IEC 950 for data processing equipment and IEC 601-1 for washing printed circuit boards. CFCs (freons) are Bio-accumulative. It also demands that batteries may be determined by one exception. Service Terms Regulatory Natural Color For Better Display Authority Mercury is sometimes found in picture tubes, display screens...
... analog and digital interfaces must be found in batteries, relays and switches. IEC 950 for data processing equipment and IEC 601-1 for washing printed circuit boards. CFCs (freons) are Bio-accumulative. It also demands that batteries may be determined by one exception. Service Terms Regulatory Natural Color For Better Display Authority Mercury is sometimes found in picture tubes, display screens...

User Manual (user Manual) (ver.1.0) (English)
Page 53
... amount of cleaner by executing "auto adjustment function" in this product are not satisfied with precision of black pixels could be scrubbed out softly. When you can use FINE/COARSE adjustment function. But the pixels of RED, GREEN, BLUE and WHITE color seem to enjoy the best quality of computer as window termination button is contained in display screen that is pressed. Adjust computer resolution and screen injection rate (refresh rate) in control panel of picture.
... amount of cleaner by executing "auto adjustment function" in this product are not satisfied with precision of black pixels could be scrubbed out softly. When you can use FINE/COARSE adjustment function. But the pixels of RED, GREEN, BLUE and WHITE color seem to enjoy the best quality of computer as window termination button is contained in display screen that is pressed. Adjust computer resolution and screen injection rate (refresh rate) in control panel of picture.


