

User Manual (user Manual) (ver.1.0) (English)
Page 1
SyncMaster 180T Dual Interface(Analog/Digital) TFT-LCD Monitor Owner's Instructions
SyncMaster 180T Dual Interface(Analog/Digital) TFT-LCD Monitor Owner's Instructions

User Manual (user Manual) (ver.1.0) (English)
Page 3
...;ol Deutsch Français English Table of Contents Safety Instructions 2 Unpacking Your LCD Monitor 3 Setting up your LCD Monitor 4 Setting up an Ergonomic Workstation 4 Monitor location 4 Workstation height 4 Viewing angle 4 Kensington Security Slot 4 Connecting Your LCD Monitor 5 Getting Help 7 Plug and Play 7 Auto Adjustment 7 Self-Test Feature Check ...(STFC 8 Adjusting Your LCD Monitor 9 User Controls 9 Automatic Save 10 Direct-Access Features 10 Brightness 10 Auto Adjustment 11 OSD Lock/Unlock 11 On ...
...;ol Deutsch Français English Table of Contents Safety Instructions 2 Unpacking Your LCD Monitor 3 Setting up your LCD Monitor 4 Setting up an Ergonomic Workstation 4 Monitor location 4 Workstation height 4 Viewing angle 4 Kensington Security Slot 4 Connecting Your LCD Monitor 5 Getting Help 7 Plug and Play 7 Auto Adjustment 7 Self-Test Feature Check ...(STFC 8 Adjusting Your LCD Monitor 9 User Controls 9 Automatic Save 10 Direct-Access Features 10 Brightness 10 Auto Adjustment 11 OSD Lock/Unlock 11 On ...

User Manual (user Manual) (ver.1.0) (English)
Page 4
...OF ELECTRIC SHOCK DO NOT OPEN CAUTION: TO REDUCE THE RISK OF ELECTRIC SHOCK, DO NOT REMOVE COVER (OR BACK). English 2 If the LCD Monitor accidentally gets wet, unplug it is made of thin glass with keton-type materials (e.g., acetone), ethyl alcohol, toluene, ethyl acid, methyl, or ...chloride - To prevent overheating, these may damage the panel. 10 Locate your LCD Monitor near swimming pools, etc.). Doing so may create the danger of electric shock. 3 To avoid electric shock, never touch the inside of the cabinet....
...OF ELECTRIC SHOCK DO NOT OPEN CAUTION: TO REDUCE THE RISK OF ELECTRIC SHOCK, DO NOT REMOVE COVER (OR BACK). English 2 If the LCD Monitor accidentally gets wet, unplug it is made of thin glass with keton-type materials (e.g., acetone), ethyl alcohol, toluene, ethyl acid, methyl, or ...chloride - To prevent overheating, these may damage the panel. 10 Locate your LCD Monitor near swimming pools, etc.). Doing so may create the danger of electric shock. 3 To avoid electric shock, never touch the inside of the cabinet....

User Manual (user Manual) (ver.1.0) (English)
Page 5
Colorfic & Driver Warranty Card (not available all location) Manual AUTO EXIT A B MENU Monitor and Base DC-Adapter Power Cord 15-pin D-Sub Signal Cabel DVI-D Signal Cabel (Optional) English 3 Italiano Portuguese Deutsch Español Français English Unpacking Your LCD Monitor Please make sure the following items are missing, contact your monitor. If any items are included with your dealer. .
Colorfic & Driver Warranty Card (not available all location) Manual AUTO EXIT A B MENU Monitor and Base DC-Adapter Power Cord 15-pin D-Sub Signal Cabel DVI-D Signal Cabel (Optional) English 3 Italiano Portuguese Deutsch Español Français English Unpacking Your LCD Monitor Please make sure the following items are missing, contact your monitor. If any items are included with your dealer. .

User Manual (user Manual) (ver.1.0) (English)
Page 6
... viewing position. Tilt the screen Kensington Security Slot This monitor offers you the opportunity to your locking device documentation for installation instructions. Refer to secure your monitor using a Kensington-type security device. Monitor location Choose a position that the top of the screen... is slightly below before you install your monitor. Viewing angle Tilt the screen backward or forward to...
... viewing position. Tilt the screen Kensington Security Slot This monitor offers you the opportunity to your locking device documentation for installation instructions. Refer to secure your monitor using a Kensington-type security device. Monitor location Choose a position that the top of the screen... is slightly below before you install your monitor. Viewing angle Tilt the screen backward or forward to...

User Manual (user Manual) (ver.1.0) (English)
Page 7
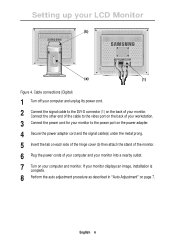
... an image, installation is complete. 6 Perform the auto adjustment procedure as described in "Auto Adjustment" on your computer and monitor. Cable connections (Analog) 1 Turn off your system and unplug its power cord. 2 Attach the blue signal cable connector to the ...and a workstation. English 5 Determine which connection method(s) you need and refer to the monitor simultaneously. One or both types of your computer and your LCD Monitor Connecting Your LCD Monitor This monitor offers a method for your monitor to the power port on the power adapter. 4 Plug the power cords of signal ...
... an image, installation is complete. 6 Perform the auto adjustment procedure as described in "Auto Adjustment" on your computer and monitor. Cable connections (Analog) 1 Turn off your system and unplug its power cord. 2 Attach the blue signal cable connector to the ...and a workstation. English 5 Determine which connection method(s) you need and refer to the monitor simultaneously. One or both types of your computer and your LCD Monitor Connecting Your LCD Monitor This monitor offers a method for your monitor to the power port on the power adapter. 4 Plug the power cords of signal ...
User Manual (user Manual) (ver.1.0) (English)
Page 8
... the power port on the power adapter. 4 Secure the power adapter cord and the signal cable(s) under the metal prong. 5 Insert the tab on your monitor. Connect the other end of the cable to the video port on the back of your workstation. 3 Connect the power cord for your... monitor to the DVI-D connector (1) on the back of your computer and your monitor into a nearby outlet. 7 Turn on each side of the hinge cover (b) then attach the stand of the...
... the power port on the power adapter. 4 Secure the power adapter cord and the signal cable(s) under the metal prong. 5 Insert the tab on your monitor. Connect the other end of the cable to the video port on the back of your workstation. 3 Connect the power cord for your... monitor to the DVI-D connector (1) on the back of your computer and your monitor into a nearby outlet. 7 Turn on each side of the hinge cover (b) then attach the stand of the...

User Manual (user Manual) (ver.1.0) (English)
Page 9
...open the Auto Adjustment OSD. 3 The screen will optimize the display settings for use with your monitor in a Plug and Play compatible system without the usual hassles and confusion. This monitor automatically tells the PC system its Extended Display Identification (EDID) data using Display Data Channel...computer. Your PC system can automatically configure itself for use the LCD Monitor. Italiano Portuguese Deutsch Español Français English Setting up your LCD Monitor Getting Help If your monitor does not display an image, check your display. If you to use with ...
...open the Auto Adjustment OSD. 3 The screen will optimize the display settings for use with your monitor in a Plug and Play compatible system without the usual hassles and confusion. This monitor automatically tells the PC system its Extended Display Identification (EDID) data using Display Data Channel...computer. Your PC system can automatically configure itself for use the LCD Monitor. Italiano Portuguese Deutsch Español Français English Setting up your LCD Monitor Getting Help If your monitor does not display an image, check your display. If you to use with ...

User Manual (user Manual) (ver.1.0) (English)
Page 10
...if the video cable becomes disconnected or damaged. 4 Turn off both your monitor is blinking, run the monitor self-test by performing the following illustration: No Connection Check Signal Cable Figure 5. Monitor self test screen The three boxes inside as shown in the following steps:... 1 Turn off your monitor is functioning properly. If your monitor screen remains blank after using the previous procedure, check your monitor and computer are red, green and blue. English 8 If the monitor is functioning properly, you to appear indicates a problem...
...if the video cable becomes disconnected or damaged. 4 Turn off both your monitor is blinking, run the monitor self-test by performing the following illustration: No Connection Check Signal Cable Figure 5. Monitor self test screen The three boxes inside as shown in the following steps:... 1 Turn off your monitor is functioning properly. If your monitor screen remains blank after using the previous procedure, check your monitor and computer are red, green and blue. English 8 If the monitor is functioning properly, you to appear indicates a problem...

User Manual (user Manual) (ver.1.0) (English)
Page 11
... OSD is off Power button s Glows green during normal operation 5 and indicator s Glows amber, blinks amber, or blinks green / amber light while the monitor is in a power saving mode. (See "Power-saving modes" on the OSD s Decreases or increases values of the image being displayed. User controls No.... Italiano Portuguese Deutsch Español Français English Adjusting Your LCD Monitor User Controls Your LCD Monitor allows you their numeric values as the change. 12 5 AUTO EXIT A B 34 MENU Figure 6. All of the...
... OSD is off Power button s Glows green during normal operation 5 and indicator s Glows amber, blinks amber, or blinks green / amber light while the monitor is in a power saving mode. (See "Power-saving modes" on the OSD s Decreases or increases values of the image being displayed. User controls No.... Italiano Portuguese Deutsch Español Français English Adjusting Your LCD Monitor User Controls Your LCD Monitor allows you their numeric values as the change. 12 5 AUTO EXIT A B 34 MENU Figure 6. All of the...
User Manual (user Manual) (ver.1.0) (English)
Page 12
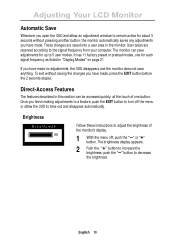
... OSD and allow the OSD to time-out and disappear automatically. User areas are saved into a user area in the monitor. To exit without pressing another button, the monitor automatically saves any adjustments you have made. The brightness display appears. 2 Push the "+" button to decrease the brightness.... preset or preload modes, one for about 3 seconds without saving the changes you have made no adjustments, the OSD disappears and the monitor does not save adjustments for up to adjust the brightness of one button. Direct-Access Features The features described in "Display Modes" on...
... OSD and allow the OSD to time-out and disappear automatically. User areas are saved into a user area in the monitor. To exit without pressing another button, the monitor automatically saves any adjustments you have made. The brightness display appears. 2 Push the "+" button to decrease the brightness.... preset or preload modes, one for about 3 seconds without saving the changes you have made no adjustments, the OSD disappears and the monitor does not save adjustments for up to adjust the brightness of one button. Direct-Access Features The features described in "Display Modes" on...

User Manual (user Manual) (ver.1.0) (English)
Page 13
Italiano Portuguese Deutsch Español Français English Adjusting Your LCD Monitor Auto Adjustment Auto Adjustment 25 Follow these instructions to enable or disable the automatic screen adjustments for 5 seconds to adjust the Brightness and Contrast, ... be inadvertently changed. You can unlock the OSD controls at any time by using the same procedure. 1 Push and hold the MENU button for your monitor. 1 With the menu off, push the EXIT button. When locked, a "LOCKED" message displays. English 11 The automatic adjustment display appears. 2 Follow the directions previously ...
Italiano Portuguese Deutsch Español Français English Adjusting Your LCD Monitor Auto Adjustment Auto Adjustment 25 Follow these instructions to enable or disable the automatic screen adjustments for 5 seconds to adjust the Brightness and Contrast, ... be inadvertently changed. You can unlock the OSD controls at any time by using the same procedure. 1 Push and hold the MENU button for your monitor. 1 With the menu off, push the EXIT button. When locked, a "LOCKED" message displays. English 11 The automatic adjustment display appears. 2 Follow the directions previously ...

User Manual (user Manual) (ver.1.0) (English)
Page 14
... move from one icon to another, the function name changes to reflect the function or group of all the functions available for the monitor. 3 Push the MENU button once to activate the highlighted function then use the "-" and "+" buttons, according to the indicators on the menu, to make your... MENU button to open the menu system and display the main function menu. 2 Push the "-" and "+" buttons to exit from the OSD. Adjusting Your LCD Monitor On Screen Display (OSD) Function icons Function name Brightness Setting slidebar 99 Numeric value indicator Figure 7.
... move from one icon to another, the function name changes to reflect the function or group of all the functions available for the monitor. 3 Push the MENU button once to activate the highlighted function then use the "-" and "+" buttons, according to the indicators on the menu, to make your... MENU button to open the menu system and display the main function menu. 2 Push the "-" and "+" buttons to exit from the OSD. Adjusting Your LCD Monitor On Screen Display (OSD) Function icons Function name Brightness Setting slidebar 99 Numeric value indicator Figure 7.

User Manual (user Manual) (ver.1.0) (English)
Page 15
... again. This function may change the width of white. English 13 The Fine and Coarse adjustments allow you to more closely adjust your monitor to adjust away interference. The color hue is most noticeable in the video signal which causes horizontal lines or areas on the screen where... the image appears to center the display image on the monitor screen. Color Controls adjust the color hue and saturation. Use the "-, +" buttons to your preference. Italiano Portuguese Deutsch Español Fran&#...
... again. This function may change the width of white. English 13 The Fine and Coarse adjustments allow you to more closely adjust your monitor to adjust away interference. The color hue is most noticeable in the video signal which causes horizontal lines or areas on the screen where... the image appears to center the display image on the monitor screen. Color Controls adjust the color hue and saturation. Use the "-, +" buttons to your preference. Italiano Portuguese Deutsch Español Fran&#...

User Manual (user Manual) (ver.1.0) (English)
Page 16
... length of the OSD. Geometry changes the Position settings, Image Lock settings and changes the Image Size to their original factory settings. Adjusting Your LCD Monitor Table 1.
... length of the OSD. Geometry changes the Position settings, Image Lock settings and changes the Image Size to their original factory settings. Adjusting Your LCD Monitor Table 1.

User Manual (user Manual) (ver.1.0) (English)
Page 17
...1 s Expanded 2 Image Effect s Scaling s Filtering Description If your computer or video board supplies a signal rate and addressability lower than 1280 x 1024, this LCD Monitor provides a scaling processor that it is easier to use the normal size viewing area for the type of the... line around each character so that can expand the addressability up to the full width of the monitor screen. Italiano Portuguese Deutsch Español Français English Adjusting Your LCD Monitor Table 1. Expanded 2 extends the viewing area both horizontally and vertically to see more detail. Image...
...1 s Expanded 2 Image Effect s Scaling s Filtering Description If your computer or video board supplies a signal rate and addressability lower than 1280 x 1024, this LCD Monitor provides a scaling processor that it is easier to use the normal size viewing area for the type of the... line around each character so that can expand the addressability up to the full width of the monitor screen. Italiano Portuguese Deutsch Español Français English Adjusting Your LCD Monitor Table 1. Expanded 2 extends the viewing area both horizontally and vertically to see more detail. Image...

User Manual (user Manual) (ver.1.0) (English)
Page 18
... The available modes are "On", "Standby", "Sleep", and "Deep Sleep". interval) Inactive Inactive Blanked Amber Blinking (1 sec. This monitor is not needed, or when leaving it is EPA ENERGY STAR® compliant and NUTEK compliant when used for details. For energy conservation,... Position A1 Position A2 Active Active Active Green Inactive Active Blanked Amber 45 W (Max.) 42 W (Nom.) Less than 5 W NOTE: This monitor automatically returns to set up this feature. See Table 2 below for a certain amount of time. Table 2. PowerSaver operates with VESA DPMS functionality....
... The available modes are "On", "Standby", "Sleep", and "Deep Sleep". interval) Inactive Inactive Blanked Amber Blinking (1 sec. This monitor is not needed, or when leaving it is EPA ENERGY STAR® compliant and NUTEK compliant when used for details. For energy conservation,... Position A1 Position A2 Active Active Active Green Inactive Active Blanked Amber 45 W (Max.) 42 W (Nom.) Less than 5 W NOTE: This monitor automatically returns to set up this feature. See Table 2 below for a certain amount of time. Table 2. PowerSaver operates with VESA DPMS functionality....

User Manual (user Manual) (ver.1.0) (English)
Page 19
... page 21. shadowed areas English 17 Picture is not clear s Adjust Fine and Coarse adjustments as needed (see that both the LCD Monitor and the computer are distorted with the data in and turned on. Picture is scrambled s Check the signal cable connection between the computer... see page 13). "No Connection, Check Signal Cable" appears s Check the signal cable connection between the computer and the LCD Monitor s Use the LCD Monitor self test described on the video port of your computer. Troubleshooting problems Symptom Corrective Actions No Picture s Check to be ghosting s...
... page 21. shadowed areas English 17 Picture is not clear s Adjust Fine and Coarse adjustments as needed (see that both the LCD Monitor and the computer are distorted with the data in and turned on. Picture is scrambled s Check the signal cable connection between the computer... see page 13). "No Connection, Check Signal Cable" appears s Check the signal cable connection between the computer and the LCD Monitor s Use the LCD Monitor self test described on the video port of your computer. Troubleshooting problems Symptom Corrective Actions No Picture s Check to be ghosting s...

User Manual (user Manual) (ver.1.0) (English)
Page 20
...the front panel You need the monitor driver software s You can download the driver from the internet at http://www.samsung-monitor.com http://www.samsungmonitor.com (USA only) English 18 Cannot adjust LCD Monitor with the s Please contact Samsung customer service. Appendix Table 3. once... Screen is blank and power indicator s The LCD Monitor is using its power management light ...
...the front panel You need the monitor driver software s You can download the driver from the internet at http://www.samsung-monitor.com http://www.samsungmonitor.com (USA only) English 18 Cannot adjust LCD Monitor with the s Please contact Samsung customer service. Appendix Table 3. once... Screen is blank and power indicator s The LCD Monitor is using its power management light ...

User Manual (user Manual) (ver.1.0) (English)
Page 24
Appendix Changing the Stand Removing the Stand (a) 1 Turn off your monitor and unplug its power cord. 2 Lay the LCD Monitor face-down on a flat surface with a cushion beneath it to protect the screen. 3 Remove the 4 screws (a) and then remove the Stand from the LCD Monitor. English 22
Appendix Changing the Stand Removing the Stand (a) 1 Turn off your monitor and unplug its power cord. 2 Lay the LCD Monitor face-down on a flat surface with a cushion beneath it to protect the screen. 3 Remove the 4 screws (a) and then remove the Stand from the LCD Monitor. English 22


