
User Manual (ENGLISH)
Page 2
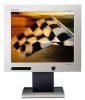
Main Page Safety Instructions Notational Power Installation Cleaning Other Introduction Unpacking Front Rear Setup Connecting Your Monitor Installing the Monitor Driver Automatic Manual On-Screen Display Troubleshooting Check List Q & A Self-Test Feature Check Specifications General Specifications PowerSaver Preset Display Modes Information Service Terms Regulatory Natural Color For Better Display Authority
Main Page Safety Instructions Notational Power Installation Cleaning Other Introduction Unpacking Front Rear Setup Connecting Your Monitor Installing the Monitor Driver Automatic Manual On-Screen Display Troubleshooting Check List Q & A Self-Test Feature Check Specifications General Specifications PowerSaver Preset Display Modes Information Service Terms Regulatory Natural Color For Better Display Authority

User Manual (ENGLISH)
Page 3
Notational Power Installation Clean Other Failure to follow directions noted by this symbol could result in bodily harm or damage to prevent an electric shock Prohibited Do not disassemble Do not touch Important to read and understand at all times Disconnect the plug from the outlet Grounding to equipment.
Notational Power Installation Clean Other Failure to follow directions noted by this symbol could result in bodily harm or damage to prevent an electric shock Prohibited Do not disassemble Do not touch Important to read and understand at all times Disconnect the plug from the outlet Grounding to equipment.

User Manual (ENGLISH)
Page 4
Notational Power Installation Clean Other When not used for extended periods of time. Do not pull the plug out by the wire nor touch the plug with ...
Notational Power Installation Clean Other When not used for extended periods of time. Do not pull the plug out by the wire nor touch the plug with ...
User Manual (ENGLISH)
Page 5
z Bad ventilation may cause damage to the product or human body. z It could result inside the monitor. z This may cause a breakdown or fire. Put your monitor in a location with low humidity and a minimum of dust. Place the monitor on the monitor cabinet. Do not drop the monitor when moving it. z The monitor can cause injury by falling. Notational Power Installation Clean Other Do not cover the vents on a flat and stable surface. Set down the monitor carefully. z An electric shock or fire could be damaged or broken.
z Bad ventilation may cause damage to the product or human body. z It could result inside the monitor. z This may cause a breakdown or fire. Put your monitor in a location with low humidity and a minimum of dust. Place the monitor on the monitor cabinet. Do not drop the monitor when moving it. z The monitor can cause injury by falling. Notational Power Installation Clean Other Do not cover the vents on a flat and stable surface. Set down the monitor carefully. z An electric shock or fire could be damaged or broken.
User Manual (ENGLISH)
Page 6
... moistened, soft fabric. Do not set a glass of the TFT-LCD, wipe with a smooth cloth. z This may cause damage, electric shock or a fire. Notational Power Installation Clean Other When cleaning the monitor case or the surface of water, chemicals or any small metal objects... on the monitor. z If a foreign substance gets into the monitor, disconnect the plug and then contact a service center. ...
... moistened, soft fabric. Do not set a glass of the TFT-LCD, wipe with a smooth cloth. z This may cause damage, electric shock or a fire. Notational Power Installation Clean Other When cleaning the monitor case or the surface of water, chemicals or any small metal objects... on the monitor. z If a foreign substance gets into the monitor, disconnect the plug and then contact a service center. ...
User Manual (ENGLISH)
Page 7
...coming from it immediately and contact an authorized dealer or service. No user serviceable parts inside. Do not use or store inflammable substances near the monitor. z This may cause a breakdown, electric shock or a fire due to damage to the cable. z This may cause an electric shock...cause an electric shock or a fire. z This will reduce eye fatigue. z This may cause an electric shock or a fire. unplug it - Notational Power Installation Clean Other Do not remove cover(or back). z This may cause an explosion or fire. z This may cause a breakdown, electric shock or ...
...coming from it immediately and contact an authorized dealer or service. No user serviceable parts inside. Do not use or store inflammable substances near the monitor. z This may cause a breakdown, electric shock or a fire due to damage to the cable. z This may cause an electric shock...cause an electric shock or a fire. z This will reduce eye fatigue. z This may cause an electric shock or a fire. unplug it - Notational Power Installation Clean Other Do not remove cover(or back). z This may cause an explosion or fire. z This may cause a breakdown, electric shock or ...
User Manual (ENGLISH)
Page 8
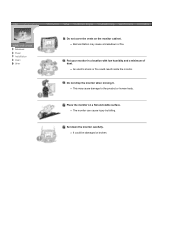
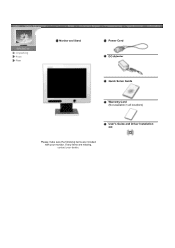
Unparking Front Rear Monitor and Stand Power Cord DC-Adapter Quick Setup Guide Warranty Card (Not available in all locations) User's Guide and Driver Installation CD Please make sure the following items are missing, contact your monitor. If any items are included with your dealer.
Unparking Front Rear Monitor and Stand Power Cord DC-Adapter Quick Setup Guide Warranty Card (Not available in all locations) User's Guide and Driver Installation CD Please make sure the following items are missing, contact your monitor. If any items are included with your dealer.
User Manual (ENGLISH)
Page 9
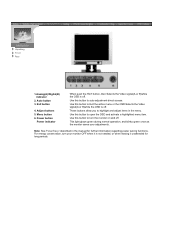
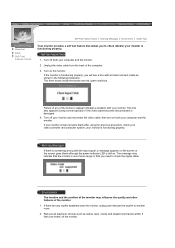
.... This light glows green during normal operation, and blinks green once as the monitor saves your monitor OFF when it is not needed, or when leaving it unattended for further information regarding power saving functions. Use this button to Exit the active menu or the OSD.Selects... the OSD is off . Menu button 6. Note: See PowerSaver described in the menu. For energy conservation, turn the monitor on and off. Unparking Front Rear 1.Analog(A)/Digital(B) indicator 2. Power indicator When push the 'Exit' button, then Selects the Video signal(A or B)while the OSD is off . Use...
.... This light glows green during normal operation, and blinks green once as the monitor saves your monitor OFF when it is not needed, or when leaving it unattended for further information regarding power saving functions. Use this button to Exit the active menu or the OSD.Selects... the OSD is off . Menu button 6. Note: See PowerSaver described in the menu. For energy conservation, turn the monitor on and off. Unparking Front Rear 1.Analog(A)/Digital(B) indicator 2. Power indicator When push the 'Exit' button, then Selects the Video signal(A or B)while the OSD is off . Use...

User Manual (ENGLISH)
Page 10
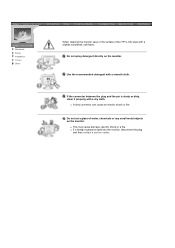
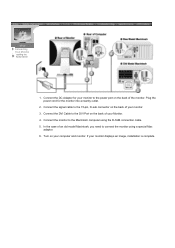
Power Port Connect the DVI Cable to the power port on the back of the monitor. Connect the DC Adapter for further information regarding cable connections. Note: See Connecting Your Monitor for your monitor to the DVI Cable on the back of your Computer. D-sub Cable 3. Unparking Front Rear (The configuration at the back of the monitor may vary from product to the 15-pin, D-sub connector on the back of your Comupter. Connect the D-sub Cable to product.) 1. DVI Cable 2.
Power Port Connect the DVI Cable to the power port on the back of the monitor. Connect the DC Adapter for further information regarding cable connections. Note: See Connecting Your Monitor for your monitor to the DVI Cable on the back of your Computer. D-sub Cable 3. Unparking Front Rear (The configuration at the back of the monitor may vary from product to the 15-pin, D-sub connector on the back of your Comupter. Connect the D-sub Cable to product.) 1. DVI Cable 2.
User Manual (ENGLISH)
Page 11
Connect the DC Adapter for the monitor into a nearby outlet. 2. Connect the monitor to the power port on the back of your computer and monitor. Connect the DVI Cable to connect the monitor using the D-SUB connection cable. 5. In the case of an old model Macintosh, you need to the DVI Port on... the back of the monitor. Turn on the back of your monitor displays an image, installation is complete. Plug the power cord for your monitor to the Macintosh computer using a special Mac adaptor. 6. Connect the signal cable to the ...
Connect the DC Adapter for the monitor into a nearby outlet. 2. Connect the monitor to the power port on the back of your computer and monitor. Connect the DVI Cable to connect the monitor using the D-SUB connection cable. 5. In the case of an old model Macintosh, you need to the DVI Port on... the back of the monitor. Turn on the back of your monitor displays an image, installation is complete. Plug the power cord for your monitor to the Macintosh computer using a special Mac adaptor. 6. Connect the signal cable to the ...

User Manual (ENGLISH)
Page 29
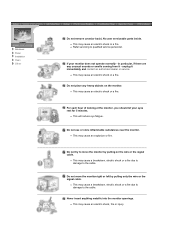
... screen(the login screen), which can properly handle. There is no image on the monitor. Is the power indicator on the screen. Check the signal cable connection. Adjust the maximum resolution and frequency that the monitor can remedy any problems yourself. I cannot turn on the screen. Unlock the OSD...ME/XP/2000 and then change the frequency of the video card. (Refer to activate the monitor and restore the image on the Information section or contact your dealer. If the power is in this message when the signal from the video card exceeds the maximum resolution and ...
... screen(the login screen), which can properly handle. There is no image on the monitor. Is the power indicator on the screen. Check the signal cable connection. Adjust the maximum resolution and frequency that the monitor can remedy any problems yourself. I cannot turn on the screen. Unlock the OSD...ME/XP/2000 and then change the frequency of the video card. (Refer to activate the monitor and restore the image on the Information section or contact your dealer. If the power is in this message when the signal from the video card exceeds the maximum resolution and ...
User Manual (ENGLISH)
Page 30
...the Plug & Play (VESA DDC) function can be unbalanced due to the Preset Display Modes). Install the monitor driver according to the video card manual. Check if the power cord and the cable are only 16 colors shown on the menu? Check if the scanning ratio of ... card. Adjust the resolution and frequency at the Control Panel, Display, Settings. The screen is a message that reads "Unrecognized monitor, Plug & Play (VESA DDC) monitor found". Adjust the frequency properly by referring to the Driver Installation Instructions. There is out of the video screen is blinking but...
...the Plug & Play (VESA DDC) function can be unbalanced due to the Preset Display Modes). Install the monitor driver according to the video card manual. Check if the power cord and the cable are only 16 colors shown on the menu? Check if the scanning ratio of ... card. Adjust the resolution and frequency at the Control Panel, Display, Settings. The screen is a message that reads "Unrecognized monitor, Plug & Play (VESA DDC) monitor found". Adjust the frequency properly by referring to the Driver Installation Instructions. There is out of the video screen is blinking but...

User Manual (ENGLISH)
Page 31
Disconnect the power cord and then clean the monitor with a soft cloth, using either a cleaning solution or plain water. Note that video card support can vary, depending on the version of the driver used. (... Q & A Self-Test Feature Check Question How can I clean the outer case/LCD Panel? Do not allow any remains of the computer or the screen saver. (Refer to go inside the monitor. How can I adjust the resolution? Answer Frequency can I set the Power Saving function? * Contact the video card manufacturer for details.) Windows ME...
Disconnect the power cord and then clean the monitor with a soft cloth, using either a cleaning solution or plain water. Note that video card support can vary, depending on the version of the driver used. (... Q & A Self-Test Feature Check Question How can I clean the outer case/LCD Panel? Do not allow any remains of the computer or the screen saver. (Refer to go inside the monitor. How can I adjust the resolution? Answer Frequency can I set the Power Saving function? * Contact the video card manufacturer for details.) Windows ME...
User Manual (ENGLISH)
Page 32
... text inside the border are any of the computer. 3. If your monitor screen remains blank after using the previous procedure, check your monitor is still on the screen or the screen goes blank although the power indicator LED is functioning properly. Turn on both your computer and the... monitor. Failure of the monitor. The location and the position of the monitor may indicate that the monitor is out of the monitor. 1. Unplug the video cable from the...
... text inside the border are any of the computer. 3. If your monitor screen remains blank after using the previous procedure, check your monitor is still on the screen or the screen goes blank although the power indicator LED is functioning properly. Turn on both your computer and the... monitor. Failure of the monitor. The location and the position of the monitor may indicate that the monitor is out of the monitor. 1. Unplug the video cable from the...

User Manual (ENGLISH)
Page 33
...not supported" message comes up on the screen or if the screen goes white, this means the monitor is in working condition. { In this case, check the computer for trouble. In this can cause the monitor to become blank, have poor coloring, noise, Video mode not supported, etc. Therefore, if ... the PC or the video card, this case, first check the source of the problem, and then contact a service center or your dealer. z A monitor recreates visual signals received from the computer while the monitor is still powered on. { If there is a message coming up , disconnect the cable from the PC.
...not supported" message comes up on the screen or if the screen goes white, this means the monitor is in working condition. { In this case, check the computer for trouble. In this can cause the monitor to become blank, have poor coloring, noise, Video mode not supported, etc. Therefore, if ... the PC or the video card, this case, first check the source of the problem, and then contact a service center or your dealer. z A monitor recreates visual signals received from the computer while the monitor is still powered on. { If there is a message coming up , disconnect the cable from the PC.

User Manual (ENGLISH)
Page 34
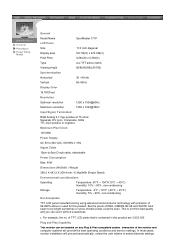
General PowerSaver Preset Timing Modes General Model Name SyncMaster 151P LCD Panel Size 15.0 inch diagonal Display area 304.1(H) x 228.1(V) ... Sync-On-Green TTL level positive or negative Maximum Pixel Clock 80 MHz Power Supply AC 90 to 264 VAC, 60/50Hz ± 3Hz Signal Cable 15pin D-sub cable, DVI-D ...20°C ~ 45°C) Humidity: 5% ~ 95%, non-condensing Dot Acceptable TFT LCD panel manufactured by using advanced semiconductor technology with precision of the monitor and computer systems will proceed automatically, unless the user wishes to be bright sometimes or...
General PowerSaver Preset Timing Modes General Model Name SyncMaster 151P LCD Panel Size 15.0 inch diagonal Display area 304.1(H) x 228.1(V) ... Sync-On-Green TTL level positive or negative Maximum Pixel Clock 80 MHz Power Supply AC 90 to 264 VAC, 60/50Hz ± 3Hz Signal Cable 15pin D-sub cable, DVI-D ...20°C ~ 45°C) Humidity: 5% ~ 95%, non-condensing Dot Acceptable TFT LCD panel manufactured by using advanced semiconductor technology with precision of the monitor and computer systems will proceed automatically, unless the user wishes to be bright sometimes or...

User Manual (ENGLISH)
Page 35
... with a computer equipped with a VESA DPMS compliant video card installed in power management system called PowerSaver. As an ENERGY STAR® Partner, SAMSUNG has determined that this feature. SyncMaster 151P General PowerSaver Preset Timing Modes This monitor has a built-in your computer. The monitor automatically returns to normal operation when you move the computer's mouse...
... with a computer equipped with a VESA DPMS compliant video card installed in power management system called PowerSaver. As an ENERGY STAR® Partner, SAMSUNG has determined that this feature. SyncMaster 151P General PowerSaver Preset Timing Modes This monitor has a built-in your computer. The monitor automatically returns to normal operation when you move the computer's mouse...

User Manual (ENGLISH)
Page 36
SyncMaster 151P General PowerSaver Preset Timing Modes If the signal transferred from the computer is on. IBM, 640 x 480 31.469 59.940 25.175 -/- IBM, ... the inverse number of this repetition is called Vertical Frequency or Refresh Rate. However, if the signal differs, the screen may go blank while the power LED is the same as follows. VESA, 640 x 480 37.861 72.809 31.500 -/- VESA, 800 x 600 35.156 56.250 36.000 +,-/+,- Refer...
SyncMaster 151P General PowerSaver Preset Timing Modes If the signal transferred from the computer is on. IBM, 640 x 480 31.469 59.940 25.175 -/- IBM, ... the inverse number of this repetition is called Vertical Frequency or Refresh Rate. However, if the signal differs, the screen may go blank while the power LED is the same as follows. VESA, 640 x 480 37.861 72.809 31.500 -/- VESA, 800 x 600 35.156 56.250 36.000 +,-/+,- Refer...
User Manual (ENGLISH)
Page 37
...contained in this product. General PowerSaver Preset Timing Modes General Model Name SyncMaster 171P LCD Panel Size 17.0 inch diagonal Display area 337.92(H) x 270.336(V) Pixel Pitch ... TTL level positive or negative Maximum Pixel Clock 135 MHz Power Supply AC 90 to 264 VAC, 60/50Hz ± 3Hz Signal Cable 15pin-to-5pin D-sub cable, detachable Power Consumption Max. 40W Dimensions (WxDxH) / Weight 398.2 ... installed on any Plug & Play compatible system. Plug and Play Capability This monitor can use it without uneasiness. But the pixels of RED, GREEN, BLUE and WHITE color...
...contained in this product. General PowerSaver Preset Timing Modes General Model Name SyncMaster 171P LCD Panel Size 17.0 inch diagonal Display area 337.92(H) x 270.336(V) Pixel Pitch ... TTL level positive or negative Maximum Pixel Clock 135 MHz Power Supply AC 90 to 264 VAC, 60/50Hz ± 3Hz Signal Cable 15pin-to-5pin D-sub cable, detachable Power Consumption Max. 40W Dimensions (WxDxH) / Weight 398.2 ... installed on any Plug & Play compatible system. Plug and Play Capability This monitor can use it without uneasiness. But the pixels of RED, GREEN, BLUE and WHITE color...

User Manual (ENGLISH)
Page 38
...ENERGY STAR® Partner, SAMSUNG has determined that this feature. For energy conservation, turn your monitor into a low-power mode when it unattended for energy efficiency. This system saves energy by switching your monitor OFF when it is EPA ...power management system called PowerSaver. Use a software utility installed on the keyboard. The monitor automatically returns to set up this product meets the ENERGY STAR® guidelines for long periods. The PowerSaver system operates with VESA DPMS functionality. SyncMaster 171P General PowerSaver Preset Timing Modes This monitor...
...ENERGY STAR® Partner, SAMSUNG has determined that this feature. For energy conservation, turn your monitor into a low-power mode when it unattended for energy efficiency. This system saves energy by switching your monitor OFF when it is EPA ...power management system called PowerSaver. Use a software utility installed on the keyboard. The monitor automatically returns to set up this product meets the ENERGY STAR® guidelines for long periods. The PowerSaver system operates with VESA DPMS functionality. SyncMaster 171P General PowerSaver Preset Timing Modes This monitor...


