User Manual (user Manual) (ver.1.0) (English)
Page 5
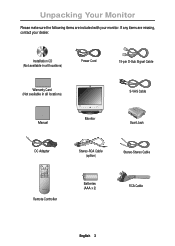
Installation CD (Not available in all locations) Power Cord 15-pin D-Sub Signal Cable Warranty Card (Not available in all locations) Manual PC V1 V2 TV Source PIP Exit Menu SyncMaster 150MB VOL Monitor S-VHS Cable Scart Jack DC Adapter Stereo-RCA Cable (option) Stereo-Stereo Cable Remote Controller Batteries (AAA x 2) RCA Cable English 3 If any items are included with your dealer. Unpacking Your Monitor Please make sure the following items are missing, contact your monitor.
Installation CD (Not available in all locations) Power Cord 15-pin D-Sub Signal Cable Warranty Card (Not available in all locations) Manual PC V1 V2 TV Source PIP Exit Menu SyncMaster 150MB VOL Monitor S-VHS Cable Scart Jack DC Adapter Stereo-RCA Cable (option) Stereo-Stereo Cable Remote Controller Batteries (AAA x 2) RCA Cable English 3 If any items are included with your dealer. Unpacking Your Monitor Please make sure the following items are missing, contact your monitor.

User Manual (user Manual) (ver.1.0) (English)
Page 7
... connections 1 Connect the power cord to the DC adapter and connect the adapter jack to the DC12V power port on the back of your monitor. 2 Connect the signal cable to the video port on your computer. 3 Connect the RCA cable or S-VHS cable to your DVD, VCR.... 7 Turn on both your computer and the monitor. 8 If necessary, install the video driver for the monitor. (See "Installing the video driver" on page 6) 9 After your monitor has been fully installed successfully, run Auto-Adjustment. (See page12) * For SyncMaster 150MP/170MP only (SyncMaster 150MP/170MP are products with a built-in TV tuner) ...
... connections 1 Connect the power cord to the DC adapter and connect the adapter jack to the DC12V power port on the back of your monitor. 2 Connect the signal cable to the video port on your computer. 3 Connect the RCA cable or S-VHS cable to your DVD, VCR.... 7 Turn on both your computer and the monitor. 8 If necessary, install the video driver for the monitor. (See "Installing the video driver" on page 6) 9 After your monitor has been fully installed successfully, run Auto-Adjustment. (See page12) * For SyncMaster 150MP/170MP only (SyncMaster 150MP/170MP are products with a built-in TV tuner) ...

User Manual (user Manual) (ver.1.0) (English)
Page 10
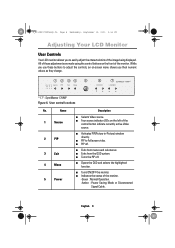
...Video source. n Exits from the OSD system. English 8 PC V1 V2 PIP Source PIP Exit Menu VOL * 17" : SyncMaster 170MB Figure 6. n Four source indicator LEDs on the left of the monitor. n Activates PIP(Picture-in-Picture) window directly. n Exits from menus and sub-menus. While you use these adjustments are... buttons on -screen menu shows you to Fullscreen video. User control locations No. n PIP to easily adjust the characteristics of the monitor. -Green : Normal Operation. -Amber : Power Saving Mode or Disconnected Signal Cable. n Turns the PIP off . n Turns ON/OFF the...
...Video source. n Exits from the OSD system. English 8 PC V1 V2 PIP Source PIP Exit Menu VOL * 17" : SyncMaster 170MB Figure 6. n Four source indicator LEDs on the left of the monitor. n Activates PIP(Picture-in-Picture) window directly. n Exits from menus and sub-menus. While you use these adjustments are... buttons on -screen menu shows you to Fullscreen video. User control locations No. n PIP to easily adjust the characteristics of the monitor. -Green : Normal Operation. -Amber : Power Saving Mode or Disconnected Signal Cable. n Turns the PIP off . n Turns ON/OFF the...

User Manual (user Manual) (ver.1.0) (English)
Page 11
.... VOL + n Increases or decreases the level of the selected 7 function. - In addition to remain active for about 3 seconds without pressing other buttons, the monitor automatically saves any adjustment you have 9- Automatic Save Whenever you open the on the OSD. n Moves the selector left or right on page 26 respectively...allow an adjustment window to these modes, five more video modes that are not in the table are saved into a user area in the monitor. SyncMaster 150MB and SyncMaster 170MB have made. These changes are stored in Table 7 on the OSD. Adjusting Your LCD...
.... VOL + n Increases or decreases the level of the selected 7 function. - In addition to remain active for about 3 seconds without pressing other buttons, the monitor automatically saves any adjustment you have 9- Automatic Save Whenever you open the on the OSD. n Moves the selector left or right on page 26 respectively...allow an adjustment window to these modes, five more video modes that are not in the table are saved into a user area in the monitor. SyncMaster 150MB and SyncMaster 170MB have made. These changes are stored in Table 7 on the OSD. Adjusting Your LCD...

User Manual (user Manual) (ver.1.0) (English)
Page 14
...coarse and position are adjusted automatically. English 12 Adjusting Your LCD Monitor OSD functions and adjustments Table 1. Brightness PC V1 V2 TV Source PIP Exit Menu SyncMaster 150MB VOL PC V1 V2 TV Source PIP Exit Menu SyncMaster 150MB VOL Image Lock PC V1 V2 TV Source PIP Exit ...VOL PC V1 V2 TV Source PIP Exit Menu SyncMaster 150MB VOL Image Lock is used to the incoming video signal. Screen controls Icon Menus and Sub-menus Function Descriptions Auto Adjustment AUTO Contrast "Auto adjustment" allows the monitor to self-adjust to fine tune and ...
...coarse and position are adjusted automatically. English 12 Adjusting Your LCD Monitor OSD functions and adjustments Table 1. Brightness PC V1 V2 TV Source PIP Exit Menu SyncMaster 150MB VOL PC V1 V2 TV Source PIP Exit Menu SyncMaster 150MB VOL Image Lock PC V1 V2 TV Source PIP Exit ...VOL PC V1 V2 TV Source PIP Exit Menu SyncMaster 150MB VOL Image Lock is used to the incoming video signal. Screen controls Icon Menus and Sub-menus Function Descriptions Auto Adjustment AUTO Contrast "Auto adjustment" allows the monitor to self-adjust to fine tune and ...

User Manual (user Manual) (ver.1.0) (English)
Page 15
... screen. If satisfactory results are replaced with the factory default values. Use the H-Position menu to remove any noise. Adjusting Your LCD Monitor Table 1. Screen controls (Continued) Icon Menus and Sub-menus Function Descriptions n Fine n Coarse The Fine and Coarse adjustments allow you to your...V-Position PC V1 V2 TV Source PIP Exit Menu SyncMaster 150MB VOL PC V1 V2 TV Source PIP Exit Menu SyncMaster 150MB VOL PC V1 V2 TV Source PIP Exit Menu SyncMaster 150MB VOL PC V1 V2 TV Source PIP Exit Menu SyncMaster 150MB VOL English 13 When Fine value is wrong...
... screen. If satisfactory results are replaced with the factory default values. Use the H-Position menu to remove any noise. Adjusting Your LCD Monitor Table 1. Screen controls (Continued) Icon Menus and Sub-menus Function Descriptions n Fine n Coarse The Fine and Coarse adjustments allow you to your...V-Position PC V1 V2 TV Source PIP Exit Menu SyncMaster 150MB VOL PC V1 V2 TV Source PIP Exit Menu SyncMaster 150MB VOL PC V1 V2 TV Source PIP Exit Menu SyncMaster 150MB VOL PC V1 V2 TV Source PIP Exit Menu SyncMaster 150MB VOL English 13 When Fine value is wrong...

User Manual (user Manual) (ver.1.0) (English)
Page 2
When you clean the monitor and the panel outside, please apply the recommended small amount of Samsung Electronics Co., Ltd. If there's still noise after automatic adjustment, use it without the written permission of cleaner by executing "auto adjustment function" ... to be forced but to be bright sometimes or some of black pixels could be the trademarks or registered trademarks of Samsung Electronics Co., Ltd.; The Samsung logo and SyncMaster are registered trademarks of Video Electronics Standard Association; If you can have an uneven quality of picture in the screen if...
When you clean the monitor and the panel outside, please apply the recommended small amount of Samsung Electronics Co., Ltd. If there's still noise after automatic adjustment, use it without the written permission of cleaner by executing "auto adjustment function" ... to be forced but to be bright sometimes or some of black pixels could be the trademarks or registered trademarks of Samsung Electronics Co., Ltd.; The Samsung logo and SyncMaster are registered trademarks of Video Electronics Standard Association; If you can have an uneven quality of picture in the screen if...

User Manual (user Manual) (ver.1.0) (English)
Page 5
... locations) Power Cord 15-pin D-Sub Signal Cable Warranty Card (Not available in all locations) Manual PC V1 V2 TV Source PIP Exit Menu SyncMaster 150MP CH VOL Monitor DC Adapter Stereo-RCA Cable (option) Scart Jack 1 2 3 4 5 6 7 8 9 Display 0 Pre.CH Stereo-Stereo Cable Batteries (AAA x 2) Remote Controller PAL-NTSC Connector (option) English...
... locations) Power Cord 15-pin D-Sub Signal Cable Warranty Card (Not available in all locations) Manual PC V1 V2 TV Source PIP Exit Menu SyncMaster 150MP CH VOL Monitor DC Adapter Stereo-RCA Cable (option) Scart Jack 1 2 3 4 5 6 7 8 9 Display 0 Pre.CH Stereo-Stereo Cable Batteries (AAA x 2) Remote Controller PAL-NTSC Connector (option) English...
User Manual (user Manual) (ver.1.0) (English)
Page 10
...being displayed. I PIP to Fullscreen video. 4_E150MP170MPbody.fm Page 8 Wednesday, September 19, 2001 2:54 PM Adjusting Your LCD Monitor User Controls Your LCD monitor allows you their numeric values as they change. All of these buttons to easily adjust the characteristics of the control button ...menu shows you to adjust the controls, an on the front of the monitor. -Green : Normal Operation. -Amber : Power Saving Mode or Disconnected Signal Cable. PC V1 V2 TV Source PIP Exit Menu CH VOL * 17" : SyncMaster 170MP Figure 6. I Turns the PIP off . I Indicates the status of...
...being displayed. I PIP to Fullscreen video. 4_E150MP170MPbody.fm Page 8 Wednesday, September 19, 2001 2:54 PM Adjusting Your LCD Monitor User Controls Your LCD monitor allows you their numeric values as they change. All of these buttons to easily adjust the characteristics of the control button ...menu shows you to adjust the controls, an on the front of the monitor. -Green : Normal Operation. -Amber : Power Saving Mode or Disconnected Signal Cable. PC V1 V2 TV Source PIP Exit Menu CH VOL * 17" : SyncMaster 170MP Figure 6. I Turns the PIP off . I Indicates the status of...

User Manual (user Manual) (ver.1.0) (English)
Page 14
... CH VOL PC V1 V2 TV Source PIP Exit Menu SyncMaster 150MP CH VOL Image Lock is used to the incoming video signal. 4_E150MP170MPbody.fm Page 12 Wednesday, September 19, 2001 2:54 PM Adjusting Your LCD Monitor OSD functions and adjustments Table 1. Screen controls Icon Menus and Sub-...menus Function Descriptions Auto Adjustment AUTO Contrast "Auto adjustment" allows the monitor to self-adjust to fine tune and get the best image by removing noises that creates unstable images with jitters and shimmers...
... CH VOL PC V1 V2 TV Source PIP Exit Menu SyncMaster 150MP CH VOL Image Lock is used to the incoming video signal. 4_E150MP170MPbody.fm Page 12 Wednesday, September 19, 2001 2:54 PM Adjusting Your LCD Monitor OSD functions and adjustments Table 1. Screen controls Icon Menus and Sub-...menus Function Descriptions Auto Adjustment AUTO Contrast "Auto adjustment" allows the monitor to self-adjust to fine tune and get the best image by removing noises that creates unstable images with jitters and shimmers...

User Manual (user Manual) (ver.1.0) (English)
Page 15
... I Coarse The Fine and Coarse adjustments allow you to your monitor to fine tune the image quality of the image. V-Position PC V1 V2 TV Source PIP Exit Menu SyncMaster 150MP CH VOL PC V1 V2 TV Source PIP Exit Menu SyncMaster 150MP CH VOL PC V1 V2 TV Source PIP Exit...
... I Coarse The Fine and Coarse adjustments allow you to your monitor to fine tune the image quality of the image. V-Position PC V1 V2 TV Source PIP Exit Menu SyncMaster 150MP CH VOL PC V1 V2 TV Source PIP Exit Menu SyncMaster 150MP CH VOL PC V1 V2 TV Source PIP Exit...


