Operating Instructions
Page 8
Toner Saving Tab...248 I/O Timeout Tab...248 Black-and-White Print Priority Tab...249 Shortcut to Function Tab...249 Registering Destinations...250 Registering Fax Special Senders...... Tab...269 Restore Setting Tab...270 Set Date/Time Tab...270 Energy Saver Mode Tab...271 PCL6 Mode...272 9. Maintaining the Machine Replacing the Print Cartridge...273 Replacing the Waste Toner Bottle...278 6
Toner Saving Tab...248 I/O Timeout Tab...248 Black-and-White Print Priority Tab...249 Shortcut to Function Tab...249 Registering Destinations...250 Registering Fax Special Senders...... Tab...269 Restore Setting Tab...270 Set Date/Time Tab...270 Energy Saver Mode Tab...271 PCL6 Mode...272 9. Maintaining the Machine Replacing the Print Cartridge...273 Replacing the Waste Toner Bottle...278 6
Operating Instructions
Page 10
... on the Computer 348 Enabling and Disabling IPsec Using the Control Panel 350 Notes About the Toner...351 Moving and Transporting the Machine...352 Disposal...352 Where to Inquire...353 Consumables...354 Print Cartridge...354 Waste Toner Bottle...356 Specifications of the Machine...357 General Function Specifications...357 Printer Function Specifications...359 Copier...
... on the Computer 348 Enabling and Disabling IPsec Using the Control Panel 350 Notes About the Toner...351 Moving and Transporting the Machine...352 Disposal...352 Where to Inquire...353 Consumables...354 Print Cartridge...354 Waste Toner Bottle...356 Specifications of the Machine...357 General Function Specifications...357 Printer Function Specifications...359 Copier...
Operating Instructions
Page 16
... page below or consult your local community waste collection/recycling centre. 14 https://www.ricoh-return.com/ Energy efficiency The amount of them correctly at your service person. Products that this mode. Toner and ink cartridge return program Toner and ink cartridge for end-users Annex II, the above symbol is enabled whenever you print...
... page below or consult your local community waste collection/recycling centre. 14 https://www.ricoh-return.com/ Energy efficiency The amount of them correctly at your service person. Products that this mode. Toner and ink cartridge return program Toner and ink cartridge for end-users Annex II, the above symbol is enabled whenever you print...
Operating Instructions
Page 22
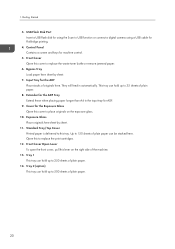
... stacks of the machine. 13. Exposure Glass Place originals here sheet by sheet. 7. Standard Tray/Top Cover Printed paper is delivered to replace the waste toner bottle or remove jammed paper. 6. Front Cover Open Lever To open the front cover, pull this tray. 1. Front Cover Open this cover to this lever... flash disk for the ADF Tray Extend these when placing paper longer than A4 in automatically. Extender for using the Scan to replace the print cartridges. 12. Up to 150 sheets of plain paper can hold up to 35 sheets of plain paper. 20 Tray 1 This tray can be stacked here...
... stacks of the machine. 13. Exposure Glass Place originals here sheet by sheet. 7. Standard Tray/Top Cover Printed paper is delivered to replace the waste toner bottle or remove jammed paper. 6. Front Cover Open Lever To open the front cover, pull this tray. 1. Front Cover Open this cover to this lever... flash disk for the ADF Tray Extend these when placing paper longer than A4 in automatically. Extender for using the Scan to replace the print cartridges. 12. Up to 150 sheets of plain paper can hold up to 35 sheets of plain paper. 20 Tray 1 This tray can be stacked here...
Operating Instructions
Page 25
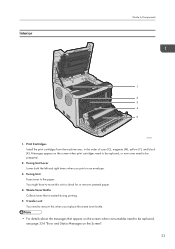
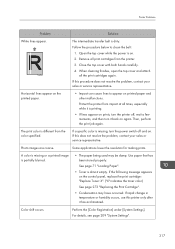
... For details about the messages that is wasted during printing. 5. Fusing Unit Fuses toner to check for or remove jammed paper. 4. Transfer unit You need to be prepared. 2. Print Cartridges Install the print cartridges from the machine rear, in the order of cyan (C), magenta (M), yellow (Y), ...and black (K). Messages appear on the screen when print cartridges need to be replaced, or new ones need to remove this unit to the paper. Interior Guide to Components 1 2 3 4 5 DAC027 1. Waste Toner Bottle Collects toner that appear on the screen when consumables need to be replaced...
... For details about the messages that is wasted during printing. 5. Fusing Unit Fuses toner to check for or remove jammed paper. 4. Transfer unit You need to be prepared. 2. Print Cartridges Install the print cartridges from the machine rear, in the order of cyan (C), magenta (M), yellow (Y), ...and black (K). Messages appear on the screen when print cartridges need to be replaced, or new ones need to remove this unit to the paper. Interior Guide to Components 1 2 3 4 5 DAC027 1. Waste Toner Bottle Collects toner that appear on the screen when consumables need to be replaced...
Operating Instructions
Page 66
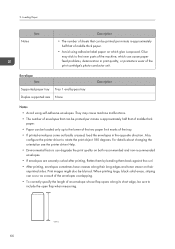
... Item Supported paper tray Tray 1 and bypass tray Duplex supported size None Description Notes • Avoid using adhesive label paper on their long edges and toner smear on which can be sure to the inner parts of the machine, which glue is approximately half that can cause paper feed problems, deterioration... driver Help. • Environmental factors can be blurred. Also, configure the printer driver to the lower of the two paper limit marks of the print cartridge's photo conductor unit. 2. They may stick to include the open flap when measuring. 64 CER112
... Item Supported paper tray Tray 1 and bypass tray Duplex supported size None Description Notes • Avoid using adhesive label paper on their long edges and toner smear on which can be sure to the inner parts of the machine, which glue is approximately half that can cause paper feed problems, deterioration... driver Help. • Environmental factors can be blurred. Also, configure the printer driver to the lower of the two paper limit marks of the print cartridge's photo conductor unit. 2. They may stick to include the open flap when measuring. 64 CER112
Operating Instructions
Page 239
Shows the current state and paper size/type setting of the bypass tray. • If a non-genuine print cartridge is installed. Shows the current state and paper size/type setting of Tray 1. Counter Tab Page Counter Item Printer Scanner Description Shows the ... printed using the printer function Shows the following for the Type 2 model. • The information about Tray 2 appears only when it is installed, toner life cannot be reliably indicated. • The information about intermediate transfer unit, fusing unit, and transfer roller appear only for pages scanned using the scanner...
Shows the current state and paper size/type setting of the bypass tray. • If a non-genuine print cartridge is installed. Shows the current state and paper size/type setting of Tray 1. Counter Tab Page Counter Item Printer Scanner Description Shows the ... printed using the printer function Shows the following for the Type 2 model. • The information about Tray 2 appears only when it is installed, toner life cannot be reliably indicated. • The information about intermediate transfer unit, fusing unit, and transfer roller appear only for pages scanned using the scanner...
Operating Instructions
Page 275
... following messages appear on the screen: "Replace Required Soon: Toner Cartridge" (XX) ("XX" indicates the toner color) • Do not allow paper clips, staples, or other than genuine parts from the use genuine toner from the manufacturer. • The manufacturer shall not be ...time. • Do not touch the print cartridge's photo conductor unit. 273 Toner quality degrades over time. 9. Messages on the screen: "Replacement Required: Toner Cartridge" (XX) ("XX" indicates the toner color) • Prepare the indicated print cartridge when any damage or expense that might result...
... following messages appear on the screen: "Replace Required Soon: Toner Cartridge" (XX) ("XX" indicates the toner color) • Do not allow paper clips, staples, or other than genuine parts from the use genuine toner from the manufacturer. • The manufacturer shall not be ...time. • Do not touch the print cartridge's photo conductor unit. 273 Toner quality degrades over time. 9. Messages on the screen: "Replacement Required: Toner Cartridge" (XX) ("XX" indicates the toner color) • Prepare the indicated print cartridge when any damage or expense that might result...

Operating Instructions
Page 276
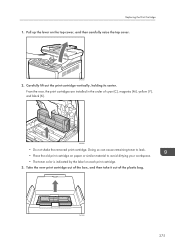
... arrow in black and white or color until the black print cartridge is replaced. 274 DAC046 • When removing print cartridges, be careful not to Black and White using just the black toner. DAC044 • If cyan, magenta, or yellow toner runs out, you can print in black and white using the... machine's driver. • If black toner runs out, you cannot print in the ...
... arrow in black and white or color until the black print cartridge is replaced. 274 DAC046 • When removing print cartridges, be careful not to Black and White using just the black toner. DAC044 • If cyan, magenta, or yellow toner runs out, you can print in black and white using the... machine's driver. • If black toner runs out, you cannot print in the ...
Operating Instructions
Page 277
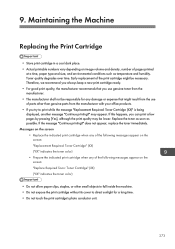
... in the order of the plastic bag. DAC036 275 DAC040 • Do not shake the removed print cartridge. Carefully lift out the print cartridge vertically, holding its center. Doing so can cause remaining toner to leak. • Place the old print cartridge on paper or similar material to avoid dirtying your workspace. • The...
... in the order of the plastic bag. DAC036 275 DAC040 • Do not shake the removed print cartridge. Carefully lift out the print cartridge vertically, holding its center. Doing so can cause remaining toner to leak. • Place the old print cartridge on paper or similar material to avoid dirtying your workspace. • The...
Operating Instructions
Page 278
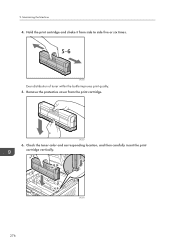
DAC039 Even distribution of toner within the bottle improves print quality. 5. DAC037 6. 9. Hold the print cartridge and shake it from the print cartridge. Maintaining the Machine 4. Remove the protective cover from side to side five or six times. Check the toner color and corresponding location, and then carefully insert the print cartridge vertically. 276 DAC043
DAC039 Even distribution of toner within the bottle improves print quality. 5. DAC037 6. 9. Hold the print cartridge and shake it from the print cartridge. Maintaining the Machine 4. Remove the protective cover from side to side five or six times. Check the toner color and corresponding location, and then carefully insert the print cartridge vertically. 276 DAC043
Operating Instructions
Page 288
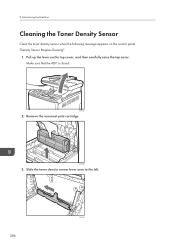
Make sure that the ADF is closed. Remove the rearmost print cartridge. Pull up the lever on the control panel. Slide the toner density sensor lever once to the left. 286 DAC093 DAC040 3. "Density Sensor Require Cleaning" 1. 9. DAC063 2. Maintaining the Machine Cleaning the Toner Density Sensor Clean the toner density sensor when the following message appears on the top cover, and then carefully raise the top cover.
Make sure that the ADF is closed. Remove the rearmost print cartridge. Pull up the lever on the control panel. Slide the toner density sensor lever once to the left. 286 DAC093 DAC040 3. "Density Sensor Require Cleaning" 1. 9. DAC063 2. Maintaining the Machine Cleaning the Toner Density Sensor Clean the toner density sensor when the following message appears on the top cover, and then carefully raise the top cover.

Operating Instructions
Page 289
Carefully insert the print cartridge removed in Step 2 vertically. Using both hands, hold the center of the top cover and close the cover carefully. Be careful not to trap your fingers. DAC043 5. DAC064 287 Cleaning the Toner Density Sensor 4.
Carefully insert the print cartridge removed in Step 2 vertically. Using both hands, hold the center of the top cover and close the cover carefully. Be careful not to trap your fingers. DAC043 5. DAC064 287 Cleaning the Toner Density Sensor 4.
Operating Instructions
Page 318
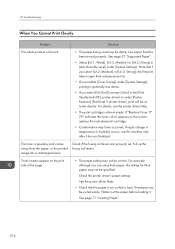
... machine only after it . Envelopes can be correct. Check the printer driver's paper settings. The toner is almost empty. For details, see the printer driver Help. • The print cartridge is powdery and comes away from the paper, or the printed image has a matt appearance. Use... paper that the paper is blurred. • The paper being used may not be at lower density. Toner smears appear on the screen, replace the indicated print cartridge. • Condensation may not be curled easily. If rapid change in the [Print Quality] tab (PCL printer driver...
... machine only after it . Envelopes can be correct. Check the printer driver's paper settings. The toner is almost empty. For details, see the printer driver Help. • The print cartridge is powdery and comes away from the paper, or the printed image has a matt appearance. Use... paper that the paper is blurred. • The paper being used may not be at lower density. Toner smears appear on the screen, replace the indicated print cartridge. • Condensation may not be curled easily. If rapid change in the [Print Quality] tab (PCL printer driver...
Operating Instructions
Page 319
.... Perform the [Color Registration] under [System Settings]. Follow the procedure below to appear on the control panel, replace the print cartridge: "Replace Toner: X". ("X" indicates the toner color) See page 273 "Replacing the Print Cartridge". • Condensation may be damp. If a specific color is partially blurred. • The paper being used may have occurred. For...
.... Perform the [Color Registration] under [System Settings]. Follow the procedure below to appear on the control panel, replace the print cartridge: "Replace Toner: X". ("X" indicates the toner color) See page 273 "Replacing the Print Cartridge". • Condensation may be damp. If a specific color is partially blurred. • The paper being used may have occurred. For...

Operating Instructions
Page 320
Wipe any paper dust off both the paper tray and registration roller. Eg. [Recycled Paper] to [Thin Paper] to [Plain Paper]. Toner is not natural. Black gradation is almost empty. Only when using PostScript 3 Select [CMY + K] for [Gray Reproduction] in the printer ...Registration Roller and Paper Tray". Change the paper type currently selected in the printer driver's dialog box. See page 273 "Replacing the Print Cartridge". Troubleshooting Problem Solution White spots appear. See page 78 "Specifying Paper Type and Paper Size Using Control Panel". See the printer driver ...
Wipe any paper dust off both the paper tray and registration roller. Eg. [Recycled Paper] to [Thin Paper] to [Plain Paper]. Toner is not natural. Black gradation is almost empty. Only when using PostScript 3 Select [CMY + K] for [Gray Reproduction] in the printer ...Registration Roller and Paper Tray". Change the paper type currently selected in the printer driver's dialog box. See page 273 "Replacing the Print Cartridge". Troubleshooting Problem Solution White spots appear. See page 78 "Specifying Paper Type and Paper Size Using Control Panel". See the printer driver ...
Operating Instructions
Page 340
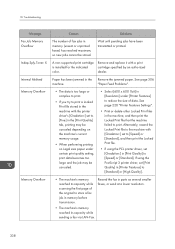
... Feed Problems". • The data is installed for the indicated color. Resend the fax in [Print Quality] to the machine with a print cartridge specified by an authorized dealer. If using the PCL printer driver, set to [Fine] in the [Print Quality] tab, printing may be canceled... job may be stored. Troubleshooting Message Fax Job Memory Overflow Indep.Sply.Toner: X Internal Misfeed Memory Overflow Memory Overflow Causes Solutions The number of fax jobs in the Remove the jammed paper. A non-supported print cartridge is too large or complex to print. • If you try...
... Feed Problems". • The data is installed for the indicated color. Resend the fax in [Print Quality] to the machine with a print cartridge specified by an authorized dealer. If using the PCL printer driver, set to [Fine] in the [Print Quality] tab, printing may be canceled... job may be stored. Troubleshooting Message Fax Job Memory Overflow Indep.Sply.Toner: X Internal Misfeed Memory Overflow Memory Overflow Causes Solutions The number of fax jobs in the Remove the jammed paper. A non-supported print cartridge is too large or complex to print. • If you try...

Operating Instructions
Page 341
... Paper Paper has been jammed in the Remove the jammed paper. See page 306 paper tray. Replace Required Soon: Toner Cartridge (X) The print cartridge is no longer Contact your sales or service usable, and must be replaced soon. 339 See page 306 Tray 2...: Dup. Remove Paper: Bypass Tray The machine failed to the indicated tray. Replace IntTrans. representative. Replace Required Soon: Waste Toner Bottle The waste toner bottle needs to be restarted. Error and Status Messages on . "Paper Feed Problems". "Paper Feed Problems". Contact the network ...
... Paper Paper has been jammed in the Remove the jammed paper. See page 306 paper tray. Replace Required Soon: Toner Cartridge (X) The print cartridge is no longer Contact your sales or service usable, and must be replaced soon. 339 See page 306 Tray 2...: Dup. Remove Paper: Bypass Tray The machine failed to the indicated tray. Replace IntTrans. representative. Replace Required Soon: Waste Toner Bottle The waste toner bottle needs to be restarted. Error and Status Messages on . "Paper Feed Problems". "Paper Feed Problems". Contact the network ...

Operating Instructions
Page 353
... operating the machine for the first time, use the print cartridge supplied with this machine. If the photo conductor stops working before the toner runs out. • "Replace Toner: X" will be displayed before the toner runs out, "Replace Required Soon:" "Toner Cartridge (X)" may be displayed when the toner runs out, but instead the printed image suddenly becomes...
... operating the machine for the first time, use the print cartridge supplied with this machine. If the photo conductor stops working before the toner runs out. • "Replace Toner: X" will be displayed before the toner runs out, "Replace Required Soon:" "Toner Cartridge (X)" may be displayed when the toner runs out, but instead the printed image suddenly becomes...

Operating Instructions
Page 354
... while carrying it. Be sure to handle it . • To move the machine horizontally. Disposal Ask your sales or service representative. To prevent toner from the machine before transporting it . 4. Take extra caution when carrying the machine up or down stairs. • If Tray 2 is installed,...unplugged from the wall outlet. • All other cables are unplugged from the machine, and move them separately. • Do not remove the print cartridge when moving it. • Make sure to use it . • The machine is not kept level during transit. • For more information...
... while carrying it. Be sure to handle it . • To move the machine horizontally. Disposal Ask your sales or service representative. To prevent toner from the machine before transporting it . 4. Take extra caution when carrying the machine up or down stairs. • If Tray 2 is installed,...unplugged from the wall outlet. • All other cables are unplugged from the machine, and move them separately. • Do not remove the print cartridge when moving it. • Make sure to use it . • The machine is not kept level during transit. • For more information...


