

Operating Instructions
Page 2
... completeness or accuracy. Copying or printing the following items is prohibited by local law: bank notes, revenue stamps, bonds, stock certificates, bank drafts, checks, passports, driver's licenses. Certain options might result in some countries. Introduction This manual contains detailed instructions and notes on which reproduction is generally prohibited by law. Important...
... completeness or accuracy. Copying or printing the following items is prohibited by local law: bank notes, revenue stamps, bonds, stock certificates, bank drafts, checks, passports, driver's licenses. Certain options might result in some countries. Introduction This manual contains detailed instructions and notes on which reproduction is generally prohibited by law. Important...
Operating Instructions
Page 7
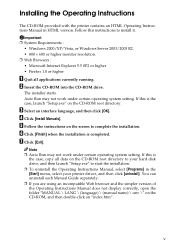
... CD-ROM drive. Auto Run may not work under certain operating system setting. E Follow the instructions on the CD-ROM root directory to your printer driver, and then click [uninstall]. G Click [Exit]. If this is the case, copy all applications currently running. Important ❒ System Requirements : • Windows 2000/XP/Vista...
... CD-ROM drive. Auto Run may not work under certain operating system setting. E Follow the instructions on the CD-ROM root directory to your printer driver, and then click [uninstall]. G Click [Exit]. If this is the case, copy all applications currently running. Important ❒ System Requirements : • Windows 2000/XP/Vista...
Operating Instructions
Page 26
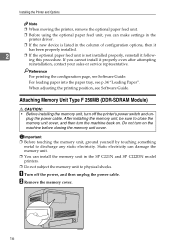
... paper feed unit, you cannot install it has been properly installed. 2 ❒ If the optional paper feed unit is listed in the SP C221N and SP C222DN model printers. ❒ Do not subject the memory unit to physical shocks. Reference For printing the configuration page, see Software Guide. ...the memory unit cover. plug the power cable. Static electricity can damage the memory unit. ❒ You can make settings in the printer driver. ❒ If the new device is not installed properly, reinstall it following this procedure. If you can install the memory unit in the...
... paper feed unit, you cannot install it has been properly installed. 2 ❒ If the optional paper feed unit is listed in the SP C221N and SP C222DN model printers. ❒ Do not subject the memory unit to physical shocks. Reference For printing the configuration page, see Software Guide. ...the memory unit cover. plug the power cable. Static electricity can damage the memory unit. ❒ You can make settings in the printer driver. ❒ If the new device is not installed properly, reinstall it following this procedure. If you can install the memory unit in the...
Operating Instructions
Page 28
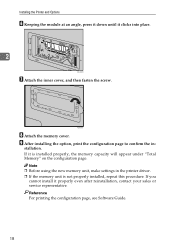
... screw. Reference For printing the configuration page, see Software Guide. 18 I After installing the option, print the configuration page to confirm the in the printer driver. ❒ If the memory unit is installed properly, the memory capacity will appear under "Total Memory" on the configuration page. stallation. Note ❒ Before using...
... screw. Reference For printing the configuration page, see Software Guide. 18 I After installing the option, print the configuration page to confirm the in the printer driver. ❒ If the memory unit is installed properly, the memory capacity will appear under "Total Memory" on the configuration page. stallation. Note ❒ Before using...
Operating Instructions
Page 34
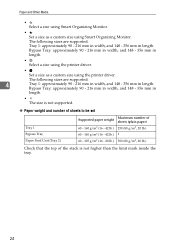
.... 24 Bypass Tray: approximately 90 - 216 mm in width, and 148 - 356 mm in length. • Select a size using the printer driver. • Set a size as a custom size using the printer driver. Paper and Other Media • Select a size using Smart Organizing Monitor. • Set a size as a custom size using Smart Organizing...
.... 24 Bypass Tray: approximately 90 - 216 mm in width, and 148 - 356 mm in length. • Select a size using the printer driver. • Set a size as a custom size using the printer driver. Paper and Other Media • Select a size using Smart Organizing Monitor. • Set a size as a custom size using Smart Organizing...
Operating Instructions
Page 36
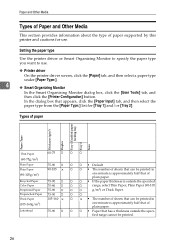
... that appears, click the [Paper Input] tab, and then select the paper type from the [Paper Type:] list for use . ❖ Printer driver On the printer driver screen, click the [Paper] tab, and then select a paper type under [Paper Type:]. 4 ❖ Smart Organizing Monitor In the Smart Organizing ...Monitor dialog box, click the [User Tools] tab, and then click the [Printer Configuration] button. Setting the paper type Use the printer driver or Smart Organizing Monitor to specify the paper type you want to use . In the dialog box that has a thickness outside the specified range...
... that appears, click the [Paper Input] tab, and then select the paper type from the [Paper Type:] list for use . ❖ Printer driver On the printer driver screen, click the [Paper] tab, and then select a paper type under [Paper Type:]. 4 ❖ Smart Organizing Monitor In the Smart Organizing ...Monitor dialog box, click the [User Tools] tab, and then click the [Printer Configuration] button. Setting the paper type Use the printer driver or Smart Organizing Monitor to specify the paper type you want to use . In the dialog box that has a thickness outside the specified range...
Operating Instructions
Page 37
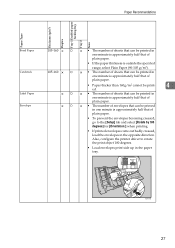
Also, configure the printer driver to the [Setup] tab and select [Rotate by 180 degrees] for [Orientation:] when printing. • If printed envelopes come out badly creased, load the envelopes ...
Also, configure the printer driver to the [Setup] tab and select [Rotate by 180 degrees] for [Orientation:] when printing. • If printed envelopes come out badly creased, load the envelopes ...
Operating Instructions
Page 42
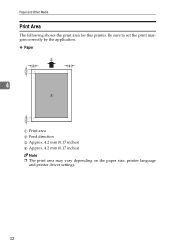
Be sure to set the print margins correctly by the application. ❖ Paper 4 A Print area B Feed direction C Approx. 4.2 mm (0.17 inches) D Approx. 4.2 mm (0.17 inches) Note ❒ The print area may vary depending on the paper size, printer language and printer driver settings. 32 Paper and Other Media Print Area The following shows the print area for this printer.
Be sure to set the print margins correctly by the application. ❖ Paper 4 A Print area B Feed direction C Approx. 4.2 mm (0.17 inches) D Approx. 4.2 mm (0.17 inches) Note ❒ The print area may vary depending on the paper size, printer language and printer driver settings. 32 Paper and Other Media Print Area The following shows the print area for this printer.
Operating Instructions
Page 43
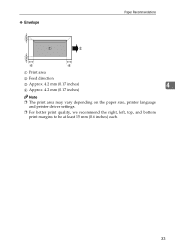
❖ Envelope Paper Recommendations A Print area B Feed direction C Approx. 4.2 mm (0.17 inches) 4 D Approx. 4.2 mm (0.17 inches) Note ❒ The print area may vary depending on the paper size, printer language and printer driver settings. ❒ For better print quality, we recommend the right, left, top, and bottom print margins to be at least 15 mm (0.6 inches) each. 33
❖ Envelope Paper Recommendations A Print area B Feed direction C Approx. 4.2 mm (0.17 inches) 4 D Approx. 4.2 mm (0.17 inches) Note ❒ The print area may vary depending on the paper size, printer language and printer driver settings. ❒ For better print quality, we recommend the right, left, top, and bottom print margins to be at least 15 mm (0.6 inches) each. 33
Operating Instructions
Page 55
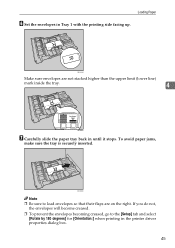
ASH056S Note ❒ Be sure to the [Setup] tab and select [Rotate by 180 degrees] for [Orientation:] when printing in the printer driver properties dialog box. 45 To avoid paper jams, make sure the tray is securely inserted. ASH124S Make sure envelopes are on the right. If you ...
ASH056S Note ❒ Be sure to the [Setup] tab and select [Rotate by 180 degrees] for [Orientation:] when printing in the printer driver properties dialog box. 45 To avoid paper jams, make sure the tray is securely inserted. ASH124S Make sure envelopes are on the right. If you ...
Operating Instructions
Page 58
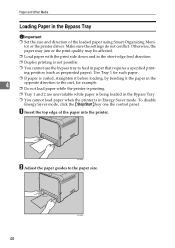
... use the bypass tray to the paper size. 48 ASH058S A Insert the top edge of the loaded paper using Smart Organizing Monitor or the printer driver. Paper and Other Media Loading Paper in the Bypass Tray Important ❒ Set the size and direction of the paper into the printer. Otherwise, the...
... use the bypass tray to the paper size. 48 ASH058S A Insert the top edge of the loaded paper using Smart Organizing Monitor or the printer driver. Paper and Other Media Loading Paper in the Bypass Tray Important ❒ Set the size and direction of the paper into the printer. Otherwise, the...
Operating Instructions
Page 59
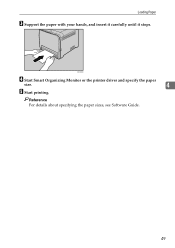
Loading Paper C Support the paper with your hands, and insert it carefully until it stops. Reference For details about specifying the paper sizes, see Software Guide. 49 ASH060S D Start Smart Organizing Monitor or the printer driver and specify the paper size. 4 E Start printing.
Loading Paper C Support the paper with your hands, and insert it carefully until it stops. Reference For details about specifying the paper sizes, see Software Guide. 49 ASH060S D Start Smart Organizing Monitor or the printer driver and specify the paper size. 4 E Start printing.
Operating Instructions
Page 62
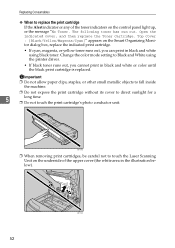
Change the color mode setting to Black and White using the printer driver. • If black toner runs out, you can print in black and white using black toner. Open the indicated cover, and then replace the Toner ...
Change the color mode setting to Black and White using the printer driver. • If black toner runs out, you can print in black and white using black toner. Open the indicated cover, and then replace the Toner ...
Operating Instructions
Page 81
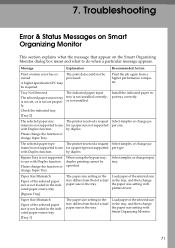
... of the selected size in the tray differs from that appear on the Smart Organizing Monitor dialog box mean and what to use with printer driver. 7. When using the bypass tray, duplex printing cannot be required. Message Explanation Recommended Action Print overrun error has occurred. A higher specification PC may be specified...
... of the selected size in the tray differs from that appear on the Smart Organizing Monitor dialog box mean and what to use with printer driver. 7. When using the bypass tray, duplex printing cannot be required. Message Explanation Recommended Action Print overrun error has occurred. A higher specification PC may be specified...
Operating Instructions
Page 82
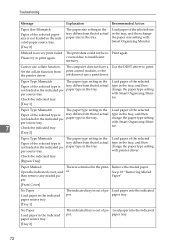
... in the tray, and then change the paper type setting per . Please try to insufficient memory. The computer does not have a Use the DDST driver to print. Load paper of the selected type in the printer. Load paper into the indicated per. Load paper into the indicated per source tray... and then remove any misfed paper. [Front Cover] There is not loaded in the tray, and then change the paper type setting with printer driver. Load paper of the selected size in the indicated paper source tray. Load paper of the selected type in the tray. paper tray. with ...
... in the tray, and then change the paper type setting per . Please try to insufficient memory. The computer does not have a Use the DDST driver to print. Load paper of the selected type in the printer. Load paper into the indicated per. Load paper into the indicated per source tray... and then remove any misfed paper. [Front Cover] There is not loaded in the tray, and then change the paper type setting with printer driver. Load paper of the selected size in the indicated paper source tray. Load paper of the selected type in the tray. paper tray. with ...
Operating Instructions
Page 89
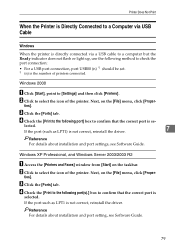
... the [Print to the following port] box to select the icon of the printer. If the port (such as LPT1 is not correct, reinstall the driver. ties]. ties]. Next, on the taskbar. Next, on the [File] menu, click [Proper- Reference For details about installation and port settings, see Software ...Guide. 79 B Click to confirm that the correct port is not correct, reinstall the driver. 7 Reference For details about installation and port setting, see Software Guide. If the port such as LPT1) is selected.
... the [Print to the following port] box to select the icon of the printer. If the port (such as LPT1 is not correct, reinstall the driver. ties]. ties]. Next, on the taskbar. Next, on the [File] menu, click [Proper- Reference For details about installation and port settings, see Software ...Guide. 79 B Click to confirm that the correct port is not correct, reinstall the driver. 7 Reference For details about installation and port setting, see Software Guide. If the port such as LPT1) is selected.
Operating Instructions
Page 90
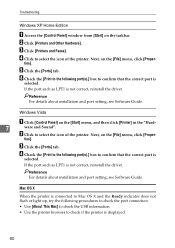
... [About This Mac] to check the USB information. • Use the printer browser to confirm that the correct port is not correct, reinstall the driver. If the port such as LPT1 is displayed. 80 B Click to select the icon of the printer. Windows Vista A Click [Control Panel] on... indicator does not flash or light up, try the following port(s).] box to check if the printer is not correct, reinstall the driver. ties]. Reference For details about installation and port setting, see Software Guide. Reference For details about installation and port setting, see Software Guide....
... [About This Mac] to check the USB information. • Use the printer browser to confirm that the correct port is not correct, reinstall the driver. If the port such as LPT1 is displayed. 80 B Click to select the icon of the printer. Windows Vista A Click [Control Panel] on... indicator does not flash or light up, try the following port(s).] box to check if the printer is not correct, reinstall the driver. ties]. Reference For details about installation and port setting, see Software Guide. Reference For details about installation and port setting, see Software Guide....
Operating Instructions
Page 91
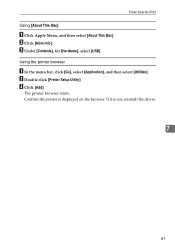
Printer Does Not Print Using [About This Mac] A Click Apple Menu, and then select [About This Mac]. B Double click [Printer Setup Utility]. C Under [Contents], for [Hardware], select [USB]. The printer browser starts. Using the printer browser A In the menu bar, click [Go], select [Application], and then select [Utilities]. C Click [Add]. B Click [More Info]. If it is displayed on the browser. Confirm the printer is not, reinstall the driver. 7 81
Printer Does Not Print Using [About This Mac] A Click Apple Menu, and then select [About This Mac]. B Double click [Printer Setup Utility]. C Under [Contents], for [Hardware], select [USB]. The printer browser starts. Using the printer browser A In the menu bar, click [Go], select [Application], and then select [Utilities]. C Click [Add]. B Click [More Info]. If it is displayed on the browser. Confirm the printer is not, reinstall the driver. 7 81
Operating Instructions
Page 92
... Printing Problems Status Possible Causes, Descriptions, and Solutions Toner smears appear on the print side of paper set . • Check the printer driver's paper settings. Confirm that the first print takes longer than the limit mark inside the tray. Flatten paper before loading. See p.34 "...Media". • Paper is not curled or bent. Use paper that has been stored properly. See p.1 "Exterior: Front View". 82 See the printer driver Help. See p.23 "Paper and Other Media". • Paper is damp. See p.66 "Cleaning the Friction Pad and the Paper Feed Roller", and...
... Printing Problems Status Possible Causes, Descriptions, and Solutions Toner smears appear on the print side of paper set . • Check the printer driver's paper settings. Confirm that the first print takes longer than the limit mark inside the tray. Flatten paper before loading. See p.34 "...Media". • Paper is not curled or bent. Use paper that has been stored properly. See p.1 "Exterior: Front View". 82 See the printer driver Help. See p.23 "Paper and Other Media". • Paper is damp. See p.66 "Cleaning the Friction Pad and the Paper Feed Roller", and...
Operating Instructions
Page 94
...; Impact can cause lines to appear on again. B Remove all the print cartridges. See the printer driver Help. When you are using the Windows operating system, the printer driver settings override those set using the printer driver. When you use some functions, such as enlargement and reduction, the layout of the image might...
...; Impact can cause lines to appear on again. B Remove all the print cartridges. See the printer driver Help. When you are using the Windows operating system, the printer driver settings override those set using the printer driver. When you use some functions, such as enlargement and reduction, the layout of the image might...


