
Operating Instructions
Page 1
Operating Instructions Hardware Guide 1 Guide to read "Safety Information" before you use , be sure to the Printer 2 Installing the Printer and Options 3 Connecting the Printer 4 Paper and Other Media 5 Replacing Consumables 6 Cleaning the Printer 7 Troubleshooting 8 Removing Misfed Paper 9 Appendix Read this machine and keep it handy for future reference. For safe and correct use this manual carefully before using the machine.
Operating Instructions Hardware Guide 1 Guide to read "Safety Information" before you use , be sure to the Printer 2 Installing the Printer and Options 3 Connecting the Printer 4 Paper and Other Media 5 Replacing Consumables 6 Cleaning the Printer 7 Troubleshooting 8 Removing Misfed Paper 9 Appendix Read this machine and keep it handy for future reference. For safe and correct use this manual carefully before using the machine.
Operating Instructions
Page 4
... injury and prevent damage to the machine, be sure to read this. ❖ Quick Installation Guide Contains procedures for removing the printer from its box, and connecting it to a computer. ❖ Hardware Guide Contains information about paper and procedures such as installing... options, replacing consumables, responding to error messages, and resolving jams. ❖ Software Guide Contain procedures for This Printer For particular functions, see the relevant parts of the manual. ❖ Safety Information Provides information on safe usage of this machine in...
... injury and prevent damage to the machine, be sure to read this. ❖ Quick Installation Guide Contains procedures for removing the printer from its box, and connecting it to a computer. ❖ Hardware Guide Contains information about paper and procedures such as installing... options, replacing consumables, responding to error messages, and resolving jams. ❖ Software Guide Contain procedures for This Printer For particular functions, see the relevant parts of the manual. ❖ Safety Information Provides information on safe usage of this machine in...
Operating Instructions
Page 6
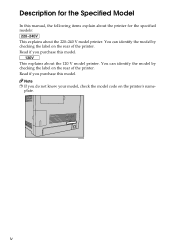
Description for the Specified Model In this model. You can identify the model by checking the label on the printer's name- ASH074S iv Read if you purchase this manual, the following items explain about the printer for the specified models: This explains about the 120 V model printer. Read if you do not know your model, check the model code on the rear of the printer. This explains about the 220-240 V model printer. You can identify the model by checking the label on the rear of the printer. Note ❒ If you purchase this model. plate.
Description for the Specified Model In this model. You can identify the model by checking the label on the printer's name- ASH074S iv Read if you purchase this manual, the following items explain about the printer for the specified models: This explains about the 120 V model printer. Read if you do not know your model, check the model code on the rear of the printer. This explains about the 220-240 V model printer. You can identify the model by checking the label on the rear of the printer. Note ❒ If you purchase this model. plate.
Operating Instructions
Page 7
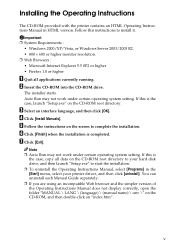
... \ LANG \ (language) \ (manual name) \ unv \" on the CD-ROM, and then double-click on the CD-ROM root directory to your printer driver, and then click [uninstall]. B Insert the CD-ROM into the CD-ROM drive. v Auto Run may not work under certain operating system setting. ...Installing the Operating Instructions The CD-ROM provided with the printer contains an HTML Operating Instructions Manual in the [Start] menu, select your hard disk drive, and then launch "Setup.exe" to start ...
... \ LANG \ (language) \ (manual name) \ unv \" on the CD-ROM, and then double-click on the CD-ROM root directory to your printer driver, and then click [uninstall]. B Insert the CD-ROM into the CD-ROM drive. v Auto Run may not work under certain operating system setting. ...Installing the Operating Instructions The CD-ROM provided with the printer contains an HTML Operating Instructions Manual in the [Start] menu, select your hard disk drive, and then launch "Setup.exe" to start ...
Operating Instructions
Page 8
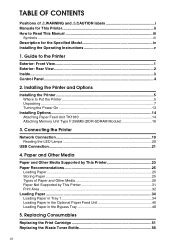
...(DDR-SDRAM Module 16 3. Replacing Consumables Replacing the Print Cartridge 51 Replacing the Waste Toner Bottle 56 vi Installing the Printer and Options Installing the Printer 5 Where to the Printer Exterior: Front View 1 Exterior: Rear View 2 Inside...3 Control Panel...4 2. TABLE OF CONTENTS Positions of Paper and Other... Media 26 Paper Not Supported by This Printer 31 Print Area ...32 Loading Paper ...34 Loading Paper in Tray 1 34 Loading Paper in the Optional Paper Feed Unit 46 Loading...
...(DDR-SDRAM Module 16 3. Replacing Consumables Replacing the Print Cartridge 51 Replacing the Waste Toner Bottle 56 vi Installing the Printer and Options Installing the Printer 5 Where to the Printer Exterior: Front View 1 Exterior: Rear View 2 Inside...3 Control Panel...4 2. TABLE OF CONTENTS Positions of Paper and Other... Media 26 Paper Not Supported by This Printer 31 Print Area ...32 Loading Paper ...34 Loading Paper in Tray 1 34 Loading Paper in the Optional Paper Feed Unit 46 Loading...
Operating Instructions
Page 9
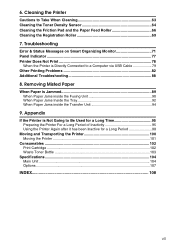
... 79 Other Printing Problems 82 Additional Troubleshooting 88 8. Troubleshooting Error & Status Messages on Smart Organizing Monitor 71 Panel Indicator ...77 Printer Does Not Print 78 When the Printer is Jammed 89 When Paper Jams inside the Fusing Unit 90 When Paper Jams Inside the Tray 92 When Paper Jams inside... the Transfer Unit 94 9. Appendix If the Printer is Not Going to Take When Cleaning 63 Cleaning the Toner Density Sensor 64 Cleaning the Friction Pad and the Paper Feed Roller 66 ...
... 79 Other Printing Problems 82 Additional Troubleshooting 88 8. Troubleshooting Error & Status Messages on Smart Organizing Monitor 71 Panel Indicator ...77 Printer Does Not Print 78 When the Printer is Jammed 89 When Paper Jams inside the Fusing Unit 90 When Paper Jams Inside the Tray 92 When Paper Jams inside... the Transfer Unit 94 9. Appendix If the Printer is Not Going to Take When Cleaning 63 Cleaning the Toner Density Sensor 64 Cleaning the Friction Pad and the Paper Feed Roller 66 ...
Operating Instructions
Page 11
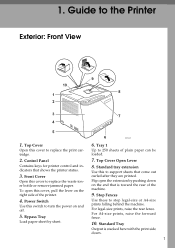
... is stacked here with the print side down. 1 For legal-size prints, raise the rear fence. Standard Tray Output is toward the rear of the printer. 8. Top Cover Open Lever Contains keys for printer control and indicators that come out curled after they are printed. Flip open this switch to the...: Front View ASH022S 1. For A4-size prints, raise the forward fence. 10. Up to support sheets that shows the printer status. 3. Front Cover Open this cover to replace the waste toner bottle or remove jammed paper. Tray 1 Open this cover to replace the print cartridge. ...
... is stacked here with the print side down. 1 For legal-size prints, raise the rear fence. Standard Tray Output is toward the rear of the printer. 8. Top Cover Open Lever Contains keys for printer control and indicators that come out curled after they are printed. Flip open this switch to the...: Front View ASH022S 1. For A4-size prints, raise the forward fence. 10. Up to support sheets that shows the printer status. 3. Front Cover Open this cover to replace the waste toner bottle or remove jammed paper. Tray 1 Open this cover to replace the print cartridge. ...
Operating Instructions
Page 12
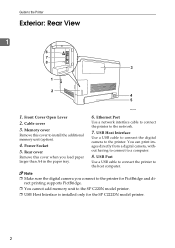
...connect to the SP C220N model printer. ❒ USB Host Interface is installed only for PictBridge and di- Note ❒ Make sure the digital camera you load paper larger than A4 in the paper tray. 6. Power Socket 5. Rear cover Remove this cover to the printer. USB Host ...the additional memory unit (option). 4. Guide to the host computer. Front Cover Open Lever 2. USB Port Use a USB cable to connect the printer to the Printer Exterior: Rear View 1 ASH023S 1. You can print images directly from a digital camera, without having to connect to the network. 7. Cable ...
...connect to the SP C220N model printer. ❒ USB Host Interface is installed only for PictBridge and di- Note ❒ Make sure the digital camera you load paper larger than A4 in the paper tray. 6. Power Socket 5. Rear cover Remove this cover to the printer. USB Host ...the additional memory unit (option). 4. Guide to the host computer. Front Cover Open Lever 2. USB Port Use a USB cable to connect the printer to the Printer Exterior: Rear View 1 ASH023S 1. You can print images directly from a digital camera, without having to connect to the network. 7. Cable ...
Operating Instructions
Page 13
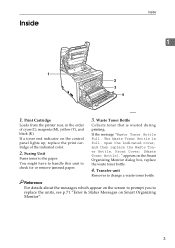
... unit Removes to replace the units, see p.71 "Error & Status Messages on Smart Organizing Monitor". 3 Front Cover: [Waste Toner Bottle]." Print Cartridge Loads from the printer rear, in the order of the indicated color. 2. Waste Toner Bottle Collects toner that is full. Reference For details about the messages which appear on...
... unit Removes to replace the units, see p.71 "Error & Status Messages on Smart Organizing Monitor". 3 Front Cover: [Waste Toner Bottle]." Print Cartridge Loads from the printer rear, in the order of the indicated color. 2. Waste Toner Bottle Collects toner that is full. Reference For details about the messages which appear on...
Operating Instructions
Page 14
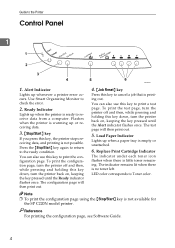
...Press this key to cancel a job that is empty or unattached. 6. The indicator remains lit when there is not available for the SP C220N model printer. LED color corresponds to the ready condition. Alert Indicator Lights up when a paper tray is printing out. Press the {Stop/Start} ... is no toner left. Guide to check the error. 2. The configuration page will then print out. 5. Use Smart Organizing Monitor to the Printer Control Panel 1 ASH021S 1. You can also use this key to print the configuration page. Replace Print Cartridge Indicator The indicator under each toner ...
...Press this key to cancel a job that is empty or unattached. 6. The indicator remains lit when there is not available for the SP C220N model printer. LED color corresponds to the ready condition. Alert Indicator Lights up when a paper tray is printing out. Press the {Stop/Start} ... is no toner left. Guide to check the error. 2. The configuration page will then print out. 5. Use Smart Organizing Monitor to the Printer Control Panel 1 ASH021S 1. You can also use this key to print the configuration page. Replace Print Cartridge Indicator The indicator under each toner ...
Operating Instructions
Page 15
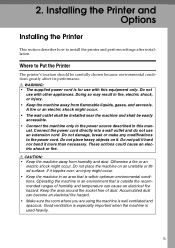
Doing so may result in this equipment only. Do not damage, break or make any modifications to install the printer and perform settings after installation. Accumulated dust can cause an electrical fire hazard. 2. Do not use with this manual. R CAUTION: • ...performance. Do not place the machine on it. If it more than necessary. Installing the Printer and Options Installing the Printer This section describes how to the power cord. Where to Put the Printer The printer's location should be easily accessible. • Connect the machine only to the power source ...
Doing so may result in this equipment only. Do not damage, break or make any modifications to install the printer and perform settings after installation. Accumulated dust can cause an electrical fire hazard. 2. Do not use with this manual. R CAUTION: • ...performance. Do not place the machine on it. If it more than necessary. Installing the Printer and Options Installing the Printer This section describes how to the power cord. Where to Put the Printer The printer's location should be easily accessible. • Connect the machine only to the power source ...
Operating Instructions
Page 16
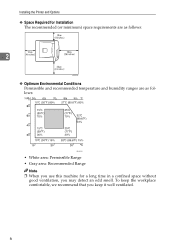
To keep the workplace comfortable, we recommend that you may detect an odd smell. Installing the Printer and Options ❖ Space Required for Installation The recommended (or minimum) space requirements are as follows: 2 ASH200S ❖ Optimum Environmental Conditions Permissible and recommended temperature and humidity ranges are as follows: ASH201S • White area: Permissible Range • Gray area: Recommended Range Note ❒ When you use this machine for a long time in a confined space without good ventilation, you keep it well ventilated. 6
To keep the workplace comfortable, we recommend that you may detect an odd smell. Installing the Printer and Options ❖ Space Required for Installation The recommended (or minimum) space requirements are as follows: 2 ASH200S ❖ Optimum Environmental Conditions Permissible and recommended temperature and humidity ranges are as follows: ASH201S • White area: Permissible Range • Gray area: Recommended Range Note ❒ When you use this machine for a long time in a confined space without good ventilation, you keep it well ventilated. 6
Operating Instructions
Page 17
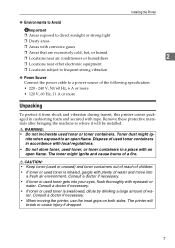
...8226; Do not store toner, used toner, or toner containers in cushioning foam and secured with tape. nite when exposed to an open flame. The printer will be installed. Dispose of water and move into your eyes, flush thoroughly with eyewash or water. The toner might ig- R WARNING: •...Hz, 11 A or more Unpacking To protect it will break or cause injury if dropped. 7 Consult a doctor if necessary. • When moving the printer, use the inset grips on both sides. R CAUTION: • Keep toner (used or unused) and toner containers out of reach of a fire. Installing ...
...8226; Do not store toner, used toner, or toner containers in cushioning foam and secured with tape. nite when exposed to an open flame. The printer will be installed. Dispose of water and move into your eyes, flush thoroughly with eyewash or water. The toner might ig- R WARNING: •...Hz, 11 A or more Unpacking To protect it will break or cause injury if dropped. 7 Consult a doctor if necessary. • When moving the printer, use the inset grips on both sides. R CAUTION: • Keep toner (used or unused) and toner containers out of reach of a fire. Installing ...
Operating Instructions
Page 18
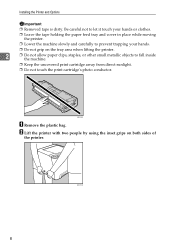
...not to let it touch your hands or clothes. ❒ Leave the tape holding the paper feed tray and cover in place while moving the printer. ❒ Lower the machine slowly and carefully to fall inside the machine. ❒ Keep the uncovered print cartridge away from direct sunlight. &#...10066; Do not touch the print cartridge's photo conductor. B Lift the printer with two people by using the inset grips on the tray area when lifting the printer. 2 ❒ Do not allow paper clips, staples, or other small metallic objects to prevent trapping ...
...not to let it touch your hands or clothes. ❒ Leave the tape holding the paper feed tray and cover in place while moving the printer. ❒ Lower the machine slowly and carefully to fall inside the machine. ❒ Keep the uncovered print cartridge away from direct sunlight. &#...10066; Do not touch the print cartridge's photo conductor. B Lift the printer with two people by using the inset grips on the tray area when lifting the printer. 2 ❒ Do not allow paper clips, staples, or other small metallic objects to prevent trapping ...
Operating Instructions
Page 19
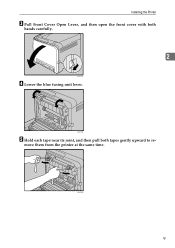
ASH108S E Hold each tape near its joint, and then pull both hands carefully. 2 ASH107S D Lower the blue fusing unit lever. ASH109S 9 Installing the Printer C Pull Front Cover Open Lever, and then open the front cover with both tapes gently upward to re- move them from the printer at the same time.
ASH108S E Hold each tape near its joint, and then pull both hands carefully. 2 ASH107S D Lower the blue fusing unit lever. ASH109S 9 Installing the Printer C Pull Front Cover Open Lever, and then open the front cover with both tapes gently upward to re- move them from the printer at the same time.
Operating Instructions
Page 20
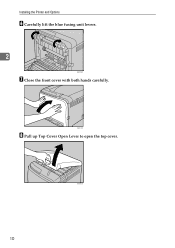
ASH112S 10 Installing the Printer and Options F Carefully lift the blue fusing unit levers. 2 ASH049S G Close the front cover with both hands carefully. ASH111S H Pull up Top Cover Open Lever to open the top cover.
ASH112S 10 Installing the Printer and Options F Carefully lift the blue fusing unit levers. 2 ASH049S G Close the front cover with both hands carefully. ASH111S H Pull up Top Cover Open Lever to open the top cover.
Operating Instructions
Page 21
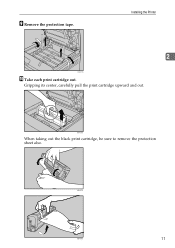
Gripping its center, carefully pull the print cartridge upward and out. ASH087S ASH088S 11 I Remove the protection tape. Installing the Printer 2 ASH110S J Take each print cartridge out. ASH005S When taking out the black print cartridge, be sure to remove the protection sheet also.
Gripping its center, carefully pull the print cartridge upward and out. ASH087S ASH088S 11 I Remove the protection tape. Installing the Printer 2 ASH110S J Take each print cartridge out. ASH005S When taking out the black print cartridge, be sure to remove the protection sheet also.
Operating Instructions
Page 22
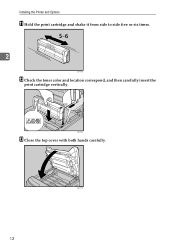
ASH009S M Close the top cover with both hands carefully. ASH010S 12 Installing the Printer and Options K Hold the print cartridge and shake it from side to side five or six times. 2 ASH113S L Check the toner color and location correspond, and then carefully insert the print cartridge vertically.
ASH009S M Close the top cover with both hands carefully. ASH010S 12 Installing the Printer and Options K Hold the print cartridge and shake it from side to side five or six times. 2 ASH113S L Check the toner color and location correspond, and then carefully insert the print cartridge vertically.
Operating Instructions
Page 23
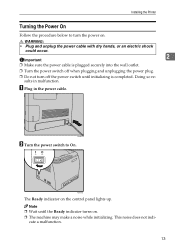
... and unplug the power cable with dry hands, or an electric shock could occur. 2 Important ❒ Make sure the power cable is completed. Installing the Printer Turning the Power On Follow the procedure below to On. ASH071S B Turn the power switch to turn off the power switch until the Ready indicator...
... and unplug the power cable with dry hands, or an electric shock could occur. 2 Important ❒ Make sure the power cable is completed. Installing the Printer Turning the Power On Follow the procedure below to On. ASH071S B Turn the power switch to turn off the power switch until the Ready indicator...
Operating Instructions
Page 24
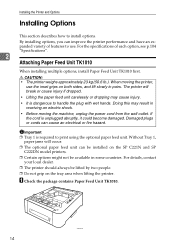
...to use the inset grips on both sides, and lift slowly in receiving an electric shock. • Before moving the printer, use . Installing the Printer and Options Installing Options This section describes how to print using the optional paper feed unit. For the specifications of features to... carelessly or dropping may result in pairs. For details, contact your local dealer. ❒ The printer should always be lifted by two people. ❒ Do not grip on the SP C221N and SP C222DN model printers. ❒ Certain options might not be installed on the tray area when lifting the...
...to use the inset grips on both sides, and lift slowly in receiving an electric shock. • Before moving the printer, use . Installing the Printer and Options Installing Options This section describes how to print using the optional paper feed unit. For the specifications of features to... carelessly or dropping may result in pairs. For details, contact your local dealer. ❒ The printer should always be lifted by two people. ❒ Do not grip on the SP C221N and SP C222DN model printers. ❒ Certain options might not be installed on the tray area when lifting the...


