
Operating Instructions
Page 1
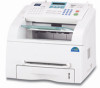
Operating Instructions Laser Facsimile For safe and correct use of this machine, please be sure to read the Safety Information in this manual before you use it.
Operating Instructions Laser Facsimile For safe and correct use of this machine, please be sure to read the Safety Information in this manual before you use it.
Operating Instructions
Page 2
... for maintaining and troubleshooting the machine. In no event will the company be liable for direct, indirect, incidental or consequential damages as a result of this manual are trademarks of the detailed instructions for using your machine as a printer, a scanner and a copier and information for setting up your machine and installing the...
... for maintaining and troubleshooting the machine. In no event will the company be liable for direct, indirect, incidental or consequential damages as a result of this manual are trademarks of the detailed instructions for using your machine as a printer, a scanner and a copier and information for setting up your machine and installing the...

Operating Instructions
Page 3
... followed, could result in accordance with the local regulations. • Keep the machine away from flammable liquids, gases, and aerosols. Safety Information When using this manual. • Turn off the power and disconnect the power plug (by pulling the plug, not the cable) if the power cable or plug becomes frayed... screws other than those specified in this machine, the following safety precautions should always be followed. Toner dust might occur. Safety During Operation In this manual, the following important symbols are used toner bottle in death or serious injury. ii
... followed, could result in accordance with the local regulations. • Keep the machine away from flammable liquids, gases, and aerosols. Safety Information When using this manual. • Turn off the power and disconnect the power plug (by pulling the plug, not the cable) if the power cable or plug becomes frayed... screws other than those specified in this machine, the following safety precautions should always be followed. Toner dust might occur. Safety During Operation In this manual, the following important symbols are used toner bottle in death or serious injury. ii

Operating Instructions
Page 8
... you in its facilities, equipment, operations or procedures that may be required. The REN for repair or warranty information, please contact RICOH CORP. Also, you to maintain uninterrupted service. 7. at 1-800-FASTFIX. CUSTOMER SUPPORT DEPT. vii If trouble is experienced with ... NUMBERS AND/OR MAKING TEST CALLS TO EMERGENCY NUMBERS: 1. USA FCC Requirements 1. This equipment complies with this equipment, for this manual. 9. See installation instructions for you will provide advance notice in this product is part of the product identifier that may make necessary...
... you in its facilities, equipment, operations or procedures that may be required. The REN for repair or warranty information, please contact RICOH CORP. Also, you to maintain uninterrupted service. 7. at 1-800-FASTFIX. CUSTOMER SUPPORT DEPT. vii If trouble is experienced with ... NUMBERS AND/OR MAKING TEST CALLS TO EMERGENCY NUMBERS: 1. USA FCC Requirements 1. This equipment complies with this equipment, for this manual. 9. See installation instructions for you will provide advance notice in this product is part of the product identifier that may make necessary...
Operating Instructions
Page 11
... Printing to the Rear Output Slot (Face up 2.5 Loading Paper in the Paper Tray 2.7 Using the Manual Feeder 2.8 Setting the Paper Type and Size for the Manual Feeder 2.10 Chapter 3: COPYING Loading Paper for Copying 3.2 Preparing a Document 3.2 Making a Copy 3.3...options 4.2 Available Fax Setup Options 4.3 Loading a Document 4.5 Adjusting the Document Resolution 4.6 Sending a Fax Automatically 4.7 Sending a Fax Manually 4.8 Redialing the Last Number 4.8 Confirming Transmission 4.9 Automatic Redialing 4.9 Receiving a Fax About Receiving Modes 4.10 Loading Paper for Receiving Faxes...
... Printing to the Rear Output Slot (Face up 2.5 Loading Paper in the Paper Tray 2.7 Using the Manual Feeder 2.8 Setting the Paper Type and Size for the Manual Feeder 2.10 Chapter 3: COPYING Loading Paper for Copying 3.2 Preparing a Document 3.2 Making a Copy 3.3...options 4.2 Available Fax Setup Options 4.3 Loading a Document 4.5 Adjusting the Document Resolution 4.6 Sending a Fax Automatically 4.7 Sending a Fax Manually 4.8 Redialing the Last Number 4.8 Confirming Transmission 4.9 Automatic Redialing 4.9 Receiving a Fax About Receiving Modes 4.10 Loading Paper for Receiving Faxes...

Operating Instructions
Page 12
... Tel Mode 4.12 Receiving Manually Using Remote Receive Start Code 4.13 Receiving Faxes Using the DRPD Mode 4.13 Receiving Faxes in the Memory 4.14 Automatic Dialing One-touch Dialing 4.15 ...
... Tel Mode 4.12 Receiving Manually Using Remote Receive Start Code 4.13 Receiving Faxes Using the DRPD Mode 4.13 Receiving Faxes in the Memory 4.14 Automatic Dialing One-touch Dialing 4.15 ...
Operating Instructions
Page 14
... Document Jams 8.2 Clearing Paper Jams 8.3 In Tray 1 8.3 In Tray 2 8.4 In the Paper Exit Area 8.5 In the Fuser Area or Around the Toner Cartridge . 8.6 In the Manual Feeder 8.6 Tips for Avoiding Paper Jams 8.7 Clearing LCD Error Messages 8.8 Solving Problems 8.11 Paper Feeding Problems 8.11 Printing Problems 8.12 Printing Quality Problems 8.14 Copying...
... Document Jams 8.2 Clearing Paper Jams 8.3 In Tray 1 8.3 In Tray 2 8.4 In the Paper Exit Area 8.5 In the Fuser Area or Around the Toner Cartridge . 8.6 In the Manual Feeder 8.6 Tips for Avoiding Paper Jams 8.7 Clearing LCD Error Messages 8.8 Solving Problems 8.11 Paper Feeding Problems 8.11 Printing Problems 8.12 Printing Quality Problems 8.14 Copying...
Operating Instructions
Page 20
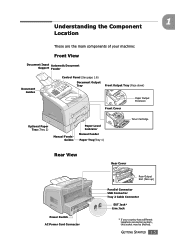
... Guides Control Panel (See page 1.6) Document Output Tray Front Output Tray (Face down) Front Cover Paper Output Extension Optional Paper Tray (Tray 2) Manual Feeder Guides Paper Level Indicator Manual Feeder Paper Tray(Tray 1) Toner Cartridge 1 Rear View Power Switch AC Power Cord Connector Rear Cover Rear Output Slot (Face up) Parallel Connector...
... Guides Control Panel (See page 1.6) Document Output Tray Front Output Tray (Face down) Front Cover Paper Output Extension Optional Paper Tray (Tray 2) Manual Feeder Guides Paper Level Indicator Manual Feeder Paper Tray(Tray 1) Toner Cartridge 1 Rear View Power Switch AC Power Cord Connector Rear Cover Rear Output Slot (Face up) Parallel Connector...
Operating Instructions
Page 22
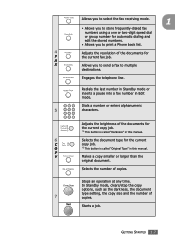
Redials the last number in Standby mode or inserts a pause into a fax number in this manual. 6 Selects the document type for the current C copy job. O *2 This button is called "Original Type" in Edit mode. In Standby mode, clears/stop the copy ..., the document type setting, the copy size and the number of the documents for the current copy job. *1 This button is called "Darkness" in this manual. Adjusts the brightness of 7 copies. Selects the number of the documents for F the current fax job. Stops an operation at any time. Engages the telephone...
Redials the last number in Standby mode or inserts a pause into a fax number in this manual. 6 Selects the document type for the current C copy job. O *2 This button is called "Original Type" in Edit mode. In Standby mode, clears/stop the copy ..., the document type setting, the copy size and the number of the documents for the current copy job. *1 This button is called "Darkness" in this manual. Adjusts the brightness of 7 copies. Selects the number of the documents for F the current fax job. Stops an operation at any time. Engages the telephone...

Operating Instructions
Page 50
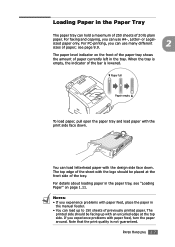
2 PAPER HANDLING This chapter introduces you to the basics of selecting print materials and loading them into your machine. This chapter includes: • Selecting Print Materials • Selecting an Output Location • Loading Paper in the Paper Tray • Using the Manual Feeder
2 PAPER HANDLING This chapter introduces you to the basics of selecting print materials and loading them into your machine. This chapter includes: • Selecting Print Materials • Selecting an Output Location • Loading Paper in the Paper Tray • Using the Manual Feeder

Operating Instructions
Page 51
... looks on the paper. Type, Input Sources and Capacities Paper Type Plain paper Input Source/Capacity* Tray 1 Optional Tray 2 Manual Feeder 250 250 1 Envelopes - - 1 Labels - - 1 Transparencies - - 1 Card stocks - - 1 * Maximum capacity may cause problems that meet... the guidelines for the manual feeder • Brightness: Some papers are whiter than others and produce sharper, more vibrant images. • Surface smoothness: The smoothness of the paper...
... looks on the paper. Type, Input Sources and Capacities Paper Type Plain paper Input Source/Capacity* Tray 1 Optional Tray 2 Manual Feeder 250 250 1 Envelopes - - 1 Labels - - 1 Transparencies - - 1 Card stocks - - 1 * Maximum capacity may cause problems that meet... the guidelines for the manual feeder • Brightness: Some papers are whiter than others and produce sharper, more vibrant images. • Surface smoothness: The smoothness of the paper...

Operating Instructions
Page 54
The tray should be used for most print jobs. 2 Printing to the Front Output Tray (Face down) The front output tray collects printed paper face-down in correct order. Using the rear output slot might improve the output quality with the following: • envelopes • labels • small custom-sized paper • postcards • transparencies PAPER HANDLING 2.5 Printing to the Rear Output Slot (Face up) Using the rear output slot, paper comes out of the machine face up. Printing from the manual feeder to the rear output slot provides the straight paper path.
The tray should be used for most print jobs. 2 Printing to the Front Output Tray (Face down) The front output tray collects printed paper face-down in correct order. Using the rear output slot might improve the output quality with the following: • envelopes • labels • small custom-sized paper • postcards • transparencies PAPER HANDLING 2.5 Printing to the Rear Output Slot (Face up) Using the rear output slot, paper comes out of the machine face up. Printing from the manual feeder to the rear output slot provides the straight paper path.
Operating Instructions
Page 56
... the paper around. NOTES: • If you can load letterhead paper with an uncurled edge at the front side of paper currently left in the manual feeder. • You can load up to 150 sheets of paper;
... the paper around. NOTES: • If you can load letterhead paper with an uncurled edge at the front side of paper currently left in the manual feeder. • You can load up to 150 sheets of paper;
Operating Instructions
Page 57
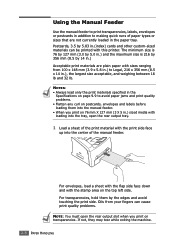
...on 76 mm X 127 mm (3 X 5 in .(index) cards and other custom-sized materials can be printed with the print side face up into the manual feeder. • When you print on transparencies. NOTES: • Always load only the print materials specified in the Specifications on page 9.9 to avoid paper jams... by 5.0 in.) and the maximum size is 216 by 356 mm (8.5 by the edges and avoid touching the print side. Using the Manual Feeder Use the manual feeder to print transparencies, labels, envelopes or postcards in addition to making quick runs of paper types or sizes that are plain paper with...
...on 76 mm X 127 mm (3 X 5 in .(index) cards and other custom-sized materials can be printed with the print side face up into the manual feeder. • When you print on transparencies. NOTES: • Always load only the print materials specified in the Specifications on page 9.9 to avoid paper jams... by 5.0 in.) and the maximum size is 216 by 356 mm (8.5 by the edges and avoid touching the print side. Using the Manual Feeder Use the manual feeder to print transparencies, labels, envelopes or postcards in addition to making quick runs of paper types or sizes that are plain paper with...
Operating Instructions
Page 58
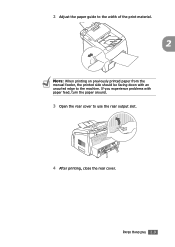
If you experience problems with an uncurled edge to use the rear output slot. 4 After printing, close the rear cover. 2 Adjust the paper guide to the width of the print material. 2 NOTE: When printing on previously printed paper from the manual feeder, the printed side should be facing down with paper feed, turn the paper around. 3 Open the rear cover to the machine. PAPER HANDLING 2.9
If you experience problems with an uncurled edge to use the rear output slot. 4 After printing, close the rear cover. 2 Adjust the paper guide to the width of the print material. 2 NOTE: When printing on previously printed paper from the manual feeder, the printed side should be facing down with paper feed, turn the paper around. 3 Open the rear cover to the machine. PAPER HANDLING 2.9
Operating Instructions
Page 59
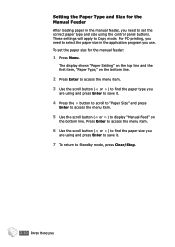
For PC-printing, you need to select the paper size in the manual feeder, you need to display "Manual Feed" on the bottom line. These settings will apply to Standby mode, press Clear/Stop. 2.10 PAPER HANDLING To set the correct paper type and ... to scroll to "Paper Size" and press Enter to access the menu item. 5 Use the scroll button ( or ) to set the paper size for the Manual Feeder After loading paper in the application program you use. Setting the Paper Type and Size for the...
For PC-printing, you need to select the paper size in the manual feeder, you need to display "Manual Feed" on the bottom line. These settings will apply to Standby mode, press Clear/Stop. 2.10 PAPER HANDLING To set the correct paper type and ... to scroll to "Paper Size" and press Enter to access the menu item. 5 Use the scroll button ( or ) to set the paper size for the Manual Feeder After loading paper in the application program you use. Setting the Paper Type and Size for the...
Operating Instructions
Page 61
... or copying. onion skin or thin paper - For further details, see page 1.11 for loading in the paper tray and page 2.8 for loading in the manual feeder. carbon-paper or carbon-backed paper - curled or rolled paper -
... or copying. onion skin or thin paper - For further details, see page 1.11 for loading in the paper tray and page 2.8 for loading in the manual feeder. carbon-paper or carbon-backed paper - curled or rolled paper -

Operating Instructions
Page 75
... the Last Number To redial the last number you need to change the darkness, see page 4.5. 2 Adjust the document resolution to send. 4.8 FAXING Sending a Fax Manually 1 Load the document(s) face down into the ADF. If you dialed: Press Redial/Pause. If a document is loaded in the ADF, the machine automatically begins...
... the Last Number To redial the last number you need to change the darkness, see page 4.5. 2 Adjust the document resolution to send. 4.8 FAXING Sending a Fax Manually 1 Load the document(s) face down into the ADF. If you dialed: Press Redial/Pause. If a document is loaded in the ADF, the machine automatically begins...

Operating Instructions
Page 79
... your machine, you must attach an answering machine to repeat this mode, you are in Tel mode, which is receiving faxes manually, when the answering machine is completed. 4.12 FAXING Receiving Manually in . 3 When you 're in Tel Mode You can hear a fax tone from the answering machine will interrupt your phone...
... your machine, you must attach an answering machine to repeat this mode, you are in Tel mode, which is receiving faxes manually, when the answering machine is completed. 4.12 FAXING Receiving Manually in . 3 When you 're in Tel Mode You can hear a fax tone from the answering machine will interrupt your phone...
Operating Instructions
Page 80
... telephone or answering machine plugged into the EXT. FAXING 4.13 Using the Distinctive Ring Pattern Detection feature, your telephone line by the FAX machine. Receiving Manually Using Remote Receive Start Code You can change the middle number to whatever you choose. When you can receive a fax from the remote machine, try...
... telephone or answering machine plugged into the EXT. FAXING 4.13 Using the Distinctive Ring Pattern Detection feature, your telephone line by the FAX machine. Receiving Manually Using Remote Receive Start Code You can change the middle number to whatever you choose. When you can receive a fax from the remote machine, try...


