
User Guide
Page 8
... Configuring the DNS Settings 259 Configuring the Alert Message Settings 260 Configuring the SNMP Settings 261 Configuring the SMTP Settings 262 Configuring the Administrator Settings 264 Configuring the Password 264 Restoring the Default Settings 264 Backing Up the Machine's Settings 265 Restoring the Machine's Settings from a Backup File 266 Configuring the Date...
... Configuring the DNS Settings 259 Configuring the Alert Message Settings 260 Configuring the SNMP Settings 261 Configuring the SMTP Settings 262 Configuring the Administrator Settings 264 Configuring the Password 264 Restoring the Default Settings 264 Backing Up the Machine's Settings 265 Restoring the Machine's Settings from a Backup File 266 Configuring the Date...
User Guide
Page 62
... requires a specific transmission speed that is enabled, manually configured IP address settings are requested to the previous level of the menu tree. ❒ A password for accessing the [Network Settings] menu can press the { } key to exit to reboot the machine, turn off , see p.226 "Printing the... on the same network. For details about [Admin Menu Lock], see p.223 "Network Settings". For details about [LINK Setting], see p.231 "Administrator Settings". Getting Started H Press the {Clear/Stop} key to return to confirm the setting. I If you are not used by any other device on...
... requires a specific transmission speed that is enabled, manually configured IP address settings are requested to the previous level of the menu tree. ❒ A password for accessing the [Network Settings] menu can press the { } key to exit to reboot the machine, turn off , see p.226 "Printing the... on the same network. For details about [Admin Menu Lock], see p.223 "Network Settings". For details about [LINK Setting], see p.231 "Administrator Settings". Getting Started H Press the {Clear/Stop} key to return to confirm the setting. I If you are not used by any other device on...
User Guide
Page 64
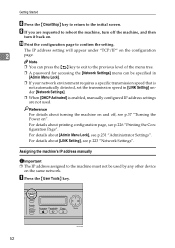
...{ } key. Note ❒ You can press the { } key to exit to the previous level of the menu tree. ❒ A password for accessing the [Network Settings] menu can be specified in [Admin Menu Lock]. ❒ If your network environment requires a specific transmission speed that.... For details about [LINK Setting], see p.37 "Turning the Power on the configuration page. For details about printing configuration page, see p.231 "Administrator Settings". Q Press the {Clear/Stop} key to return to reboot the machine, turn off , see p.223 "Network Settings". 54 Getting Started ...
...{ } key. Note ❒ You can press the { } key to exit to the previous level of the menu tree. ❒ A password for accessing the [Network Settings] menu can be specified in [Admin Menu Lock]. ❒ If your network environment requires a specific transmission speed that.... For details about [LINK Setting], see p.37 "Turning the Power on the configuration page. For details about printing configuration page, see p.231 "Administrator Settings". Q Press the {Clear/Stop} key to return to reboot the machine, turn off , see p.223 "Network Settings". 54 Getting Started ...
User Guide
Page 65
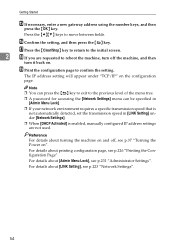
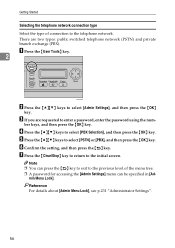
..., and then press the { } key. min Menu Lock]. E Press the {U}{T} keys to the previous level of the menu tree. ❒ A password for your telephone line service. Configuring the Machine Configuring Telephone Network Settings Selecting the telephone line type Select the telephone line type according to select... [TEL Line Type], and then press the {OK} key. Reference For details about [Admin Menu Lock], see p.231 "Administrator Settings". 55 Note ❒ You can press the { } key to exit to select the telephone line type appropriate for accessing the [Admin...
..., and then press the { } key. min Menu Lock]. E Press the {U}{T} keys to the previous level of the menu tree. ❒ A password for your telephone line service. Configuring the Machine Configuring Telephone Network Settings Selecting the telephone line type Select the telephone line type according to select... [TEL Line Type], and then press the {OK} key. Reference For details about [Admin Menu Lock], see p.231 "Administrator Settings". 55 Note ❒ You can press the { } key to exit to select the telephone line type appropriate for accessing the [Admin...
User Guide
Page 66
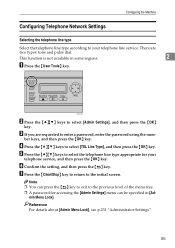
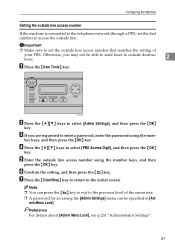
...OK} key. Note ❒ You can be specified in [Ad- min Menu Lock]. A Press the {User Tools} key. 2 BPC028S B Press the {U}{T} keys to enter a password, enter the password using the num- F Confirm the setting, and then press the { } key. C If you are two types: public switched telephone network (PSTN) and private branch... keys to the telephone network. G Press the {Clear/Stop} key to return to the initial screen. Reference For details about [Admin Menu Lock], see p.231 "Administrator Settings". 56 There are requested to select [Admin Settings], and then press the {OK} key.
...OK} key. Note ❒ You can be specified in [Ad- min Menu Lock]. A Press the {User Tools} key. 2 BPC028S B Press the {U}{T} keys to enter a password, enter the password using the num- F Confirm the setting, and then press the { } key. C If you are two types: public switched telephone network (PSTN) and private branch... keys to the telephone network. G Press the {Clear/Stop} key to return to the initial screen. Reference For details about [Admin Menu Lock], see p.231 "Administrator Settings". 56 There are requested to select [Admin Settings], and then press the {OK} key.
User Guide
Page 67
... the dial number to access the outside line. C If you may not be specified in [Ad- Reference For details about [Admin Menu Lock], see p.231 "Administrator Settings". 57 F Confirm the setting, and then press the { } key. D Press the {U}{T} keys to select [Admin Settings], and then press the {OK} .... Note ❒ You can press the { } key to exit to the previous level of your PBX. Otherwise, you are requested to enter a password, enter the password using the number keys, and then press the {OK} key. G Press the {Clear/Stop} key to return to the initial screen. Configuring the ...
... the dial number to access the outside line. C If you may not be specified in [Ad- Reference For details about [Admin Menu Lock], see p.231 "Administrator Settings". 57 F Confirm the setting, and then press the { } key. D Press the {U}{T} keys to select [Admin Settings], and then press the {OK} .... Note ❒ You can press the { } key to exit to the previous level of your PBX. Otherwise, you are requested to enter a password, enter the password using the number keys, and then press the {OK} key. G Press the {Clear/Stop} key to return to the initial screen. Configuring the ...

User Guide
Page 108
A maximum of 20 users can use that function. D Enter the administrator password if required. For each user, you do not want to restrict. Proceed to the following steps to copy, send faxes, or scan using the control ...
A maximum of 20 users can use that function. D Enter the administrator password if required. For each user, you do not want to restrict. Proceed to the following steps to copy, send faxes, or scan using the control ...
User Guide
Page 109
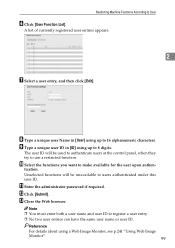
K Enter the administrator password if required. L Click [Submit]. Reference For details about using up to 16 alphanumeric characters. tication. A list of currently registered user entries appears. 2 G Select a user entry, ...
K Enter the administrator password if required. L Click [Submit]. Reference For details about using up to 16 alphanumeric characters. tication. A list of currently registered user entries appears. 2 G Select a user entry, ...
User Guide
Page 110
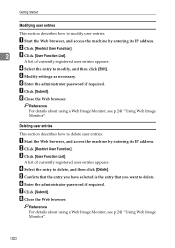
... Monitor, see p.241 "Using Web Image Monitor". 100 E Confirm that the entry you have selected is the entry that you want to delete. F Enter the administrator password if required. A Start the Web browser, and access the machine by entering its IP address. F Enter the...
... Monitor, see p.241 "Using Web Image Monitor". 100 E Confirm that the entry you have selected is the entry that you want to delete. F Enter the administrator password if required. A Start the Web browser, and access the machine by entering its IP address. F Enter the...

User Guide
Page 148
... be correctly entered in the Address Book. C From the [Add New Type] list, select [E-mail], [FTP] or [Folder]. E Enter the administrator password if required. Scan to 100 entries, including 20 Quick Dial entries. In such cases, after registering destinations, check that the user name and...register varies depending on your network environment, the Scan to FTP and Scan to Folder functions may require a user name and password to be selected by pressing the corresponding One Touch button. D Register information as Quick Dial entries can contain up to E-mail Settings...
... be correctly entered in the Address Book. C From the [Add New Type] list, select [E-mail], [FTP] or [Folder]. E Enter the administrator password if required. Scan to 100 entries, including 20 Quick Dial entries. In such cases, after registering destinations, check that the user name and...register varies depending on your network environment, the Scan to FTP and Scan to Folder functions may require a user name and password to be selected by pressing the corresponding One Touch button. D Register information as Quick Dial entries can contain up to E-mail Settings...
User Guide
Page 153
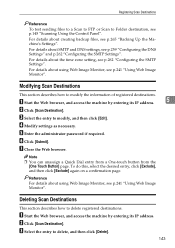
For details about the time zone setting, see p.265 "Backing Up the Machine's Settings". E Enter the administrator password if required. F Click [Submit]. To do this, select the desired entry, click [Exclude], and then click [Exclude] again on a confirmation page. B Click [Scan Destination]. D Modify ...
For details about the time zone setting, see p.265 "Backing Up the Machine's Settings". E Enter the administrator password if required. F Click [Submit]. To do this, select the desired entry, click [Exclude], and then click [Exclude] again on a confirmation page. B Click [Scan Destination]. D Modify ...

User Guide
Page 154
lete. Using the Scanner Function D Confirm that the entry you have selected is the entry that you want to de- F Click [Delete]. G Close the Web browser. Reference For details about using Web Image Monitor, see p.241 "Using Web Image Monitor". 5 144 E Enter the administrator password if required.
lete. Using the Scanner Function D Confirm that the entry you have selected is the entry that you want to de- F Click [Delete]. G Close the Web browser. Reference For details about using Web Image Monitor, see p.241 "Using Web Image Monitor". 5 144 E Enter the administrator password if required.

User Guide
Page 169
... {OK} key. Note ❒ You can press the { } key to exit to step N. Reference For details about [Admin Menu Lock], see p.231 "Administrator Settings". 159 P Confirm the current setting, and then press the {OK} key. Setting the Date and Time K Press the {U}{T} keys to the previous level ...of the menu tree. ❒ A password for accessing the [Admin Settings] menu can be specified in [Ad- 6 min Menu Lock]. ❒ Only dates that correspond with the year and month ...
... {OK} key. Note ❒ You can press the { } key to exit to step N. Reference For details about [Admin Menu Lock], see p.231 "Administrator Settings". 159 P Confirm the current setting, and then press the {OK} key. Setting the Date and Time K Press the {U}{T} keys to the previous level ...of the menu tree. ❒ A password for accessing the [Admin Settings] menu can be specified in [Ad- 6 min Menu Lock]. ❒ Only dates that correspond with the year and month ...

User Guide
Page 174
...Menu Lock]. Reference For details about [Admin Menu Lock], see p.231 "Administrator Settings". Registering Fax Destinations Using Web Image Monitor This section describes how to the previous level of the menu tree. ❒ A password for accessing the [Fax Directory] menu can press the { } key...select the registration number from the list. H Close the Web browser. E Register [Name] and [Fax Number] as necessary. F Enter the administrator password if required. K Press the {Clear/Stop} key to return to the initial screen. A Start the Web browser and access the machine by ...
...Menu Lock]. Reference For details about [Admin Menu Lock], see p.231 "Administrator Settings". Registering Fax Destinations Using Web Image Monitor This section describes how to the previous level of the menu tree. ❒ A password for accessing the [Fax Directory] menu can press the { } key...select the registration number from the list. H Close the Web browser. E Register [Name] and [Fax Number] as necessary. F Enter the administrator password if required. K Press the {Clear/Stop} key to return to the initial screen. A Start the Web browser and access the machine by ...

User Guide
Page 175
... Time], see p.209 "Fax Transmission Settings". 6 For details about using Web Image Monitor, see p.241 "Using Web Image Monitor". C Click [Fax Quick Dial]. F Enter the administrator password if required. H Close the Web browser. 165
... Time], see p.209 "Fax Transmission Settings". 6 For details about using Web Image Monitor, see p.241 "Using Web Image Monitor". C Click [Fax Quick Dial]. F Enter the administrator password if required. H Close the Web browser. 165

User Guide
Page 176
F Enter the administrator password if required. Using the Fax Function Deleting fax destinations This section describes how to delete, and then click [Delete]. lete. B Click [One Touch Button] or [Fax Speed Dial]. E Confirm that the entry you have selected is the entry that you delete the Speed Dial entry, proceed to de- H Close the Web browser. 6 166 D Select the entry to delete registered destination. G Click [Submit]. If you want to step D. A Start the Web browser and access the machine by entering its IP address. C Click [Fax Quick Dial].
F Enter the administrator password if required. Using the Fax Function Deleting fax destinations This section describes how to delete, and then click [Delete]. lete. B Click [One Touch Button] or [Fax Speed Dial]. E Confirm that the entry you have selected is the entry that you delete the Speed Dial entry, proceed to de- H Close the Web browser. 6 166 D Select the entry to delete registered destination. G Click [Submit]. If you want to step D. A Start the Web browser and access the machine by entering its IP address. C Click [Fax Quick Dial].
User Guide
Page 274
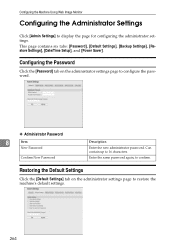
... Settings] to confirm. Restoring the Default Settings Click the [Default Settings] tab on the administrator settings page to restore the machine's default settings. 264 Configuring the Password Click the [Password] tab on the administrator settings page to configure the password. ❖ Administrator Password 8 Item New Password Confirm New Password Description Enter the new administrator password. Can contain up to 16 characters.
... Settings] to confirm. Restoring the Default Settings Click the [Default Settings] tab on the administrator settings page to restore the machine's default settings. 264 Configuring the Password Click the [Password] tab on the administrator settings page to configure the password. ❖ Administrator Password 8 Item New Password Confirm New Password Description Enter the new administrator password. Can contain up to 16 characters.
User Guide
Page 276
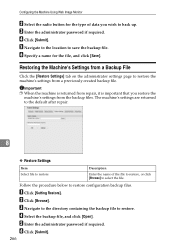
...]. F Click [Submit]. 266 Follow the procedure below to restore. C Enter the administrator password if required. Restoring the Machine's Settings from a Backup File Click the [Restore Settings] tab on the administrator settings page to back up. The machine's settings are returned to the default after repair... Enter the name of data you restore the machine's settings from a previously created backup file. E Enter the administrator password if required. B Click [Browse]. Configuring the Machine Using Web Image Monitor B Select the radio button for the file, and click ...
...]. F Click [Submit]. 266 Follow the procedure below to restore. C Enter the administrator password if required. Restoring the Machine's Settings from a Backup File Click the [Restore Settings] tab on the administrator settings page to back up. The machine's settings are returned to the default after repair... Enter the name of data you restore the machine's settings from a previously created backup file. E Enter the administrator password if required. B Click [Browse]. Configuring the Machine Using Web Image Monitor B Select the radio button for the file, and click ...

User Guide
Page 361
...as Quick Dial entries can contain up to those destinations. The Address Book can be correctly entered in the destination information. E Enter the administrator password if required. B Click [One Touch Button] or [Scan Destination]. The information you must register varies depending on your network environment, the ...Scan to FTP and Scan to Folder functions may require a user name and password to be selected by pressing the corresponding One Touch button. For details, see the tables below. A Start the Web browser, and...
...as Quick Dial entries can contain up to those destinations. The Address Book can be correctly entered in the destination information. E Enter the administrator password if required. B Click [One Touch Button] or [Scan Destination]. The information you must register varies depending on your network environment, the ...Scan to FTP and Scan to Folder functions may require a user name and password to be selected by pressing the corresponding One Touch button. For details, see the tables below. A Start the Web browser, and...

User Guide
Page 371
... allows you to select Confirm the current setting, and [Am] or [Pm], and then press the then press the {OK} key. {OK} key. F Enter the administrator password if required. C From the [Add New Type] list, select [Fax]. H Close the Web browser. 15 Registering Fax Destinations M P Press the {U}{T} keys to specify fax destinations...
... allows you to select Confirm the current setting, and [Am] or [Pm], and then press the then press the {OK} key. {OK} key. F Enter the administrator password if required. C From the [Add New Type] list, select [Fax]. H Close the Web browser. 15 Registering Fax Destinations M P Press the {U}{T} keys to specify fax destinations...


