

Network Guide
Page 3
System Settings General Features...23 Output Tray Settings...25 Tray Paper Settings...27 Timer Settings...31 Setting the Date and Time (mainly Europe and Asia 33 Setting the Date and Time (mainly North America 34 Interface Settings...36 Network...36 Wireless LAN...40 Print List...42 File Transfer...44 Administrator Tools...51 Programming the LDAP server...62 Programming the LDAP server...62 Changing the LDAP server...66 1 TABLE OF CONTENTS Manuals for This Machine...10 Notice...13 Important...13 How...
System Settings General Features...23 Output Tray Settings...25 Tray Paper Settings...27 Timer Settings...31 Setting the Date and Time (mainly Europe and Asia 33 Setting the Date and Time (mainly North America 34 Interface Settings...36 Network...36 Wireless LAN...40 Print List...42 File Transfer...44 Administrator Tools...51 Programming the LDAP server...62 Programming the LDAP server...62 Changing the LDAP server...66 1 TABLE OF CONTENTS Manuals for This Machine...10 Notice...13 Important...13 How...

Network Guide
Page 9
... 7. Special Operations under Windows Printing Files Directly from a Group...285 Deleting a Group Within Another Group 286 Changing a Group Name...287 Deleting a Group...288 Registering a Protection Code...290 Registering a Protection Code to a Single User 290 Registering a Protection Code to a Group User 291 Registering SMTP and LDAP Authentication 293 SMTP Authentication...293 LDAP Authentication...294 6. Appendix When Using Windows Terminal Service/Citrix Presentation Server/Citrix XenApp 301 Operating Environment...301 Supported Printer Drivers...301...
... 7. Special Operations under Windows Printing Files Directly from a Group...285 Deleting a Group Within Another Group 286 Changing a Group Name...287 Deleting a Group...288 Registering a Protection Code...290 Registering a Protection Code to a Single User 290 Registering a Protection Code to a Group User 291 Registering SMTP and LDAP Authentication 293 SMTP Authentication...293 LDAP Authentication...294 6. Appendix When Using Windows Terminal Service/Citrix Presentation Server/Citrix XenApp 301 Operating Environment...301 Supported Printer Drivers...301...
Network Guide
Page 12
... this machine. Troubleshooting Provides a guide for Scanner and Fax Explains how to set up the Scanner and Facsimile functions and use this machine. Before using the machine, the control panel, how to install options, how to enter text, how to install the CD-ROMs provided, and how to replace paper, print cartridge, staples, and other consumables. Initial Guide for resolving common usage-related problems. Copy and Document Server Reference Explains Copier and Document Server functions and operations. This manual is provided in Scanner Reference...
... this machine. Troubleshooting Provides a guide for Scanner and Fax Explains how to set up the Scanner and Facsimile functions and use this machine. Before using the machine, the control panel, how to install options, how to enter text, how to install the CD-ROMs provided, and how to replace paper, print cartridge, staples, and other consumables. Initial Guide for resolving common usage-related problems. Copy and Document Server Reference Explains Copier and Document Server functions and operations. This manual is provided in Scanner Reference...
Network Guide
Page 13
... functions and operations. This manual includes explanations of the administrator using Web Image Monitor. Network and System Settings Reference Explains how to connect the machine to a network and how to set up and use of the machine. For enhanced security, we recommend that you first make the following settings: • Install the Device Certificate. • Enable SSL (Secure Sockets Layer) Encryption. • Change the user name and password of functions and settings that you can use...
... functions and operations. This manual includes explanations of the administrator using Web Image Monitor. Network and System Settings Reference Explains how to connect the machine to a network and how to set up and use of the machine. For enhanced security, we recommend that you first make the following settings: • Install the Device Certificate. • Enable SSL (Secure Sockets Layer) Encryption. • Change the user name and password of functions and settings that you can use...

Network Guide
Page 26
... the power is useful if you are delivered. Copy Count Display (copier/Document Server) The copy counter can prevent interruption from five types. Default: [Up] Function Priority Specify the mode to the mode selected. Default: [Copier] Print Priority Print Priority is set a longer reset period, you select [Set Time], enter the time (3-30 seconds, in 1 second increments) using the multiaccess function. Default: [Set Time], [3 second(s)] When you can be made (count up Beeper setting. Default: [Display Mode] Function Reset Timer You can select the screen color among...
... the power is useful if you are delivered. Copy Count Display (copier/Document Server) The copy counter can prevent interruption from five types. Default: [Up] Function Priority Specify the mode to the mode selected. Default: [Copier] Print Priority Print Priority is set a longer reset period, you select [Set Time], enter the time (3-30 seconds, in 1 second increments) using the multiaccess function. Default: [Set Time], [3 second(s)] When you can be made (count up Beeper setting. Default: [Display Mode] Function Reset Timer You can select the screen color among...

Network Guide
Page 31
... possible paper sizes and thickness, see "Recommended Paper Sizes and Types", About This Machine. The print function uses this information to the paper tray on the printer screen. For details about the relations between possible paper sizes and thickness, see "Recommended 1 Paper Sizes and Types", About This Machine. After selecting the paper tray, you can also specify the display timing and copy method for twosided copying. Cover Sheet Tray You can see what type of paper is used to set for using thick paper...
... possible paper sizes and thickness, see "Recommended Paper Sizes and Types", About This Machine. The print function uses this information to the paper tray on the printer screen. For details about the relations between possible paper sizes and thickness, see "Recommended 1 Paper Sizes and Types", About This Machine. After selecting the paper tray, you can also specify the display timing and copy method for twosided copying. Cover Sheet Tray You can see what type of paper is used to set for using thick paper...

Network Guide
Page 47
... sending e-mail to [On], and then specify the user name, password and encryption. Enter port number between 1 and 65535 using up to 191 characters. SMTP Server Specify the SMTP server name. Spaces cannot be entered. If DNS is not in "user name@realm". • E-mail Address Enter the E-mail address using Internet Fax. To print a stored file, select [Print File], and to insufficient memory or an internal hard disk error will automatically be deleted, and a Reception File...
... sending e-mail to [On], and then specify the user name, password and encryption. Enter port number between 1 and 65535 using up to 191 characters. SMTP Server Specify the SMTP server name. Spaces cannot be entered. If DNS is not in "user name@realm". • E-mail Address Enter the E-mail address using Internet Fax. To print a stored file, select [Print File], and to insufficient memory or an internal hard disk error will automatically be deleted, and a Reception File...
Network Guide
Page 63
... this machine has already been installed on how to fix the USB port. If set both the realm name and KDC server name when programming a realm. Administrator Tools Transfer Log Setting For details about Program/Change/Delete Realm, see "Accessing User Tools". • p.20 "Accessing User Tools" • p.62 "Programming the LDAP server" • p.68 "Programming the Realm" • p.223 "Address Book" • p.239 "Printing the Counter for Each User" • p.240 "Printing the Counter for All Users...
... this machine has already been installed on how to fix the USB port. If set both the realm name and KDC server name when programming a realm. Administrator Tools Transfer Log Setting For details about Program/Change/Delete Realm, see "Accessing User Tools". • p.20 "Accessing User Tools" • p.62 "Programming the LDAP server" • p.68 "Programming the Realm" • p.223 "Address Book" • p.239 "Printing the Counter for Each User" • p.240 "Printing the Counter for All Users...
Network Guide
Page 80
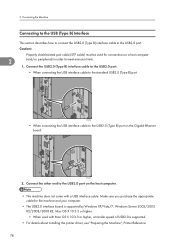
....0 (Type B) port on the host computer. • This machine does not come with Mac OS X 10.3.3 or higher, a transfer speed of USB2.0 is supported by Windows XP/Vista/7, Windows Server 2003/2003 R2/2008/2008 R2, Mac OS X 10.3.3 or higher. • When used for the machine and your computer. • The USB2.0 interface board is supported. • For details about installing the printer driver, see...
....0 (Type B) port on the host computer. • This machine does not come with Mac OS X 10.3.3 or higher, a transfer speed of USB2.0 is supported by Windows XP/Vista/7, Windows Server 2003/2003 R2/2008/2008 R2, Mac OS X 10.3.3 or higher. • When used for the machine and your computer. • The USB2.0 interface board is supported. • For details about installing the printer driver, see...
Network Guide
Page 81
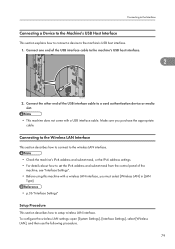
... USB interface cable to a card authentication device or media slot. • This machine does not come with a wireless LAN interface, you purchase the appropriate cable. To configure the wireless LAN settings: open [System Settings], [Interface Settings], select [Wireless LAN], and then use the following procedure. 79 Make sure you must select [Wireless LAN] in [LAN Type]. • p.36 "Interface Settings" Setup Procedure This section describes how to the machine's USB host interface. 1. Connecting...
... USB interface cable to a card authentication device or media slot. • This machine does not come with a wireless LAN interface, you purchase the appropriate cable. To configure the wireless LAN settings: open [System Settings], [Interface Settings], select [Wireless LAN], and then use the following procedure. 79 Make sure you must select [Wireless LAN] in [LAN Type]. • p.36 "Interface Settings" Setup Procedure This section describes how to the machine's USB host interface. 1. Connecting...
Network Guide
Page 123
Use the [Network] dialog box of Windows to change the frame type of the computer. • For details about Web Image Monitor, see "Using Web Image Monitor". • p.131 "Using Web Image Monitor" Setting Up as a Print Server (NetWare 4.x, 5/5.1, 6/6.5) Follow the procedure below to 255 seconds). Enter the same number as the number of the printer to be created on the print server (0 to 254 characters). 3 • Job Timeout: When the interface board is...
Use the [Network] dialog box of Windows to change the frame type of the computer. • For details about Web Image Monitor, see "Using Web Image Monitor". • p.131 "Using Web Image Monitor" Setting Up as a Print Server (NetWare 4.x, 5/5.1, 6/6.5) Follow the procedure below to 255 seconds). Enter the same number as the number of the printer to be created on the print server (0 to 254 characters). 3 • Job Timeout: When the interface board is...
Network Guide
Page 124
... login user name and password, consult your network administrator. In the menu area, click [Configuration]. 5. Configuration is correct, enter the following from the command prompt: F:> USERLIST • If the printer works as a connected user. • If you cannot identify the printer you want to configure, check the printer name against the configuration page printed from the printer. 3. A dialog box for the computer and printer. Use the [Network] dialog box of Windows to connect the machine as a print server. 1. Quit Web Image...
... login user name and password, consult your network administrator. In the menu area, click [Configuration]. 5. Configuration is correct, enter the following from the command prompt: F:> USERLIST • If the printer works as a connected user. • If you cannot identify the printer you want to configure, check the printer name against the configuration page printed from the printer. 3. A dialog box for the computer and printer. Use the [Network] dialog box of Windows to connect the machine as a print server. 1. Quit Web Image...

Network Guide
Page 198
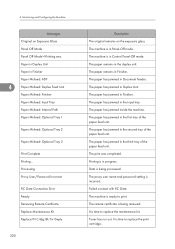
... on the options installed on the machine, some items might not be ejected. "rsh" and "rcp" cannot be used in the machine. Messages Description Access Restricted The job was canceled because user have no authority. Cover Open: Rear Cover The rear cover is open . Error An error has occurred. 196 Change Tnr Cartridge to MICR Replace the toner cartridge with the standard toner cartridge. Canceling Job... Setting is open . Cover Open: Front Cover The front cover is being reset. 4. The job is open . Cover Open: ADF The document feeder is...
... on the options installed on the machine, some items might not be ejected. "rsh" and "rcp" cannot be used in the machine. Messages Description Access Restricted The job was canceled because user have no authority. Cover Open: Rear Cover The rear cover is open . Error An error has occurred. 196 Change Tnr Cartridge to MICR Replace the toner cartridge with the standard toner cartridge. Canceling Job... Setting is open . Cover Open: Front Cover The front cover is being reset. 4. The job is open . Cover Open: ADF The document feeder is...
Network Guide
Page 202
... the paper feed unit. The paper has jammed in the first tray of the paper feed unit. Failed connect with RC Gate. Paper in Duplex Unit Paper in Duplex Unit. Data is in the duplex unit. The paper has jammed in Panel-Off mode. Toner has run out. Monitoring and Configuring the Machine Messages Original on the exposure glass. The proxy user name and password setting is time to replace the print cartridge. It is incorrect. The machine is in the third tray of the paper feed unit. The paper has jammed...
... the paper feed unit. The paper has jammed in the first tray of the paper feed unit. Failed connect with RC Gate. Paper in Duplex Unit Paper in Duplex Unit. Data is in the duplex unit. The paper has jammed in Panel-Off mode. Toner has run out. Monitoring and Configuring the Machine Messages Original on the exposure glass. The proxy user name and password setting is time to replace the print cartridge. It is incorrect. The machine is in the third tray of the paper feed unit. The paper has jammed...
Network Guide
Page 218
... BINDERY mode. Login to fileserver (), When the print server was canceled due to in seconds. Memory allocate error. The spooled job was online, the system logged in seconds. Monitoring and Configuring the Machine Message Problem and solutions card removed The interface managed by the supplicant is displayed in [renew time] in to error or user request. IPP cancel -job: permission denied. The renewal time is disabled, or cannot connect to the access point has failed. interface...
... BINDERY mode. Login to fileserver (), When the print server was canceled due to in seconds. Memory allocate error. The spooled job was online, the system logged in seconds. Monitoring and Configuring the Machine Message Problem and solutions card removed The interface managed by the supplicant is displayed in [renew time] in to error or user request. IPP cancel -job: permission denied. The renewal time is disabled, or cannot connect to the access point has failed. interface...

Network Guide
Page 236
... you change or delete user codes, management data and limits associated with each user code. Press the [User Tools/Counter] key. 234 Registering Addresses and Users for Facsimile/Scanner Functions Authentication Information Following describes the procedure for the printer driver, see the printer driver Help. • p.51 "Administrator Tools" Registering a User Code This section describes how to check each user's usage. • To automatically register the printer driver user code, select [Printer: PC Control] in the Document Server using the scanner function is counted...
... you change or delete user codes, management data and limits associated with each user code. Press the [User Tools/Counter] key. 234 Registering Addresses and Users for Facsimile/Scanner Functions Authentication Information Following describes the procedure for the printer driver, see the printer driver Help. • p.51 "Administrator Tools" Registering a User Code This section describes how to check each user's usage. • To automatically register the printer driver user code, select [Printer: PC Control] in the Document Server using the scanner function is counted...
Network Guide
Page 318
... [Off] in the RADIUS server. In "User Name", enter the user name set in "Permit Sub-domain". EAP-TLS • Make the following settings according to communicate with settings, you might not be able to the operating system you cannot identify the problem, reset the printer interface to the EAP Type. LEAP • Click [Change] in "Password", and then enter the password set in "Trust Intermediate Certificate Authority...
... [Off] in the RADIUS server. In "User Name", enter the user name set in "Permit Sub-domain". EAP-TLS • Make the following settings according to communicate with settings, you might not be able to the operating system you cannot identify the problem, reset the printer interface to the EAP Type. LEAP • Click [Change] in "Password", and then enter the password set in "Trust Intermediate Certificate Authority...

Network Guide
Page 365
... Changing an SMB folder 266 Citrix XenApp 301 Clearing the number of prints for all users........242 Clearing the number of prints for each user......241 Communication Mode 40 Connecting the telephone line 118 Connecting to the interfaces 71 Copier / Document Server Auto Reset Timer......31 Copy Count Display 24 Copy speed 14 Copyrights 322 Cover Sheet Tray 29 D Data Carry-over Setting for Address Book Autoprogram 55 Data Security for Copying 61 DDNS Configuration 37 Default User Name / Password (Send 48 Delete All Files in Document Server 59 Delete All Logs 60 Deleting a fax...
... Changing an SMB folder 266 Citrix XenApp 301 Clearing the number of prints for all users........242 Clearing the number of prints for each user......241 Communication Mode 40 Connecting the telephone line 118 Connecting to the interfaces 71 Copier / Document Server Auto Reset Timer......31 Copy Count Display 24 Copy speed 14 Copyrights 322 Cover Sheet Tray 29 D Data Carry-over Setting for Address Book Autoprogram 55 Data Security for Copying 61 DDNS Configuration 37 Default User Name / Password (Send 48 Delete All Files in Document Server 59 Delete All Logs 60 Deleting a fax...

Network Guide
Page 370
... Transfer Log Setting 61 Tray paper settings 27 Tray Paper Size Tray 1 27 Tray 2-4 27 U USB Host Interface connecting 79 USB interface connecting 78 User Authentication Management 57 User tools 20 change the settings 20 quit the settings 21 Using NetWare 120 V Virtual printer 298 W Warm-up Beeper 24 Web Image Monitor 131 administrator mode 134 auto e-mail notification 151 e-mail notification 147 guest mode 134 help 144 log out 134 login 134 mail authentication 149 menu 134 mode 134...
... Transfer Log Setting 61 Tray paper settings 27 Tray Paper Size Tray 1 27 Tray 2-4 27 U USB Host Interface connecting 79 USB interface connecting 78 User Authentication Management 57 User tools 20 change the settings 20 quit the settings 21 Using NetWare 120 V Virtual printer 298 W Warm-up Beeper 24 Web Image Monitor 131 administrator mode 134 auto e-mail notification 151 e-mail notification 147 guest mode 134 help 144 log out 134 login 134 mail authentication 149 menu 134 mode 134...

Basics Guide
Page 10
Using the Scanner Function Preparation for scanning from a computer • Check that the network cable is connected to the machine • Configure the network settings in [System Settings] 1 • Install the TWAIN driver on a client computer • Install a TWAIN-compliant application on the same client computer For details about the network TWAIN scanner function, see "Scanning Originals with the Network TWAIN Scanner", Scanner Reference . 8 1.
Using the Scanner Function Preparation for scanning from a computer • Check that the network cable is connected to the machine • Configure the network settings in [System Settings] 1 • Install the TWAIN driver on a client computer • Install a TWAIN-compliant application on the same client computer For details about the network TWAIN scanner function, see "Scanning Originals with the Network TWAIN Scanner", Scanner Reference . 8 1.


