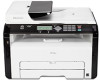
Software Installation Guide
Page 1
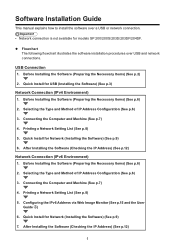
...(See p.7) 4. Connecting the Computer and Machine (See p.7) 4. Printing a Network Setting List (See p.8) 5. Quick Install for models SP 200/200S/203S/203SF/204SF. ◆ Flowchart The following flowchart illustrates the software installation procedures over USB and network connections. Configuring the IPv6... Address via Web Image Monitor (See p.15 and the User Guide ) 6. Software Installation Guide This manual explains how to install the software over a USB or network connection. • Network connection is not available for USB (...
...(See p.7) 4. Connecting the Computer and Machine (See p.7) 4. Printing a Network Setting List (See p.8) 5. Quick Install for models SP 200/200S/203S/203SF/204SF. ◆ Flowchart The following flowchart illustrates the software installation procedures over USB and network connections. Configuring the IPv6... Address via Web Image Monitor (See p.15 and the User Guide ) 6. Software Installation Guide This manual explains how to install the software over a USB or network connection. • Network connection is not available for USB (...
Software Installation Guide
Page 7
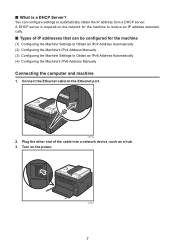
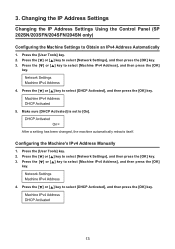
.... Turn on the network for the machine (1) Configuring the Machine Settings to Obtain an IPv4 Address Automatically (2) Configuring the Machine's IPv4 Address Manually (3) Configuring the Machine Settings to receive an IP address automatically. ■ Types of the cable into a network device, such as a hub...the power. CTT138 2. You can be configured for the machine to Obtain an IPv6 Address Automatically (4) Configuring the Machine's IPv6 Address Manually Connecting the computer and machine 1. CTT061 7 A DHCP server is a DHCP Server? Plug the other end of IP addresses that ...
.... Turn on the network for the machine (1) Configuring the Machine Settings to Obtain an IPv4 Address Automatically (2) Configuring the Machine's IPv4 Address Manually (3) Configuring the Machine Settings to receive an IP address automatically. ■ Types of the cable into a network device, such as a hub...the power. CTT138 2. You can be configured for the machine to Obtain an IPv6 Address Automatically (4) Configuring the Machine's IPv6 Address Manually Connecting the computer and machine 1. CTT061 7 A DHCP server is a DHCP Server? Plug the other end of IP addresses that ...
Software Installation Guide
Page 9
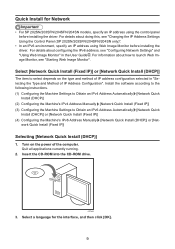
...204SN only)". • In an IPv6 environment, specify an IP address using the control panel before installing the driver. Install the software according to the following instructions. (1) Configuring the Machine Settings to Obtain an IPv4 Address Automatically [Network Quick Install (DHCP)] (2) Configuring the Machine's IPv4 Address Manually...Install (Fixed IP)] Selecting [Network Quick Install (DHCP)] 1. Select a language for Network • For SP 202SN/203SFN/204SFN/204SN models, specify an IP address using Web Image Monitor before installing the driver. For details about how to Obtain...
...204SN only)". • In an IPv6 environment, specify an IP address using the control panel before installing the driver. Install the software according to the following instructions. (1) Configuring the Machine Settings to Obtain an IPv4 Address Automatically [Network Quick Install (DHCP)] (2) Configuring the Machine's IPv4 Address Manually...Install (Fixed IP)] Selecting [Network Quick Install (DHCP)] 1. Select a language for Network • For SP 202SN/203SFN/204SFN/204SN models, specify an IP address using Web Image Monitor before installing the driver. For details about how to Obtain...
Software Installation Guide
Page 13
... IPv4 Address], and then press the [OK] key. 4. Configuring the Machine's IPv4 Address Manually 1. Press the [ ] or [ ] key to [On]. Changing the IP Address Settings Changing the IP Address Settings Using the Control Panel (SP 202SN/203SFN/204SFN/204SN only) Configuring the Machine Settings to select [Machine IPv4 Address], and then press the...
... IPv4 Address], and then press the [OK] key. 4. Configuring the Machine's IPv4 Address Manually 1. Press the [ ] or [ ] key to [On]. Changing the IP Address Settings Changing the IP Address Settings Using the Control Panel (SP 202SN/203SFN/204SFN/204SN only) Configuring the Machine Settings to select [Machine IPv4 Address], and then press the...
Software Installation Guide
Page 16
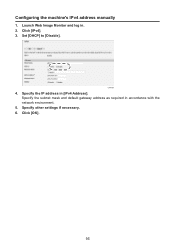
Set [DHCP] to [Disable]. Specify other settings if necessary. 6. Launch Web Image Monitor and log in [IPv4 Address]. Click [IPv4]. 3. Configuring the machine's IPv4 address manually 1. CTT167 4. Click [OK]. 16 Specify the IP address in . 2. Specify the subnet mask and default gateway address as required in accordance with the network environment. 5.
Set [DHCP] to [Disable]. Specify other settings if necessary. 6. Launch Web Image Monitor and log in [IPv4 Address]. Click [IPv4]. 3. Configuring the machine's IPv4 address manually 1. CTT167 4. Click [OK]. 16 Specify the IP address in . 2. Specify the subnet mask and default gateway address as required in accordance with the network environment. 5.
User Guide
Page 3
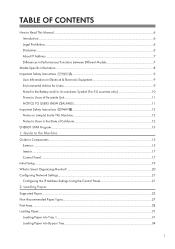
Guide to the Machine Guide to Users in the State of California...12 ENERGY STAR Program...13 1. TABLE OF CONTENTS How to Read This Manual...6 Introduction...6 Legal Prohibition...6 Disclaimer...6 About IP Address...7 Differences in Performance/Functions between Different Models 7 Model-Specific Information...8 Important Safety Instructions ...9 User Information on Electrical & Electronic ...
Guide to the Machine Guide to Users in the State of California...12 ENERGY STAR Program...13 1. TABLE OF CONTENTS How to Read This Manual...6 Introduction...6 Legal Prohibition...6 Disclaimer...6 About IP Address...7 Differences in Performance/Functions between Different Models 7 Model-Specific Information...8 Important Safety Instructions ...9 User Information on Electrical & Electronic ...
User Guide
Page 8
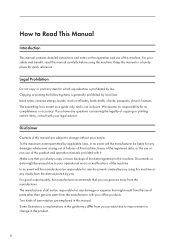
... any damages whatsoever arising out of failures of this machine, losses of the registered data, or the use or non-use of this manual. We assume no responsibility for any results from the manufacturer with your legal advisor. The manufacturer shall not be responsible for which reproduction... subject to change in this machine or any damage or expense that might be liable for quick reference. Keep this manual in this product and operation manuals provided with your office products. Legal Prohibition Do not copy or print any item for any questions concerning the legality ...
... any damages whatsoever arising out of failures of this machine, losses of the registered data, or the use or non-use of this manual. We assume no responsibility for any results from the manufacturer with your legal advisor. The manufacturer shall not be responsible for which reproduction... subject to change in this machine or any damage or expense that might be liable for quick reference. Keep this manual in this product and operation manuals provided with your office products. Legal Prohibition Do not copy or print any item for any questions concerning the legality ...
User Guide
Page 9
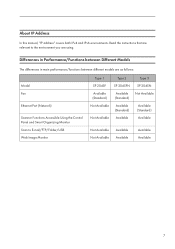
About IP Address In this manual, "IP address" covers both IPv4 and IPv6 environments. Read the instructions that are using. Differences in Performance/Functions between Different Models The differences ... and Smart Organizing Monitor Scan to the environment you are relevant to E-mail/FTP/Folder/USB Web Image Monitor Type 1 SP 204SF Available (Standard) Not Available Not Available Type 2 SP 204SFN Available (Standard) Available (Standard) Available Type 3 SP 204SN Not Available Available (Standard) Available Not Available Not Available Available Available Available Available 7
About IP Address In this manual, "IP address" covers both IPv4 and IPv6 environments. Read the instructions that are using. Differences in Performance/Functions between Different Models The differences ... and Smart Organizing Monitor Scan to the environment you are relevant to E-mail/FTP/Folder/USB Web Image Monitor Type 1 SP 204SF Available (Standard) Not Available Not Available Type 2 SP 204SFN Available (Standard) Available (Standard) Available Type 3 SP 204SN Not Available Available (Standard) Available Not Available Not Available Available Available Available Available 7
User Guide
Page 10
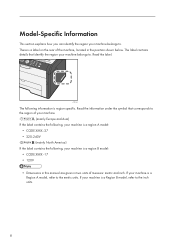
.... There is a Region A model, refer to the inch units. 8 If your machine is a region B model: • CODE XXXX -17 • 120V • Dimensions in this manual are given in two units of the machine, located in the position shown below. CTT110 The following , your machine is a region A model: • CODE XXXX...
.... There is a Region A model, refer to the inch units. 8 If your machine is a region B model: • CODE XXXX -17 • 120V • Dimensions in this manual are given in two units of the machine, located in the position shown below. CTT110 The following , your machine is a region A model: • CODE XXXX...
User Guide
Page 11
It must not be disposed of products helps to either the User's Manual for this product, please contact the shop where you bought this product is produced in the EU, Switzerland and Norway Consumables yield Please refer to ...
It must not be disposed of products helps to either the User's Manual for this product, please contact the shop where you bought this product is produced in the EU, Switzerland and Norway Consumables yield Please refer to ...
User Guide
Page 23
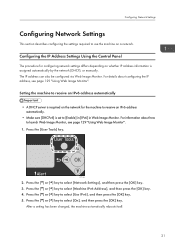
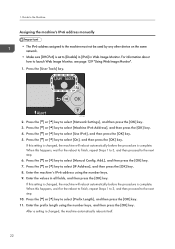
... on whether IP address information is set to receive an IPv6 address automatically. • Make sure [DHCPv6] is assigned automatically by the network (DHCP), or manually. Configuring Network Settings Configuring Network Settings This section describes configuring the settings required to select [Machine IPv6 Address], and then press the [OK] key. 4. Press...
... on whether IP address information is set to receive an IPv6 address automatically. • Make sure [DHCPv6] is assigned automatically by the network (DHCP), or manually. Configuring Network Settings Configuring Network Settings This section describes configuring the settings required to select [Machine IPv6 Address], and then press the [OK] key. 4. Press...
User Guide
Page 24
... a setting is set to select [Machine IPv6 Address], and then press the [OK] key. 4. Press the [ ] or [ ] key to select [Manual Config. Guide to the Machine Assigning the machine's IPv6 address manually • The IPv6 address assigned to the machine must not be used by any other device on the same network...
... a setting is set to select [Machine IPv6 Address], and then press the [OK] key. 4. Press the [ ] or [ ] key to select [Manual Config. Guide to the Machine Assigning the machine's IPv6 address manually • The IPv6 address assigned to the machine must not be used by any other device on the same network...
User Guide
Page 54
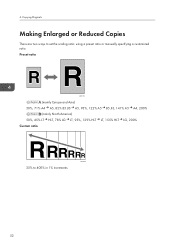
4. Preset ratio CES103 (mainly Europe and Asia) 50%, 71% A4 A5, 82% B5 JIS A5, 93%, 122% A5 B5 JIS, 141% A5 A4, 200% (mainly North America) 50%, 65% LT HLT, 78% LG LT, 93%, 129% HLT LT, 155% HLT LG, 200% Custom ratio CES106 25% to set the scaling ratio: using a preset ratio or manually specifying a customized ratio. Copying Originals Making Enlarged or Reduced Copies There are two ways to 400% in 1% increments. 52
4. Preset ratio CES103 (mainly Europe and Asia) 50%, 71% A4 A5, 82% B5 JIS A5, 93%, 122% A5 B5 JIS, 141% A5 A4, 200% (mainly North America) 50%, 65% LT HLT, 78% LG LT, 93%, 129% HLT LT, 155% HLT LG, 200% Custom ratio CES106 25% to set the scaling ratio: using a preset ratio or manually specifying a customized ratio. Copying Originals Making Enlarged or Reduced Copies There are two ways to 400% in 1% increments. 52
User Guide
Page 77
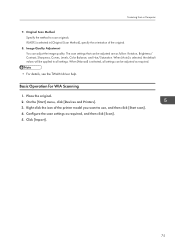
...]. 3. If [ADF] is selected in [Original Scan Method], specify the orientation of the printer model you want to use, and then click [Start scan]. 4. When [Manual] is selected, the default values will be adjusted are as required. • For details, see the TWAIN driver help. Place the original. 2. Image Quality Adjustment...
...]. 3. If [ADF] is selected in [Original Scan Method], specify the orientation of the printer model you want to use, and then click [Start scan]. 4. When [Manual] is selected, the default values will be adjusted are as required. • For details, see the TWAIN driver help. Place the original. 2. Image Quality Adjustment...
User Guide
Page 87
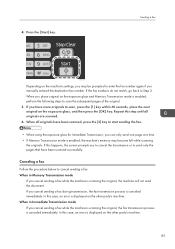
... step until all originals have been scanned, press the [2] key to start sending the fax. • When using the exposure glass for Immediate Transmission, you manually entered the destination fax number. When in Immediate Transmission mode If you cancel sending a fax while the machine is scanning the original, the fax transmission...
... step until all originals have been scanned, press the [2] key to start sending the fax. • When using the exposure glass for Immediate Transmission, you manually entered the destination fax number. When in Immediate Transmission mode If you cancel sending a fax while the machine is scanning the original, the fax transmission...
User Guide
Page 91
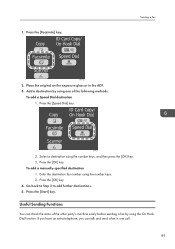
... [Speed Dial] key. Go back to Step 3 to add further destinations. 5. Useful Sending Functions You can talk and send a fax in the ADF. 3. To add a manually-specified destination 1. Press the [OK] key. 4. Add a destination by using one call. 89 Place the original on the exposure glass or in one of the...
... [Speed Dial] key. Go back to Step 3 to add further destinations. 5. Useful Sending Functions You can talk and send a fax in the ADF. 3. To add a manually-specified destination 1. Press the [OK] key. 4. Add a destination by using one call. 89 Place the original on the exposure glass or in one of the...
User Guide
Page 93
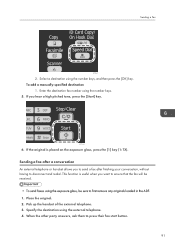
... answers, ask them to disconnect and redial. Specify the destination using the number keys, and then press the [OK] key. Sending a Fax CTT127 2. To add a manually-specified destination 1. If you to send a fax after a conversation An external telephone or handset allows you hear a high pitched tone, press the [Start] key. This...
... answers, ask them to disconnect and redial. Specify the destination using the number keys, and then press the [OK] key. Sending a Fax CTT127 2. To add a manually-specified destination 1. If you to send a fax after a conversation An external telephone or handset allows you hear a high pitched tone, press the [Start] key. This...
User Guide
Page 96
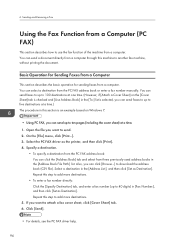
... Operation for Sending Faxes from a Computer This section describes the basic operation for sending faxes from the PC FAX address book or enter a fax number manually. Open the file you want to use the fax function of the machine from a computer through this step to add more destinations. 5. Repeat this machine...
... Operation for Sending Faxes from a Computer This section describes the basic operation for sending faxes from the PC FAX address book or enter a fax number manually. Open the file you want to use the fax function of the machine from a computer through this step to add more destinations. 5. Repeat this machine...
User Guide
Page 100
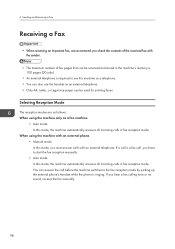
... the machine switches to the fax reception mode by picking up the external phone's handset while the phone is required to start the fax reception manually. • Auto mode In this mode, the machine automatically answers all incoming calls in the machine's memory is 100 pages (50 jobs). ...8226; An external telephone is ringing. Selecting Reception Mode The reception modes are as follows: When using the machine with an external phone • Manual mode In this machine as a telephone. • You can also use this mode, you check the contents of the received fax with an external...
... the machine switches to the fax reception mode by picking up the external phone's handset while the phone is required to start the fax reception manually. • Auto mode In this mode, the machine automatically answers all incoming calls in the machine's memory is 100 pages (50 jobs). ...8226; An external telephone is ringing. Selecting Reception Mode The reception modes are as follows: When using the machine with an external phone • Manual mode In this machine as a telephone. • You can also use this mode, you check the contents of the received fax with an external...
User Guide
Page 101
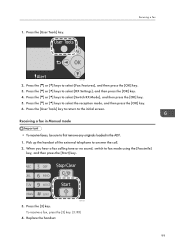
Press the [User Tools] key. Press the [ ] or [ ] keys to first remove any originals loaded in the ADF. 1. Receiving a fax in Manual mode • To receive faxes, be sure to select [RX Settings], and then press the [OK] key. 4. When you hear a fax calling tone or no ...
Press the [User Tools] key. Press the [ ] or [ ] keys to first remove any originals loaded in the ADF. 1. Receiving a fax in Manual mode • To receive faxes, be sure to select [RX Settings], and then press the [OK] key. 4. When you hear a fax calling tone or no ...


