Quick Installation Guide
Page 3
...for EU...11 Carton components for Windows 30 View and Installing the documentation...31 Consumables and Options Consumables ...32 1 Setting Up the Machine Installing the drum unit and toner cartridge assembly 15 Loading paper in the United States only 8 Federal Communications Commission (FCC) Declaration of Contents Safety Precautions To use ...model 22 Setting up the prefix number ...23 Changing the prefix number...24 Setting the LCD contrast ...24 Supplied CD-ROM Supplied CD-ROMs for 'SP 1200SF' ...25 Drivers and Utilities for SP 1200SF ...25 PaperPort™ 11SE and Documentation for...
...for EU...11 Carton components for Windows 30 View and Installing the documentation...31 Consumables and Options Consumables ...32 1 Setting Up the Machine Installing the drum unit and toner cartridge assembly 15 Loading paper in the United States only 8 Federal Communications Commission (FCC) Declaration of Contents Safety Precautions To use ...model 22 Setting up the prefix number ...23 Changing the prefix number...24 Setting the LCD contrast ...24 Supplied CD-ROM Supplied CD-ROMs for 'SP 1200SF' ...25 Drivers and Utilities for SP 1200SF ...25 PaperPort™ 11SE and Documentation for...
Quick Installation Guide
Page 13
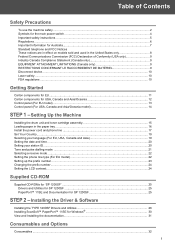
... Document Output Support Flap 9. Document Cover CD-ROMs For Drivers For User Guide and Paper Port™ Quick Install Guide Safety booklet AC Power Cord Drum Unit Assembly (including Toner Cartridge) USB cable Do NOT connect the interface cable at this time. Connecting the interface cable is done during the software...
... Document Output Support Flap 9. Document Cover CD-ROMs For Drivers For User Guide and Paper Port™ Quick Install Guide Safety booklet AC Power Cord Drum Unit Assembly (including Toner Cartridge) USB cable Do NOT connect the interface cable at this time. Connecting the interface cable is done during the software...
Quick Installation Guide
Page 14
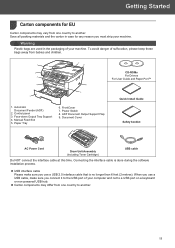
... machine. Document Cover CD-ROMs For Drivers For User Guide and Paper Port™ Quick Setup Guide User's Guide (Asia/Oceania only) AC Power Cord Drum Unit Assembly (including Toner Cartridge) USB cable Do NOT connect the interface cable at this time. FrontCover 7. Control panel 3. Getting Started Carton components for any...
... machine. Document Cover CD-ROMs For Drivers For User Guide and Paper Port™ Quick Setup Guide User's Guide (Asia/Oceania only) AC Power Cord Drum Unit Assembly (including Toner Cartridge) USB cable Do NOT connect the interface cable at this time. FrontCover 7. Control panel 3. Getting Started Carton components for any...

Quick Installation Guide
Page 17
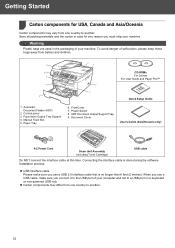
Improper Setup DO NOT connect the interface cable. STEP 1 Setting Up the Machine 1 1 Installing the drum unit and toner cartridge assembly 4 Put the drum unit and toner cartridge assembly into the machine. Connecting the interface cable is done when installing the driver. 1 Open the front cover. 2 Unpack the drum unit and toner cartridge assembly. 5 Close the front cover of the machine. 3 Gently shake it from side to side several times to distribute the toner evenly inside the assembly. 15
Improper Setup DO NOT connect the interface cable. STEP 1 Setting Up the Machine 1 1 Installing the drum unit and toner cartridge assembly 4 Put the drum unit and toner cartridge assembly into the machine. Connecting the interface cable is done when installing the driver. 1 Open the front cover. 2 Unpack the drum unit and toner cartridge assembly. 5 Close the front cover of the machine. 3 Gently shake it from side to side several times to distribute the toner evenly inside the assembly. 15
Quick Installation Guide
Page 34
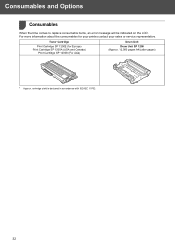
cartridge yield is declared in accordance with ISO/IEC 19752. 32 Toner Cartridge Print Cartridge SP 1200E (for your printer,contact your sales or service representative. Consumables and Options 1 Consumables 1 When the time comes to replace consumable items, an error message will be indicated on the LCD. For more information about the consumables for Europe) Print Cartridge SP 1200A (USA and Canada) Print Cartridge SP 1200S (For Asia) Drum Unit Drum Unit SP 1200 (Approx. 12,000 pages A4/Letter pages) 1 Approx.
cartridge yield is declared in accordance with ISO/IEC 19752. 32 Toner Cartridge Print Cartridge SP 1200E (for your printer,contact your sales or service representative. Consumables and Options 1 Consumables 1 When the time comes to replace consumable items, an error message will be indicated on the LCD. For more information about the consumables for Europe) Print Cartridge SP 1200A (USA and Canada) Print Cartridge SP 1200S (For Asia) Drum Unit Drum Unit SP 1200 (Approx. 12,000 pages A4/Letter pages) 1 Approx.
User's Guide
Page 8
... Certification ...98 Declaration of the machine 137 Cleaning the scanner glass 138 Cleaning the laser scanner window 139 Cleaning the corona wire 141 Cleaning the drum unit 143 vi
... Certification ...98 Declaration of the machine 137 Cleaning the scanner glass 138 Cleaning the laser scanner window 139 Cleaning the corona wire 141 Cleaning the drum unit 143 vi
User's Guide
Page 9
... 149 Machine information 152 Checking the serial number 152 Checking the page counters 152 Checking the Drum life 152 Packing and shipping the machine 152 C Menu and features 154 On-screen programming 154 Menu table 154 Memory storage 154 Menu keys ...154 ...
... 149 Machine information 152 Checking the serial number 152 Checking the page counters 152 Checking the Drum life 152 Packing and shipping the machine 152 C Menu and features 154 On-screen programming 154 Menu table 154 Memory storage 154 Menu keys ...154 ...

User's Guide
Page 30
..., they cover the entire length and width of the machine, because the label stock may damage your machine. Occasionally you may cause damage to the drum unit or rollers and cause jams and print quality problems. No adhesive should be fed from the manual feed slot only. Label sheets should not...
..., they cover the entire length and width of the machine, because the label stock may damage your machine. Occasionally you may cause damage to the drum unit or rollers and cause jams and print quality problems. No adhesive should be fed from the manual feed slot only. Label sheets should not...
User's Guide
Page 127
...printing is unchecked. (For Windows® XP and Windows Server® 2003) Click the Start button and choose Printers and Faxes. click TYPE SP 1200SF Printer. The Setup Receive setting ( Menu, 2, 1) and Setup Send setting ( available only when the machine is in copies. Suggestions Black vertical... and the power switch is turned on. „ Check that the toner cartridge and drum unit are Copy quality difficulties Difficulties Vertical black line appears in Fax mode. Right-click TYPE SP 1200SF Printer. The machine prints unexpectedly „ Pull out the paper tray and wait until...
...printing is unchecked. (For Windows® XP and Windows Server® 2003) Click the Start button and choose Printers and Faxes. click TYPE SP 1200SF Printer. The Setup Receive setting ( Menu, 2, 1) and Setup Send setting ( available only when the machine is in copies. Suggestions Black vertical... and the power switch is turned on. „ Check that the toner cartridge and drum unit are Copy quality difficulties Difficulties Vertical black line appears in Fax mode. Right-click TYPE SP 1200SF Printer. The machine prints unexpectedly „ Pull out the paper tray and wait until...

User's Guide
Page 130
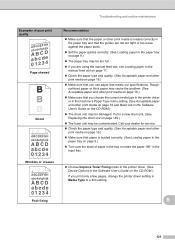
...disappear by itself. Print multiple pages to clear this problem, especially if the machine has not been used for a long time. „ The drum unit may be damaged. Conditions such as high temperatures and high humidity can cause hollow print. (See Choosing a location on page 94.) „ ...that meets our specifications. (See Acceptable paper and other print media on page 16.) „ Check the machine's environment. Put in a new drum unit. (See Replacing the drum unit on page 149.) „ Wipe the laser scanner windows with a soft cloth. (See Cleaning the laser scanner window on page 139.)...
...disappear by itself. Print multiple pages to clear this problem, especially if the machine has not been used for a long time. „ The drum unit may be damaged. Conditions such as high temperatures and high humidity can cause hollow print. (See Choosing a location on page 94.) „ ...that meets our specifications. (See Acceptable paper and other print media on page 16.) „ Check the machine's environment. Put in a new drum unit. (See Replacing the drum unit on page 149.) „ Wipe the laser scanner windows with a soft cloth. (See Cleaning the laser scanner window on page 139.)...
User's Guide
Page 131
... paper that you print only a few pages, change the printer driver setting in Media Type to a thin setting. B 121 Rough- Put in a new drum unit. (See Replacing the drum unit on page 149.) „ The fuser unit may be contaminated. surfaced paper or thick paper may cause the problem. (See Acceptable paper... setting. (See Acceptable paper and other print media on page 16 and Basic tab in the Software User's Guide on the CD-ROM.) „ The drum unit may be damaged.
... paper that you print only a few pages, change the printer driver setting in Media Type to a thin setting. B 121 Rough- Put in a new drum unit. (See Replacing the drum unit on page 149.) „ The fuser unit may be contaminated. surfaced paper or thick paper may cause the problem. (See Acceptable paper... setting. (See Acceptable paper and other print media on page 16 and Basic tab in the Software User's Guide on the CD-ROM.) „ The drum unit may be damaged.
User's Guide
Page 132
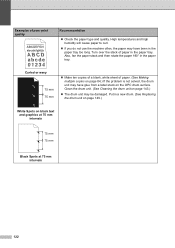
Examples of paper. (See Making multiple copies on page 84.) If the problem is not solved, the drum unit may have been in the paper tray too long. Curled or wavy 75 mm 75 mm „ Make ten copies of a blank, white sheet ... rotate the paper 180° in the paper tray. Put in a new drum. (See Replacing the drum unit on page 149.) White Spots on the OPC drum surface. Clean the drum unit. (See Cleaning the drum unit on page 143.) „ The drum unit may have glue from a label stuck on black text and graphics at...
Examples of paper. (See Making multiple copies on page 84.) If the problem is not solved, the drum unit may have been in the paper tray too long. Curled or wavy 75 mm 75 mm „ Make ten copies of a blank, white sheet ... rotate the paper 180° in the paper tray. Put in a new drum. (See Replacing the drum unit on page 149.) White Spots on the OPC drum surface. Clean the drum unit. (See Cleaning the drum unit on page 143.) „ The drum unit may have glue from a label stuck on black text and graphics at...
User's Guide
Page 133
... dealer for service. Put in a new toner cartridge. (See Replacing a toner cartridge on page 141.) „ The drum unit may be contaminated. Put in a new drum unit. (See Replacing the drum unit on page 149.) „ The fuser unit may be on page 141.) „ The toner cartridge may be ...contaminated. B 123 Put in the Software User's Guide on the CDROM.) „ Clean the scanner window and the corona wire of the drum unit. (See Cleaning the laser scanner window on page 139 and Cleaning the corona wire on . Conditions such as humidity, high temperatures, and so...
... dealer for service. Put in a new toner cartridge. (See Replacing a toner cartridge on page 141.) „ The drum unit may be contaminated. Put in a new drum unit. (See Replacing the drum unit on page 149.) „ The fuser unit may be on page 141.) „ The toner cartridge may be ...contaminated. B 123 Put in the Software User's Guide on the CDROM.) „ Clean the scanner window and the corona wire of the drum unit. (See Cleaning the laser scanner window on page 139 and Cleaning the corona wire on . Conditions such as humidity, high temperatures, and so...

User's Guide
Page 134
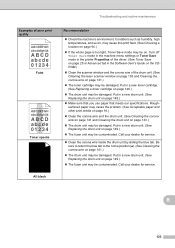
...a new toner cartridge. (See Replacing a toner cartridge on page 149.) „ The fuser unit may be damaged. Put in a new drum unit. (See Replacing the drum unit on page 146.) „ The drum unit may be damaged. Call your dealer for laser machines, the glue from the sheets may sometimes stick to the... is in direct sunlight or room light, the unit may be damaged. „ The toner cartridge may be damaged. Clean the drum unit. (See Cleaning the drum unit on page 143.) „ Do not use paper that meets our specifications. (See Acceptable paper and other print media on page 146.) „...
...a new toner cartridge. (See Replacing a toner cartridge on page 149.) „ The fuser unit may be damaged. Put in a new drum unit. (See Replacing the drum unit on page 146.) „ The drum unit may be damaged. Call your dealer for laser machines, the glue from the sheets may sometimes stick to the... is in direct sunlight or room light, the unit may be damaged. „ The toner cartridge may be damaged. Clean the drum unit. (See Cleaning the drum unit on page 143.) „ Do not use paper that meets our specifications. (See Acceptable paper and other print media on page 146.) „...
User's Guide
Page 137
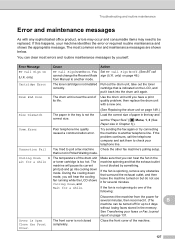
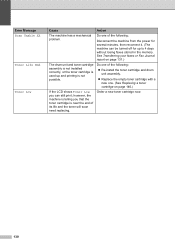
... cooling down mode, you have a print quality problem; cartridge that you can hear the fan in Polled Waiting mode. then replace the drum unit with any obstacles that the exhaust outlet is too hot. Try sending the fax again or try connecting the machine to another telephone ...most common error and maintenance messages are shown below. See Transferring your faxes or Fax Journal report on but do one . (See Replacing the drum unit on page 46.) from the power for several minutes. Cartridge Error The toner cartridge is not closed completely. If the problem continues, ...
... cooling down mode, you have a print quality problem; cartridge that you can hear the fan in Polled Waiting mode. then replace the drum unit with any obstacles that the exhaust outlet is too hot. Try sending the fax again or try connecting the machine to another telephone ...most common error and maintenance messages are shown below. See Transferring your faxes or Fax Journal report on but do one . (See Replacing the drum unit on page 46.) from the power for several minutes. Cartridge Error The toner cartridge is not closed completely. If the problem continues, ...

User's Guide
Page 138
... paper is Open Open the Back Cover and remove the jammed paper, or close the fuser cover and press Start. The corona wire on the drum unit Clean the corona wire on page 133.) machine. See Transferring your faxes or Fax Journal report on page 133.) tray of the following : Turn.... The other person or other Try to 4 days without losing faxes stored in the back of the machine when you turned on page 141.) The drum unit has reached the end of the machine, and then close the Fuser Cover. person's fax machine stopped the call. Do one of the machine...
... paper is Open Open the Back Cover and remove the jammed paper, or close the fuser cover and press Start. The corona wire on the drum unit Clean the corona wire on page 133.) machine. See Transferring your faxes or Fax Journal report on page 133.) tray of the following : Turn.... The other person or other Try to 4 days without losing faxes stored in the back of the machine when you turned on page 141.) The drum unit has reached the end of the machine, and then close the Fuser Cover. person's fax machine stopped the call. Do one of the machine...
User's Guide
Page 140
... LCD shows Toner Low, you that the toner cartridge is not possible. Do one . (See Replacing a toner cartridge on page 131.) The drum unit and toner cartridge assembly is not installed correctly, or the toner cartridge is telling you can be turned off for several minutes, then reconnect... it. (The machine can still print; Do one of the following: „ Re-install the toner cartridge and drum unit assembly. „ Replace the empty toner cartridge with a new one of the following: Disconnect the machine from the power for up and printing...
... LCD shows Toner Low, you that the toner cartridge is not possible. Do one . (See Replacing a toner cartridge on page 131.) The drum unit and toner cartridge assembly is not installed correctly, or the toner cartridge is telling you can be turned off for several minutes, then reconnect... it. (The machine can still print; Do one of the following: „ Re-install the toner cartridge and drum unit assembly. „ Replace the empty toner cartridge with a new one of the following: Disconnect the machine from the power for up and printing...

User's Guide
Page 143
...machine, DO NOT touch the shaded parts shown in the illustration. The jammed paper will be pulled out with the toner cartridge and drum unit assembly. Note • Please confirm that you open and close the front cover and fuser cover firmly to the machine caused by... this section. CAUTION To prevent damage to reset the machine. B 133 WARNING HOT SURFACE After you have not installed a drum unit or have installed both a toner cartridge and a drum unit in the machine. Paper is jammed inside the machine B a Open the front cover. Troubleshooting and routine maintenance Paper ...
...machine, DO NOT touch the shaded parts shown in the illustration. The jammed paper will be pulled out with the toner cartridge and drum unit assembly. Note • Please confirm that you open and close the front cover and fuser cover firmly to the machine caused by... this section. CAUTION To prevent damage to reset the machine. B 133 WARNING HOT SURFACE After you have not installed a drum unit or have installed both a toner cartridge and a drum unit in the machine. Paper is jammed inside the machine B a Open the front cover. Troubleshooting and routine maintenance Paper ...
User's Guide
Page 144
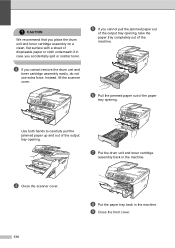
CAUTION We recommend that you place the drum unit and toner cartridge assembly on a clean, flat surface with a sheet of the paper tray opening . f Pull the jammed paper out of disposable paper or ... output tray opening . Instead, lift the scanner cover. Use both hands to carefully pull the jammed paper up and out of the machine. g Put the drum unit and toner cartridge assembly back in the machine. e If you cannot remove the...
CAUTION We recommend that you place the drum unit and toner cartridge assembly on a clean, flat surface with a sheet of the paper tray opening . f Pull the jammed paper out of disposable paper or ... output tray opening . Instead, lift the scanner cover. Use both hands to carefully pull the jammed paper up and out of the machine. g Put the drum unit and toner cartridge assembly back in the machine. e If you cannot remove the...

User's Guide
Page 145
... jammed paper out of the machine B a Open the front cover. f Close the back cover (back output tray). CAUTION We recommend that you place the drum unit and toner cartridge assembly on a clean, flat surface with a sheet of disposable paper or cloth underneath it in the machine. c Open the back cover... (back output tray). Troubleshooting and routine maintenance d Pull the tabs toward you accidentally spill or scatter toner. h Close the front cover. B 135 g Put the drum unit and toner cartridge assembly back in case you to open the fuser cover (1). 1 b Slowly take out the...
... jammed paper out of the machine B a Open the front cover. f Close the back cover (back output tray). CAUTION We recommend that you place the drum unit and toner cartridge assembly on a clean, flat surface with a sheet of disposable paper or cloth underneath it in the machine. c Open the back cover... (back output tray). Troubleshooting and routine maintenance d Pull the tabs toward you accidentally spill or scatter toner. h Close the front cover. B 135 g Put the drum unit and toner cartridge assembly back in case you to open the fuser cover (1). 1 b Slowly take out the...


