Quick Start Guide
Page 1
www.ricoh-usa.com Ricoh Product Line Segment 2 thru 6 MP/5000/5001, MP C5000/C6000/C6501, MP7000/8000, MP6001/7001, MP8001/9001, MP907EX This guide is not intended to replace your users manual, features and options will vary by machine type, model and finisher type installed.
www.ricoh-usa.com Ricoh Product Line Segment 2 thru 6 MP/5000/5001, MP C5000/C6000/C6501, MP7000/8000, MP6001/7001, MP8001/9001, MP907EX This guide is not intended to replace your users manual, features and options will vary by machine type, model and finisher type installed.
Quick Start Guide
Page 4
... are additional feature functionality from the system HDD after printing. Does not require the user to print files immediately while simultaneously storing data. 4-8 digit password is entered at a later date. Document Server: Sends files directly to the document server for accuracy prior to printing the entire job. Sample Print: Outputs the first set of a multiple-set print job so that output settings can be checked for storage and printing at the control panel. Store and Print enables users to enter a password. Files are not immediately deleted after printing.
... are additional feature functionality from the system HDD after printing. Does not require the user to print files immediately while simultaneously storing data. 4-8 digit password is entered at a later date. Document Server: Sends files directly to the document server for accuracy prior to printing the entire job. Sample Print: Outputs the first set of a multiple-set print job so that output settings can be checked for storage and printing at the control panel. Store and Print enables users to enter a password. Files are not immediately deleted after printing.
Quick Start Guide
Page 5
...the user to print files immediately while simultaneously storing data. 4-8 digit password is entered at a later date. Store and Print enables users to enter a password. Files are not immediately deleted after printing. Stored Print/Store and Print: Identical in functionality to printing the entire job. Sample Print: Outputs the first set of a multiple-set print job so that output settings can be checked for storage and printing at the control panel. Hold Print: Temporarily holds multiple print files in the memory until a valid password is optional. Document Server: Sends files...
...the user to print files immediately while simultaneously storing data. 4-8 digit password is entered at a later date. Store and Print enables users to enter a password. Files are not immediately deleted after printing. Stored Print/Store and Print: Identical in functionality to printing the entire job. Sample Print: Outputs the first set of a multiple-set print job so that output settings can be checked for storage and printing at the control panel. Hold Print: Temporarily holds multiple print files in the memory until a valid password is optional. Document Server: Sends files...
Quick Start Guide
Page 8
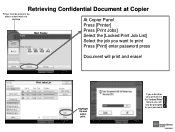
Print Jobs List Highlight file and select print. If you submitted your password. Retrieving Confidential Document at Copier Printer must be online to print Press [Print] enter password press Document will now be able to submit work via desktop At Copier Panel Press [Printer] Main Display Press [Print Jobs] Select the [Locked Print Job List] Select the job you want to be prompted for your print job via the "locked Print" feature, you will print and erase!
Print Jobs List Highlight file and select print. If you submitted your password. Retrieving Confidential Document at Copier Printer must be online to print Press [Print] enter password press Document will now be able to submit work via desktop At Copier Panel Press [Printer] Main Display Press [Print Jobs] Select the [Locked Print Job List] Select the job you want to be prompted for your print job via the "locked Print" feature, you will print and erase!
Quick Start Guide
Page 9
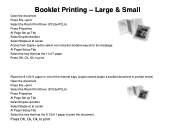
... Paper Setup Tab Select the tray that has the 11x17 paper Press OK, Ok, Ok, to print Place the 8 1/2x11 paper in one of the internal trays (copier cannot staple a booklet document in portrait mode) Open the document Press File >print Select the Ricoh Print Driver (PCL5e/PCL6) Press Properties At Page Set up Tab Select Duplex>booklet Select Staple>2 at center At Paper Setup Tab Select the tray that has the 8 1/2x11 paper to print...
... Paper Setup Tab Select the tray that has the 11x17 paper Press OK, Ok, Ok, to print Place the 8 1/2x11 paper in one of the internal trays (copier cannot staple a booklet document in portrait mode) Open the document Press File >print Select the Ricoh Print Driver (PCL5e/PCL6) Press Properties At Page Set up Tab Select Duplex>booklet Select Staple>2 at center At Paper Setup Tab Select the tray that has the 8 1/2x11 paper to print...
Quick Start Guide
Page 11
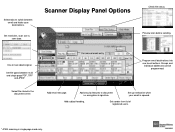
.... Add email message. Add security features to switch between multi and single page PDF, TIFF and JPEG* Select file stored in single page mode only. Set sender from list of registered users. * JPEG scanning in the document server. encryption & signature. Preview scan before sending. Add subject heading. For manual email entry Program email destinations into one touch buttons. Set up notification when your email is opened. Scanner Display Panel Options Check file status. Groups and individual addresses can be programmed. Set resolution, scan size & scan type...
.... Add email message. Add security features to switch between multi and single page PDF, TIFF and JPEG* Select file stored in single page mode only. Set sender from list of registered users. * JPEG scanning in the document server. encryption & signature. Preview scan before sending. Add subject heading. For manual email entry Program email destinations into one touch buttons. Set up notification when your email is opened. Scanner Display Panel Options Check file status. Groups and individual addresses can be programmed. Set resolution, scan size & scan type...
Quick Start Guide
Page 16
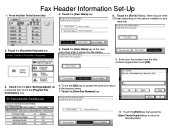
... the options installed on your fax number from the display keypad 9. Enter your machine) 2. Touch the [OK] key to accept the name and return to Standby Mode Touch the [Own Name] key at the next menu then enter a name from the blue numeric keypad then touch [OK] 3. Touch the [Own Name] key 8. Settings/Adjust] tab is selected then touch the [Program Fax Information] key 6. Press the [User Tools/Counter] key 4. Check that...
... the options installed on your fax number from the display keypad 9. Enter your machine) 2. Touch the [OK] key to accept the name and return to Standby Mode Touch the [Own Name] key at the next menu then enter a name from the blue numeric keypad then touch [OK] 3. Touch the [Own Name] key 8. Settings/Adjust] tab is selected then touch the [Program Fax Information] key 6. Press the [User Tools/Counter] key 4. Check that...

Quick Start Guide
Page 18
When Networked, users have the option of Copier Use to Store a FAX Destination Users can print automatically, selectively, for faxing documents from the desktop with fax Covers and other options. Use The Original Feed type to select 2 sided when originals are 2 sided and copier Will scan and send both sides. Confirmations can send single document to one or more users simultaneously. Select Stored Fax Destination(s) or enter a New Destination using the Numeric Key Pad on Right Side of Installing the LAN fax driver for errors only or off.
When Networked, users have the option of Copier Use to Store a FAX Destination Users can print automatically, selectively, for faxing documents from the desktop with fax Covers and other options. Use The Original Feed type to select 2 sided when originals are 2 sided and copier Will scan and send both sides. Confirmations can send single document to one or more users simultaneously. Select Stored Fax Destination(s) or enter a New Destination using the Numeric Key Pad on Right Side of Installing the LAN fax driver for errors only or off.

Quick Start Guide
Page 19
... [Print]. 5. Select [File], then [Print] Faxing From Desktop 3. You can customize your fax cover. 8. Press [Attach Cover] to add a fax cover to confirm Recipient's destination. In the [Name] list, click the LAN-Fax M8 driver 4. Press [Send] or [Print] Press [Set as if you can select more than one destination to fax 2. At [Fax Number] type the Recipient's Fax# just as Destination] to the document, you were manually dialing the number at a Fax Machine or select from [Address Book], if...
... [Print]. 5. Select [File], then [Print] Faxing From Desktop 3. You can customize your fax cover. 8. Press [Attach Cover] to add a fax cover to confirm Recipient's destination. In the [Name] list, click the LAN-Fax M8 driver 4. Press [Send] or [Print] Press [Set as if you can select more than one destination to fax 2. At [Fax Number] type the Recipient's Fax# just as Destination] to the document, you were manually dialing the number at a Fax Machine or select from [Address Book], if...
Troubleshooting Guide
Page 13
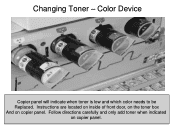
Changing Toner - Follow directions carefully and only add toner when indicated on copier panel. Color Device Copier panel will indicate when toner is low and which color needs to be Replaced. Instructions are located on inside of front door, on the toner box And on copier panel.
Changing Toner - Follow directions carefully and only add toner when indicated on copier panel. Color Device Copier panel will indicate when toner is low and which color needs to be Replaced. Instructions are located on inside of front door, on the toner box And on copier panel.
User Guide
Page 2
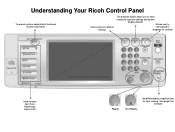
See page 2 for easy viewing. Understanding Your Ricoh Control Panel To access system administrator tools and counter information Clears screen to default settings The program button allows you to store frequently used job settings and screen display defaults Allows user to interrupt job in progress for new job Hard function keys have Red/Yellow status LEDs 8.5" Full Color W-VGA Screen Ready Not Ready Simplified display magnifies fonts for example
See page 2 for easy viewing. Understanding Your Ricoh Control Panel To access system administrator tools and counter information Clears screen to default settings The program button allows you to store frequently used job settings and screen display defaults Allows user to interrupt job in progress for new job Hard function keys have Red/Yellow status LEDs 8.5" Full Color W-VGA Screen Ready Not Ready Simplified display magnifies fonts for example
User Guide
Page 3
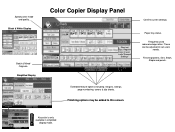
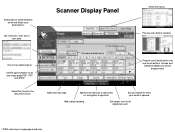
Register keys in simplified display mode. margins, stamps, page numbering, covers & slip sheets. Specify color mode and quality. Simplified Display Color Copier Display Panel Confirm current settings. Finishing options may be adjusted to this screen. These can be added to suit users needs. Finishing options. Black & White Display Batch & Mixed Originals. Frequently used reduce/enlarge ratios. Sort, Stack, Staple and punch. Key color is only available in user tools "General Settings" Paper tray status. Short cut keys. Extended feature options including;
Register keys in simplified display mode. margins, stamps, page numbering, covers & slip sheets. Specify color mode and quality. Simplified Display Color Copier Display Panel Confirm current settings. Finishing options may be adjusted to this screen. These can be added to suit users needs. Finishing options. Black & White Display Batch & Mixed Originals. Frequently used reduce/enlarge ratios. Sort, Stack, Staple and punch. Key color is only available in user tools "General Settings" Paper tray status. Short cut keys. Extended feature options including;
User Guide
Page 10
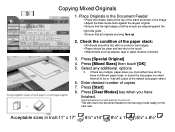
... in different paper trays, or select the size paper you have all be removed. 3. Acceptable sizes in the Document Feeder Place the smaller sizes at the top of copies 7. Selecting Duplexing must all the sizes in the image Adjust the Side Guide flush against the right side guide . Ensure that all originals are multiple paper sizes you must be output on the same size. Press [Mixed Sizes] then touch [OK] 5. Check the...
... in different paper trays, or select the size paper you have all be removed. 3. Acceptable sizes in the Document Feeder Place the smaller sizes at the top of copies 7. Selecting Duplexing must all the sizes in the image Adjust the Side Guide flush against the right side guide . Ensure that all originals are multiple paper sizes you must be output on the same size. Press [Mixed Sizes] then touch [OK] 5. Check the...
User Guide
Page 14
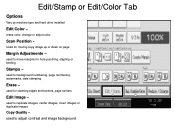
used for cleaning edges and borders, page centers Edit Image - used to move margins for moving copy image up or down on page Margin Adjustments - erase color, change or adjust color Scan Position - used for background numbering, page numbering, watermarks, date stamping Erase - used to adjust contrast and image background Used for hole-punching, stapling or binding Stamps - Edit/Stamp or Edit/Color Tab Options Vary by machine type and hard drive installed Edit Color - used to replicate images, center images, invert images or duplicate images Copy Quality -
used for cleaning edges and borders, page centers Edit Image - used to move margins for moving copy image up or down on page Margin Adjustments - erase color, change or adjust color Scan Position - used for background numbering, page numbering, watermarks, date stamping Erase - used to adjust contrast and image background Used for hole-punching, stapling or binding Stamps - Edit/Stamp or Edit/Color Tab Options Vary by machine type and hard drive installed Edit Color - used to replicate images, center images, invert images or duplicate images Copy Quality -

User Guide
Page 26
... the job stapled and folded. Book - Create a magazine output (use booklet for 4 page output) use Magazine for 5 or more pages. Combine multiple pages on single pages with options for 2 sided or single sided output and options of a book as a duplex output. Use to 2 single pages. Series - Dup./Combine/Series Full menu for short cuts on a single page. output documents from 2 Sided to 1 Sided Copy 2 face forwarding pages of a book to copy 2 face forwarding pages of placing 2, 4, 8 or pages on panel Duplex - 1 sided+2 Sided 2 Sided+ 2 Sided Combine - Default Screen Settings
... the job stapled and folded. Book - Create a magazine output (use booklet for 4 page output) use Magazine for 5 or more pages. Combine multiple pages on single pages with options for 2 sided or single sided output and options of a book as a duplex output. Use to 2 single pages. Series - Dup./Combine/Series Full menu for short cuts on a single page. output documents from 2 Sided to 1 Sided Copy 2 face forwarding pages of a book to copy 2 face forwarding pages of placing 2, 4, 8 or pages on panel Duplex - 1 sided+2 Sided 2 Sided+ 2 Sided Combine - Default Screen Settings

User Guide
Page 36
... [Sample Copy] again or press [Start] to change some settings. This feature is the number of copies made is not available from the [Simplified screen]. If you press [Suspend] after checking the results, return to step 1 to adjust the copy settings as a sample SIfcrSeaenmspeltetinCgospwyillischaacncgeepatnadbldeis, pplareyss"c[Coonntitninuuee"] or Suspend. -The number of copies requested minus the proof copy. Sample Copy Use this option to check the copy settings before making a long copy run.
... [Sample Copy] again or press [Start] to change some settings. This feature is the number of copies made is not available from the [Simplified screen]. If you press [Suspend] after checking the results, return to step 1 to adjust the copy settings as a sample SIfcrSeaenmspeltetinCgospwyillischaacncgeepatnadbldeis, pplareyss"c[Coonntitninuuee"] or Suspend. -The number of copies requested minus the proof copy. Sample Copy Use this option to check the copy settings before making a long copy run.
User Guide
Page 42
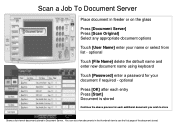
optional Touch [File Name] delete the default name and enter new document name using keyboard Touch [Password] enter a password for each entry Press [Start] Document is stored Continue the above process for your name or select from list - optional Press [OK] after each additional document you wish to store Shows a list view of documents stored in the thumbnail view to see the first page of the document stored. You can also...
optional Touch [File Name] delete the default name and enter new document name using keyboard Touch [Password] enter a password for each entry Press [Start] Document is stored Continue the above process for your name or select from list - optional Press [OK] after each additional document you wish to store Shows a list view of documents stored in the thumbnail view to see the first page of the document stored. You can also...
User Guide
Page 50
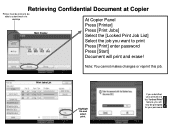
Print Jobs List Highlight file and select print. Note: You cannot makes changes or reprint this job. If you submitted your password. Retrieving Confidential Document at Copier Printer must be online to be prompted for your print job via the "locked Print" feature, you will now be able to submit work via desktop At Copier Panel Press [Printer] Main Display Press [Print Jobs] Select the [Locked Print Job List] Select the job you want to print Press [Print] enter password Press [Start] Document will print and erase!
Print Jobs List Highlight file and select print. Note: You cannot makes changes or reprint this job. If you submitted your password. Retrieving Confidential Document at Copier Printer must be online to be prompted for your print job via the "locked Print" feature, you will now be able to submit work via desktop At Copier Panel Press [Printer] Main Display Press [Print Jobs] Select the [Locked Print Job List] Select the job you want to print Press [Print] enter password Press [Start] Document will print and erase!
User Guide
Page 52
... size & scan type. Scanner Display Panel Check file status. Add email message. Set up notification when your email is opened. Add subject heading. Preview scan before sending. encryption & signature. For manual email entry Program email destinations into one touch buttons. One or two sided original. Set file types between email and folder scan destinations. Select tabs to document i.e. Groups and individual addresses can be programmed. Add security features to switch between multi and single page PDF, TIFF and JPEG* Select file stored in single page mode...
... size & scan type. Scanner Display Panel Check file status. Add email message. Set up notification when your email is opened. Add subject heading. Preview scan before sending. encryption & signature. For manual email entry Program email destinations into one touch buttons. One or two sided original. Set file types between email and folder scan destinations. Select tabs to document i.e. Groups and individual addresses can be programmed. Add security features to switch between multi and single page PDF, TIFF and JPEG* Select file stored in single page mode...
User Guide
Page 60
...-Fax driver, saving • paper. • ■ Simultaneous Save: Users can save the fax document as the primary task of manually • re-entering address book entries is sending the fax in addition to the • Fax Option Type 9001. This removes • customer resistance to switching from existing LAN-Fax solutions to Ricoh's, as a TIFF file directly to a designated folder on SP models) in one operation. • ■ Wireless Faxing: If the Aficio MP 6001/MP 7001/MP 8001/MP 9001 Series is connected...
...-Fax driver, saving • paper. • ■ Simultaneous Save: Users can save the fax document as the primary task of manually • re-entering address book entries is sending the fax in addition to the • Fax Option Type 9001. This removes • customer resistance to switching from existing LAN-Fax solutions to Ricoh's, as a TIFF file directly to a designated folder on SP models) in one operation. • ■ Wireless Faxing: If the Aficio MP 6001/MP 7001/MP 8001/MP 9001 Series is connected...


