
Troubleshooting Guide
Page 35
...administrator. See "Con- 3 necting the Machine to a larger value. maximum e-mail size to a Tele- Press [Original Size:], select the scanning area, and then resend the document. See "E-mail Settings", General Settings Guide. If this is recommended that the modular cable is in User...set ." If you use On Hook Dial or Manual Dial frequently, it correctly. See "Placing blank at the other end. to a "maximum email size" error. Set [Maximum E-mail Size] under [Ement exceeds the maximum e- Both transmission and The terminal adaptor setting is correctly connected. ...
...administrator. See "Con- 3 necting the Machine to a larger value. maximum e-mail size to a Tele- Press [Original Size:], select the scanning area, and then resend the document. See "E-mail Settings", General Settings Guide. If this is recommended that the modular cable is in User...set ." If you use On Hook Dial or Manual Dial frequently, it correctly. See "Placing blank at the other end. to a "maximum email size" error. Set [Maximum E-mail Size] under [Ement exceeds the maximum e- Both transmission and The terminal adaptor setting is correctly connected. ...

Troubleshooting Guide
Page 36
.... in the address book. It is possible. Forwarding, Forwarding of specified destina- Reception is impossible. but transmission is impossible during scanning. ry Transmission. Cannot cancel a Memo- See ry Transmission. "Canceling a Transmission", Fac- See "Canceling a Transmission", Facsimile Reference... Problem Cause Solution The machine failed to print received fax documents. Fax transmission. The number of Special Sender, Email TX Result, routing email received via SMTP. making printing impossible. When the B Load Paper indica- Press the {Clear/Stop} key....
.... in the address book. It is possible. Forwarding, Forwarding of specified destina- Reception is impossible. but transmission is impossible during scanning. ry Transmission. Cannot cancel a Memo- See ry Transmission. "Canceling a Transmission", Fac- See "Canceling a Transmission", Facsimile Reference... Problem Cause Solution The machine failed to print received fax documents. Fax transmission. The number of Special Sender, Email TX Result, routing email received via SMTP. making printing impossible. When the B Load Paper indica- Press the {Clear/Stop} key....
Troubleshooting Guide
Page 39
... Fax Messages As Wanted ❖ Others Problem Cause Solution All fax documents All fax documents are not available: Forwarding, routing email received via SMTP. Those docu- unpowered for Memo- This function is turned on. Do you press [Exit], the machine returns to send ...the scanned data? by the enhanced security function. If stored through Memory, Mem- when the machine is made unavailable Contact the administrator. the ...
... Fax Messages As Wanted ❖ Others Problem Cause Solution All fax documents All fax documents are not available: Forwarding, routing email received via SMTP. Those docu- unpowered for Memo- This function is turned on. Do you press [Exit], the machine returns to send ...the scanned data? by the enhanced security function. If stored through Memory, Mem- when the machine is made unavailable Contact the administrator. the ...
Quick Use Guide
Page 3
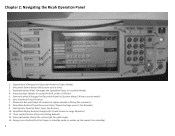
... / Dialing Fax numbers) 8. Scanner button (Changes the Operation Panel to Scanner Mode / Allows scan to Start Copy, Fax & Scan) 10. Start button (Used to email) 6. Clear modes button (Clears all setting default) 12. User Interface (Touch Screen) 7. Chapter 2: Navigating the Ricoh Operation Panel 1. Clear/Stop button (Stops the current Job / Clears the Page count...
... / Dialing Fax numbers) 8. Scanner button (Changes the Operation Panel to Scanner Mode / Allows scan to Start Copy, Fax & Scan) 10. Start button (Used to email) 6. Clear modes button (Clears all setting default) 12. User Interface (Touch Screen) 7. Chapter 2: Navigating the Ricoh Operation Panel 1. Clear/Stop button (Stops the current Job / Clears the Page count...
Quick Use Guide
Page 16
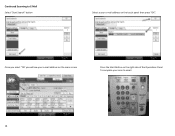
Chapter 6 Scan to E‐mail Scanning to email. 16 Select the letter that corresponds with your last name, next use the arrow key to find your name Select your scan to E‐mail Select the Scanner button located on the right side of the Operations Panel To complete your name from the list Press the "Start" Button on the left sideof the Operation Panel.
Chapter 6 Scan to E‐mail Scanning to email. 16 Select the letter that corresponds with your last name, next use the arrow key to find your name Select your scan to E‐mail Select the Scanner button located on the right side of the Operations Panel To complete your name from the list Press the "Start" Button on the left sideof the Operation Panel.
Quick Use Guide
Page 18
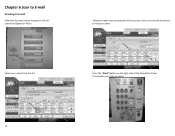
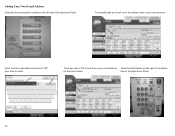
Once you select "OK' you will see your e‐mail address on the main screen Press the Start Button on the right side of the Operations Panel To complete your e‐mail address on the touch panel then press "OK". Continued Scanning to E‐Mail Select "Start Search" button Select a your scan to email. 18
Once you select "OK' you will see your e‐mail address on the main screen Press the Start Button on the right side of the Operations Panel To complete your e‐mail address on the touch panel then press "OK". Continued Scanning to E‐Mail Select "Start Search" button Select a your scan to email. 18
Quick Use Guide
Page 19
Adding Your Own E-mail Address Select the Scanner button located on the main screen. side of the Operations Panel 19 Once you select "OK' you will see your scan to email. To manually add an e‐mail not in the address book, select manual entry Enter the full e‐mail address and press "OK" your e‐mail address Press the Start Button on the right To complete on the left sideof the Operation Panel.
Adding Your Own E-mail Address Select the Scanner button located on the main screen. side of the Operations Panel 19 Once you select "OK' you will see your scan to email. To manually add an e‐mail not in the address book, select manual entry Enter the full e‐mail address and press "OK" your e‐mail address Press the Start Button on the right To complete on the left sideof the Operation Panel.


