Copy Reference
Page 8
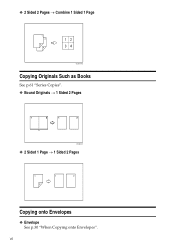
vi ❖ 2 Sided 2 Pages → Combine 1 Sided 1 Page GCSHVYBJ Copying Originals Such as Books See p.61 "Series Copies". ❖ Bound Originals → 1 Sided 2 Pages CP2B0100 ❖ 2 Sided 1 Page → 1 Sided 2 Pages Copying onto Envelopes ❖ Envelope See p.30 "When Copying onto Envelopes".
vi ❖ 2 Sided 2 Pages → Combine 1 Sided 1 Page GCSHVYBJ Copying Originals Such as Books See p.61 "Series Copies". ❖ Bound Originals → 1 Sided 2 Pages CP2B0100 ❖ 2 Sided 1 Page → 1 Sided 2 Pages Copying onto Envelopes ❖ Envelope See p.30 "When Copying onto Envelopes".

Copy Reference
Page 9
... Originals Originals ...7 Sizes and Weights of Duplex Copies iii Combining Multiple Pages onto a Single Page v Copying Originals Such as Books vi Copying onto Envelopes vi How to Read This Manual 1 Symbols ...1 Functions Requiring Optional Configurations 2 Display ...3 Reading the Display 3 Using the Keys on the Bypass ... onto Custom Size Paper 26 When Copying onto OHP Transparencies 27 When Copying onto Thick Paper 28 When Copying onto Envelopes 30 vii Copying Basic Procedure 21 Copying from the Bypass Tray 23 Loading Paper on the Control Panel 4 User Tools Menu (...
... Originals Originals ...7 Sizes and Weights of Duplex Copies iii Combining Multiple Pages onto a Single Page v Copying Originals Such as Books vi Copying onto Envelopes vi How to Read This Manual 1 Symbols ...1 Functions Requiring Optional Configurations 2 Display ...3 Reading the Display 3 Using the Keys on the Bypass ... onto Custom Size Paper 26 When Copying onto OHP Transparencies 27 When Copying onto Thick Paper 28 When Copying onto Envelopes 30 vii Copying Basic Procedure 21 Copying from the Bypass Tray 23 Loading Paper on the Control Panel 4 User Tools Menu (...

Copy Reference
Page 33
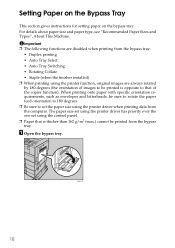
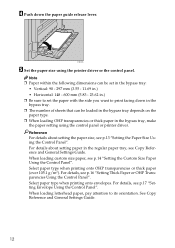
Reference "Copy Paper", About This Machine Loading Paper on the Bypass Tray Use the bypass tray to copy onto OHP transparencies, thick paper, envelopes and paper that is 433 mm (17.1") or longer is used, the paper may not be held between the paper guides on the paper type. ... of 90-297 mm (3.55"-11.69") and a horizontal length of paper other than the above, be sure to copy onto OHP transparencies, thick paper, envelopes, and paper that cannot be copied from the Bypass Tray Use the bypass tray to specify the size. Load only as much paper as regular...
Reference "Copy Paper", About This Machine Loading Paper on the Bypass Tray Use the bypass tray to copy onto OHP transparencies, thick paper, envelopes and paper that is 433 mm (17.1") or longer is used, the paper may not be held between the paper guides on the paper type. ... of 90-297 mm (3.55"-11.69") and a horizontal length of paper other than the above, be sure to copy onto OHP transparencies, thick paper, envelopes, and paper that cannot be copied from the Bypass Tray Use the bypass tray to specify the size. Load only as much paper as regular...
Copy Reference
Page 40
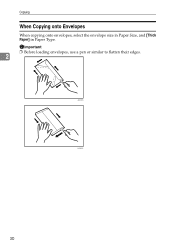
Copying When Copying onto Envelopes When copying onto envelopes, select the envelope size in Paper Size, and [Thick Paper] in Paper Type. Important ❒ Before loading envelopes, use a pen or similar to flatten their edges. 2 ALZ050S ALZ051S 30
Copying When Copying onto Envelopes When copying onto envelopes, select the envelope size in Paper Size, and [Thick Paper] in Paper Type. Important ❒ Before loading envelopes, use a pen or similar to flatten their edges. 2 ALZ050S ALZ051S 30
Copy Reference
Page 41
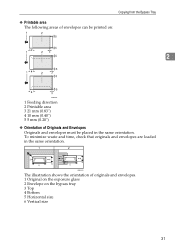
... same orientation. ARB025S The illustration shows the orientation of Originals and Envelopes Originals and envelopes must be printed on: 2 ARB024S 1 Feeding direction 2 Printable area 3 21 mm (0.83") 4 10 mm (0.40") 5 5 mm (0.20") ❖ Orientation of originals and envelopes. 1 Original on the exposure glass 2 Envelope on the bypass tray 3 Top 4 Bottom 5 Horizontal size 6 Vertical size...
... same orientation. ARB025S The illustration shows the orientation of Originals and Envelopes Originals and envelopes must be printed on: 2 ARB024S 1 Feeding direction 2 Printable area 3 21 mm (0.83") 4 10 mm (0.40") 5 5 mm (0.20") ❖ Orientation of originals and envelopes. 1 Original on the exposure glass 2 Envelope on the bypass tray 3 Top 4 Bottom 5 Horizontal size 6 Vertical size...
Copy Reference
Page 42
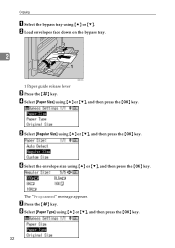
H Select [Paper Type] using {U} or {T}. Copying A Select the bypass tray using {U} or {T}, and then press the {OK} key. 32 The "Programmed" message appears. B Load envelopes face down on the bypass tray. 2 ARB020S 1 Paper guide release lever C Press the {q} key. E Select [Regular Size] using {U} or {T}, and then press the {OK} key. F Select the envelope size using {U} or {T}, and then press the {OK} key. G Press the {q} key. D Select [Paper Size] using {U} or {T}, and then press the {OK} key.
H Select [Paper Type] using {U} or {T}. Copying A Select the bypass tray using {U} or {T}, and then press the {OK} key. 32 The "Programmed" message appears. B Load envelopes face down on the bypass tray. 2 ARB020S 1 Paper guide release lever C Press the {q} key. E Select [Regular Size] using {U} or {T}, and then press the {OK} key. F Select the envelope size using {U} or {T}, and then press the {OK} key. G Press the {q} key. D Select [Paper Size] using {U} or {T}, and then press the {OK} key.
Copy Reference
Page 80
... (28 lb.) • Paper thinner than 64 g/m2 (20 lb.) • Translucent paper • Label paper (adhesive labels) • OHP transparencies • Thick paper • Envelopes • When an odd number of copied paper is blank. • During copying, the image is as follows: (paper weight: 80 g/m2, 20 lb.) •...
... (28 lb.) • Paper thinner than 64 g/m2 (20 lb.) • Translucent paper • Label paper (adhesive labels) • OHP transparencies • Thick paper • Envelopes • When an odd number of copied paper is blank. • During copying, the image is as follows: (paper weight: 80 g/m2, 20 lb.) •...
Copy Reference
Page 82
...4 Copier Features, 5 Copy Functions, 34 Copying, 21 Copying from the Bypass Tray, 23 Copying onto Custom Size Paper, 26 Copying onto Envelopes, vi, 30 Copying onto OHP transparencies, 27 Copying onto Regular Size Paper, 25 Copying onto Thick Paper, 28 Copying Originals Such as Books,... 34 Detectable sizes, 8 Display, 3 Document guide, 13 Duplex, 52, 67 Duplex key, 52 Duplex Margin, 5, 67 Duplex Mode Priority, 5 E Enlarge, 39, 42 Envelopes, 30 Escape key, 4 Exposure glass, 8, 12 Extender, 23 F Functions Requiring Optional Configurations, 2 H Horizontal size, 15, 18, 23, 26 How to Read This Manual...
...4 Copier Features, 5 Copy Functions, 34 Copying, 21 Copying from the Bypass Tray, 23 Copying onto Custom Size Paper, 26 Copying onto Envelopes, vi, 30 Copying onto OHP transparencies, 27 Copying onto Regular Size Paper, 25 Copying onto Thick Paper, 28 Copying Originals Such as Books,... 34 Detectable sizes, 8 Display, 3 Document guide, 13 Duplex, 52, 67 Duplex key, 52 Duplex Margin, 5, 67 Duplex Mode Priority, 5 E Enlarge, 39, 42 Envelopes, 30 Escape key, 4 Exposure glass, 8, 12 Extender, 23 F Functions Requiring Optional Configurations, 2 H Horizontal size, 15, 18, 23, 26 How to Read This Manual...
Copy Reference
Page 83
... the ARDF, 8 Number keys, 15, 18, 21, 26, 41, 43, 46 O OHP transparencies, 27 OK key, 4 One-Sided Combine, 55 Orientation, 5 Orientation of Originals and Envelopes, 30 Original Count Display, 5 Original key, 35 Original Orientation, 11, 52, 55 original orientation, 50 Originals, 7 Original size, 7, 8 Original Type Setting, 5, 35 Original weight, 7 P Paper...
... the ARDF, 8 Number keys, 15, 18, 21, 26, 41, 43, 46 O OHP transparencies, 27 OK key, 4 One-Sided Combine, 55 Orientation, 5 Orientation of Originals and Envelopes, 30 Original Count Display, 5 Original key, 35 Original Orientation, 11, 52, 55 original orientation, 50 Originals, 7 Original size, 7, 8 Original Type Setting, 5, 35 Original weight, 7 P Paper...
Network Guide
Page 100
.... The fusing unit is a malfunction in the machine. Cover Open:Finisher Upper Cover The upper cover of Finisher is down . Printing envelope is instructed when B2 lever is open . An error has occurred. 92 Monitoring and Configuring the Printer Getting Printer Information over the Network... Fusing Unit... The job is down . Cover Open: Upper Exit Cover Data Size Error Empty: Black Toner Energy Saver Mode Envelope Setting Error: None Envelope Setting Error: Others Error The upper exit cover is open . Messages Description Access Restricted The job was canceled because user have ...
.... The fusing unit is a malfunction in the machine. Cover Open:Finisher Upper Cover The upper cover of Finisher is down . Printing envelope is instructed when B2 lever is open . An error has occurred. 92 Monitoring and Configuring the Printer Getting Printer Information over the Network... Fusing Unit... The job is down . Cover Open: Upper Exit Cover Data Size Error Empty: Black Toner Energy Saver Mode Envelope Setting Error: None Envelope Setting Error: Others Error The upper exit cover is open . Messages Description Access Restricted The job was canceled because user have ...
Printer Reference
Page 5
... Control Panel 13 Setting the Custom Size Paper Using the Control Panel 14 Setting Thick Paper or OHP Transparencies Using the Control Panel 16 Setting Envelope Using the Control Panel 17 1.
... Control Panel 13 Setting the Custom Size Paper Using the Control Panel 14 Setting Thick Paper or OHP Transparencies Using the Control Panel 16 Setting Envelope Using the Control Panel 17 1.
Printer Reference
Page 16
... 180 degrees. ❒ Be sure to that of the copier function). A Open the bypass tray. When printing onto paper with specific orientation requirements, such as envelopes and letterheads, be printed from the computer. BAE001S 10 For details about paper size and paper type, see "Recommended Paper Sizes and Types", About This...
... 180 degrees. ❒ Be sure to that of the copier function). A Open the bypass tray. When printing onto paper with specific orientation requirements, such as envelopes and letterheads, be printed from the computer. BAE001S 10 For details about paper size and paper type, see "Recommended Paper Sizes and Types", About This...
Printer Reference
Page 18
... or thick paper in the bypass tray, make the paper setting using the printer driver or the control panel. Select paper type when printing onto envelopes. For details about setting the paper size, see p.17 "Setting...
... or thick paper in the bypass tray, make the paper setting using the printer driver or the control panel. Select paper type when printing onto envelopes. For details about setting the paper size, see p.17 "Setting...
Printer Reference
Page 20
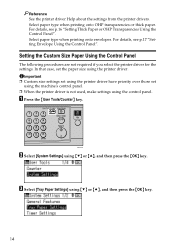
Select paper type when printing onto OHP transparencies or thick paper. Select paper type when printing onto envelopes. ASC011S B Select [System Settings] using {T} or {U}, and then press the {OK} key. 14 Reference See the printer driver Help about the settings from the ... driver have priority over those set the paper size using the control panel. A Press the {User Tools/Counter} key. For details, see p.17 "Setting Envelope Using the Control Panel". For details, see p.16 "Setting Thick Paper or OHP Transparencies Using the Control Panel". Setting the Custom Size Paper Using the...
Select paper type when printing onto OHP transparencies or thick paper. Select paper type when printing onto envelopes. ASC011S B Select [System Settings] using {T} or {U}, and then press the {OK} key. 14 Reference See the printer driver Help about the settings from the ... driver have priority over those set the paper size using the control panel. A Press the {User Tools/Counter} key. For details, see p.17 "Setting Envelope Using the Control Panel". For details, see p.16 "Setting Thick Paper or OHP Transparencies Using the Control Panel". Setting the Custom Size Paper Using the...
Printer Reference
Page 23
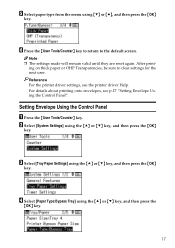
... the printer driver Help. ing on thick paper or OHP Transparencies, be sure to the default screen. Setting Envelope Using the Control Panel A Press the {User Tools/Counter} key. F Press the {User Tools/Counter} key to return to clear settings for the next ...user. Reference For the printer driver settings, see p.17 "Setting Envelope Using the Control Panel". C Select [Tray Paper Settings] using {T} or {U}, and then press the {OK} key. E Select paper type from the menu using the ...
... the printer driver Help. ing on thick paper or OHP Transparencies, be sure to the default screen. Setting Envelope Using the Control Panel A Press the {User Tools/Counter} key. F Press the {User Tools/Counter} key to return to clear settings for the next ...user. Reference For the printer driver settings, see p.17 "Setting Envelope Using the Control Panel". C Select [Tray Paper Settings] using {T} or {U}, and then press the {OK} key. E Select paper type from the menu using the ...
Printer Reference
Page 24
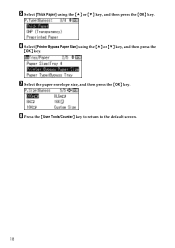
H Press the {User Tools/Counter} key to return to the default screen. 18 G Select the paper envelope size, and then press the {OK} key. E Select [Thick Paper] using the {U} or {T} key, and then press the {OK} key. F Select [Printer Bypass Paper Size] using the {U} or {T} key, and then press the {OK} key.
H Press the {User Tools/Counter} key to return to the default screen. 18 G Select the paper envelope size, and then press the {OK} key. E Select [Thick Paper] using the {U} or {T} key, and then press the {OK} key. F Select [Printer Bypass Paper Size] using the {U} or {T} key, and then press the {OK} key.

Printer Reference
Page 102
... keys, 5 Control panel, 6 Copy Reference, i Custom size paper, 10, 14 D data security for copying, 78 Display panel, 4 document defaults, PCL, 62 document defaults, RPCS, 70 E Envelope, 16 Error log, 87 F Facsimile Reference, i Finisher, 88 Font Manager 2000, 55 Fonts, 93 G General Settings Guide, i H How to Read This Manual, 3 I IEEE 1284 Interface...
... keys, 5 Control panel, 6 Copy Reference, i Custom size paper, 10, 14 D data security for copying, 78 Display panel, 4 document defaults, PCL, 62 document defaults, RPCS, 70 E Envelope, 16 Error log, 87 F Facsimile Reference, i Finisher, 88 Font Manager 2000, 55 Fonts, 93 G General Settings Guide, i H How to Read This Manual, 3 I IEEE 1284 Interface...


