
Printer Configuration
Page 1
...Ricoh Corporation Network Solutions Center Ricoh Corporation Version: 1.0 Page 1 of such companies. No such use, or the use of any trade name, or web site is intended to convey endorsement or other affiliation with regards to the completeness or accuracy of the contents and accepts no representation or warranties of their respective companies. Ricoh Printer... Configuration on CUPS Ricoh Printer Configuration on the Common UNIX Printing System NOTICE THIS DOCUMENT SHALL NOT BE ...
...Ricoh Corporation Network Solutions Center Ricoh Corporation Version: 1.0 Page 1 of such companies. No such use, or the use of any trade name, or web site is intended to convey endorsement or other affiliation with regards to the completeness or accuracy of the contents and accepts no representation or warranties of their respective companies. Ricoh Printer... Configuration on CUPS Ricoh Printer Configuration on the Common UNIX Printing System NOTICE THIS DOCUMENT SHALL NOT BE ...
Printer Configuration
Page 4
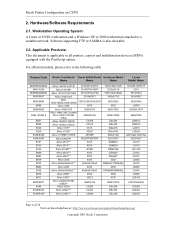
... LD238c Page 4 of 30 Visit our knowledgebase at: http://www.ricoh-usa.com/support/knowledgebase.asp Copyright 2003 Ricoh Corporation Applicable Products: This document is also desirable. 2.2. For affected models, please refer to a suitable network. Software supporting FTP or SAMBA is applicable to all printers, copiers and multifunction devices (MFPs) equipped with the PostScript...
... LD238c Page 4 of 30 Visit our knowledgebase at: http://www.ricoh-usa.com/support/knowledgebase.asp Copyright 2003 Ricoh Corporation Applicable Products: This document is also desirable. 2.2. For affected models, please refer to a suitable network. Software supporting FTP or SAMBA is applicable to all printers, copiers and multifunction devices (MFPs) equipped with the PostScript...

Printer Configuration
Page 6
....com/support/knowledgebase.asp Copyright 2003 Ricoh Corporation Who Should Read this Document? Ricoh Printer Configuration on CUPS Product Code Ricoh Corp Model Savin (USA) Model Gestetner Model Name Name Name Lanier Model Name CL7100*** * These models support PS (file format) only. All other models support up to your network. 2.4. The reader should be familiar...
....com/support/knowledgebase.asp Copyright 2003 Ricoh Corporation Who Should Read this Document? Ricoh Printer Configuration on CUPS Product Code Ricoh Corp Model Savin (USA) Model Gestetner Model Name Name Name Lanier Model Name CL7100*** * These models support PS (file format) only. All other models support up to your network. 2.4. The reader should be familiar...
Printer Configuration
Page 8
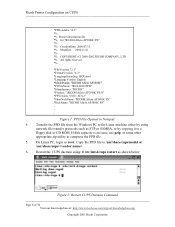
... utility to compress the PPD file. 5. Restart the CUPS daemon using network file transfer protocols such as FTP or SAMBA, or by copying it to /usr/share/cups/model or /usr/share/cups/ 6. Ricoh Printer Configuration on CUPS *PPD-Adobe: "4.3" *% *% Printer Description file *% for "RICOH Aficio AP3800C PS" *% *% CreationDate: 2000/07/12 *% Modified: 2002/11/21...
... utility to compress the PPD file. 5. Restart the CUPS daemon using network file transfer protocols such as FTP or SAMBA, or by copying it to /usr/share/cups/model or /usr/share/cups/ 6. Ricoh Printer Configuration on CUPS *PPD-Adobe: "4.3" *% *% Printer Description file *% for "RICOH Aficio AP3800C PS" *% *% CreationDate: 2000/07/12 *% Modified: 2002/11/21...
Printer Configuration
Page 10
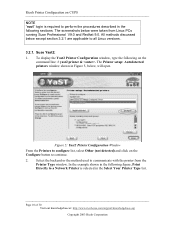
... Professional V9.0 and Redhat 9.0. The screenshots below were taken from the Printer Type window. Ricoh Printer Configuration on CUPS NOTE "root" login is required to perform the procedures described in the following figure, Print Directly to a Network Printer is selected in the Select Your Printer Type list. In the example shown in the following sections. Page...
... Professional V9.0 and Redhat 9.0. The screenshots below were taken from the Printer Type window. Ricoh Printer Configuration on CUPS NOTE "root" login is required to perform the procedures described in the following figure, Print Directly to a Network Printer is selected in the Select Your Printer Type list. In the example shown in the following sections. Page...

Printer Configuration
Page 11
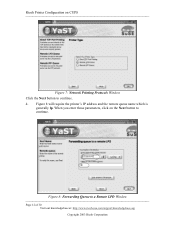
NOTE All three protocols listed in Figure 7. Two protocols, Direct TCP Port Printing and Remote LPD Queue, are generally used. Page 11 of network printing protocol from the Select Your Printer Type field in the Figure 7 should be supported by most Ricoh printers or MFDs. Select the type of 30 Visit our knowledgebase at: http://www.ricoh-usa.com/support/knowledgebase.asp Copyright 2003 Ricoh Corporation Ricoh Printer Configuration on CUPS Figure 6: Printer Type Window Click the Next button to continue 3.
NOTE All three protocols listed in Figure 7. Two protocols, Direct TCP Port Printing and Remote LPD Queue, are generally used. Page 11 of network printing protocol from the Select Your Printer Type field in the Figure 7 should be supported by most Ricoh printers or MFDs. Select the type of 30 Visit our knowledgebase at: http://www.ricoh-usa.com/support/knowledgebase.asp Copyright 2003 Ricoh Corporation Ricoh Printer Configuration on CUPS Figure 6: Printer Type Window Click the Next button to continue 3.
Printer Configuration
Page 12
Ricoh Printer Configuration on the Next button to continue. Figure 8: Forwarding Queue to continue. 4. When you enter those parameters, click on CUPS Figure 7: Network Printing Protocols Window Click the Next button to a Remote LPD Window Page 12 of 30 Visit our knowledgebase at: http://www.ricoh-usa.com/support/knowledgebase.asp Copyright 2003 Ricoh Corporation Figure 8 will require the printer's IP address and the remote queue name which is generally lp.
Ricoh Printer Configuration on the Next button to continue. Figure 8: Forwarding Queue to continue. 4. When you enter those parameters, click on CUPS Figure 7: Network Printing Protocols Window Click the Next button to a Remote LPD Window Page 12 of 30 Visit our knowledgebase at: http://www.ricoh-usa.com/support/knowledgebase.asp Copyright 2003 Ricoh Corporation Figure 8 will require the printer's IP address and the remote queue name which is generally lp.

Printer Configuration
Page 15
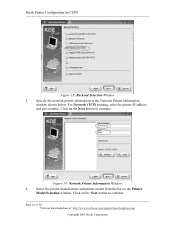
... In the example in Figure 13, Network (TCP) printing is selected. This setting will open a menu where Keyboard, Mouse and Printers are available. Page 15 of the main window and select Add Printer/Class from the pull down menu. Ricoh Printer Configuration on the Next button to continue.... 2. KDE Print Manager: 1. Click on Printers. Select the backend to continue. To ...
... In the example in Figure 13, Network (TCP) printing is selected. This setting will open a menu where Keyboard, Mouse and Printers are available. Page 15 of the main window and select Add Printer/Class from the pull down menu. Ricoh Printer Configuration on the Next button to continue.... 2. KDE Print Manager: 1. Click on Printers. Select the backend to continue. To ...
Printer Configuration
Page 16
... the Next button to continue Page 16 of 30 Visit our knowledgebase at: http://www.ricoh-usa.com/support/knowledgebase.asp Copyright 2003 Ricoh Corporation Click on the Next button to continue. For Network (TCP) printing, enter the printer IP address and port number. Figure 14: Network Printer Information Window 4. Ricoh Printer Configuration on the Printer Model Selection window.
... the Next button to continue Page 16 of 30 Visit our knowledgebase at: http://www.ricoh-usa.com/support/knowledgebase.asp Copyright 2003 Ricoh Corporation Click on the Next button to continue. For Network (TCP) printing, enter the printer IP address and port number. Figure 14: Network Printer Information Window 4. Ricoh Printer Configuration on the Printer Model Selection window.
Setup Guide
Page 7
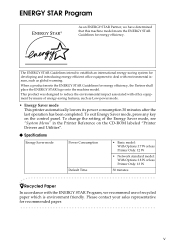
...paper. The ENERGY STAR Guidelines intend to deal with environmental issues, such as Low-power mode. • Energy Saver mode This printer automatically lowers its power consumption 30 minutes after the last operation has been completed. To exit Energy Saver mode, press any key... on the CD-ROM labeled "Printer Drivers and Utilities". ❖ Specifications Energy Saver mode Power Consumption Default Time • Basic model: With Options: 17 W or less Printer Only: 12 W • Network standard model: With Options: 18 W or less Printer Only: 13 W 30 minutes -Recycled Paper...
...paper. The ENERGY STAR Guidelines intend to deal with environmental issues, such as Low-power mode. • Energy Saver mode This printer automatically lowers its power consumption 30 minutes after the last operation has been completed. To exit Energy Saver mode, press any key... on the CD-ROM labeled "Printer Drivers and Utilities". ❖ Specifications Energy Saver mode Power Consumption Default Time • Basic model: With Options: 17 W or less Printer Only: 12 W • Network standard model: With Options: 18 W or less Printer Only: 13 W 30 minutes -Recycled Paper...
Setup Guide
Page 8
... visit our Web site or consult your authorized reseller. This manual is provided on the CD-ROM labeled "Operating Instructions". ❖ Network Printing Guide Provides information about using the printer in a network environment. This manual is provided on the CD-ROM labeled "Operating Instructions". vi To enhance safe and efficient operation of this...
... visit our Web site or consult your authorized reseller. This manual is provided on the CD-ROM labeled "Operating Instructions". ❖ Network Printing Guide Provides information about using the printer in a network environment. This manual is provided on the CD-ROM labeled "Operating Instructions". vi To enhance safe and efficient operation of this...

Setup Guide
Page 10
... Board Type 2610 21 Installing the Network Interface Board 21 Connecting the Network Interface Cable to the Network 24 1394 Interface Unit Type 4510 25 Installing the 1394 Interface Unit 25 Connecting the 1394 Interface Cable to This Printer 6 Mainframe ...6 Control Panel 9 2. TABLE OF CONTENTS 1. Configuring the Printer for This Printer 2 Software and Utilities Included on...
... Board Type 2610 21 Installing the Network Interface Board 21 Connecting the Network Interface Cable to the Network 24 1394 Interface Unit Type 4510 25 Installing the 1394 Interface Unit 25 Connecting the 1394 Interface Cable to This Printer 6 Mainframe ...6 Control Panel 9 2. TABLE OF CONTENTS 1. Configuring the Printer for This Printer 2 Software and Utilities Included on...

Setup Guide
Page 13
...; Time Saving Superior features save time on your desk or desk side. ❖ Network Connectivity • Basic model This is a printer with a standard USB port and parallel port. • Network standard model This is designed especially for office workgroups, both for shared usage within... a network environment, and for one-to-one usage by being connected directly to place it on print tasks. • Continuous Printing Speed : 26 ppm. Getting Started Features of This Printer This printer is a printer with a standard Ethernet port, USB port...
...; Time Saving Superior features save time on your desk or desk side. ❖ Network Connectivity • Basic model This is a printer with a standard USB port and parallel port. • Network standard model This is designed especially for office workgroups, both for shared usage within... a network environment, and for one-to-one usage by being connected directly to place it on print tasks. • Continuous Printing Speed : 26 ppm. Getting Started Features of This Printer This printer is a printer with a standard Ethernet port, USB port...
Setup Guide
Page 16
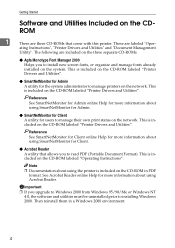
... See SmartNetMonitor for Admin online Help for more information about using SmartNetMonitor for users to manage their own print status on the network. Note ❒ Documentation about using SmartNetMonitor for Admin. ❖ SmartNetMonitor for Client A utility for Client. ❖ Acrobat Reader A ...Windows 2000 from Windows 95/98/Me or Windows NT 4.0, the software and utilities must be uninstalled prior to manage printers on the network. These are included on the CD-ROM in a Windows 2000 environment. 4 This is included on the CD-ROM labeled "Operating...
... See SmartNetMonitor for Admin online Help for more information about using SmartNetMonitor for users to manage their own print status on the network. Note ❒ Documentation about using SmartNetMonitor for Admin. ❖ SmartNetMonitor for Client A utility for Client. ❖ Acrobat Reader A ...Windows 2000 from Windows 95/98/Me or Windows NT 4.0, the software and utilities must be uninstalled prior to manage printers on the network. These are included on the CD-ROM in a Windows 2000 environment. 4 This is included on the CD-ROM labeled "Operating...
Setup Guide
Page 19
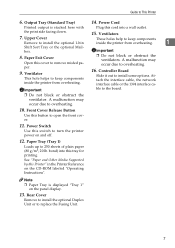
... this tray for printing. See "Paper and Other Media Supported by this button to turn the printer power on and off. 12. Ventilators 7. Attach the interface cable, the network interface cable or the 1394 interface ca- Upper Cover Remove to install the optional 1-bin These ...holes help to keep components inside the printer from overheating. 1 Shift Sort Tray or the optional Mailbox. 8. Output Tray ...
... this tray for printing. See "Paper and Other Media Supported by this button to turn the printer power on and off. 12. Ventilators 7. Attach the interface cable, the network interface cable or the 1394 interface ca- Upper Cover Remove to install the optional 1-bin These ...holes help to keep components inside the printer from overheating. 1 Shift Sort Tray or the optional Mailbox. 8. Output Tray ...
Setup Guide
Page 23
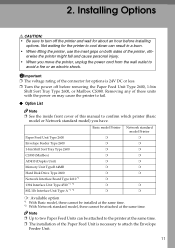
... AD410 (Duplex Unit) Memory Unit TypeB 64MB Hard Disk Drive Type 2600 Network Interface Board Type 2610 *1 1394 Interface Unit Type 4510 *1 *2 802.11b Interface Unit Type A *1 *2 Basic model Printer Network standard model Printer ❍ ❍ ❍ : Available option *1 With Basic model, ...these cannot be installed at the same time. *2 With Network standard model, these units with the power on both sides of the...
... AD410 (Duplex Unit) Memory Unit TypeB 64MB Hard Disk Drive Type 2600 Network Interface Board Type 2610 *1 1394 Interface Unit Type 4510 *1 *2 802.11b Interface Unit Type A *1 *2 Basic model Printer Network standard model Printer ❍ ❍ ❍ : Available option *1 With Basic model, ...these cannot be installed at the same time. *2 With Network standard model, these units with the power on both sides of the...

Setup Guide
Page 25
...; The 1-bin Shift Sort Tray and the Mailbox cannot be installed in the printer at the same time. 2 ❖ Basic model Printer : Interior Note ❒ See the inside front cover of paper. Note ❒ The Network Interface Board , the 1394 Interface Unit, and the 802.11b Interface Unit cannot...Unit) 5. CS380 (Mailbox) You can sort the printings and also de- 4. 1-bin Shift Sort Tray Type 2600 liver them to confirm which printer (Basic model or Network standard model) you have. 1 2 3 4 5 1. You can print on the IEEE 1394 environment. You can perform the print job on the...
...; The 1-bin Shift Sort Tray and the Mailbox cannot be installed in the printer at the same time. 2 ❖ Basic model Printer : Interior Note ❒ See the inside front cover of paper. Note ❒ The Network Interface Board , the 1394 Interface Unit, and the 802.11b Interface Unit cannot...Unit) 5. CS380 (Mailbox) You can sort the printings and also de- 4. 1-bin Shift Sort Tray Type 2600 liver them to confirm which printer (Basic model or Network standard model) you have. 1 2 3 4 5 1. You can print on the IEEE 1394 environment. You can perform the print job on the...
Setup Guide
Page 26
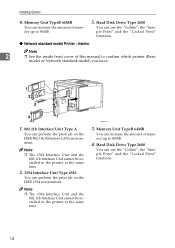
... amount of memory up to 96MB. 4. Note ❒ The 1394 Interface Unit and the 802.11b Interface Unit cannot be installed in the printer at the same time. 2. 1394 Interface Unit Type 4510 You can use the "Collate", the "Sample Print" and the "Locked Print" ...You can use the "Collate", the "Sample Print" and the "Locked Print" functions. ❖ Network standard model Printer : Interior Note 2 ❒ See the inside front cover of memory up to confirm which printer (Basic model or Network standard model) you have. 1 2 3 4 1. 802.11b Interface Unit Type A You can increase...
... amount of memory up to 96MB. 4. Note ❒ The 1394 Interface Unit and the 802.11b Interface Unit cannot be installed in the printer at the same time. 2. 1394 Interface Unit Type 4510 You can use the "Collate", the "Sample Print" and the "Locked Print" ...You can use the "Collate", the "Sample Print" and the "Locked Print" functions. ❖ Network standard model Printer : Interior Note 2 ❒ See the inside front cover of memory up to confirm which printer (Basic model or Network standard model) you have. 1 2 3 4 1. 802.11b Interface Unit Type A You can increase...

Setup Guide
Page 33
...power switch is turned off. Important ❒ Before touching the Network Interface Board, touch something metal to remove the two screws. ZGDX281J • The interface cable is unplugged from the printer. Network Interface Board Type 2610 Network Interface Board Type 2610 Note C If the Duplex Unit is ...attached, ❒ Depending on the model you use , push down the lever on right side the Network Interface Board , the (A) and pull...
...power switch is turned off. Important ❒ Before touching the Network Interface Board, touch something metal to remove the two screws. ZGDX281J • The interface cable is unplugged from the printer. Network Interface Board Type 2610 Network Interface Board Type 2610 Note C If the Duplex Unit is ...attached, ❒ Depending on the model you use , push down the lever on right side the Network Interface Board , the (A) and pull...
Setup Guide
Page 34
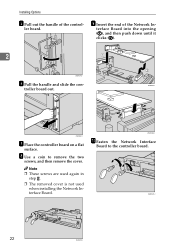
ler board. H Use a coin to the controller board. troller board out. ZGDX432J J Fasten the Network Interface Board to remove the two screws, and then remove the cover. ZGDX422J ZGDX261J G Place the controller board on a flat surface. terface Board into the ... I Insert the end of the control- Note ❒ These screws are used again in step J. ❒ The removed cover is not used when installing the Network Interface Board. Installing Options E Pull out the handle of the...
ler board. H Use a coin to the controller board. troller board out. ZGDX432J J Fasten the Network Interface Board to remove the two screws, and then remove the cover. ZGDX422J ZGDX261J G Place the controller board on a flat surface. terface Board into the ... I Insert the end of the control- Note ❒ These screws are used again in step J. ❒ The removed cover is not used when installing the Network Interface Board. Installing Options E Pull out the handle of the...


