
Printer Configuration
Page 6
...operating systems unless the preferred method of file transfer is required for printing. ** These models support RedHat 9.x, Enterprise, IBM AIX 5L V5.2, and HP-UX11i. Who Should Read this Document? The reader should be familiar with Post Script capability connected to perform the command line instructions. Ricoh Printer... Configuration on CUPS Product Code Ricoh Corp Model Savin (USA) Model Gestetner Model Name Name Name Lanier Model Name CL7100*** ...
...operating systems unless the preferred method of file transfer is required for printing. ** These models support RedHat 9.x, Enterprise, IBM AIX 5L V5.2, and HP-UX11i. Who Should Read this Document? The reader should be familiar with Post Script capability connected to perform the command line instructions. Ricoh Printer... Configuration on CUPS Product Code Ricoh Corp Model Savin (USA) Model Gestetner Model Name Name Name Lanier Model Name CL7100*** ...
Setup Guide
Page 8
... its options. Note ❒ There are three CD-ROMs that come with this manual) Provides information about setting up and using the printer and its options. "Operating Instructions", "Printer Drivers and Utilities", and "Document Management Utility". ❒ Concerning UNIX information, please visit our Web site or consult your authorized reseller. This manual is provided...
... its options. Note ❒ There are three CD-ROMs that come with this manual) Provides information about setting up and using the printer and its options. "Operating Instructions", "Printer Drivers and Utilities", and "Document Management Utility". ❒ Concerning UNIX information, please visit our Web site or consult your authorized reseller. This manual is provided...
Setup Guide
Page 14
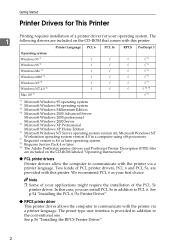
..., PCL 6 and PCL 5e, are included on the CD-ROM labeled "Operating Instructions". ❖ PCL printer drivers Printer drivers allow the computer to the conventional one. In this printer. See p.54 "Installing the PCL 6/5e Printer Driver" ❖ RPCS printer driver This printer driver allows the computer to PCL 6. The 1 following drivers are provided with this case, you...
..., PCL 6 and PCL 5e, are included on the CD-ROM labeled "Operating Instructions". ❖ PCL printer drivers Printer drivers allow the computer to the conventional one. In this printer. See p.54 "Installing the PCL 6/5e Printer Driver" ❖ RPCS printer driver This printer driver allows the computer to PCL 6. The 1 following drivers are provided with this case, you...
Setup Guide
Page 16
... status on the network. This is included on the CD-ROM labeled "Operating Instructions". Important ❒ If you upgrade to Windows 2000 from Windows 95/98/Me or Windows NT 4.0, the software and utilities must be uninstalled prior to manage printers on the network. Getting Started Software and Utilities Included on the CDROM...
... status on the network. This is included on the CD-ROM labeled "Operating Instructions". Important ❒ If you upgrade to Windows 2000 from Windows 95/98/Me or Windows NT 4.0, the software and utilities must be uninstalled prior to manage printers on the network. Getting Started Software and Utilities Included on the CDROM...
Setup Guide
Page 18
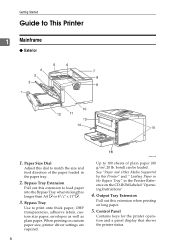
... " Loading Paper in the Bypass Tray" in the paper tray. 2. Control Panel Contains keys for the printer operation and a panel display that shows the printer status. 6 When printing on the CD-ROM labeled "Operating Instructions". 4. See "Paper and Other Media Supported by this extension when printing on long paper. 5. Bypass Tray Extension Pull out this...
... " Loading Paper in the Bypass Tray" in the paper tray. 2. Control Panel Contains keys for the printer operation and a panel display that shows the printer status. 6 When printing on the CD-ROM labeled "Operating Instructions". 4. See "Paper and Other Media Supported by this extension when printing on long paper. 5. Bypass Tray Extension Pull out this...
Setup Guide
Page 19
... 20 lb. A malfunction may occur due to turn the printer power on the panel display. 13. Power Switch Use this Printer" in the Printer Reference on the CD-ROM labeled "Operating Instructions". Paper Tray (Tray 1) Loads up to This Printer 6. See "Paper and Other Media Supported by this switch ...printing. Power Cord Printed output is displayed "Tray 1" on and off. 12. A malfunction may occur due to keep components inside the printer from overheating. 1 Shift Sort Tray or the optional Mailbox. 8. Upper Cover Remove to install the optional 1-bin These holes help to ...
... 20 lb. A malfunction may occur due to turn the printer power on the panel display. 13. Power Switch Use this Printer" in the Printer Reference on the CD-ROM labeled "Operating Instructions". Paper Tray (Tray 1) Loads up to This Printer 6. See "Paper and Other Media Supported by this switch ...printing. Power Cord Printed output is displayed "Tray 1" on and off. 12. A malfunction may occur due to keep components inside the printer from overheating. 1 Shift Sort Tray or the optional Mailbox. 8. Upper Cover Remove to install the optional 1-bin These holes help to ...

Setup Guide
Page 20
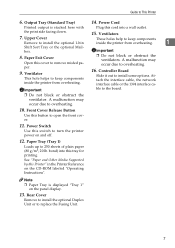
... this cover when accessing the inside of the printer. 3. Guide Board Open this unit. 8 See "Cleaning the Registration Roller" in the Printer Reference on the panel display, replace this board to remove misfed paper. 4. When "Replace Maintenance Kit" appears on the CD-ROM labeled "Operating Instructions". Getting Started ❖ Interior 1 [Front side] [Back side...
... this cover when accessing the inside of the printer. 3. Guide Board Open this unit. 8 See "Cleaning the Registration Roller" in the Printer Reference on the panel display, replace this board to remove misfed paper. 4. When "Replace Maintenance Kit" appears on the CD-ROM labeled "Operating Instructions". Getting Started ❖ Interior 1 [Front side] [Back side...

Setup Guide
Page 21
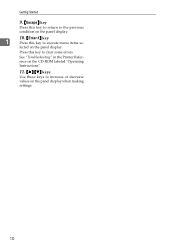
... does not work if the printer is data to cancel any printer error occurs. Is on the CD-ROM labeled "Operating Instructions". 4. See "Canceling a Print job" in the Printer Reference on the CD-ROM labeled "Operating Instructions". See "Making Printer Settings with the Control Panel" in the Printer Reference on the CD-ROM labeled "Operating Instructions". Blinks or lights up whenever...
... does not work if the printer is data to cancel any printer error occurs. Is on the CD-ROM labeled "Operating Instructions". 4. See "Canceling a Print job" in the Printer Reference on the CD-ROM labeled "Operating Instructions". See "Making Printer Settings with the Control Panel" in the Printer Reference on the CD-ROM labeled "Operating Instructions". Blinks or lights up whenever...
Setup Guide
Page 22
See "Troubleshooting" in the Printer Reference on the CD-ROM labeled "Operating Instructions". 11. {U} {T} keys Use these keys to increase or decrease values on the panel display. Press this key to execute menu items se- Getting Started 9. {Escape} key Press this key to return to the previous condition on the panel display. 10. {Enter #} key 1 Press this key to clear some errors. lected on the panel display when making settings. 10
See "Troubleshooting" in the Printer Reference on the CD-ROM labeled "Operating Instructions". 11. {U} {T} keys Use these keys to increase or decrease values on the panel display. Press this key to execute menu items se- Getting Started 9. {Escape} key Press this key to return to the previous condition on the panel display. 10. {Enter #} key 1 Press this key to clear some errors. lected on the panel display when making settings. 10
Setup Guide
Page 28
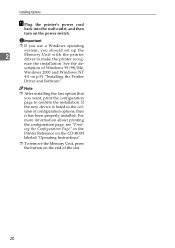
...into the wall outlet, and then turn on the CD-ROM labeled "Operating Instructions". umn of the Trays" in the col- ing the Configuration Page" in the Printer Reference on the CD-ROM labeled "Operating Instructions". Note ❒ After installing the last option that you want, ...print the configuration 2 page to confirm the installation. If the printing position is listed in the Printer Reference. 16 If the ...
...into the wall outlet, and then turn on the CD-ROM labeled "Operating Instructions". umn of the Trays" in the col- ing the Configuration Page" in the Printer Reference on the CD-ROM labeled "Operating Instructions". Note ❒ After installing the last option that you want, ...print the configuration 2 page to confirm the installation. If the printing position is listed in the Printer Reference. 16 If the ...

Setup Guide
Page 29
...must be used in the top-most optional Paper Feed Unit (Tray 3). Then slide it stops. Having more than one paper the printer until it into the printer. sition could cause the machine to fall down. ZDDP330E 17 used in the top-most option- 2 al Paper Feed Unit is a... Envelope Feeder, place the feeder Important into ❒ Do not slide more than one paper tray filled with paper in the Printer Reference on the CD-ROM labeled "Operating Instructions". the bottom-most optional Paper Feed Unit (Tray 2). tray out at the same time. After that slides into ❒ ...
...must be used in the top-most optional Paper Feed Unit (Tray 3). Then slide it stops. Having more than one paper the printer until it into the printer. sition could cause the machine to fall down. ZDDP330E 17 used in the top-most option- 2 al Paper Feed Unit is a... Envelope Feeder, place the feeder Important into ❒ Do not slide more than one paper tray filled with paper in the Printer Reference on the CD-ROM labeled "Operating Instructions". the bottom-most optional Paper Feed Unit (Tray 2). tray out at the same time. After that slides into ❒ ...
Setup Guide
Page 32
... cord back into the wall outlet, and then turn on p.51 "Installing the Printer Driver and Software". For more information about printing the configuration page, see "Printing the Configuration Page" in the column of the slot. 20 See the... to confirm the installation. Important ❒ If you use a Windows operating system, you want, print the configuration page to make the printer recog- nize the installation. If the new device is listed in the Printer Reference on the CD-ROM labeled "Operating Instructions". ❒ To remove the Memory Unit, press the button on the end...
... cord back into the wall outlet, and then turn on p.51 "Installing the Printer Driver and Software". For more information about printing the configuration page, see "Printing the Configuration Page" in the column of the slot. 20 See the... to confirm the installation. Important ❒ If you use a Windows operating system, you want, print the configuration page to make the printer recog- nize the installation. If the new device is listed in the Printer Reference on the CD-ROM labeled "Operating Instructions". ❒ To remove the Memory Unit, press the button on the end...
Setup Guide
Page 36
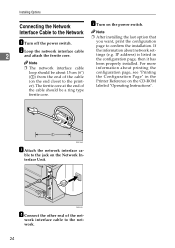
...) is listed in the (on the power switch. For more ❒ The network interface cable information about printing the loop should be about network settings (e.g. Printer Reference on the Network Interface Unit. ble to the jack on the CD-ROM er). Interface Cable to confirm the installation. B Loop the network interface... the end of the net- Installing Options Connecting the Network E Turn on the end closet to the print- ZGDX291J D Connect the other end of labeled "Operating Instructions".
...) is listed in the (on the power switch. For more ❒ The network interface cable information about printing the loop should be about network settings (e.g. Printer Reference on the Network Interface Unit. ble to the jack on the CD-ROM er). Interface Cable to confirm the installation. B Loop the network interface... the end of the net- Installing Options Connecting the Network E Turn on the end closet to the print- ZGDX291J D Connect the other end of labeled "Operating Instructions".
Setup Guide
Page 40
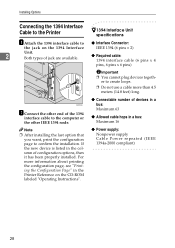
...to create loops. ❒ Do not use a cable more information about printing the configuration page, see "Printing the Configuration Page" in the Printer Reference on the 1394 Interface IEEE 1394 (6 pins × 2) Unit. 2 Both types of jack are available. ❖ Required cable:... togeth- Installing Options Connecting the 1394 Interface Cable to the Printer -1394 Interface Unit specifications A Attach the 1394 interface cable to ❖ Interface Connector: the jack on the CD-ROM labeled "Operating Instructions". ❖ Connectable number of devices in a bus: Maximum...
...to create loops. ❒ Do not use a cable more information about printing the configuration page, see "Printing the Configuration Page" in the Printer Reference on the 1394 Interface IEEE 1394 (6 pins × 2) Unit. 2 Both types of jack are available. ❖ Required cable:... togeth- Installing Options Connecting the 1394 Interface Cable to the Printer -1394 Interface Unit specifications A Attach the 1394 interface cable to ❖ Interface Connector: the jack on the CD-ROM labeled "Operating Instructions". ❖ Connectable number of devices in a bus: Maximum...
Setup Guide
Page 45
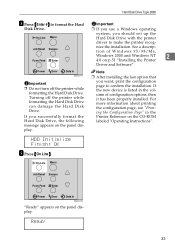
...Press {Enter #} to format the Hard Important Disk Drive. ❒ If you use a Windows operating system, you should set up the On Line Menu Hard Disk Drive with the printer driver to confirm the installation. Job Reset Escape nize the installation. On Line Menu Job Reset ...If you want, print the configuration page to make the printer recog- Note ❒ After installing the last option that you successfully format the Hard Disk Drive, the following message appears on the CD-ROM labeled "Operating Instructions". Power Error Data In Important ❒ Do not turn ...
...Press {Enter #} to format the Hard Important Disk Drive. ❒ If you use a Windows operating system, you should set up the On Line Menu Hard Disk Drive with the printer driver to confirm the installation. Job Reset Escape nize the installation. On Line Menu Job Reset ...If you want, print the configuration page to make the printer recog- Note ❒ After installing the last option that you successfully format the Hard Disk Drive, the following message appears on the CD-ROM labeled "Operating Instructions". Power Error Data In Important ❒ Do not turn ...

Setup Guide
Page 47
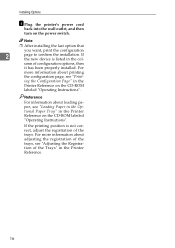
H Plug the printer's power cord back into the wall outlet, and then turn on the CD-ROM labeled "Operating Instructions". ❒ If the printing position is listed in the column of configuration options, then it has been properly installed. For more information about...For more information about adjusting the registration of the trays, see "Printing the Configuration Page" in the Printer Reference. Note ❒ After installing the last option that you want, print the configuration page to the printer. If the new device is not correct, adjust the registration of the Trays" in the...
H Plug the printer's power cord back into the wall outlet, and then turn on the CD-ROM labeled "Operating Instructions". ❒ If the printing position is listed in the column of configuration options, then it has been properly installed. For more information about...For more information about adjusting the registration of the trays, see "Printing the Configuration Page" in the Printer Reference. Note ❒ After installing the last option that you want, print the configuration page to the printer. If the new device is not correct, adjust the registration of the Trays" in the...

Setup Guide
Page 49
...been properly installed. F Slide the upper tray into the wall outlet, and then turn on the CD-ROM labeled "Operating Instructions". 1-bin Shift Sort Tray Type 2600 2 37 H Plug the printer's power cord back into the 1-bin Shift Sort Tray. Note ❒ After installing the last option that you want..., print the configuration page to the printer. If the new device is listed in the Printer Reference on the power switch. ZGDX180J G Attach...
...been properly installed. F Slide the upper tray into the wall outlet, and then turn on the CD-ROM labeled "Operating Instructions". 1-bin Shift Sort Tray Type 2600 2 37 H Plug the printer's power cord back into the 1-bin Shift Sort Tray. Note ❒ After installing the last option that you want..., print the configuration page to the printer. If the new device is listed in the Printer Reference on the power switch. ZGDX180J G Attach...
Setup Guide
Page 51
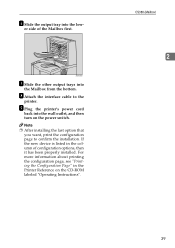
... cord back into the low- If the new device is listed in the Printer Reference on the power switch. CS380 (Mailbox) 2 39 For more information about printing the configuration page, see "Printing the Configuration Page" in the column of ... first. H Attach the interface cable to confirm the installation. F Slide the output tray into the wall outlet, and then turn on the CD-ROM labeled "Operating Instructions". ZGDX200J G Slide the other output trays into the Mailbox from the bottom. er side of configuration options, then it has been properly installed. Note ❒...
... cord back into the low- If the new device is listed in the Printer Reference on the power switch. CS380 (Mailbox) 2 39 For more information about printing the configuration page, see "Printing the Configuration Page" in the column of ... first. H Attach the interface cable to confirm the installation. F Slide the output tray into the wall outlet, and then turn on the CD-ROM labeled "Operating Instructions". ZGDX200J G Slide the other output trays into the Mailbox from the bottom. er side of configuration options, then it has been properly installed. Note ❒...
Setup Guide
Page 53
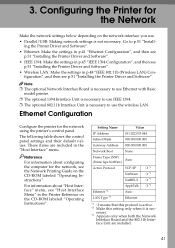
..." in p.45 "IEEE 1394 Configuration", and then see the Network Printing Guide on the CD-ROM labeled "Operating Instructions". Reference For information about "Host Interface" menu, see p.51 "Installing the Printer Driver and Software". ing the Printer Driver and Software". • Ethernet: Make the settings in p.41 "Ethernet Configuration", and then see p.51 "Installing...
..." in p.45 "IEEE 1394 Configuration", and then see the Network Printing Guide on the CD-ROM labeled "Operating Instructions". Reference For information about "Host Interface" menu, see p.51 "Installing the Printer Driver and Software". ing the Printer Driver and Software". • Ethernet: Make the settings in p.41 "Ethernet Configuration", and then see p.51 "Installing...
Setup Guide
Page 77
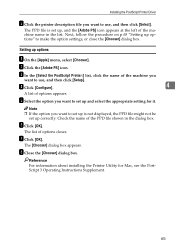
..., click the name of options closes. Check the name of options appears. G Click [OK]. Installing the PostScript Printer Driver E Click the printer description file you want to use , and then click [Select]. E Select the option you want to set up options" to set ...is not displayed, the PPD file might not be set up correctly. Setting up and select the appropriate setting for Mac, see the PostScript 3 Operating Instructions Supplement. 65 Note ❒ If the option you want to make the option settings, or close the [Chooser] dialog box. Reference For ...
..., click the name of options closes. Check the name of options appears. G Click [OK]. Installing the PostScript Printer Driver E Click the printer description file you want to use , and then click [Select]. E Select the option you want to set up options" to set ...is not displayed, the PPD file might not be set up correctly. Setting up and select the appropriate setting for Mac, see the PostScript 3 Operating Instructions Supplement. 65 Note ❒ If the option you want to make the option settings, or close the [Chooser] dialog box. Reference For ...
