Printer Configuration
Page 14
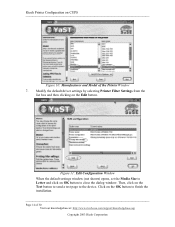
... default settings window (not shown) opens, set the Media Size to Letter and click on the OK button to finish the installation Page 14 of the Printer Window 7. Click on OK button to the device. Modify the default driver settings by selecting Printer Filter Settings from the list box and then clicking on the Test button to send a test page to close the dialog window. Then, click on the Edit button. Ricoh Printer Configuration on CUPS Figure 10: Manufacturer and Model...
... default settings window (not shown) opens, set the Media Size to Letter and click on the OK button to finish the installation Page 14 of the Printer Window 7. Click on OK button to the device. Modify the default driver settings by selecting Printer Filter Settings from the list box and then clicking on the Test button to send a test page to close the dialog window. Then, click on the Edit button. Ricoh Printer Configuration on CUPS Figure 10: Manufacturer and Model...
Setup Guide
Page 8
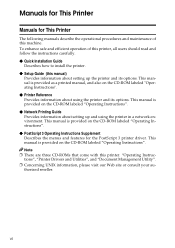
... the CD-ROM labeled "Operating Instructions". ❖ PostScript 3 Operating Instructions Supplement Describes the menus and features for This Printer The following manuals describe the operational procedures and maintenance of this printer, all users should read and follow the instructions carefully. ❖ Quick Installation Guide Describes how to install the printer. ❖ Setup Guide (this manual) Provides information about setting up and using the printer and its options. "Operating Instructions", "Printer Drivers and Utilities...
... the CD-ROM labeled "Operating Instructions". ❖ PostScript 3 Operating Instructions Supplement Describes the menus and features for This Printer The following manuals describe the operational procedures and maintenance of this printer, all users should read and follow the instructions carefully. ❖ Quick Installation Guide Describes how to install the printer. ❖ Setup Guide (this manual) Provides information about setting up and using the printer and its options. "Operating Instructions", "Printer Drivers and Utilities...

Setup Guide
Page 11
... Installing the RPCS Printer Driver 56 Installing the RPCS Printer Driver 56 Setting Up Options 57 Installing the PostScript Printer Driver 58 Windows 95/98/Me - Installing the PostScript Printer Driver 58 Windows 2000/Windows XP - Installing the Printer Driver Using USB 66 Windows 2000/Windows XP-Installing the Printer Driver Using USB .......... 67 Macintosh-Creating a Desktop Printer icon 67 Installing the Printer Driver Using IEEE 1394 68 Printing with SCSI Print 68 Printing with IP over 1394 71 Installing the SmartNetMonitor for Client/Admin 73 Installing the Agfa Monotype Font...
... Installing the RPCS Printer Driver 56 Installing the RPCS Printer Driver 56 Setting Up Options 57 Installing the PostScript Printer Driver 58 Windows 95/98/Me - Installing the PostScript Printer Driver 58 Windows 2000/Windows XP - Installing the Printer Driver Using USB 66 Windows 2000/Windows XP-Installing the Printer Driver Using USB .......... 67 Macintosh-Creating a Desktop Printer icon 67 Installing the Printer Driver Using IEEE 1394 68 Printing with SCSI Print 68 Printing with IP over 1394 71 Installing the SmartNetMonitor for Client/Admin 73 Installing the Agfa Monotype Font...

Setup Guide
Page 13
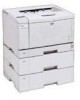
... replace the toner cartridge, check indicators, and clear a paper misfeed if it occurs. ❖ Compact Body Its compact body requires minimum space to the computer. ❖ Time Saving Superior features save time on your desk or desk side. ❖ Network Connectivity • Basic model This is a printer with a standard USB port and parallel port. • Network standard model This is a printer with a standard Ethernet port, USB port, and parallel port. ❖ Major Specifications Printing Speed Maximum Print Quality Printer Language Maximum Input Paper Size Standard Memory Size...
... replace the toner cartridge, check indicators, and clear a paper misfeed if it occurs. ❖ Compact Body Its compact body requires minimum space to the computer. ❖ Time Saving Superior features save time on your desk or desk side. ❖ Network Connectivity • Basic model This is a printer with a standard USB port and parallel port. • Network standard model This is a printer with a standard Ethernet port, USB port, and parallel port. ❖ Major Specifications Printing Speed Maximum Print Quality Printer Language Maximum Input Paper Size Standard Memory Size...

Setup Guide
Page 21
... Printer Reference on - Panel display 5. {On Line} key Shows the current status of the error also appears on the CD-ROM labeled "Operating Instructions". tween online and offline. See "Error & Status Messages on the Control Note ❒ This does not work if the printer is data to This Printer 1 On Line Menu Job Reset Escape Form Feed Enter Power Error Data In On Line Menu Job Reset Escape Form Feed Enter ZDDS100N 1. line. 8. {Menu} key Panel" in Energy Saver mode. 3. See "Error & Status Messages on the Control Panel" in the Printer...
... Printer Reference on - Panel display 5. {On Line} key Shows the current status of the error also appears on the CD-ROM labeled "Operating Instructions". tween online and offline. See "Error & Status Messages on the Control Note ❒ This does not work if the printer is data to This Printer 1 On Line Menu Job Reset Escape Form Feed Enter Power Error Data In On Line Menu Job Reset Escape Form Feed Enter ZDDS100N 1. line. 8. {Menu} key Panel" in Energy Saver mode. 3. See "Error & Status Messages on the Control Panel" in the Printer...
Setup Guide
Page 32
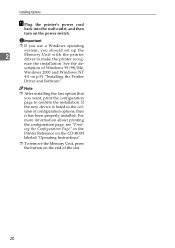
Installing Options N Plug the printer's power cord back into the wall outlet, and then turn on p.51 "Installing the Printer Driver and Software". nize the installation. See the de- If the new device is listed in the Printer Reference on the CD-ROM labeled "Operating Instructions". ❒ To remove the Memory Unit, press the button on the end of the slot. 20 For more information about printing the configuration page, see "Printing the Configuration Page" in the...
Installing Options N Plug the printer's power cord back into the wall outlet, and then turn on p.51 "Installing the Printer Driver and Software". nize the installation. See the de- If the new device is listed in the Printer Reference on the CD-ROM labeled "Operating Instructions". ❒ To remove the Memory Unit, press the button on the end of the slot. 20 For more information about printing the configuration page, see "Printing the Configuration Page" in the...

Setup Guide
Page 33
... time. Static electricity can damage the Network Interface Board. ❒ Use the shielded twisted-pair (STP) network interface cable. ZGDX281J • The interface cable is turned off. tached, go to step D. 21 Network Interface Board Type 2610 Network Interface Board Type 2610 Note C If the Duplex Unit is attached, ❒ Depending on right side the Network Interface Board , the (A) and pull out the Duplex Unit 1394 Interface Unit, and the until it stops (B). 802.11b Interface Unit cannot be 2 installed...
... time. Static electricity can damage the Network Interface Board. ❒ Use the shielded twisted-pair (STP) network interface cable. ZGDX281J • The interface cable is turned off. tached, go to step D. 21 Network Interface Board Type 2610 Network Interface Board Type 2610 Note C If the Duplex Unit is attached, ❒ Depending on right side the Network Interface Board , the (A) and pull out the Duplex Unit 1394 Interface Unit, and the until it stops (B). 802.11b Interface Unit cannot be 2 installed...

Setup Guide
Page 37
... the model you take out the controller board with cables plugged in, the 1394 Interface Unit might be damaged. ❒ Use the 1394 interface cable that the followings are true: • The power switch is turned off. • The interface cable is attached, push down the lever on right side (A) and pull out the Duplex Unit until it stops (B). For more information, see p.11 "Installing Options". Installing the 1394 Interface Unit A Check the...
... the model you take out the controller board with cables plugged in, the 1394 Interface Unit might be damaged. ❒ Use the 1394 interface cable that the followings are true: • The power switch is turned off. • The interface cable is attached, push down the lever on right side (A) and pull out the Duplex Unit until it stops (B). For more information, see p.11 "Installing Options". Installing the 1394 Interface Unit A Check the...
Setup Guide
Page 45
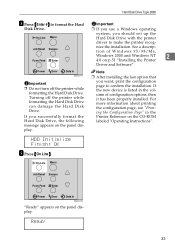
... Disk Drive. ❒ If you use a Windows operating system, you successfully format the Hard Disk Drive, the following message appears on the panel display. HDD Initialize Finish: OK I Press {On Line}. Turning off the printer while formatting the Hard Disk Drive. If the new device is listed in the Printer Reference on the CD-ROM labeled "Operating Instructions". On Line Menu Job Reset Escape Form Feed Enter Power Error Data In "Ready" appears on p.51 "Installing the Printer Driver and Software". Job Reset Escape nize the installation. Power Error Data...
... Disk Drive. ❒ If you use a Windows operating system, you successfully format the Hard Disk Drive, the following message appears on the panel display. HDD Initialize Finish: OK I Press {On Line}. Turning off the printer while formatting the Hard Disk Drive. If the new device is listed in the Printer Reference on the CD-ROM labeled "Operating Instructions". On Line Menu Job Reset Escape Form Feed Enter Power Error Data In "Ready" appears on p.51 "Installing the Printer Driver and Software". Job Reset Escape nize the installation. Power Error Data...
Setup Guide
Page 53
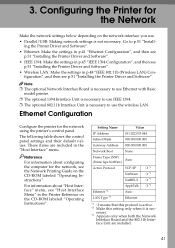
...-ROM labeled "Operating Instructions". Note ❒ The optional Network Interface Board is necessary to use Ethernet with Basic model printer. ❒ The optional 1394 Interface Unit is necessary to use IEEE 1394. ❒ The optional 802.11b Interface Unit is necessary to p.51 "Install- Reference For information about "Host Interface" menu, see p.51 "Installing the Printer Driver and Software". • Wireless LAN: Make the settings in the "Host Interface" menu. Configuring the Printer for the network, see p.51 "Installing the Printer Driver and Software...
...-ROM labeled "Operating Instructions". Note ❒ The optional Network Interface Board is necessary to use Ethernet with Basic model printer. ❒ The optional 1394 Interface Unit is necessary to use IEEE 1394. ❒ The optional 802.11b Interface Unit is necessary to p.51 "Install- Reference For information about "Host Interface" menu, see p.51 "Installing the Printer Driver and Software". • Wireless LAN: Make the settings in the "Host Interface" menu. Configuring the Printer for the network, see p.51 "Installing the Printer Driver and Software...
Setup Guide
Page 56
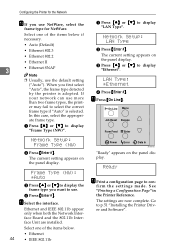
... frame type if "Auto" is adopted. Ready M Print a configuration page to display "Ethernet". The settings are installed. Configuring the Printer for NetWare. When you use the default setting ("Auto"). The current setting appears on the panel display. Ethernet and IEEE 802.11b appear only when both the Network Interface Board and the 802.11b Interface Unit are now complete. Network Setup: LAN Type B Press {Enter #}. C Press {U} or {T} to con- On Line Menu Job Reset Escape Form Feed Enter Power Error Data In...
... frame type if "Auto" is adopted. Ready M Print a configuration page to display "Ethernet". The settings are installed. Configuring the Printer for NetWare. When you use the default setting ("Auto"). The current setting appears on the panel display. Ethernet and IEEE 802.11b appear only when both the Network Interface Board and the 802.11b Interface Unit are now complete. Network Setup: LAN Type B Press {Enter #}. C Press {U} or {T} to con- On Line Menu Job Reset Escape Form Feed Enter Power Error Data In...
Setup Guide
Page 64
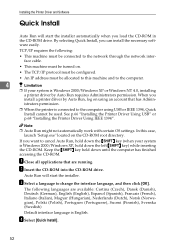
... you can install the necessary software easily. Auto Run will start the installer. Note ❒ Auto Run might not automatically work with certain OS settings. A Close all applications that has Admin- C Select a language to the computer. 4 Limitation ❒ If your system is English. See p.66 "Installing the Printer Driver Using USB" or p.68 "Installing the Printer Driver Using IEEE 1394". B Insert the CD-ROM into the CD-ROM drive.
... you can install the necessary software easily. Auto Run will start the installer. Note ❒ Auto Run might not automatically work with certain OS settings. A Close all applications that has Admin- C Select a language to the computer. 4 Limitation ❒ If your system is English. See p.66 "Installing the Printer Driver Using USB" or p.68 "Installing the Printer Driver Using IEEE 1394". B Insert the CD-ROM into the CD-ROM drive.
Setup Guide
Page 74
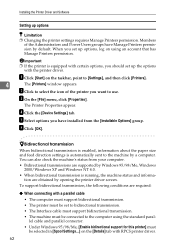
...; When connecting with a parallel cable • The computer must support bidirectional transmission. • The printer must be set to bidirectional transmission. • The Interface cable must support bidirectional transmission. • The machine must be connected to use. C On the [File] menu, click [Properties]. D Click the [Device Settings] tab. You can also check the machine's status from the [Installable Options] group. When you should set up options, log on using the standard paral...
...; When connecting with a parallel cable • The computer must support bidirectional transmission. • The printer must be set to bidirectional transmission. • The Interface cable must support bidirectional transmission. • The machine must be connected to use. C On the [File] menu, click [Properties]. D Click the [Device Settings] tab. You can also check the machine's status from the [Installable Options] group. When you should set up options, log on using the standard paral...
Setup Guide
Page 76
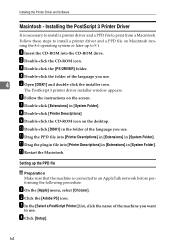
... [DISK1] in [System Folder]. Setting up to use . 4 E Open [DISK1] and double-click the installer icon. F Follow the instructions on the desktop. M Restart the Macintosh. A On the [Apple] menu, select [Chooser]. B Click the [Adobe PS] icon. Installing the Printer Driver and Software Macintosh - D Double-click the folder of the machine you use . H Double-click [Printer Descriptions]. C In the [Select a PostScript Printer:] list, click the name of the...
... [DISK1] in [System Folder]. Setting up to use . 4 E Open [DISK1] and double-click the installer icon. F Follow the instructions on the desktop. M Restart the Macintosh. A On the [Apple] menu, select [Chooser]. B Click the [Adobe PS] icon. Installing the Printer Driver and Software Macintosh - D Double-click the folder of the machine you use . H Double-click [Printer Descriptions]. C In the [Select a PostScript Printer:] list, click the name of the...
Setup Guide
Page 78
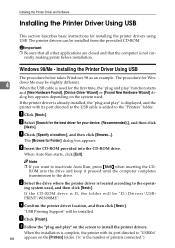
... installing the printer drivers using USB. Note ❒ If you want to inactivate Auto Run, press {Shift} when inserting the CDROM into the CD-ROM drive. alog box appears depending on the [Printers] folder. ("n" is not cur- "USB Printing Support" will be slightly different. Installing the Printer Driver and Software Installing the Printer Driver Using USB This section describes basic instructions for Folder] dialog box appears. Installing the Printer Driver Using USB The procedure below takes Windows...
... installing the printer drivers using USB. Note ❒ If you want to inactivate Auto Run, press {Shift} when inserting the CDROM into the CD-ROM drive. alog box appears depending on the [Printers] folder. ("n" is not cur- "USB Printing Support" will be slightly different. Installing the Printer Driver and Software Installing the Printer Driver Using USB This section describes basic instructions for Folder] dialog box appears. Installing the Printer Driver Using USB The procedure below takes Windows...
Setup Guide
Page 79
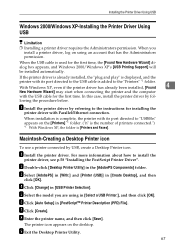
... first time, the [Found New Hardware Wizard] dialog box appears, and Windows 2000/Windows XP's [USB Printing Support] will be installed automatically. Macintosh-Creating a Desktop Printer icon To use a printer connected by USB, create a Desktop Printer icon. The printer icon appears on the [Printers] *1 folder. ("n" is the number of printers connected.") *1 With Windows XP, the folder is used for installing the printer driver with Parallel/Ethernet connection. B Double-click [Desktop Printer Utility] in [PostScriptTM Printer Description (PPD) File]. F Click [Auto Setup...
... first time, the [Found New Hardware Wizard] dialog box appears, and Windows 2000/Windows XP's [USB Printing Support] will be installed automatically. Macintosh-Creating a Desktop Printer icon To use a printer connected by USB, create a Desktop Printer icon. The printer icon appears on the [Printers] *1 folder. ("n" is the number of printers connected.") *1 With Windows XP, the folder is used for installing the printer driver with Parallel/Ethernet connection. B Double-click [Desktop Printer Utility] in [PostScriptTM Printer Description (PPD) File]. F Click [Auto Setup...
Setup Guide
Page 80
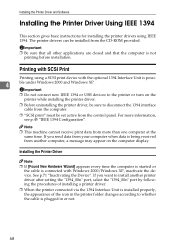
... are closed and that the computer is being received from the CD-ROM provided. If you send data from the control panel. Installing the Printer Driver and Software Installing the Printer Driver Using IEEE 1394 This section gives basic instructions for installing the printer drivers using a SCSI print device with the optional 1394 Interface Unit is connected with SCSI Print Printing using IEEE 1394. The printer drivers can be set active from your computer when data is not printing before installation.
... are closed and that the computer is being received from the CD-ROM provided. If you send data from the control panel. Installing the Printer Driver and Software Installing the Printer Driver Using IEEE 1394 This section gives basic instructions for installing the printer drivers using a SCSI print device with the optional 1394 Interface Unit is connected with SCSI Print Printing using IEEE 1394. The printer drivers can be set active from your computer when data is not printing before installation.
Setup Guide
Page 81
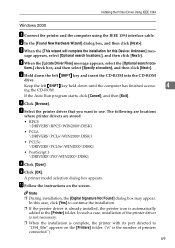
.... tions.] check box, and then select [Specify a location], and then click [Next>]. D When the [Locate Driver Files] message appears, select the [Optional search loca- F Click [Browse]. If the Auto Run program starts, click [Cancel], and then [Exit]. G Select the printer driver that you want to "1394_00n" appears on the screen. J Follow the instructions on the [Printers] folder. ("n" is the number of the printer driver is not...
.... tions.] check box, and then select [Specify a location], and then click [Next>]. D When the [Locate Driver Files] message appears, select the [Optional search loca- F Click [Browse]. If the Auto Run program starts, click [Cancel], and then [Exit]. G Select the printer driver that you want to "1394_00n" appears on the screen. J Follow the instructions on the [Printers] folder. ("n" is the number of the printer driver is not...
Setup Guide
Page 83
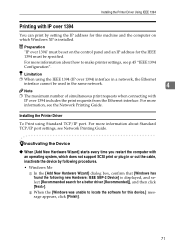
...; The maximum number of simultaneous print requests when connecting with IP over 1394) interface in or out the cable, inactivate the device by setting the IP address for this device.] message appears, click [Finish]. 71 Limitation ❒ When using Standard TCP/IP port. Installing the Printer Driver To Print using the IEEE 1394 (IP over 1394 You can print by following procedures. • Windows Me A In the [Add New Hardware Wizard] dialog...
...; The maximum number of simultaneous print requests when connecting with IP over 1394) interface in or out the cable, inactivate the device by setting the IP address for this device.] message appears, click [Finish]. 71 Limitation ❒ When using Standard TCP/IP port. Installing the Printer Driver To Print using the IEEE 1394 (IP over 1394 You can print by following procedures. • Windows Me A In the [Add New Hardware Wizard] dialog...
Setup Guide
Page 91
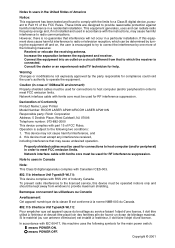
... generates, uses and can be used for connections to host computer (and/or peripheral) in order to meet FCC emission limits. Warning Changes or modifications not expressly approved by one more of Industry Canada. Declaration of Conformity Product Name: Laser Printer Model Number: RICOH LASER AP2610/RICOH LASER AP2610N Responsible party: Ricoh Corporation Address: 5 Dedrick Place, West Caldwell, NJ 07006 Telephone number: 973-882-2000 This device complies...
... generates, uses and can be used for connections to host computer (and/or peripheral) in order to meet FCC emission limits. Warning Changes or modifications not expressly approved by one more of Industry Canada. Declaration of Conformity Product Name: Laser Printer Model Number: RICOH LASER AP2610/RICOH LASER AP2610N Responsible party: Ricoh Corporation Address: 5 Dedrick Place, West Caldwell, NJ 07006 Telephone number: 973-882-2000 This device complies...


