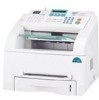
Operating Instructions
Page 2
... comes with the References: This Operating Instructions provides information you need for setting up your machine as a result of the detailed instructions for maintaining and troubleshooting the machine. It also provides all of handling or operating the machine. In no event will the company be liable for direct, indirect, incidental or...
... comes with the References: This Operating Instructions provides information you need for setting up your machine as a result of the detailed instructions for maintaining and troubleshooting the machine. It also provides all of handling or operating the machine. In no event will the company be liable for direct, indirect, incidental or...
Operating Instructions
Page 14
... Maintaining the Toner Cartridge 7.6 Redistributing Toner 7.7 Replacing the Toner Cartridge 7.8 Setting the Notify Toner Option 7.9 Cleaning the Drum 7.9 Ignoring the Toner Empty Message 7.10 Chapter 8: TROUBLESHOOTING Clearing Document Jams 8.2 Clearing Paper Jams 8.3 In Tray 1 8.3 In Tray 2 8.4 In the Paper Exit Area 8.5 In the Fuser Area or Around the Toner Cartridge . ...Clearing LCD Error Messages 8.8 Solving Problems 8.11 Paper Feeding Problems 8.11 Printing Problems 8.12 Printing Quality Problems 8.14 Copying Problems 8.19 Scanning Problems 8.20 Faxing Problems 8.21 xiii
... Maintaining the Toner Cartridge 7.6 Redistributing Toner 7.7 Replacing the Toner Cartridge 7.8 Setting the Notify Toner Option 7.9 Cleaning the Drum 7.9 Ignoring the Toner Empty Message 7.10 Chapter 8: TROUBLESHOOTING Clearing Document Jams 8.2 Clearing Paper Jams 8.3 In Tray 1 8.3 In Tray 2 8.4 In the Paper Exit Area 8.5 In the Fuser Area or Around the Toner Cartridge . ...Clearing LCD Error Messages 8.8 Solving Problems 8.11 Paper Feeding Problems 8.11 Printing Problems 8.12 Printing Quality Problems 8.14 Copying Problems 8.19 Scanning Problems 8.20 Faxing Problems 8.21 xiii
Operating Instructions
Page 144
This chapter includes: • Clearing Document Jams • Clearing Paper Jams • Clearing LCD Error Messages • Solving Problems 8 TROUBLESHOOTING This chapter gives helpful information for what to do if you encounter an error.
This chapter includes: • Clearing Document Jams • Clearing Paper Jams • Clearing LCD Error Messages • Solving Problems 8 TROUBLESHOOTING This chapter gives helpful information for what to do if you encounter an error.
Operating Instructions
Page 145
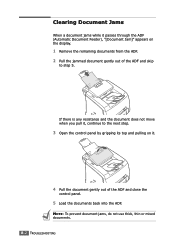
NOTE: To prevent document jams, do not use thick, thin or mixed documents. 8.2 TROUBLESHOOTING Clearing Document Jams When a document jams while it passes through the ADF (Automatic Document Feeder), "[Document Jam]" appears on it , continue to step 5. If there ...
NOTE: To prevent document jams, do not use thick, thin or mixed documents. 8.2 TROUBLESHOOTING Clearing Document Jams When a document jams while it passes through the ADF (Automatic Document Feeder), "[Document Jam]" appears on it , continue to step 5. If there ...
Operating Instructions
Page 146
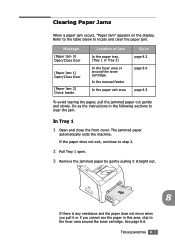
.... Clearing Paper Jams When a paper jam occurs, "Paper Jam" appears on the display. Do as the instructions in this area, skip to clear the jam. TROUBLESHOOTING 8.3
.... Clearing Paper Jams When a paper jam occurs, "Paper Jam" appears on the display. Do as the instructions in this area, skip to clear the jam. TROUBLESHOOTING 8.3
Operating Instructions
Page 147
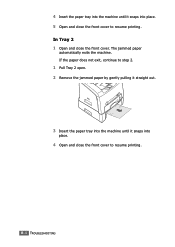
4 Insert the paper tray into the machine until it snaps into place. 4 Open and close the front cover to resume printing. 8.4 TROUBLESHOOTING In Tray 2 1 Open and close the front cover to step 2. 1 Pull Tray 2 open. 2 Remove the jammed paper by gently pulling it straight out. 3 Insert the paper tray into the machine until it snaps into place. 5 Open and close the front cover. If the paper does not exit, continue to resume printing. The jammed paper automatically exits the machine.
4 Insert the paper tray into the machine until it snaps into place. 4 Open and close the front cover to resume printing. 8.4 TROUBLESHOOTING In Tray 2 1 Open and close the front cover to step 2. 1 Pull Tray 2 open. 2 Remove the jammed paper by gently pulling it straight out. 3 Insert the paper tray into the machine until it snaps into place. 5 Open and close the front cover. If the paper does not exit, continue to resume printing. The jammed paper automatically exits the machine.

Operating Instructions
Page 148
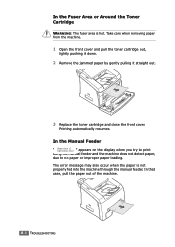
If there is any resistance and the paper does not move when you pull it or if you cannot see the paper in the front output tray, continue to step 3. 3 Open the rear cover. 4 Remove the jammed paper by gently pulling it straight out. 5 Close the rear cover. 6 Open and close the front cover. If the paper does not exit, continue to step 6. In the Paper Exit Area 1 Open and close the front cover to resume printing. 8 TROUBLESHOOTING 8.5 The jammed paper automatically exits the machine. Skip to step 2. 2 Gently pull the paper out of the front output tray.
If there is any resistance and the paper does not move when you pull it or if you cannot see the paper in the front output tray, continue to step 3. 3 Open the rear cover. 4 Remove the jammed paper by gently pulling it straight out. 5 Close the rear cover. 6 Open and close the front cover. If the paper does not exit, continue to step 6. In the Paper Exit Area 1 Open and close the front cover to resume printing. 8 TROUBLESHOOTING 8.5 The jammed paper automatically exits the machine. Skip to step 2. 2 Gently pull the paper out of the front output tray.
Operating Instructions
Page 149
... close the front cover. The error message may also occur when the paper is hot. In that case, pull the paper out of the machine. 8.6 TROUBLESHOOTING In the Manual Feeder " " appears on the display when you try to print using the manual feeder and the machine does not detect paper, due...
... close the front cover. The error message may also occur when the paper is hot. In that case, pull the paper out of the machine. 8.6 TROUBLESHOOTING In the Manual Feeder " " appears on the display when you try to print using the manual feeder and the machine does not detect paper, due...

Operating Instructions
Page 150
Ensure that the paper is below . - See page 5.3. 8 TROUBLESHOOTING 8.7 Set the page orientation to Landscape in page 8.3. • Follow the procedures on the A5sized paper: - Load the paper into the tray as shown below ...
Ensure that the paper is below . - See page 5.3. 8 TROUBLESHOOTING 8.7 Set the page orientation to Landscape in page 8.3. • Follow the procedures on the A5sized paper: - Load the paper into the tray as shown below ...
Operating Instructions
Page 151
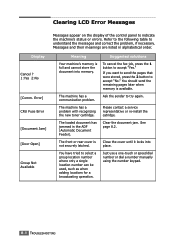
...remaining pages later when memory is not securely latched. The machine has a problem with recognizing the new toner cartridge. Suggested solutions To cancel the fax job, press the 1 button to accept "No." If you want to send the pages that were stored, press the 2 button to ...when adding locations for a broadcasting operation. Just use a one-touch or speed dial number or dial a number manually using the number keypad. 8.8 TROUBLESHOOTING Error] CRU Fuse Error [Document Jam] [Door Open] Group Not Available Meaning Your machine's memory is full and cannot store the document into place...
...remaining pages later when memory is not securely latched. The machine has a problem with recognizing the new toner cartridge. Suggested solutions To cancel the fax job, press the 1 button to accept "No." If you want to send the pages that were stored, press the 2 button to ...when adding locations for a broadcasting operation. Just use a one-touch or speed dial number or dial a number manually using the number keypad. 8.8 TROUBLESHOOTING Error] CRU Fuse Error [Document Jam] [Door Open] Group Not Available Meaning Your machine's memory is full and cannot store the document into place...
Operating Instructions
Page 152
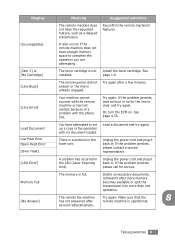
... and try again. If the problem persists, please call for the line to set up a copy or fax operation with the phone line. TROUBLESHOOTING 8.9 several redial attempts. See page 4.35. Delete unnecessary documents, retransmit after a few minutes. [Line ...Error] Your machine cannot connect with the remote machine or has lost contact because of a problem with no document loaded. Memory Full [No Answer] The memory is a problem in the LSU (Laser...
... and try again. If the problem persists, please call for the line to set up a copy or fax operation with the phone line. TROUBLESHOOTING 8.9 several redial attempts. See page 4.35. Delete unnecessary documents, retransmit after a few minutes. [Line ...Error] Your machine cannot connect with the remote machine or has lost contact because of a problem with no document loaded. Memory Full [No Answer] The memory is a problem in the LSU (Laser...
Operating Instructions
Page 153
...cancel the redial operation. [Stop Pressed] The Clear/Stop button is almost empty. See page 8.5. You can temporarily reestablish printing operations. 8.10 TROUBLESHOOTING Replace with a new toner cartridge. Display No. Not Assigned [No Paper] Add Paper Operation Not Assigned [Paper Jam 0] Open/Close Door...Cancel operation, but there are in the paper tray. See page 7.8. [Toner Low] The toner cartridge is pressed during a copy or fax operation. The paper tray has run out. See page 8.3. You are no number assigned to redial a previously busy station. See page ...
...cancel the redial operation. [Stop Pressed] The Clear/Stop button is almost empty. See page 8.5. You can temporarily reestablish printing operations. 8.10 TROUBLESHOOTING Replace with a new toner cartridge. Display No. Not Assigned [No Paper] Add Paper Operation Not Assigned [Paper Jam 0] Open/Close Door...Cancel operation, but there are in the paper tray. See page 7.8. [Toner Low] The toner cartridge is pressed during a copy or fax operation. The paper tray has run out. See page 8.3. You are no number assigned to redial a previously busy station. See page ...

Operating Instructions
Page 154
... of only one type, size and weight. • If multiple sheets have caused a paper jam, clear the paper jam. See page 8.3. TROUBLESHOOTING 8.11 Remove paper from the tray and reload it exits from the tray. • The paper is jammed during printing. See "Paper Specifications"... on page 9.9. Remove excess paper from inside the machine. If the problem persists, please call for a laser printer. Open the front cover and remove the debris. 8 Transparencies stick together in the paper exit. Clear the paper jam. Solving Problems ...
... of only one type, size and weight. • If multiple sheets have caused a paper jam, clear the paper jam. See page 8.3. TROUBLESHOOTING 8.11 Remove paper from the tray and reload it exits from the tray. • The paper is jammed during printing. See "Paper Specifications"... on page 9.9. Remove excess paper from inside the machine. If the problem persists, please call for a laser printer. Open the front cover and remove the debris. 8 Transparencies stick together in the paper exit. Clear the paper jam. Solving Problems ...

Operating Instructions
Page 155
... printer cable and reconnect it . • Close the cover. • Clear the paper jam. The paper source selection in your service representative. See page 5.8. 8.12 TROUBLESHOOTING The machine selects print materials from the wrong paper source. Possible cause Suggested solutions The machine is found under the Paper tab within the printer...
... printer cable and reconnect it . • Close the cover. • Clear the paper jam. The paper source selection in your service representative. See page 5.8. 8.12 TROUBLESHOOTING The machine selects print materials from the wrong paper source. Possible cause Suggested solutions The machine is found under the Paper tab within the printer...
Operating Instructions
Page 156
..., click the Details tab, and then choose the Spool Settings button. Half the page is malfunctioning. Software application is loose or defective. Redistribute the toner. TROUBLESHOOTING 8.13 The printer cable is malfunctioning. Contact a service representative. If possible, attach the cable and the machine to ensure that you are blank. The toner...
..., click the Details tab, and then choose the Spool Settings button. Half the page is malfunctioning. Software application is loose or defective. Redistribute the toner. TROUBLESHOOTING 8.13 The printer cable is malfunctioning. Contact a service representative. If possible, attach the cable and the machine to ensure that you are blank. The toner...

Operating Instructions
Page 157
...; If the entire page is light, the print resolution setting is too low or Toner Save mode is set to Standby Mode. See page 7.5. 8.14 TROUBLESHOOTING An error occurs repeatedly when you are printing with the USB connection. To do so, follow these steps: 1. If this does not improve the print...
...; If the entire page is light, the print resolution setting is too low or Toner Save mode is set to Standby Mode. See page 7.5. 8.14 TROUBLESHOOTING An error occurs repeatedly when you are printing with the USB connection. To do so, follow these steps: 1. If this does not improve the print...
Operating Instructions
Page 158
... • The paper may be defective. Clean the inside the toner cartridge has probably been scratched. See page 7.4. • Check the paper type and quality. TROUBLESHOOTING 8.15
... • The paper may be defective. Clean the inside the toner cartridge has probably been scratched. See page 7.4. • Check the paper type and quality. TROUBLESHOOTING 8.15
Operating Instructions
Page 159
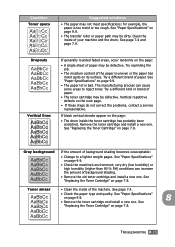
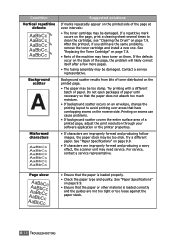
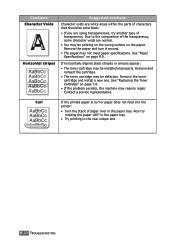
... print resolution through your software application or the printer properties. • If characters are not too tight or too loose against the paper stack. 8.16 TROUBLESHOOTING Condition Vertical repetitive defects AaBbCc AaBbCc AaBbCc AaBbCc AaBbCc Background scatter A Misformed characters Suggested solutions If marks repeatedly appear on the printed side of the...
... print resolution through your software application or the printer properties. • If characters are not too tight or too loose against the paper stack. 8.16 TROUBLESHOOTING Condition Vertical repetitive defects AaBbCc AaBbCc AaBbCc AaBbCc AaBbCc Background scatter A Misformed characters Suggested solutions If marks repeatedly appear on the printed side of the...
Operating Instructions
Page 160
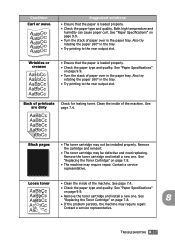
... Toner Cartridge" on page 9.9. • Turn the stack of printouts Check for leaking toner. Also try rotating the paper 180° in the paper tray. TROUBLESHOOTING 8.17 Back of paper over in the tray. • Try printing to the rear output slot. Remove the cartridge and reinsert. • The toner cartridge...
... Toner Cartridge" on page 9.9. • Turn the stack of printouts Check for leaking toner. Also try rotating the paper 180° in the paper tray. TROUBLESHOOTING 8.17 Back of paper over in the tray. • Try printing to the rear output slot. Remove the cartridge and reinsert. • The toner cartridge...
Operating Instructions
Page 161
... machine may be installed improperly. Also try another type of paper over in the paper tray. • Try printing to the rear output slot. 8.18 TROUBLESHOOTING Remove the paper and turn it around. • The paper may be defective. Contact a service representative. See "Paper Specifications" on page 9.9. Remove and reinsert the...
... machine may be installed improperly. Also try another type of paper over in the paper tray. • Try printing to the rear output slot. 8.18 TROUBLESHOOTING Remove the paper and turn it around. • The paper may be defective. Contact a service representative. See "Paper Specifications" on page 9.9. Remove and reinsert the...


