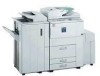

Operating Instructions
Page 1
Operating Instructions Copy Reference Placing Originals Copying Connect Copy Troubleshooting User Tools (Copier/Document Server Features) Specifications Read this manual carefully before using the machine. For safe and correct use, please be sure to read the Safety Information in the "General Settings Guide" before you use this product and keep it handy for future reference.
Operating Instructions Copy Reference Placing Originals Copying Connect Copy Troubleshooting User Tools (Copier/Document Server Features) Specifications Read this manual carefully before using the machine. For safe and correct use, please be sure to read the Safety Information in the "General Settings Guide" before you use this product and keep it handy for future reference.
Operating Instructions
Page 2
...toner from the supplier. Introduction This manual describes detailed instructions on the operation and notes about power source, see P.3 "Machine Types".) • Type 1: 4051/DSm651/LD151/Aficio 2051 • Type 2: 4060/DSm660/LD160/Aficio 2060 • Type 3: 4075/DSm675/LD175/Aficio 2075 Certain types might not be ..., 60Hz, 16A or more Please be responsible for any damage or expense that you use of your machine before reading this manual might be slightly different from the supplier with your office products. For details, please contact your local dealer. Two kinds of...
...toner from the supplier. Introduction This manual describes detailed instructions on the operation and notes about power source, see P.3 "Machine Types".) • Type 1: 4051/DSm651/LD151/Aficio 2051 • Type 2: 4060/DSm660/LD160/Aficio 2060 • Type 3: 4075/DSm675/LD175/Aficio 2075 Certain types might not be ..., 60Hz, 16A or more Please be responsible for any damage or expense that you use of your machine before reading this manual might be slightly different from the supplier with your office products. For details, please contact your local dealer. Two kinds of...
Operating Instructions
Page 3
...administrators of this machine. Also refer to protect data from being tampered, or prevent the machine from those of the manual. CD-ROM1) Provides information about configuring and operating the printer in a network environment or using software. It describes ...as Tray Paper Settings), Document Server functions, and troubleshooting. ❖ Security Reference This manual is for the machine's scanner function. Manuals for This Machine The following manuals describe the operational procedures of this machine. Images, illustrations, functions, and supported operating systems...
...administrators of this machine. Also refer to protect data from being tampered, or prevent the machine from those of the manual. CD-ROM1) Provides information about configuring and operating the printer in a network environment or using software. It describes ...as Tray Paper Settings), Document Server functions, and troubleshooting. ❖ Security Reference This manual is for the machine's scanner function. Manuals for This Machine The following manuals describe the operational procedures of this machine. Images, illustrations, functions, and supported operating systems...
Operating Instructions
Page 4
... DeskTopBinder Lite is installed. This guide is added to the [Start] menu when DeskTopBinder Lite is installed. • Auto Document Link Guide (PDF file - ❖ Manuals for DeskTopBinder Lite in detail. CD-ROM2) Describes operations and functions of its functions. ii This guide can be displayed from the [Setup] display when...
... DeskTopBinder Lite is installed. This guide is added to the [Start] menu when DeskTopBinder Lite is installed. • Auto Document Link Guide (PDF file - ❖ Manuals for DeskTopBinder Lite in detail. CD-ROM2) Describes operations and functions of its functions. ii This guide can be displayed from the [Setup] display when...
Operating Instructions
Page 8
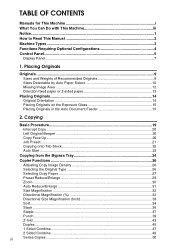
... This Machine i What You Can Do with This Machine iii Notice ...1 How to Read This Manual 2 Machine Types ...3 Functions Requiring Optional Configurations 4 Control Panel...5 Display Panel ...7 1. Placing Originals Originals ...9 Sizes and Weights of Recommended Originals 9 Sizes Detectable by Auto Paper Select ...
... This Machine i What You Can Do with This Machine iii Notice ...1 How to Read This Manual 2 Machine Types ...3 Functions Requiring Optional Configurations 4 Control Panel...5 Display Panel ...7 1. Placing Originals Originals ...9 Sizes and Weights of Recommended Originals 9 Sizes Detectable by Auto Paper Select ...

Operating Instructions
Page 12
... included in the Safety Information section in death or serious injury if you misuse the machine without following user error. How to Read This Manual Symbols This manual uses the following symbols: R WARNING: This symbol indicates a potentially hazardous situation that does not involve personal injury when you misuse the machine by not...
... included in the Safety Information section in death or serious injury if you misuse the machine without following user error. How to Read This Manual Symbols This manual uses the following symbols: R WARNING: This symbol indicates a potentially hazardous situation that does not involve personal injury when you misuse the machine by not...

Operating Instructions
Page 13
Copy speed Type 1 51 copies/minute (A4K, 81/2" × 11"K) Type 2 60 copies/minute (A4K, 81/2" × 11"K) Type 3 75 copies/minute (A4K, 81/2" × 11"K) 3 Machine Types This machine comes in three models which model you have, see the inside front cover of this manual. To confirm which vary by copy speed.
Copy speed Type 1 51 copies/minute (A4K, 81/2" × 11"K) Type 2 60 copies/minute (A4K, 81/2" × 11"K) Type 3 75 copies/minute (A4K, 81/2" × 11"K) 3 Machine Types This machine comes in three models which model you have, see the inside front cover of this manual. To confirm which vary by copy speed.
Operating Instructions
Page 22
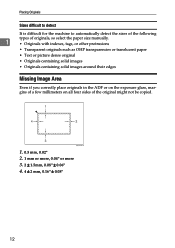
... difficult to detect It is difficult for the machine to automatically detect the sizes of the following types of originals, so select the paper size manually. 1 • Originals with indexes, tags, or other protrusions • Transparent originals such as OHP transparencies or translucent paper • Text or picture dense original •...
... difficult to detect It is difficult for the machine to automatically detect the sizes of the following types of originals, so select the paper size manually. 1 • Originals with indexes, tags, or other protrusions • Transparent originals such as OHP transparencies or translucent paper • Text or picture dense original •...

Operating Instructions
Page 36
...: ❖ Text When originals contain only text (no pictures). ❖ Photo When you want to adjust image density. Combined auto and manual image density A Make sure [Auto Image Density] is selected. B Press [Lighter] or [Darker] to reproduce the delicate tones of photographs... and pictures. 26 Selecting the Original Type Select one of the original in nine increments. ❖ Combined auto and manual image density Use when copying originals with dirty backgrounds (such as newspapers). Copying Copier Functions Adjusting Copy Image Density B Press [Lighter...
...: ❖ Text When originals contain only text (no pictures). ❖ Photo When you want to adjust image density. Combined auto and manual image density A Make sure [Auto Image Density] is selected. B Press [Lighter] or [Darker] to reproduce the delicate tones of photographs... and pictures. 26 Selecting the Original Type Select one of the original in nine increments. ❖ Combined auto and manual image density Use when copying originals with dirty backgrounds (such as newspapers). Copying Copier Functions Adjusting Copy Image Density B Press [Lighter...

Operating Instructions
Page 37
... Copy Paper There are copied with Auto Paper Select (when copying at a ratio of copy paper automatically based on original size and reproduction ratio. ❖ Manual Paper Select Choose the paper you want to select copy paper: ❖ Auto Paper Select The machine selects a suitable size of 100%). ❖ Metric version...
... Copy Paper There are copied with Auto Paper Select (when copying at a ratio of copy paper automatically based on original size and reproduction ratio. ❖ Manual Paper Select Choose the paper you want to select copy paper: ❖ Auto Paper Select The machine selects a suitable size of 100%). ❖ Metric version...

Operating Instructions
Page 38
See "Paper Type" in "Tray Paper Settings", General Settings Guide. Manual Paper Select A Select the paper tray, bypass tray or LCT. See "Paper Type" in "Tray Paper Settings", General Settings Guide. Auto Paper Select A Make sure [...
See "Paper Type" in "Tray Paper Settings", General Settings Guide. Manual Paper Select A Select the paper tray, bypass tray or LCT. See "Paper Type" in "Tray Paper Settings", General Settings Guide. Auto Paper Select A Make sure [...

Operating Instructions
Page 66
... following table for original and copy paper sizes and orientations when using a 100% ratio: 56 B Press [Edit Image]. D Press [OK] twice. C Press [Double Copies]. per manually or place the originals in the ADF. E Press [Image Repeat].
... following table for original and copy paper sizes and orientations when using a 100% ratio: 56 B Press [Edit Image]. D Press [OK] twice. C Press [Double Copies]. per manually or place the originals in the ADF. E Press [Image Repeat].

Operating Instructions
Page 94
... machine. • You cannot use Connect Copy without an optional finisher or large capacity tray (LCT). Connect Copy How It Works Note ❒ In this manual, the two machines connected are referred to make Connect Copy settings. Interrupt Copy • You can still use Connect Copy when a job has been paused...
... machine. • You cannot use Connect Copy without an optional finisher or large capacity tray (LCT). Connect Copy How It Works Note ❒ In this manual, the two machines connected are referred to make Connect Copy settings. Interrupt Copy • You can still use Connect Copy when a job has been paused...

Operating Instructions
Page 115
... or custom size Place the original on the exposure original is in the same orienthe same orientation as the tation as displayed. Specify the size manually. Select a proper paper size. "Staple". Copy Quantity". is over the staple capac- 4. Check paper size. It is displayed, press [Stop]. 105 See p.144 set is...
... or custom size Place the original on the exposure original is in the same orienthe same orientation as the tation as displayed. Specify the size manually. Select a proper paper size. "Staple". Copy Quantity". is over the staple capac- 4. Check paper size. It is displayed, press [Stop]. 105 See p.144 set is...
Operating Instructions
Page 122
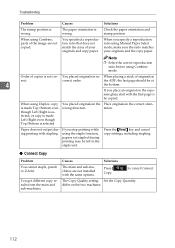
...- sure glass, start with the first page to cancel Connect The Copy Quality setting Set the Copy Quantity. Press [ Copy. ] to be copied. When using Manual Paper Select mode, make sure the ratio matches your originals and copy paper. Note ❒ Select the correct reproduction ratio before using the staple function...
...- sure glass, start with the first page to cancel Connect The Copy Quality setting Set the Copy Quantity. Press [ Copy. ] to be copied. When using Manual Paper Select mode, make sure the ratio matches your originals and copy paper. Note ❒ Select the correct reproduction ratio before using the staple function...

Operating Instructions
Page 166
..., 72 stamp position, size and density, 66 stored program, 82 Check Modes key, 5 Clear Modes key, 5 Clear/Stop key, 6 Combination chart, 137 Combined auto and manual image density, 26 Connect copy, 83 Control panel, 5 Copier/Document Server Features, 115 Copier functions, 26 1 sided combine, 47 2 sided combine, 49 adjusting copy image...
..., 72 stamp position, size and density, 66 stored program, 82 Check Modes key, 5 Clear Modes key, 5 Clear/Stop key, 6 Combination chart, 137 Combined auto and manual image density, 26 Connect copy, 83 Control panel, 5 Copier/Document Server Features, 115 Copier functions, 26 1 sided combine, 47 2 sided combine, 49 adjusting copy image...

Operating Instructions
Page 168
M Main power indicator, 5 Manual image density, 26 Manual paper select, 28 Messages, 105 Missing image area, 12 Mixed size, 17 N Number keys, 6 O OHP transparencies, 77 one-sided combine 1 sided 2 pages → combine 1 side, ...
M Main power indicator, 5 Manual image density, 26 Manual paper select, 28 Messages, 105 Missing image area, 12 Mixed size, 17 N Number keys, 6 O OHP transparencies, 77 one-sided combine 1 sided 2 pages → combine 1 side, ...
Quick Start Guide
Page 6
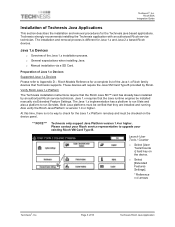
... installed and running. Java 1.x requires that the Ricoh Java SD™ card has already been installed by Ricoh. Ricoh Models Reference for Java 1.x and Java 2.x based Ricoh devices. Technesis strongly recommends installing the Technesis application with an authorized Ricoh service technician. o Manual installation via Extended Feature Settings. Verify Ricoh Java 1.x Platform The Technesis installation instructions require that...
... installed and running. Java 1.x requires that the Ricoh Java SD™ card has already been installed by Ricoh. Ricoh Models Reference for Java 1.x and Java 2.x based Ricoh devices. Technesis strongly recommends installing the Technesis application with an authorized Ricoh service technician. o Manual installation via Extended Feature Settings. Verify Ricoh Java 1.x Platform The Technesis installation instructions require that...

Quick Start Guide
Page 7
...Inc. Extended Feature Details o Under Extended Feature Name, you should be displaying Starting Up o The Version must be set manually at system startup and locks out the panel. This will ensure at system startup the Technesis Java application launches at the ... Web Image Monitor and must be 1.4 or higher for both . Ricoh ESA Integration Guide Extended Feature Settings o Select [Extended Features]. Technesis®, Inc. Please contact your Ricoh sales or service technician. Page 7 of 50 Technesis Ricoh Java Application If the Java platforms are not detected as loaded features...
...Inc. Extended Feature Details o Under Extended Feature Name, you should be displaying Starting Up o The Version must be set manually at system startup and locks out the panel. This will ensure at system startup the Technesis Java application launches at the ... Web Image Monitor and must be 1.4 or higher for both . Ricoh ESA Integration Guide Extended Feature Settings o Select [Extended Features]. Technesis®, Inc. Please contact your Ricoh sales or service technician. Page 7 of 50 Technesis Ricoh Java Application If the Java platforms are not detected as loaded features...

Quick Start Guide
Page 18
...enable this time, there is not ready to the Java Platform. Launch User Tools / Counter o Select [User Tools] hard key on the Ricoh device must be 2.10 or higher. If the JavaTM Platform is not detected as the default function priority. This will ensure at system startup ...Priority The default function priority on the device. o Select [Back] to set manually at system startup and locks out the panel. o Select [System Settings]. * Reference red arrow Technesis®, Inc. Please contact your Ricoh sales or service technician. At this via Web Image Monitor and must be ...
...enable this time, there is not ready to the Java Platform. Launch User Tools / Counter o Select [User Tools] hard key on the Ricoh device must be 2.10 or higher. If the JavaTM Platform is not detected as the default function priority. This will ensure at system startup ...Priority The default function priority on the device. o Select [Back] to set manually at system startup and locks out the panel. o Select [System Settings]. * Reference red arrow Technesis®, Inc. Please contact your Ricoh sales or service technician. At this via Web Image Monitor and must be ...


