
Operating Instructions
Page 2
... laser diode. Check the type of your machine before using the machine. For details about power source, see P.iii "Machine Types".) • Type 1: 8016/DSm616/LD116/Aficio 2016 • Type 2: 8020/DSm620/LD120/Aficio 2020 • Type 3: 8020d/DSm620d/LD120d/Aficio 2020D ...Certain types might not be liable for direct, indirect, special, incidental, or consequential damages as above. Certain options might be responsible for any damage or expense that you use genuine toner...
... laser diode. Check the type of your machine before using the machine. For details about power source, see P.iii "Machine Types".) • Type 1: 8016/DSm616/LD116/Aficio 2016 • Type 2: 8020/DSm620/LD120/Aficio 2020 • Type 3: 8020d/DSm620d/LD120d/Aficio 2020D ...Certain types might not be liable for direct, indirect, special, incidental, or consequential damages as above. Certain options might be responsible for any damage or expense that you use genuine toner...
Operating Instructions
Page 27
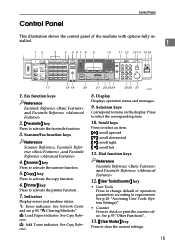
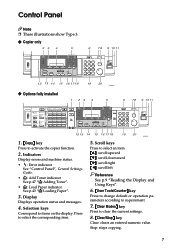
... Communicating Start Manual Reception Receive File Immediate Trance. Indicators Display errors and machine status. Selection keys Correspond to check or print the counter value. D: Add Toner indicator. Control Panel Control Panel This illustration shows the control panel of the machine with options fully in-
... Communicating Start Manual Reception Receive File Immediate Trance. Indicators Display errors and machine status. Selection keys Correspond to check or print the counter value. D: Add Toner indicator. Control Panel Control Panel This illustration shows the control panel of the machine with options fully in-

Operating Instructions
Page 95
... instructions displayed. Problem Causes Solutions "Please wait." on the oper- This message appears Wait for the machine to eight dig- ation switch or change the toner bottle. The user code entry display appears.
... instructions displayed. Problem Causes Solutions "Please wait." on the oper- This message appears Wait for the machine to eight dig- ation switch or change the toner bottle. The user code entry display appears.

Settings Guide
Page 2
... For details, please contact your local dealer. Two kinds of size notation are subject to the operator. Laser Safety: This machine is attached on the operation and use genuine toner from the supplier. The following pages. Power Source 220 - 240V, 50/60Hz, 7A or more Please... do not appear in the Copy Reference. For details about power source, see "Power Connection" in the following label is considered a class 1 laser device, safe for direct, indirect, special, incidental, or consequential damages as above. Important Contents of this machine refer to a power source as ...
... For details, please contact your local dealer. Two kinds of size notation are subject to the operator. Laser Safety: This machine is attached on the operation and use genuine toner from the supplier. The following pages. Power Source 220 - 240V, 50/60Hz, 7A or more Please... do not appear in the Copy Reference. For details about power source, see "Power Connection" in the following label is considered a class 1 laser device, safe for direct, indirect, special, incidental, or consequential damages as above. Important Contents of this machine refer to a power source as ...

Settings Guide
Page 27
... 1. See Copy Reference. Display Displays operation status and messages. 9. Scroll keys Press to select the corresponding item. 10. Indicators Display errors and machine status. D: Add Toner indicator. See p.26 "Accessing User Tools (System Settings)". • Counter Press to activate the facsimile function. 3. stalled. 1 12 3 4 5 67 8 9 10 11 12 1314 1516 Communicating...
... 1. See Copy Reference. Display Displays operation status and messages. 9. Scroll keys Press to select the corresponding item. 10. Indicators Display errors and machine status. D: Add Toner indicator. See p.26 "Accessing User Tools (System Settings)". • Counter Press to activate the facsimile function. 3. stalled. 1 12 3 4 5 67 8 9 10 11 12 1314 1516 Communicating...

Settings Guide
Page 95
... off . If other manuals for the machine to eight dig- See p.i "Manuals for This Machine". Problem Causes Solutions "Please wait." ation switch or change the toner bottle. Saver mode. management. its), and then press the {OK} or {#} key. 83
... off . If other manuals for the machine to eight dig- See p.i "Manuals for This Machine". Problem Causes Solutions "Please wait." ation switch or change the toner bottle. Saver mode. management. its), and then press the {OK} or {#} key. 83
Copy Reference
Page 2
... power source, see P.6 "Machine Types".) • Type 1: Aficio 2016 • Type 2: Aficio 2020 • Type 3: Aficio 2020D Certain types might result from the use of parts other than genuine Ricoh parts with the laser beam might not be slightly different from the machine. Introduction This ...hazardous radiation exposure. Notes Some illustrations in this manual might be available in a handy place for office/EDP use genuine Ricoh toner. Certain options might cause serious eye damage. Keep this manual in some countries. Safety precautions and interlock mechanisms have ...
... power source, see P.6 "Machine Types".) • Type 1: Aficio 2016 • Type 2: Aficio 2020 • Type 3: Aficio 2020D Certain types might result from the use of parts other than genuine Ricoh parts with the laser beam might not be slightly different from the machine. Introduction This ...hazardous radiation exposure. Notes Some illustrations in this manual might be available in a handy place for office/EDP use genuine Ricoh toner. Certain options might cause serious eye damage. Keep this manual in some countries. Safety precautions and interlock mechanisms have ...
Copy Reference
Page 6
... When Memory Is Full 42 B Loading Paper 43 Loading Paper...43 Orientation-Fixed Paper or Two-Sided Paper 44 D Adding Toner 47 Handling Toner...47 Toner Storage ...47 Used Toner ...47 Removing Toner 48 Inserting Toner...49 4. 3. User Tools (Copier Features) Accessing User Tools (Copier Features 51 Changing Default Settings 51 Quitting User Tools 52 Settings...
... When Memory Is Full 42 B Loading Paper 43 Loading Paper...43 Orientation-Fixed Paper or Two-Sided Paper 44 D Adding Toner 47 Handling Toner...47 Toner Storage ...47 Used Toner ...47 Removing Toner 48 Inserting Toner...49 4. 3. User Tools (Copier Features) Accessing User Tools (Copier Features 51 Changing Default Settings 51 Quitting User Tools 52 Settings...

Copy Reference
Page 11
...the plug, not the cable) if the power cable or plug becomes frayed or otherwise damaged. • To avoid hazardous electric shock or laser radiation exposure, do not use an extension cord. • Do not damage, break or make any covers or screws other than necessary. ...Connect the power cord directly into the machine. • You suspect that your machine has been damaged. • Do not incinerate spilled toner or used : R WARNING: Indicates a potentially hazardous situation which , if instructions are not followed, could cause an electric shock or fire. 3 These...
...the plug, not the cable) if the power cable or plug becomes frayed or otherwise damaged. • To avoid hazardous electric shock or laser radiation exposure, do not use an extension cord. • Do not damage, break or make any covers or screws other than necessary. ...Connect the power cord directly into the machine. • You suspect that your machine has been damaged. • Do not incinerate spilled toner or used : R WARNING: Indicates a potentially hazardous situation which , if instructions are not followed, could cause an electric shock or fire. 3 These...

Copy Reference
Page 12
... is installed, do not dispose of the machine or expended supply waste at an authorized dealer. • The inside the machine. • Keep toner (used or unused) and toner bottle out of the reach of children. • For environmental reasons, do not push the upper part of the machine could be sure...
... is installed, do not dispose of the machine or expended supply waste at an authorized dealer. • The inside the machine. • Keep toner (used or unused) and toner bottle out of the reach of children. • For environmental reasons, do not push the upper part of the machine could be sure...
Copy Reference
Page 15
... Manual Reception Receive File Immediate Trans. Indicators Display errors and machine status. • h: Error indicator See "Control Panel", General Settings Guide. • D: Add Toner indicator See p.47 "D Adding Toner". • B: Load Paper indicator See p.43 "B Loading Paper". 3. Switch RX Mode Transmission Stamp Standard Detail Fine Search Check Job Destination Destination Information 01...
... Manual Reception Receive File Immediate Trans. Indicators Display errors and machine status. • h: Error indicator See "Control Panel", General Settings Guide. • D: Add Toner indicator See p.47 "D Adding Toner". • B: Load Paper indicator See p.43 "B Loading Paper". 3. Switch RX Mode Transmission Stamp Standard Detail Fine Search Check Job Destination Destination Information 01...
Copy Reference
Page 21
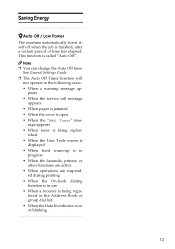
... elapsed. Saving Energy -Auto Off / Low Power The machine automatically turns itself off when the job is open • When the "Add Toner" mes- sage appears • When toner is called "Auto Off". ished • When the User Tools screen is displayed • When fixed warm-up is on or blinking 13...
... elapsed. Saving Energy -Auto Off / Low Power The machine automatically turns itself off when the job is open • When the "Add Toner" mes- sage appears • When toner is called "Auto Off". ished • When the User Tools screen is displayed • When fixed warm-up is on or blinking 13...

Copy Reference
Page 48
... side of the original. See p.26 inal image is almost emp- Put mending tape over the pasted areas. Your Machine". Toner bottle is copied. Toner". "Placing Originals". An improper paper size is not placed correctly. The original is Select the proper paper size. See selected.... Copies are blank. Image density is not appropriate. The paper size is too light. Add toner. See p.47 "D Adding ty. Parts of the paper are not The original is produced on copies. See p.18 "Placing Originals". glass ...
... side of the original. See p.26 inal image is almost emp- Put mending tape over the pasted areas. Your Machine". Toner bottle is copied. Toner". "Placing Originals". An improper paper size is not placed correctly. The original is Select the proper paper size. See selected.... Copies are blank. Image density is not appropriate. The paper size is too light. Add toner. See p.47 "D Adding ty. Parts of the paper are not The original is produced on copies. See p.18 "Placing Originals". glass ...
Copy Reference
Page 55
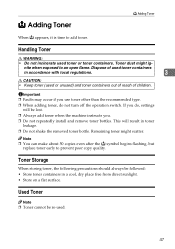
... D symbol begins flashing, but replace toner early to an open flame. Toner Storage When storing toner, the following precautions should always be followed: • Store toner containers in toner leakage. ❒ Do not shake the removed toner bottle. Toner dust might scatter. D Adding Toner D Adding Toner When D appears, it is time to add toner. Handling Toner R WARNING: • Do not incinerate...
... D symbol begins flashing, but replace toner early to an open flame. Toner Storage When storing toner, the following precautions should always be followed: • Store toner containers in toner leakage. ❒ Do not shake the removed toner bottle. Toner dust might scatter. D Adding Toner D Adding Toner When D appears, it is time to add toner. Handling Toner R WARNING: • Do not incinerate...

Copy Reference
Page 56
Troubleshooting Removing Toner • 1: Open the front cover of the machine. • 2: Lift the green lever. 3 • 3: Push the green lever, and then gently pull out the holder. • 4: Press the toner bottle back to raise its top, and then gently pull it out. 48
Troubleshooting Removing Toner • 1: Open the front cover of the machine. • 2: Lift the green lever. 3 • 3: Push the green lever, and then gently pull out the holder. • 4: Press the toner bottle back to raise its top, and then gently pull it out. 48
Copy Reference
Page 57
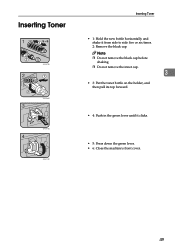
Note ❒ Do not remove the black cap before shaking. ❒ Do not remove the inner cap. 3 • 3: Put the toner bottle on the holder, and then pull its top forward. • 4: Push in the green lever until it from side to side five or six times. 2: Remove the black cap. Inserting Toner Inserting Toner • 1: Hold the new bottle horizontally and shake it clicks. • 5: Press down the green lever. • 6: Close the machine's front cover. 49
Note ❒ Do not remove the black cap before shaking. ❒ Do not remove the inner cap. 3 • 3: Put the toner bottle on the holder, and then pull its top forward. • 4: Push in the green lever until it from side to side five or six times. 2: Remove the black cap. Inserting Toner Inserting Toner • 1: Hold the new bottle horizontally and shake it clicks. • 5: Press down the green lever. • 6: Close the machine's front cover. 49
Copy Reference
Page 75
... 7 D Display, 9 Do's and Don'ts, 57 Duplex 1 sided → 2 sided, 31 2 sided → 2 sided, 32 Duplex key, 8 E Environment, 58 H Handling toner, 47 I Indicators, 7 Inserting toner, 49 67 INDEX 1 Sided → 2 Sided, 31 2 Sided → 1 Sided, 37 2 Sided → 2 Sided, 32 A Accessing user tools copier features, 51 Adding... toner, 47 Adjusting image density, 26 Auto paper select, 26 reduce/enlarge, 29 tray switching, 53 Auto Off / Low Power, 13 Auto paper select, 27...
... 7 D Display, 9 Do's and Don'ts, 57 Duplex 1 sided → 2 sided, 31 2 sided → 2 sided, 32 Duplex key, 8 E Environment, 58 H Handling toner, 47 I Indicators, 7 Inserting toner, 49 67 INDEX 1 Sided → 2 Sided, 31 2 Sided → 1 Sided, 37 2 Sided → 2 Sided, 32 A Accessing user tools copier features, 51 Adding... toner, 47 Adjusting image density, 26 Auto paper select, 26 reduce/enlarge, 29 tray switching, 53 Auto Off / Low Power, 13 Auto paper select, 27...
Copy Reference
Page 76
.../ARDF, 19 originals on exposure glass, 18 Placing Originals, 15 Power connection, 59 68 Q Quitting user tools, 52 R Reading display, 9 using keys, 9 Remarks, 57 Removing toner, 48 Rotated copy, 27 S Safety information, 3 Saving energy, 13 Scroll keys, 7 Selecting copy paper, 26 original type setting, 26 Selection keys, 7 Series copies 2 sided →..., 65 bypass tray copy, 64 combine, 66 duplex, 65 duplex margin, 66 preset enlarge/reduce, 64 rotate sort, 65 sort, 65 zoom, 65 T Text, 26 Toner adding, 47 handling, 47 inserting, 49 removing, 48
.../ARDF, 19 originals on exposure glass, 18 Placing Originals, 15 Power connection, 59 68 Q Quitting user tools, 52 R Reading display, 9 using keys, 9 Remarks, 57 Removing toner, 48 Rotated copy, 27 S Safety information, 3 Saving energy, 13 Scroll keys, 7 Selecting copy paper, 26 original type setting, 26 Selection keys, 7 Series copies 2 sided →..., 65 bypass tray copy, 64 combine, 66 duplex, 65 duplex margin, 66 preset enlarge/reduce, 64 rotate sort, 65 sort, 65 zoom, 65 T Text, 26 Toner adding, 47 handling, 47 inserting, 49 removing, 48

Copy Reference
Page 77
storage, 47 used, 47 Toner storage, 47 Troubleshooting, 39 memory is full, 42 you cannot make clear copies, 40 you cannot make copies as you want, 41 your machine does not operate as you want, 39 Turning Off main power, 12 power, 12 Turning On, 11 main power, 11 power, 11 Two-sided combine 1 sided 4 pages → combine 2 side, 35 1 sided 8 pages → combine 2 side, 35 2 sided 4 pages → combine 2 side, 35 2 sided 8 pages → combine 2 side, 35 U Used toner, 47 User Tools, 51 User Tools key, 7 W Weights of recommended originals, 15 69
storage, 47 used, 47 Toner storage, 47 Troubleshooting, 39 memory is full, 42 you cannot make clear copies, 40 you cannot make copies as you want, 41 your machine does not operate as you want, 39 Turning Off main power, 12 power, 12 Turning On, 11 main power, 11 power, 11 Two-sided combine 1 sided 4 pages → combine 2 side, 35 1 sided 8 pages → combine 2 side, 35 2 sided 4 pages → combine 2 side, 35 2 sided 8 pages → combine 2 side, 35 U Used toner, 47 User Tools, 51 User Tools key, 7 W Weights of recommended originals, 15 69
Operating Instructions
Page 3
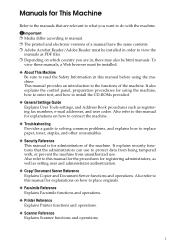
... to this manual for explanations on how to connect the machine. ❖ Troubleshooting Provides a guide to solving common problems, and explains how to replace paper, toner, staples, and other consumables. ❖ Security Reference This manual is for explanations on which country you are relevant to what you want to do with...
... to this manual for explanations on how to connect the machine. ❖ Troubleshooting Provides a guide to solving common problems, and explains how to replace paper, toner, staples, and other consumables. ❖ Security Reference This manual is for explanations on which country you are relevant to what you want to do with...


