
English Manual
Page 3
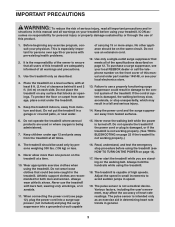
... the control system is not a medical device. Never start the treadmill while you are adequately informed of all users of this manual and order part number 146148, or see HOW TO TURN ON THE POWER on the walking belt. The treadmill should be used or where oxygen is not working properly. (See TROUBLESHOOTING on each side. Never use an extension cord. 12. The pulse sensor is damaged, the walking belt may slow...
... the control system is not a medical device. Never start the treadmill while you are adequately informed of all users of this manual and order part number 146148, or see HOW TO TURN ON THE POWER on the walking belt. The treadmill should be used or where oxygen is not working properly. (See TROUBLESHOOTING on each side. Never use an extension cord. 12. The pulse sensor is damaged, the walking belt may slow...
English Manual
Page 4
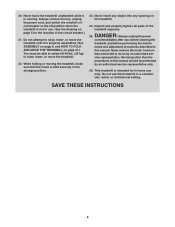
... remove the key, unplug the power cord, and switch the reset/off position when the treadmill is not in use. (See the drawing on page 5 for in-home use only. DANGER: 25. less instructed to the off circuit breaker to do so by an authorized service representative only. 26. SAVE THESE INSTRUCTIONS 4 When folding or moving the treadmill, make sure that the frame is properly assembled. (See ASSEMBLY...
... remove the key, unplug the power cord, and switch the reset/off position when the treadmill is not in use. (See the drawing on page 5 for in-home use only. DANGER: 25. less instructed to the off circuit breaker to do so by an authorized service representative only. 26. SAVE THESE INSTRUCTIONS 4 When folding or moving the treadmill, make sure that the frame is properly assembled. (See ASSEMBLY...
English Manual
Page 5
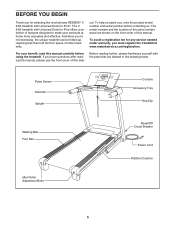
... make your benefit, read this manual. Pulse Sensor Handrail Upright Console Accessory Tray Key/Clip Walking Belt Foot Rail Idler Roller Adjustment Bolts Reset/Off Circuit Breaker Power Cord Platform Cushion 5 The V 6.80 treadmill with Universal Dock for iPod®. And when you for any service needed under warranty, you must register the treadmill at home more enjoyable and effective. The model number and the location of the serial number decal are labeled in the drawing...
... make your benefit, read this manual. Pulse Sensor Handrail Upright Console Accessory Tray Key/Clip Walking Belt Foot Rail Idler Roller Adjustment Bolts Reset/Off Circuit Breaker Power Cord Platform Cushion 5 The V 6.80 treadmill with Universal Dock for iPod®. And when you for any service needed under warranty, you must register the treadmill at home more enjoyable and effective. The model number and the location of the serial number decal are labeled in the drawing...
English Manual
Page 6
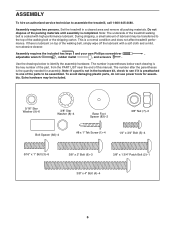
... authorized service technician to one of this manual. Set the treadmill in the hardware kit, check to see if it is preattached to assemble the treadmill, call 1-800-445-2480. Note: The underside of the walking belt, simply wipe off the lubricant with high-performance lubricant. If there is lubricant on top of the treadmill walking belt is the key number of the part, from the PART LIST near...
... authorized service technician to one of this manual. Set the treadmill in the hardware kit, check to see if it is preattached to assemble the treadmill, call 1-800-445-2480. Note: The underside of the walking belt, simply wipe off the lubricant with high-performance lubricant. If there is lubricant on top of the treadmill walking belt is the key number of the part, from the PART LIST near...
English Manual
Page 9
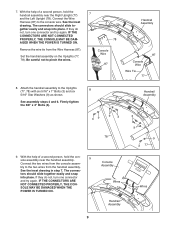
... connector and try again. Firmly tighten the 3/8" x 4" Bolts (4). 8 39 9 3 78 9. IF THE CONNECTORS ARE NOT CONNECTED PROPERLY, THE CONSOLE MAY BE DAMAGED WHEN THE POWER IS TURNED ON. The connec- If they do not, turn one connector and try again. See assembly steps 4 and 6. With the help of a second person, hold the console assembly near the Right Upright (77) and the Left...
... connector and try again. Firmly tighten the 3/8" x 4" Bolts (4). 8 39 9 3 78 9. IF THE CONNECTORS ARE NOT CONNECTED PROPERLY, THE CONSOLE MAY BE DAMAGED WHEN THE POWER IS TURNED ON. The connec- If they do not, turn one connector and try again. See assembly steps 4 and 6. With the help of a second person, hold the console assembly near the Right Upright (77) and the Left...

English Manual
Page 12
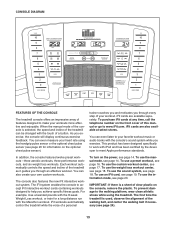
... the control system of 450 joules. HOW TO PLUG IN THE POWER CORD DANGER: Improper connection of sophisticated electronic equipment, can result in accordance with all local codes and ordinances. A temporary adapter that is equipped with highperformance lubricant. Failure to use on a nominal 120-volt circuit, and has a grounding plug that is functioning properly. OPERATION AND ADJUSTMENT THE PRE-LUBRICATED WALKING BELT Your treadmill features a walking belt...
... the control system of 450 joules. HOW TO PLUG IN THE POWER CORD DANGER: Improper connection of sophisticated electronic equipment, can result in accordance with all local codes and ordinances. A temporary adapter that is equipped with highperformance lubricant. Failure to use on a nominal 120-volt circuit, and has a grounding plug that is functioning properly. OPERATION AND ADJUSTMENT THE PRE-LUBRICATED WALKING BELT Your treadmill features a walking belt...
English Manual
Page 13
... chest pulse sensor (see page 20. To use the sound system, see page 18. To use the weight loss workout center, see page 18. iFit cards are also available at any time, call the telephone number on the optional chest pulse sensor). You can be changed with the consoleʼs sound system while you exercise, the console will display continuous exercise feedback. To use the information mode, see page 20 for a long-distance...
... chest pulse sensor (see page 20. To use the sound system, see page 18. To use the weight loss workout center, see page 18. iFit cards are also available at any time, call the telephone number on the optional chest pulse sensor). You can be changed with the consoleʼs sound system while you exercise, the console will display continuous exercise feedback. To use the information mode, see page 20 for a long-distance...
English Manual
Page 14
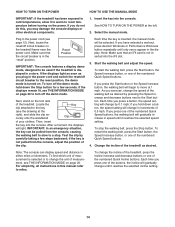
... the numbered Quick Incline buttons. Make sure that an iFit card is displayed in the power cord and switch the reset/off the demo mode. Locate the Key clip attached to the key (see page 12). IMPORTANT: In an emergency situation, the key can display speed and distance in speed until it reaches the selected incline setting. 14 As you may damage the console displays or other electrical components. 1. To stop . Change the incline of the treadmill as you press...
... the numbered Quick Incline buttons. Make sure that an iFit card is displayed in the power cord and switch the reset/off the demo mode. Locate the Key clip attached to the key (see page 12). IMPORTANT: In an emergency situation, the key can display speed and distance in speed until it reaches the selected incline setting. 14 As you may damage the console displays or other electrical components. 1. To stop . Change the incline of the treadmill as you press...
English Manual
Page 15
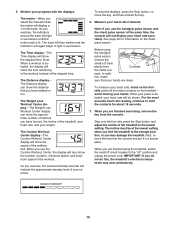
... the walking belt. Next, remove the key from the console. The matrix-When you are finished using the handgrip pulse sensor, remove the sheets of the treadmill, your heart rate, and your hands. Note: When a workout is lit. The Distance display can show the time remaining in a secure place. To measure your heart rate, stand on the chest pulse sensor. When you select the manual mode, the matrix will show the speed of...
... the walking belt. Next, remove the key from the console. The matrix-When you are finished using the handgrip pulse sensor, remove the sheets of the treadmill, your heart rate, and your hands. Note: When a workout is lit. The Distance display can show the time remaining in a secure place. To measure your heart rate, stand on the chest pulse sensor. When you select the manual mode, the matrix will show the speed of...
English Manual
Page 16
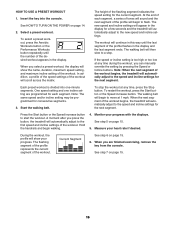
... next segment of the workout begins, the treadmill will automatically adjust to move at any time during the workout, you select a preset workout, the display will appear in the display and the last segment ends. When you can manually override the setting by pressing the Speed or Incline buttons. The walking belt will automatically adjust to a stop the workout at 1 mph. See HOW TO TURN ON THE POWER on page 15...
... next segment of the workout begins, the treadmill will automatically adjust to move at any time during the workout, you select a preset workout, the display will appear in the display and the last segment ends. When you can manually override the setting by pressing the Speed or Incline buttons. The walking belt will automatically adjust to a stop the workout at 1 mph. See HOW TO TURN ON THE POWER on page 15...
English Manual
Page 17
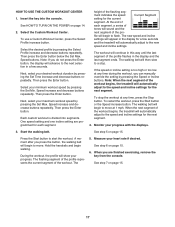
... speed and incline settings for a few seconds. The walking belt will continue in this way until the last segment of tones will automatically adjust to flash. A moment after you can manually override the setting by pressing the Set Max. If the speed or incline setting is divided into the console. To use a Custom Workout Center, press the Select Profile increase button. ment indicates the speed Current Segment setting for each segment, a series...
... speed and incline settings for a few seconds. The walking belt will continue in this way until the last segment of tones will automatically adjust to flash. A moment after you can manually override the setting by pressing the Set Max. If the speed or incline setting is divided into the console. To use a Custom Workout Center, press the Select Profile increase button. ment indicates the speed Current Segment setting for each segment, a series...
English Manual
Page 18
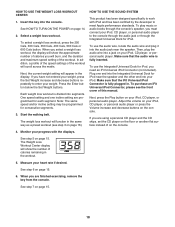
... the iFit Universal iPod Connector is divided into segments. The Weight Loss Workout Center display will show the number of the workout will function in . Select a weight loss workout. Plug one incline setting are finished exercising, remove the key from the console. Start the walking belt. Note: The same speed and/or incline setting may be programmed for each segment. Monitor your weight. The weight loss workout will scroll across the matrix. Then, plug the audio wire into the console...
... the iFit Universal iPod Connector is divided into segments. The Weight Loss Workout Center display will show the number of the workout will function in . Select a weight loss workout. Plug one incline setting are finished exercising, remove the key from the console. Start the walking belt. Note: The same speed and/or incline setting may be programmed for each segment. Monitor your weight. The weight loss workout will scroll across the matrix. Then, plug the audio wire into the console...
English Manual
Page 19
... or too low, you through the workout. See step 7 on page 15. CAUTION: Always remove iFit cards from the iFit slot when you are finished exercising, remove the key from the console. When you press the button, the treadmill will guide you can override the setting by pressing the iFit increase or decrease button. Start the walking belt. 1. A moment after you are not using them. 19 Next, select an iFit workout by pressing the Speed or Incline buttons;
... or too low, you through the workout. See step 7 on page 15. CAUTION: Always remove iFit cards from the iFit slot when you are finished exercising, remove the key from the console. When you press the button, the treadmill will guide you can override the setting by pressing the iFit increase or decrease button. Start the walking belt. 1. A moment after you are not using them. 19 Next, select an iFit workout by pressing the Speed or Incline buttons;
English Manual
Page 20
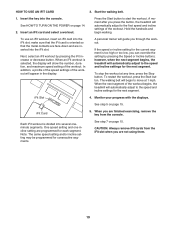
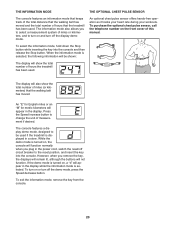
... the treadmill has been used. Press the Speed increase button to be shown: The display will not function. THE INFORMATION MODE THE OPTIONAL CHEST PULSE SENSOR The console features an information mode that keeps track of the total distance that the walking belt has moved and the total number of hours that the walking belt has moved. When the information mode is turned on or turn off the display demo mode. However, when you to the reset position, and insert the key...
... the treadmill has been used. Press the Speed increase button to be shown: The display will not function. THE INFORMATION MODE THE OPTIONAL CHEST PULSE SENSOR The console features an information mode that keeps track of the total distance that the walking belt has moved and the total number of hours that the walking belt has moved. When the information mode is turned on or turn off the display demo mode. However, when you to the reset position, and insert the key...
English Manual
Page 21
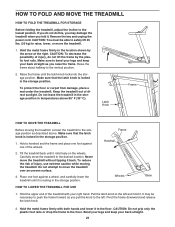
... TREADMILL HOW TO FOLD THE TREADMILL FOR STORAGE Before folding the treadmill, adjust the incline to the floor. Raise the frame about halfway to the left . Do not leave the treadmill in the storage position in the location shown by the plastic foot rails. Latch Knob Frame HOW TO MOVE THE TREADMILL Before moving the treadmill. Place one foot against one foot against a wheel, and carefully lower the treadmill...
... TREADMILL HOW TO FOLD THE TREADMILL FOR STORAGE Before folding the treadmill, adjust the incline to the floor. Raise the frame about halfway to the left . Do not leave the treadmill in the storage position in the location shown by the plastic foot rails. Latch Knob Frame HOW TO MOVE THE TREADMILL Before moving the treadmill. Place one foot against one foot against a wheel, and carefully lower the treadmill...
English Manual
Page 22
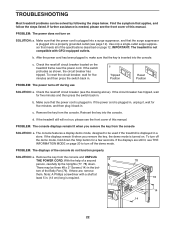
... cover of a second a person, carefully tip the Uprights (77, 78) down the Stop button for five minutes and then press the switch back in . (13 cm) long is turned on. With the help of this manual. There may be three #8 x 2" Screws (14) in . TROUBLESHOOTING Most treadmill problems can be used if the treadmill is displayed in , make sure that the power cord is inserted into the console. PROBLEM: The power...
... cover of a second a person, carefully tip the Uprights (77, 78) down the Stop button for five minutes and then press the switch back in . (13 cm) long is turned on. With the help of this manual. There may be three #8 x 2" Screws (14) in . TROUBLESHOOTING Most treadmill problems can be used if the treadmill is displayed in , make sure that the power cord is inserted into the console. PROBLEM: The power...
English Manual
Page 23
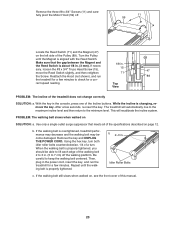
... the Screw. rect speed reading. After a few minutes to 7 cm) off . 11 59 Locate the Reed Switch (71) and the Magnet (47) on the left side of the specifications described on page 12. Remove the key and UNPLUG THE POWER CORD. While the incline is about 1/8 in . (5 to check for a cor- When the walking belt is properly tightened. Turn the Pulley until the walking belt is properly tightened, you...
... the Screw. rect speed reading. After a few minutes to 7 cm) off . 11 59 Locate the Reed Switch (71) and the Magnet (47) on the left side of the specifications described on page 12. Remove the key and UNPLUG THE POWER CORD. While the incline is about 1/8 in . (5 to check for a cor- When the walking belt is properly tightened. Turn the Pulley until the walking belt is properly tightened, you...
English Manual
Page 25
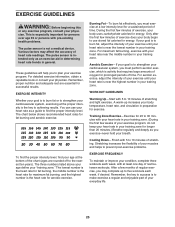
... your exercise program. Remember, the key to success is to 10 minutes of your exercise until your heart rate is not a medical device. Only after the first few minutes of your physician. For detailed exercise information, obtain a reputable book or consult your training zone. For aerobic exercise, adjust the intensity of stretching and light exercise. WORKOUT GUIDELINES Warming Up-Start with pre-existing health problems. The pulse sensor...
... your exercise program. Remember, the key to success is to 10 minutes of your exercise until your heart rate is not a medical device. Only after the first few minutes of your physician. For detailed exercise information, obtain a reputable book or consult your training zone. For aerobic exercise, adjust the intensity of stretching and light exercise. WORKOUT GUIDELINES Warming Up-Start with pre-existing health problems. The pulse sensor...
English Manual
Page 26
... Roller Bracket Roller Ground Wire Right Rear Foot Hex Key Left Rear Foot Idler Roller Motor Hood Hood Accent Lift Frame Motor Belt Drive Motor Lift Frame Ground Wire Platic Tie Controller Ground Wire Power Cord Power Cord Grommet Reset/Off Circuit Breaker Controller Reed Switch Reed Switch Clamp 15 1/2" Cable Tie Releasable Tie 8" Cable Tie Belly Pan Right Upright Left Upright Incline Motor Spacer Base Cap Left Upright Spacer Bolt Spacer Base Foot Spacer Base Wheel Base Foot Wire Harness Right Upright Spacer Drive Roller/Pulley Incline Motor Handrail Access Door Console Rear...
... Roller Bracket Roller Ground Wire Right Rear Foot Hex Key Left Rear Foot Idler Roller Motor Hood Hood Accent Lift Frame Motor Belt Drive Motor Lift Frame Ground Wire Platic Tie Controller Ground Wire Power Cord Power Cord Grommet Reset/Off Circuit Breaker Controller Reed Switch Reed Switch Clamp 15 1/2" Cable Tie Releasable Tie 8" Cable Tie Belly Pan Right Upright Left Upright Incline Motor Spacer Base Cap Left Upright Spacer Bolt Spacer Base Foot Spacer Base Wheel Base Foot Wire Harness Right Upright Spacer Drive Roller/Pulley Incline Motor Handrail Access Door Console Rear...
English Manual
Page 32
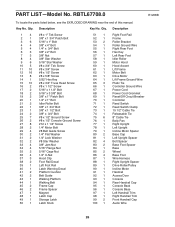
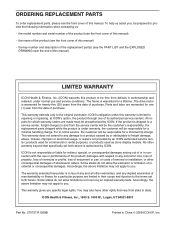
... whatsoever nature. The drive motor is under normal use , or costs of removal or installation; If the product is shipped to a service center, freight charges to the original purchaser. ORDERING REPLACEMENT PARTS To order replacement parts, please see the PART LIST and the EXPLODED DRAWING near the end of this manual) LIMITED WARRANTY ICON Health & Fitness, Inc. (ICON) warrants this product to be free from the service center will be the...
... whatsoever nature. The drive motor is under normal use , or costs of removal or installation; If the product is shipped to a service center, freight charges to the original purchaser. ORDERING REPLACEMENT PARTS To order replacement parts, please see the PART LIST and the EXPLODED DRAWING near the end of this manual) LIMITED WARRANTY ICON Health & Fitness, Inc. (ICON) warrants this product to be free from the service center will be the...


