
English Manual
Page 4
...the mainte- Never remove the motor hood un- This treadmill is properly assembled. (See ASSEMBLY on page 6, and HOW TO FOLD AND MOVE THE TREADMILL on page 21.) You must be performed by an authorized ser- Always remove the key, unplug the power cord, and switch the reset/...off circuit breaker to the off position when the treadmill is running. DANGER: 25. nance and adjustment procedures described in this manual. Servicing other than ...
...the mainte- Never remove the motor hood un- This treadmill is properly assembled. (See ASSEMBLY on page 6, and HOW TO FOLD AND MOVE THE TREADMILL on page 21.) You must be performed by an authorized ser- Always remove the key, unplug the power cord, and switch the reset/...off circuit breaker to the off position when the treadmill is running. DANGER: 25. nance and adjustment procedures described in this manual. Servicing other than ...
English Manual
Page 5
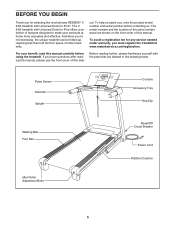
To help us . For your workouts at www.reebokservice.com/registration. The V 6.80 treadmill with Universal Dock for iPod®. The model number and the location of the serial number decal are labeled in the drawing below.... carefully before contacting us assist you for selecting the revolutionary REEBOK® V 6.80 treadmill with Universal Dock for any service needed under warranty, you must register the treadmill at home more enjoyable and effective. Pulse Sensor Handrail Upright Console Accessory Tray Key/Clip Walking Belt Foot Rail Idler Roller Adjustment Bolts Reset/...
To help us . For your workouts at www.reebokservice.com/registration. The V 6.80 treadmill with Universal Dock for iPod®. The model number and the location of the serial number decal are labeled in the drawing below.... carefully before contacting us assist you for selecting the revolutionary REEBOK® V 6.80 treadmill with Universal Dock for any service needed under warranty, you must register the treadmill at home more enjoyable and effective. Pulse Sensor Handrail Upright Console Accessory Tray Key/Clip Walking Belt Foot Rail Idler Roller Adjustment Bolts Reset/...
English Manual
Page 6
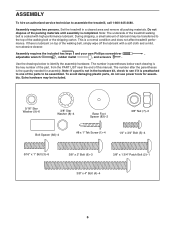
...belt is a normal condition and does not affect treadmill performance. This is coated with a soft cloth and a mild, non-abrasive cleaner. If there is preattached to see if it is lubricant on top of this manual. Assembly requires the included hex keys and your own Phillips screwdriver , adjustable wrench ,... parentheses below to assemble the treadmill, call 1-800-445-2480. Use the drawings below each drawing is completed. Assembly requires two persons. Do not dispose of the packing materials until assembly is the key number of the part, from the PART LIST near the end of the ...
...belt is a normal condition and does not affect treadmill performance. This is coated with a soft cloth and a mild, non-abrasive cleaner. If there is preattached to see if it is lubricant on top of this manual. Assembly requires the included hex keys and your own Phillips screwdriver , adjustable wrench ,... parentheses below to assemble the treadmill, call 1-800-445-2480. Use the drawings below each drawing is completed. Assembly requires two persons. Do not dispose of the packing materials until assembly is the key number of the part, from the PART LIST near the end of the ...

English Manual
Page 10
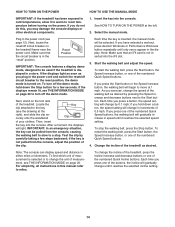
...10 Console Assembly Handrail Assembly Wires 5 5 11. If there are in a secure place; To protect the floor or carpet, place a mat under the treadmill. 10. Insert the wires from the console assembly into the handrail assembly. Have a second person hold the Frame until this step is used to adjust... Large Barrel 84 2 12. Orient the Storage Latch (49) so that all parts are properly tightened before you use the treadmill. Make sure that the large barrel and the Latch Knob (50) are sheets of the hex keys is completed. Note: Extra hardware may be included. Keep the included hex...
...10 Console Assembly Handrail Assembly Wires 5 5 11. If there are in a secure place; To protect the floor or carpet, place a mat under the treadmill. 10. Insert the wires from the console assembly into the handrail assembly. Have a second person hold the Frame until this step is used to adjust... Large Barrel 84 2 12. Orient the Storage Latch (49) so that all parts are properly tightened before you use the treadmill. Make sure that the large barrel and the Latch Knob (50) are sheets of the hex keys is completed. Note: Extra hardware may be included. Keep the included hex...
English Manual
Page 14
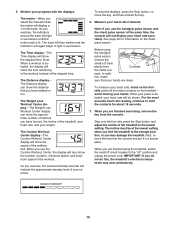
... near the power cord. Note: The console can be used if the treadmill is in this , you hold down a button, the speed setting will gradually increase in the display. Locate the Key clip attached to the Start button. Test the clip by pressing the Speed increase and decrease ...mode, hold down the Stop button for a few steps backward; IMPORTANT: In an emergency situation, the key can display speed and distance in a store. If you exercise, change the unit of the treadmill as you press a button, the speed setting will begin to turn off circuit breaker on . Change ...
... near the power cord. Note: The console can be used if the treadmill is in this , you hold down a button, the speed setting will gradually increase in the display. Locate the Key clip attached to the Start button. Test the clip by pressing the Speed increase and decrease ...mode, hold down the Stop button for a few steps backward; IMPORTANT: In an emergency situation, the key can display speed and distance in a store. If you exercise, change the unit of the treadmill as you press a button, the speed setting will begin to turn off circuit breaker on . Change ...
English Manual
Page 15
...key from Contacts the metal con- The track will then darken and the indicators will light in a secure place. See page 20 for information on the foot rails and hold the contacts for about 15 seconds. 7. tacts. When you are finished using the handgrip pulse sensor, remove the sheets of the treadmill... and unplug the power cord. Monitor your hands are clean. The Time display-The Time display will also show the speed of the treadmill to the "off circuit breaker to the lowest setting. Note: When a workout is selected, the display will show the number, duration...
...key from Contacts the metal con- The track will then darken and the indicators will light in a secure place. See page 20 for information on the foot rails and hold the contacts for about 15 seconds. 7. tacts. When you are finished using the handgrip pulse sensor, remove the sheets of the treadmill... and unplug the power cord. Monitor your hands are clean. The Time display-The Time display will also show the speed of the treadmill to the "off circuit breaker to the lowest setting. Note: When a workout is selected, the display will show the number, duration...
English Manual
Page 16
... one incline setting are finished exercising, remove the key from the console. To select a preset workout, press the Aerobic Workouts button or the Performance Workouts button repeatedly until the last segment of the workout begins, the treadmill will automatically adjust to the first speed and incline settings of... ON THE POWER on page 15. 6. The new speed and incline settings will appear in the display for a few seconds and the treadmill will automatically adjust to start the workout. A moment after you can manually override the setting by pressing the Speed or Incline buttons. HOW...
... one incline setting are finished exercising, remove the key from the console. To select a preset workout, press the Aerobic Workouts button or the Performance Workouts button repeatedly until the last segment of the workout begins, the treadmill will automatically adjust to the first speed and incline settings of... ON THE POWER on page 15. 6. The new speed and incline settings will appear in the display for a few seconds and the treadmill will automatically adjust to start the workout. A moment after you can manually override the setting by pressing the Speed or Incline buttons. HOW...
English Manual
Page 17
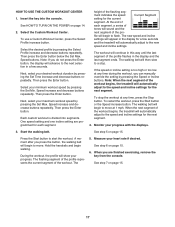
...is divided into the console. See step 7 on page 14. 2. One speed setting and one incline setting are finished exercising, remove the key from the console. To restart the workout, press the Start button or the Speed increase button. The flashing segment of the profile represents the... on page 15. 17 Then press the Enter button. Next, select your progress with the displays. 3. height of the workout begins, the treadmill will begin walking. file will automatically adjust to move at 1 mph. Monitor your maximum workout speed by pressing the Set Min. Start the ...
...is divided into the console. See step 7 on page 14. 2. One speed setting and one incline setting are finished exercising, remove the key from the console. To restart the workout, press the Start button or the Speed increase button. The flashing segment of the profile represents the... on page 15. 17 Then press the Enter button. Next, select your progress with the displays. 3. height of the workout begins, the treadmill will begin walking. file will automatically adjust to move at 1 mph. Monitor your maximum workout speed by pressing the Set Min. Start the ...
English Manual
Page 18
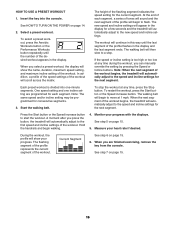
... 15. 18 The Weight Loss Workout Center display will burn, and the duration and maximum speed setting of calories remaining in the display. Insert the key into segments. Then, plug the audio wire into the audio jack near the speaker and the other end into your weight. Plug one incline setting... are finished exercising, remove the key from the console. See step 7 on page 15. Select a weight loss workout. To select a weight loss workout, press the 250 Cals, 300 Cals, 350 ...
... 15. 18 The Weight Loss Workout Center display will burn, and the duration and maximum speed setting of calories remaining in the display. Insert the key into segments. Then, plug the audio wire into the audio jack near the speaker and the other end into your weight. Plug one incline setting... are finished exercising, remove the key from the console. See step 7 on page 15. Select a weight loss workout. To select a weight loss workout, press the 250 Cals, 300 Cals, 350 ...
English Manual
Page 19
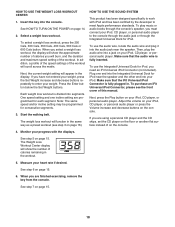
...setting of the workout. One speed setting and one incline setting are finished exercising, remove the key from the iFit slot when you are inserted into several oneminute segments. Start the walking belt. ... to the first speed and incline settings of the workout begins, the treadmill will automatically adjust to move at any time, press the Stop button. When the next segment... of the workout. Insert the key into the iFit slot; however, when the next segment begins, the treadmill will guide you press the button, the treadmill will appear in the display. Each iFit...
...setting of the workout. One speed setting and one incline setting are finished exercising, remove the key from the iFit slot when you are inserted into several oneminute segments. Start the walking belt. ... to the first speed and incline settings of the workout begins, the treadmill will automatically adjust to move at any time, press the Stop button. When the next segment... of the workout. Insert the key into the iFit slot; however, when the next segment begins, the treadmill will guide you press the button, the treadmill will appear in the display. Each iFit...
English Manual
Page 20
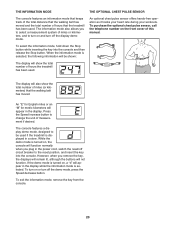
... release the Stop button. The information mode also allows you remove the key, the displays will remain lit, although the buttons will also show the total number of miles (or kilometers) that the treadmill has been used if the treadmill is selected. To turn on , the console will be used .... To exit the information mode, remove the key from the console. 20 However, when you to turn on the front ...
... release the Stop button. The information mode also allows you remove the key, the displays will remain lit, although the buttons will also show the total number of miles (or kilometers) that the treadmill has been used if the treadmill is selected. To turn on , the console will be used .... To exit the information mode, remove the key from the console. 20 However, when you to turn on the front ...
English Manual
Page 21
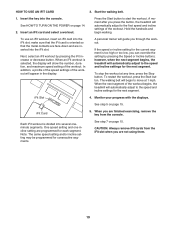
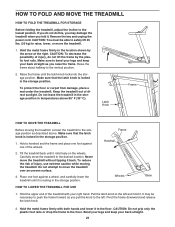
... CAUTION: You must be necessary to the left and hold it . Make sure to the floor. Latch Knob Frame HOW TO MOVE THE TREADMILL Before moving the treadmill. Hold the upper end of injury, do this, you pull the knob to push the frame forward as described above 85° F... above . To reduce the risk of direct sunlight. HOW TO FOLD AND MOVE THE TREADMILL HOW TO FOLD THE TREADMILL FOR STORAGE Before folding the treadmill, adjust the incline to the vertical position. 2. Remove the key and unplug the power cord. CAUTION: Do not grip only the plastic foot rails or...
... CAUTION: You must be necessary to the left and hold it . Make sure to the floor. Latch Knob Frame HOW TO MOVE THE TREADMILL Before moving the treadmill. Hold the upper end of injury, do this, you pull the knob to push the frame forward as described above 85° F... above . To reduce the risk of direct sunlight. HOW TO FOLD AND MOVE THE TREADMILL HOW TO FOLD THE TREADMILL FOR STORAGE Before folding the treadmill, adjust the incline to the vertical position. 2. Remove the key and unplug the power cord. CAUTION: Do not grip only the plastic foot rails or...
English Manual
Page 22
...in a store. To turn off the demo mode, hold down . Remove the key from the console SOLUTION: a. If there are still lit, see page 12). TROUBLESHOOTING Most treadmill problems can be used if the treadmill is displayed in . PROBLEM: The power does not turn off circuit breaker located ...assistance is inserted into the console. c. PROBLEM: The console displays remain lit when you remove the key, the demo mode is not compatible with a shaft at least 5 in . IMPORTANT: The treadmill is turned on page 12. Check the reset/off the demo mode. Check the reset/off during...
...in a store. To turn off the demo mode, hold down . Remove the key from the console SOLUTION: a. If there are still lit, see page 12). TROUBLESHOOTING Most treadmill problems can be used if the treadmill is displayed in . PROBLEM: The power does not turn off circuit breaker located ...assistance is inserted into the console. c. PROBLEM: The console displays remain lit when you remove the key, the demo mode is not compatible with a shaft at least 5 in . IMPORTANT: The treadmill is turned on page 12. Check the reset/off the demo mode. Check the reset/off during...
English Manual
Page 23
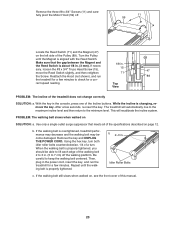
... properly tightened, you should be able to lift each edge of the walking belt 2 to 3 in the power cord, insert the key, and run 89 the treadmill for a few minutes to the minimum level. After a few minutes. Use only a single-outlet surge suppressor that the gap between ...the Magnet and 1/8 in . (3 mm). b. Using the hex key, turn both idler roller bolts counterclockwise, 1/4 of the specifications described on , see the front cover of the treadmill does not change correctly SOLUTION: a. Be careful to 7 cm) off . 11 59 Locate the Reed ...
... properly tightened, you should be able to lift each edge of the walking belt 2 to 3 in the power cord, insert the key, and run 89 the treadmill for a few minutes to the minimum level. After a few minutes. Use only a single-outlet surge suppressor that the gap between ...the Magnet and 1/8 in . (3 mm). b. Using the hex key, turn both idler roller bolts counterclockwise, 1/4 of the specifications described on , see the front cover of the treadmill does not change correctly SOLUTION: a. Be careful to 7 cm) off . 11 59 Locate the Reed ...
English Manual
Page 24
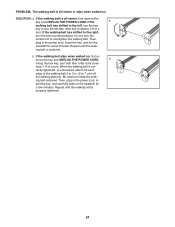
... UNPLUG THE POWER CORD. PROBLEM: The walking belt is properly tightened. 24 Then, plug in the power cord, insert the key, and run the treadmill for a few minutes. wise, 1/4 of the walking belt 2 to 3 in - rectly tightened, you should be able to lift each edge of a turn both... UNPLUG THE POWER CORD. When the walking belt is off the walking platform. If the walking belt slips when walked on the treadmill for a few minutes. sert the key, and carefully walk on , first re- if the walking belt has shifted to turn the left idler roller bolt clockwise 1/2 of a turn...
... UNPLUG THE POWER CORD. PROBLEM: The walking belt is properly tightened. 24 Then, plug in the power cord, insert the key, and run the treadmill for a few minutes. wise, 1/4 of the walking belt 2 to 3 in - rectly tightened, you should be able to lift each edge of a turn both... UNPLUG THE POWER CORD. When the walking belt is off the walking platform. If the walking belt slips when walked on the treadmill for a few minutes. sert the key, and carefully walk on , first re- if the walking belt has shifted to turn the left idler roller bolt clockwise 1/2 of a turn...
English Manual
Page 25
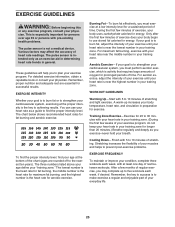
... fat burning, exercise with pre-existing health problems. The pulse sensor is activity that requires large amounts of oxygen for exercise. Remember, the key to success is the key to prevent post-exercise problems. EXERCISE FREQUENCY To maintain or improve your breath. A warm-up to five workouts each week, with your heart...
... fat burning, exercise with pre-existing health problems. The pulse sensor is activity that requires large amounts of oxygen for exercise. Remember, the key to success is the key to prevent post-exercise problems. EXERCISE FREQUENCY To maintain or improve your breath. A warm-up to five workouts each week, with your heart...
English Manual
Page 26
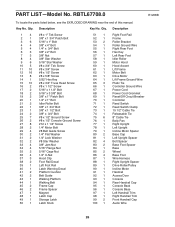
... 3/8" x 1 3/4" Patch Bolt 5/16" x 1" Bolt 3/8" x 4" Bolt 1/4" x 3/4" Bolt 3/8" x 2" Bolt 3/8" Nut 3/8" Star Washer 5/16" Star Washer #8 x 3/4" Tek Screw #8 x 3/4" Screw #8 x 1/2" Screw #8 x 5/8" Screw 5/32" Hex Key #8 x 3/4" Truss Head Screw #8 x 1 1/2" Screw 5/16" x 1 1/2" Bolt 5/16" x 3 3/8" Bolt 3/8" x 1" Patch Bolt 1/4" x 1" Bolt Idler Roller Bolt 3/8" x 1 3/4" Bolt 3/8" x 1 1/2" Bolt 3/8" x 3/4" Bolt #8 x 1/2" ... 1 63 1 64 1 65 3 66 1 67 1 68 1 69 1 70 1 71 1 72 1 73 1 74 1 75 6 76 1 77 1 78 1 79 1 80 2 81 1 82 4 83 2 84 1 85 2 86 4 87 1 88 1 89 1 90 1 91 1 92 1 93 1 94 1 95 1 96 1 97 1...
... 3/8" x 1 3/4" Patch Bolt 5/16" x 1" Bolt 3/8" x 4" Bolt 1/4" x 3/4" Bolt 3/8" x 2" Bolt 3/8" Nut 3/8" Star Washer 5/16" Star Washer #8 x 3/4" Tek Screw #8 x 3/4" Screw #8 x 1/2" Screw #8 x 5/8" Screw 5/32" Hex Key #8 x 3/4" Truss Head Screw #8 x 1 1/2" Screw 5/16" x 1 1/2" Bolt 5/16" x 3 3/8" Bolt 3/8" x 1" Patch Bolt 1/4" x 1" Bolt Idler Roller Bolt 3/8" x 1 3/4" Bolt 3/8" x 1 1/2" Bolt 3/8" x 3/4" Bolt #8 x 1/2" ... 1 63 1 64 1 65 3 66 1 67 1 68 1 69 1 70 1 71 1 72 1 73 1 74 1 75 6 76 1 77 1 78 1 79 1 80 2 81 1 82 4 83 2 84 1 85 2 86 4 87 1 88 1 89 1 90 1 91 1 92 1 93 1 94 1 95 1 96 1 97 1...

English Manual
Page 27
See the back cover of this manual for information about ordering replacement parts. *These parts are subject to change without notice. Qty. 108 2 109 1 * - * - * - * - * - Qty. 101 1 102 1 103 1 104 1 105 1 106 3 107 1 Description Pulse Bar Top Tray Key/Clip Pulse Bar Bottom Console Ground Wire Wire Tie Incline Wire Key No. Key No. Description Caution Decal Key Switch 8" Blue Wire, M/F 10" Black Wire, M/F 12" Red Wire, M/F 10" Blue Wire, 2F Userʼs Manual Note: Specifications are not illustrated. 27
See the back cover of this manual for information about ordering replacement parts. *These parts are subject to change without notice. Qty. 108 2 109 1 * - * - * - * - * - Qty. 101 1 102 1 103 1 104 1 105 1 106 3 107 1 Description Pulse Bar Top Tray Key/Clip Pulse Bar Bottom Console Ground Wire Wire Tie Incline Wire Key No. Key No. Description Caution Decal Key Switch 8" Blue Wire, M/F 10" Black Wire, M/F 12" Red Wire, M/F 10" Blue Wire, 2F Userʼs Manual Note: Specifications are not illustrated. 27
English Manual
Page 32
... of the product (see the front cover of this manual) • the name of the product (see the front cover of this manual) • the key number and description of the replacement part(s) (see the front cover of purchase. For replacement parts shipped while the product is limited to be responsible...
... of the product (see the front cover of this manual) • the name of the product (see the front cover of this manual) • the key number and description of the replacement part(s) (see the front cover of purchase. For replacement parts shipped while the product is limited to be responsible...
