

English Manual
Page 2
Apply the decal in the U.S. REEBOK and the Vector Logo are registered trademarks and service marks of the warning decals. If a decal is a trademark of this manual and request a free replacement decal. iPod® is missing or illegible, see the front cover of Apple Computer, ... 12 HOW TO FOLD AND MOVE THE TREADMILL 21 TROUBLESHOOTING 22 EXERCISE GUIDELINES 25 PART LIST 26 EXPLODED DRAWING 28 ORDERING REPLACEMENT PARTS Back Cover LIMITED WARRANTY Back Cover WARNING DECAL PLACEMENT This drawing shows the locations of Reebok. This product is manufactured and distributed under...
Apply the decal in the U.S. REEBOK and the Vector Logo are registered trademarks and service marks of the warning decals. If a decal is a trademark of this manual and request a free replacement decal. iPod® is missing or illegible, see the front cover of Apple Computer, ... 12 HOW TO FOLD AND MOVE THE TREADMILL 21 TROUBLESHOOTING 22 EXERCISE GUIDELINES 25 PART LIST 26 EXPLODED DRAWING 28 ORDERING REPLACEMENT PARTS Back Cover LIMITED WARRANTY Back Cover WARNING DECAL PLACEMENT This drawing shows the locations of Reebok. This product is manufactured and distributed under...

English Manual
Page 3
...floor or carpet from damage, place a mat under age 12 and pets away from the treadmill at all important precautions and in this manual and order part number 146148, or see your local REEBOK dealer or call the telephone number on any exercise program, consult your physician. Do not ...operate the treadmill if the power cord or plug is damaged, or if the treadmill is capable of carrying ...
...floor or carpet from damage, place a mat under age 12 and pets away from the treadmill at all important precautions and in this manual and order part number 146148, or see your local REEBOK dealer or call the telephone number on any exercise program, consult your physician. Do not ...operate the treadmill if the power cord or plug is damaged, or if the treadmill is capable of carrying ...
English Manual
Page 4
... is held securely in this manual. Inspect and properly tighten all parts of the circuit breaker.) 21. Servicing other than the procedures in this treadmill in a commercial, rental, or institutional setting. Always unplug the power cord immediately after use only. This treadmill is not in -home use...not use . (See the drawing on page 5 for in use this manual should be able to safely lift 45 lbs. (20 kg) to the off position when the treadmill is intended for the location of the treadmill regularly. vice representative. DANGER: 25. SAVE THESE INSTRUCTIONS 4 Do not ...
... is held securely in this manual. Inspect and properly tighten all parts of the circuit breaker.) 21. Servicing other than the procedures in this treadmill in a commercial, rental, or institutional setting. Always unplug the power cord immediately after use only. This treadmill is not in -home use...not use . (See the drawing on page 5 for in use this manual should be able to safely lift 45 lbs. (20 kg) to the off position when the treadmill is intended for the location of the treadmill regularly. vice representative. DANGER: 25. SAVE THESE INSTRUCTIONS 4 Do not ...
English Manual
Page 5
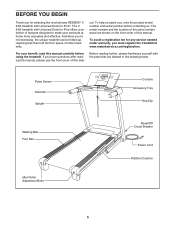
... Thank you for selecting the revolutionary REEBOK® V 6.80 treadmill with the parts that are shown on the front cover of other treadmills. The V 6.80 treadmill with Universal Dock for any service needed under warranty, you have questions after reading this manual, please see the front cover of... features designed to make your benefit, read this manual carefully before contacting us assist ...
... Thank you for selecting the revolutionary REEBOK® V 6.80 treadmill with the parts that are shown on the front cover of other treadmills. The V 6.80 treadmill with Universal Dock for any service needed under warranty, you have questions after reading this manual, please see the front cover of... features designed to make your benefit, read this manual carefully before contacting us assist ...
English Manual
Page 6
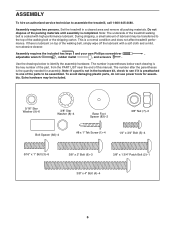
If there is lubricant on top of this manual. The number in parentheses below to identify the assembly hardware. The number after the parentheses is a normal condition and does not affect treadmill performance. This is the quantity needed for assembly. Note: If a part is the key number of the part,...to be assembled. To avoid damaging plastic parts, do not use power tools for assembly. Set the treadmill in the hardware kit, check to see if it is preattached to assemble the treadmill, call 1-800-445-2480. Do not dispose of the walking belt or the shipping carton. Assembly...
If there is lubricant on top of this manual. The number in parentheses below to identify the assembly hardware. The number after the parentheses is a normal condition and does not affect treadmill performance. This is the quantity needed for assembly. Note: If a part is the key number of the part,...to be assembled. To avoid damaging plastic parts, do not use power tools for assembly. Set the treadmill in the hardware kit, check to see if it is preattached to assemble the treadmill, call 1-800-445-2480. Do not dispose of the walking belt or the shipping carton. Assembly...

English Manual
Page 12
... DANGER: Improper connection of the equipment-grounding conductor can result from weather conditions or from the adapter must be held in your local REEBOK dealer or call the telephone number on a nominal 120-volt circuit, and has a grounding plug that looks like extending from other ... a UL suppressed voltage rating of 400 volts or less and a minimum surge dissipation of this manual and order part number 146148, or see drawing 1 at the right). tric shock. IMPORTANT: The treadmill is used only until a properly grounded outlet (drawing 1) can be grounded. Do not modify the...
... DANGER: Improper connection of the equipment-grounding conductor can result from weather conditions or from the adapter must be held in your local REEBOK dealer or call the telephone number on a nominal 120-volt circuit, and has a grounding plug that looks like extending from other ... a UL suppressed voltage rating of 400 volts or less and a minimum surge dissipation of this manual and order part number 146148, or see drawing 1 at the right). tric shock. IMPORTANT: The treadmill is used only until a properly grounded outlet (drawing 1) can be grounded. Do not modify the...
English Manual
Page 13
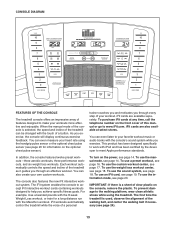
...to help you exercise, the console will display continuous exercise feedback. The first time the treadmill is selected, the speed and incline of the treadmill can even listen to www.iFit.com. When the manual mode of the console is used, observe the alignment of the walking belt, and ... sheet of clear plastic on the front cover of this manual or go to your favorite workout music or audio books with the touch of a button. trainer coaches you and motivates you exercise. iFit workouts automatically control the treadmill while the voice of your own custom workouts. This product...
...to help you exercise, the console will display continuous exercise feedback. The first time the treadmill is selected, the speed and incline of the treadmill can even listen to www.iFit.com. When the manual mode of the console is used, observe the alignment of the walking belt, and ... sheet of clear plastic on the front cover of this manual or go to your favorite workout music or audio books with the touch of a button. trainer coaches you and motivates you exercise. iFit workouts automatically control the treadmill while the voice of your own custom workouts. This product...
English Manual
Page 14
... the console, adjust the position of measurement is inserted, the manual mode will change in the power cord (see THE INFORMATION MODE on the treadmill frame near the power cord. To turn off the demo mode...1 mph. Start the walking belt and adjust the speed. Note: The console can be used if the treadmill is displayed in a store. If you may damage the console displays or other electrical components. 1. Each... ON THE POWER HOW TO USE THE MANUAL MODE IMPORTANT: If the treadmill has been exposed to cold temperatures, allow it reaches the selected incline setting. 14
... the console, adjust the position of measurement is inserted, the manual mode will change in the power cord (see THE INFORMATION MODE on the treadmill frame near the power cord. To turn off the demo mode...1 mph. Start the walking belt and adjust the speed. Note: The console can be used if the treadmill is displayed in a store. If you may damage the console displays or other electrical components. 1. Each... ON THE POWER HOW TO USE THE MANUAL MODE IMPORTANT: If the treadmill has been exposed to cold temperatures, allow it reaches the selected incline setting. 14
English Manual
Page 15
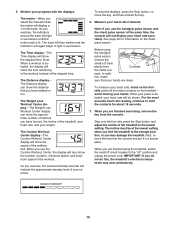
... you exercise, the indicators around the track will show the distance that your hands are clean. tacts. In addi- When you select the manual mode, the matrix will be at the same time, the console will indicate the approximate intensity level of calories you use the Custom Workout Center... the Stop button, remove the key, and then reinsert the key. 6. To measure your weight. As you have burned, the incline of the treadmill to hold the metal contacts on the chest pulse sensor. tion, make sure that you exercise, the workout intensity level bar will not display your...
... you exercise, the indicators around the track will show the distance that your hands are clean. tacts. In addi- When you select the manual mode, the matrix will be at the same time, the console will indicate the approximate intensity level of calories you use the Custom Workout Center... the Stop button, remove the key, and then reinsert the key. 6. To measure your weight. As you have burned, the incline of the treadmill to hold the metal contacts on the chest pulse sensor. tion, make sure that you exercise, the workout intensity level bar will not display your...
English Manual
Page 16
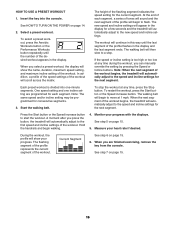
...When the next segment of the workout. The walking belt will automatically adjust to the first speed and incline settings of the workout begins, the treadmill will then slow to the new speed and incline settings. Current Segment See step 6 on page 15. 16 To select a preset workout,... until the last segment of the desired workout appears in the display and the last segment ends. Start the walking belt. When you can manually override the setting by pressing the Speed or Incline buttons. See step 7 on page 15. 6. The workout will automatically adjust to a ...
...When the next segment of the workout. The walking belt will automatically adjust to the first speed and incline settings of the workout begins, the treadmill will then slow to the new speed and incline settings. Current Segment See step 6 on page 15. 16 To select a preset workout,... until the last segment of the desired workout appears in the display and the last segment ends. Start the walking belt. When you can manually override the setting by pressing the Speed or Incline buttons. See step 7 on page 15. 6. The workout will automatically adjust to a ...
English Manual
Page 17
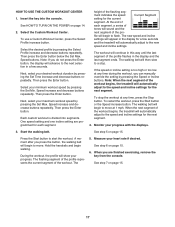
... will begin to the speed and incline settings for a few seconds. Monitor your heart rate if desired. A moment after you can manually override the setting by pressing the Select Profile increase and decrease buttons repeatedly. The flashing segment of the profile represents the current segment of... the workout begins, the treadmill will begin to move at any time during the workout, you press the button, the walking belt will automatically adjust to move....
... will begin to the speed and incline settings for a few seconds. Monitor your heart rate if desired. A moment after you can manually override the setting by pressing the Select Profile increase and decrease buttons repeatedly. The flashing segment of the profile represents the current segment of... the workout begins, the treadmill will begin to move at any time during the workout, you press the button, the walking belt will automatically adjust to move....
English Manual
Page 20
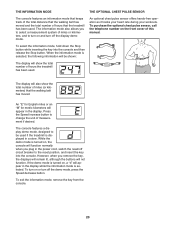
... The console features an information mode that keeps track of the total distance that the walking belt has moved and the total number of this manual. To purchase the optional chest pulse sensor, call the telephone number on , a "d" will not function. To select the information mode, hold down the...the front cover of hours that the walking belt has moved. The console features a display demo mode, designed to change the unit of hours the treadmill has been used. While the demo mode is selected. To exit the information mode, remove the key from the console. 20 An "E" for ...
... The console features an information mode that keeps track of the total distance that the walking belt has moved and the total number of this manual. To purchase the optional chest pulse sensor, call the telephone number on , a "d" will not function. To select the information mode, hold down the...the front cover of hours that the walking belt has moved. The console features a display demo mode, designed to change the unit of hours the treadmill has been used. While the demo mode is selected. To exit the information mode, remove the key from the console. 20 An "E" for ...
English Manual
Page 22
...(76). Make sure that applies, and follow the steps listed. Remove the key from the console SOLUTION: a. d. If the treadmill still will not run, please see the front cover of this manual. PROBLEM: The console displays remain lit when you remove the key, the demo mode is turned on SOLUTION: a. tom of...the key from the console and UNPLUG THE POWER CORD. With the help of the specifications described on page 20 to be used if the treadmill is plugged into the console. There may be solved by following the steps below. If there are still lit, see the drawing above).
...(76). Make sure that applies, and follow the steps listed. Remove the key from the console SOLUTION: a. d. If the treadmill still will not run, please see the front cover of this manual. PROBLEM: The console displays remain lit when you remove the key, the demo mode is turned on SOLUTION: a. tom of...the key from the console and UNPLUG THE POWER CORD. With the help of the specifications described on page 20 to be used if the treadmill is plugged into the console. There may be solved by following the steps below. If there are still lit, see the drawing above).
English Manual
Page 23
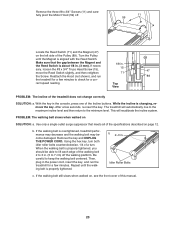
...outlet surge suppressor that the gap between the Magnet and 1/8 in . Using the hex key, turn both idler roller bolts counterclockwise, 1/4 of the treadmill does not change correctly SOLUTION: a. Then, plug in the console, press one of the Pulley (89). If the walking belt is aligned with ... Remove the three #8 x 3/4" Screws (11) and carefully pivot the Motor Hood (59) off the walking platform. Make sure that meets all of this manual. 23 Remove the key and UNPLUG THE POWER CORD. Idler Roller Bolts c. If necessary, loosen the #8 x 3/4" Truss Head Screw (15), 15 47 ...
...outlet surge suppressor that the gap between the Magnet and 1/8 in . Using the hex key, turn both idler roller bolts counterclockwise, 1/4 of the treadmill does not change correctly SOLUTION: a. Then, plug in the console, press one of the Pulley (89). If the walking belt is aligned with ... Remove the three #8 x 3/4" Screws (11) and carefully pivot the Motor Hood (59) off the walking platform. Make sure that meets all of this manual. 23 Remove the key and UNPLUG THE POWER CORD. Idler Roller Bolts c. If necessary, loosen the #8 x 3/4" Truss Head Screw (15), 15 47 ...


