

English Manual
Page 2
... BEGIN 5 ASSEMBLY 6 OPERATION AND ADJUSTMENT 12 HOW TO FOLD AND MOVE THE TREADMILL 21 TROUBLESHOOTING 22 EXERCISE GUIDELINES 25 PART LIST 26 EXPLODED DRAWING 28 ORDERING REPLACEMENT PARTS Back Cover LIMITED WARRANTY Back Cover WARNING DECAL PLACEMENT This drawing shows the locations of Reebok. REEBOK and the Vector Logo are registered trademarks and service... front cover of Apple Computer, Inc., registered in the location shown. Apply the decal in the U.S. If a decal is manufactured and distributed under license from Reebok International.
... BEGIN 5 ASSEMBLY 6 OPERATION AND ADJUSTMENT 12 HOW TO FOLD AND MOVE THE TREADMILL 21 TROUBLESHOOTING 22 EXERCISE GUIDELINES 25 PART LIST 26 EXPLODED DRAWING 28 ORDERING REPLACEMENT PARTS Back Cover LIMITED WARRANTY Back Cover WARNING DECAL PLACEMENT This drawing shows the locations of Reebok. REEBOK and the Vector Logo are registered trademarks and service... front cover of Apple Computer, Inc., registered in the location shown. Apply the decal in the U.S. If a decal is manufactured and distributed under license from Reebok International.
English Manual
Page 4
... Never remove the motor hood un- When folding or moving the treadmill, make sure that the frame is held securely in this manual. less instructed to raise, lower, or move the treadmill until it is intended for the location of the treadmill regularly. Inspect and properly tighten all parts ... reset/off circuit breaker to raise, lower, or move the treadmill. 22. Do not attempt to the off position when the treadmill is properly assembled. (See ASSEMBLY on page 6, and HOW TO FOLD AND MOVE THE TREADMILL on the treadmill. 24. Never insert any object into any opening on page ...
... Never remove the motor hood un- When folding or moving the treadmill, make sure that the frame is held securely in this manual. less instructed to raise, lower, or move the treadmill until it is intended for the location of the treadmill regularly. Inspect and properly tighten all parts ... reset/off circuit breaker to raise, lower, or move the treadmill. 22. Do not attempt to the off position when the treadmill is properly assembled. (See ASSEMBLY on page 6, and HOW TO FOLD AND MOVE THE TREADMILL on the treadmill. 24. Never insert any object into any opening on page ...
English Manual
Page 5
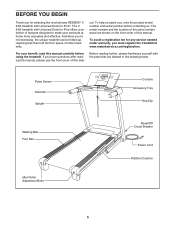
... 5 BEFORE YOU BEGIN Thank you for selecting the revolutionary REEBOK® V 6.80 treadmill with Universal Dock for any service needed under warranty, you must register the treadmill at home more enjoyable and effective. And when youʼre not exercising, the unique treadmill can be folded up, requiring less than half the floor space of features...
... 5 BEFORE YOU BEGIN Thank you for selecting the revolutionary REEBOK® V 6.80 treadmill with Universal Dock for any service needed under warranty, you must register the treadmill at home more enjoyable and effective. And when youʼre not exercising, the unique treadmill can be folded up, requiring less than half the floor space of features...

English Manual
Page 7
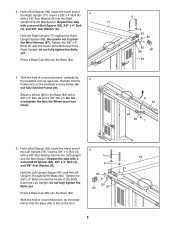
...Foot Spacers (83). 83 52 86 1 Then, attach the other end of the Wire Harness (87). 1. Partially fold the Frame (52) so that the power cord is unplugged. 1 With the help of the hole. the Wheel ...) near the Wire Harness (87). 2 Attach a Wheel (85) to the Base (84). do not fully fold the Frame yet. Then, set the Right Upright Spacer on the Base (84). See the inset drawing. Attach two...Base Feet (86) to pull the Wire Harness out of a second person, carefully tip 87 the treadmill onto its left side. Cut the plastic tie near the Base (84). Identify the Right Upright (...
...Foot Spacers (83). 83 52 86 1 Then, attach the other end of the Wire Harness (87). 1. Partially fold the Frame (52) so that the power cord is unplugged. 1 With the help of the hole. the Wheel ...) near the Wire Harness (87). 2 Attach a Wheel (85) to the Base (84). do not fully fold the Frame yet. Then, set the Right Upright Spacer on the Base (84). See the inset drawing. Attach two...Base Feet (86) to pull the Wire Harness out of a second person, carefully tip 87 the treadmill onto its left side. Cut the plastic tie near the Base (84). Identify the Right Upright (...
English Manual
Page 8
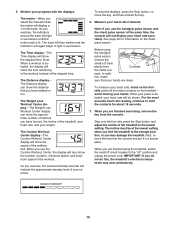
...fold the 5 Frame (52) so the treadmill is flat on the floor. 8 Attach a Wheel (85) to pinch the Wire Harness (87). Insert a 3/8" x 4" Bolt (4) 6 with a 3/8" x 2" Bolt (6) and a 3/8" Nut (7). With the help of the Left Upright (78). Hold a Bolt Spacer (82) inside the lower end of a second person, carefully tip the treadmill... Right Upright; With the help of the Right Upright (77). do not fully tighten the Bolts yet. 82 82 80 84 Press a Base Cap (80) into the Left Upright 4 and the Bolt Spacer. Do not overtighten the Nut; Repeat this step with a second...
...fold the 5 Frame (52) so the treadmill is flat on the floor. 8 Attach a Wheel (85) to pinch the Wire Harness (87). Insert a 3/8" x 4" Bolt (4) 6 with a 3/8" x 2" Bolt (6) and a 3/8" Nut (7). With the help of the Left Upright (78). Hold a Bolt Spacer (82) inside the lower end of a second person, carefully tip the treadmill... Right Upright; With the help of the Right Upright (77). do not fully tighten the Bolts yet. 82 82 80 84 Press a Base Cap (80) into the Left Upright 4 and the Bolt Spacer. Do not overtighten the Nut; Repeat this step with a second...
English Manual
Page 15
...approximate number of calories you select the manual mode, the matrix will show the elapsed time. As you have burned, the incline of the treadmill to the lowest setting. To measure your heart rate accurately. avoid moving your heart rate if desired. When you use the handgrip pulse sensor... and the chest pulse sensor at the lowest setting when you fold the treadmill to the "off" position and unplug the power cord. When you are finished exercising, remove the key from Contacts the metal con- To...
...approximate number of calories you select the manual mode, the matrix will show the elapsed time. As you have burned, the incline of the treadmill to the lowest setting. To measure your heart rate accurately. avoid moving your heart rate if desired. When you use the handgrip pulse sensor... and the chest pulse sensor at the lowest setting when you fold the treadmill to the "off" position and unplug the power cord. When you are finished exercising, remove the key from Contacts the metal con- To...
English Manual
Page 21
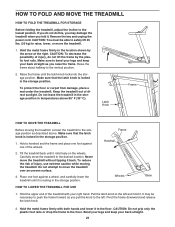
... that the latch knob is locked in the storage position. 1. Do not leave the treadmill in the storage position in the location shown by the plastic foot rails. It may damage the treadmill when you fold it rolls freely on the wheels. Pivot the frame downward and release the latch knob....position. CAUTION: Do not grip only the plastic foot rails or drop the frame to the floor. HOW TO FOLD AND MOVE THE TREADMILL HOW TO FOLD THE TREADMILL FOR STORAGE Before folding the treadmill, adjust the incline to bend your legs and keep your right hand. Remove the key and unplug the power...
... that the latch knob is locked in the storage position. 1. Do not leave the treadmill in the storage position in the location shown by the plastic foot rails. It may damage the treadmill when you fold it rolls freely on the wheels. Pivot the frame downward and release the latch knob....position. CAUTION: Do not grip only the plastic foot rails or drop the frame to the floor. HOW TO FOLD AND MOVE THE TREADMILL HOW TO FOLD THE TREADMILL FOR STORAGE Before folding the treadmill, adjust the incline to bend your legs and keep your right hand. Remove the key and unplug the power...
