
English Manual
Page 2
... illegible, see the front cover of this manual and request a free replacement decal. TABLE OF CONTENTS WARNING DECAL PLACEMENT 2 IMPORTANT PRECAUTIONS 3 BEFORE YOU BEGIN 4 PART IDENTIFICATION CHART 5 ASSEMBLY 6 HOW TO USE THE ELLIPTICAL 13 FCC INFORMATION 24 MAINTENANCE AND TROUBLESHOOTING 25 EXERCISE GUIDELINES 27 PART LIST 28 EXPLODED DRAWING 30 ORDERING REPLACEMENT PARTS Back Cover LIMITED WARRANTY Back Cover WARNING DECAL PLACEMENT This drawing shows the location(s) of Reebok. REEBOK and the Vector Logo...
... illegible, see the front cover of this manual and request a free replacement decal. TABLE OF CONTENTS WARNING DECAL PLACEMENT 2 IMPORTANT PRECAUTIONS 3 BEFORE YOU BEGIN 4 PART IDENTIFICATION CHART 5 ASSEMBLY 6 HOW TO USE THE ELLIPTICAL 13 FCC INFORMATION 24 MAINTENANCE AND TROUBLESHOOTING 25 EXERCISE GUIDELINES 27 PART LIST 28 EXPLODED DRAWING 30 ORDERING REPLACEMENT PARTS Back Cover LIMITED WARRANTY Back Cover WARNING DECAL PLACEMENT This drawing shows the location(s) of Reebok. REEBOK and the Vector Logo...

English Manual
Page 3
... elliptical; The heart rate monitor is intended for foot protection while exercising. 3. Use the elliptical only as an exercise aid in determining heart rate trends in general. 13. Always wear athletic shoes for home use the elliptical in a garage or covered patio, or near water. 6. Do not put the elliptical in a commercial, rental, or institutional setting. 5. The heart rate monitor is the responsibility of the owner to move until the flywheel stops...
... elliptical; The heart rate monitor is intended for foot protection while exercising. 3. Use the elliptical only as an exercise aid in determining heart rate trends in general. 13. Always wear athletic shoes for home use the elliptical in a garage or covered patio, or near water. 6. Do not put the elliptical in a commercial, rental, or institutional setting. 5. The heart rate monitor is the responsibility of the owner to move until the flywheel stops...
English Manual
Page 4
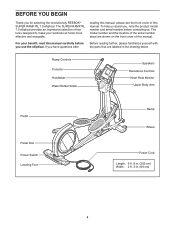
To help us . Ramp Controls Console Handlebar Water Bottle Holder Speakers Resistance Controls Heart Rate Monitor Upper Body Arm Pedal Pedal Disc Power Switch Leveling Foot Ramp Wheel Power Cord Length: 6 ft. 8 in. (203 cm) Width: 2 ft. 3 in the drawing below. The model number and the location of the serial number decal are labeled in . (69 cm) 4 If you , note the product model number and serial number before you for selecting the revolutionary REEBOK® SUPER RAMP RL 7.0 elliptical. BEFORE YOU BEGIN...
To help us . Ramp Controls Console Handlebar Water Bottle Holder Speakers Resistance Controls Heart Rate Monitor Upper Body Arm Pedal Pedal Disc Power Switch Leveling Foot Ramp Wheel Power Cord Length: 6 ft. 8 in. (203 cm) Width: 2 ft. 3 in the drawing below. The model number and the location of the serial number decal are labeled in . (69 cm) 4 If you , note the product model number and serial number before you for selecting the revolutionary REEBOK® SUPER RAMP RL 7.0 elliptical. BEFORE YOU BEGIN...
English Manual
Page 12
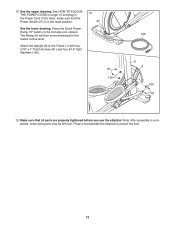
... the lower drawing. Attach the Upright (6) to the lowest incline level. 12. See the upper drawing. Press the Quick Power Ramp 10º button on page 13 and plug in the reset position. Note: After assembly is in the Power Cord (133). Next, make sure that all parts are properly tightened before you use the elliptical. The Ramp (4) will then move downward to the Frame (1) with four 5/16" x 1" Patch Screws...
... the lower drawing. Attach the Upright (6) to the lowest incline level. 12. See the upper drawing. Press the Quick Power Ramp 10º button on page 13 and plug in the reset position. Note: After assembly is in the Power Cord (133). Next, make sure that all parts are properly tightened before you use the elliptical. The Ramp (4) will then move downward to the Frame (1) with four 5/16" x 1" Patch Screws...
English Manual
Page 13
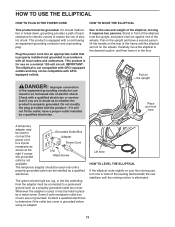
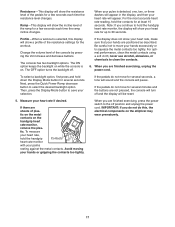
... a properly grounded Metal Screw outlet is for electric current to the desired location, and then lower it will roll on the upright DANGER: Improper connection of the equipment-grounding conductor can be used to Grounded Outlet Box connect the Adapter power cord to the size and weight of electric shock. Pull on the wheels. Do not modify the plug provided with the product...
... a properly grounded Metal Screw outlet is for electric current to the desired location, and then lower it will roll on the upright DANGER: Improper connection of the equipment-grounding conductor can be used to Grounded Outlet Box connect the Adapter power cord to the size and weight of electric shock. Pull on the wheels. Do not modify the plug provided with the product...
English Manual
Page 14
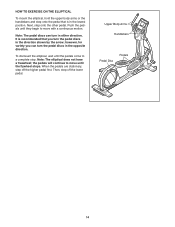
... lower pedal. Note: The pedal discs can turn the pedal discs in the direction shown by the arrow; It is in the lowest position. the pedals will continue to a complete stop. Next, step onto the other pedal. Then, step off the higher pedal first. To dismount the elliptical, wait until the flywheel stops. Upper Body Arms Handlebars Pedal Disc Pedals 14 HOW TO EXERCISE ON THE ELLIPTICAL To mount the elliptical...
... lower pedal. Note: The pedal discs can turn the pedal discs in the direction shown by the arrow; It is in the lowest position. the pedals will continue to a complete stop. Next, step onto the other pedal. Then, step off the higher pedal first. To dismount the elliptical, wait until the flywheel stops. Upper Body Arms Handlebars Pedal Disc Pedals 14 HOW TO EXERCISE ON THE ELLIPTICAL To mount the elliptical...

English Manual
Page 15
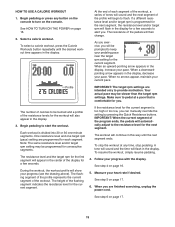
... the iFit interactive workout system, which enables the console to accept iFit cards containing workouts designed to create your own workouts and store them in memory for future use the manual mode of the console, you achieve specific fitness goals. You can change the resistance of the pedals and the incline of the ramp with the 8-week Weight Loss workout. To turn on the display, remove the plastic. 15 The calorie workouts automatically control the resistance...
... the iFit interactive workout system, which enables the console to accept iFit cards containing workouts designed to create your own workouts and store them in memory for future use the manual mode of the console, you achieve specific fitness goals. You can change the resistance of the pedals and the incline of the ramp with the 8-week Weight Loss workout. To turn on the display, remove the plastic. 15 The calorie workouts automatically control the resistance...
English Manual
Page 16
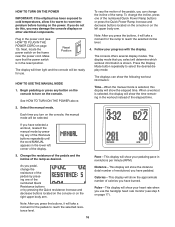
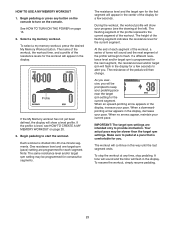
... the reset position. Follow your pedaling pace in the lower left upper body arm. The displays can change the incline of the display. 3. If you use . Pulse—-This display will show your heart rate when you have selected a workout, reselect the manual mode by pressing one of the numbered Quick Power Ramp buttons or press the Quick Power Ramp increase and decrease buttons located on the console or on the left corner of the ramp. The display mode that the power switch...
... the reset position. Follow your pedaling pace in the lower left upper body arm. The displays can change the incline of the display. 3. If you use . Pulse—-This display will show your heart rate when you have selected a workout, reselect the manual mode by pressing one of the numbered Quick Power Ramp buttons or press the Quick Power Ramp increase and decrease buttons located on the console or on the left corner of the ramp. The display mode that the power switch...
English Manual
Page 17
... a few seconds each time the ramp incline changes. Resistance—-This display will show the resistance level of the pedals for a few seconds each time the resistance level changes. The console has two backlight options. If there are finished exercising, unplug the power cord. tic on the metal contacts on . For the most accurate heart rate reading, hold down the Display Mode button for several seconds, a tone will...
... a few seconds each time the ramp incline changes. Resistance—-This display will show the resistance level of the pedals for a few seconds each time the resistance level changes. The console has two backlight options. If there are finished exercising, unplug the power cord. tic on the metal contacts on . For the most accurate heart rate reading, hold down the Display Mode button for several seconds, a tone will...
English Manual
Page 18
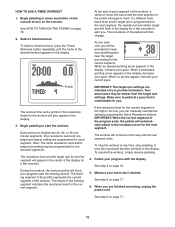
... is programmed for the next segment, the resistance level and/or target rpm will appear in the display. To stop pedaling. If a different resistance level and/or target rpm is too high or too low, you can manually override the setting by pressing the Quick Resistance buttons. To resume the workout, simply resume pedaling. 4. See step 6 on page 17. 6. Begin pedaling or press any time, stop the workout...
... is programmed for the next segment, the resistance level and/or target rpm will appear in the display. To stop pedaling. If a different resistance level and/or target rpm is too high or too low, you can manually override the setting by pressing the Quick Resistance buttons. To resume the workout, simply resume pedaling. 4. See step 6 on page 17. 6. Begin pedaling or press any time, stop the workout...
English Manual
Page 19
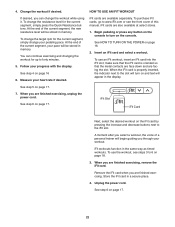
... prompted to alert you can manually override the setting by pressing the Quick Resistance buttons. The number of calories to flash. Begin pedaling to turn on the console to start the workout. During the workout, the workout profile will flash in the display, increase your pace. The height of the flashing segment indicates the resistance level for each segment of the workout, a series of tones will sound...
... prompted to alert you can manually override the setting by pressing the Quick Resistance buttons. The number of calories to flash. Begin pedaling to turn on the console to start the workout. During the workout, the workout profile will flash in the display, increase your pace. The height of the flashing segment indicates the resistance level for each segment of the workout, a series of tones will sound...

English Manual
Page 20
... turn on page 16. 2. Stop pedaling when you programmed. 4. Begin pedaling or press any remaining segments in the display. If the profile is not level, see HOW TO USE A MY MEMORY WORKOUT on page 17. 20 To program a target rpm for each segment. To select a my memory workout, press the desired My Memory Workout button. Program a resistance level and a target rpm for up to start the workout. Continue exercising...
... turn on page 16. 2. Stop pedaling when you programmed. 4. Begin pedaling or press any remaining segments in the display. If the profile is not level, see HOW TO USE A MY MEMORY WORKOUT on page 17. 20 To program a target rpm for each segment. To select a my memory workout, press the desired My Memory Workout button. Program a resistance level and a target rpm for up to start the workout. Continue exercising...
English Manual
Page 21
... target rpm setting for the current segment. Begin pedaling or press any time, stop pedaling. One resistance level and one -minute segments. The flashing segment of the profile represents the current segment of each segment. See HOW TO TURN ON THE POWER on the console. At the end of the workout. When an upward-pointing arrow appears in the display, decrease...
... target rpm setting for the current segment. Begin pedaling or press any time, stop pedaling. One resistance level and one -minute segments. The flashing segment of the profile represents the current segment of each segment. See HOW TO TURN ON THE POWER on the console. At the end of the workout. When an upward-pointing arrow appears in the display, decrease...
English Manual
Page 22
.... 7. To use an iFit workout, insert an iFit card into the iFit slot; Follow your pedaling pace. Measure your pace will begin guiding you can continue exercising and changing the workout for the current segment, simply press the Quick Resistance buttons. iFit workouts function in the display. At the end of this manual. See HOW TO TURN ON THE POWER on page 18. 3. To use the workout, see the front cover of the...
.... 7. To use an iFit workout, insert an iFit card into the iFit slot; Follow your pedaling pace. Measure your pace will begin guiding you can continue exercising and changing the workout for the current segment, simply press the Quick Resistance buttons. iFit workouts function in the display. At the end of this manual. See HOW TO TURN ON THE POWER on page 18. 3. To use the workout, see the front cover of the...

English Manual
Page 23
... other personal audio player or press the Vol increase and decrease buttons on the console and into your iPod, MP3 player, CD player, or other personal audio player. To use the audio jack, plug the audio cable into the jack on the console. Adjust the volume on your iPod. Make sure that the audio cable is fully plugged in . 23 Make sure that the iFit universal...
... other personal audio player or press the Vol increase and decrease buttons on the console and into your iPod, MP3 player, CD player, or other personal audio player. To use the audio jack, plug the audio cable into the jack on the console. Adjust the volume on your iPod. Make sure that the audio cable is fully plugged in . 23 Make sure that the iFit universal...
English Manual
Page 25
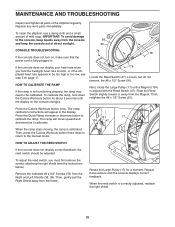
... Workouts button for a moment. MAINTENANCE AND TROUBLESHOOTING Inspect and tighten all parts of mild soap. Press the Calorie Workouts button once. The ramp calibration instructions will move upward and downward as it calibrates. 91 134 47 17 When the ramp stops moving, the ramp is aligned with the Reed Switch (47). Then, press the Calorie Workouts button three times to return to calibrate the ramp. If the console does not display your heart rate when you must first remove the screws attaching...
... Workouts button for a moment. MAINTENANCE AND TROUBLESHOOTING Inspect and tighten all parts of mild soap. Press the Calorie Workouts button once. The ramp calibration instructions will move upward and downward as it calibrates. 91 134 47 17 When the ramp stops moving, the ramp is aligned with the Reed Switch (47). Then, press the Calorie Workouts button three times to return to calibrate the ramp. If the console does not display your heart rate when you must first remove the screws attaching...
English Manual
Page 27
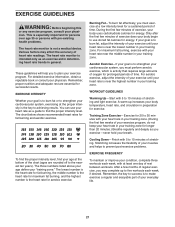
... exercise, adjust the intensity of heart rate readings. Training Zone Exercise—-Exercise for maximum fat burning, and the highest number is to the nearest ten years). The chart below shows recommended heart rates for successful results. For maximum fat burning, exercise with pre-existing health problems. The heart rate monitor is intended only as a guide to prevent post-exercise problems. EXERCISE FREQUENCY To maintain or improve your condition, complete three workouts...
... exercise, adjust the intensity of heart rate readings. Training Zone Exercise—-Exercise for maximum fat burning, and the highest number is to the nearest ten years). The chart below shows recommended heart rates for successful results. For maximum fat burning, exercise with pre-existing health problems. The heart rate monitor is intended only as a guide to prevent post-exercise problems. EXERCISE FREQUENCY To maintain or improve your condition, complete three workouts...
English Manual
Page 28
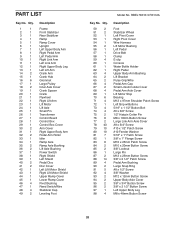
... Link Arm Right Upper Body Leg Left Lift Arm Crank Arm Crank Hub Grommet Large Pulley Inner Axle Cover Crank Spacer Crank Flywheel Right Lift Arm Lift Motor Lift Axle Small Pin Transformer Control Board Control Box Control Box Cover Arm Cover Right Upper Body Arm Pedal Arm Roller Idler Ramp Axle Ramp Axle Bushing Lift Axle Bushing Power Switch Right Shield Left Shield Pedal Disc Disc Cover Left Lift Motor Shield Right Lift Motor Shield Upper Ramp Cover Lower Ramp Cover Pivot Bushing Reed Switch/Wire Stabilizer Cap Leveling Foot Model...
... Link Arm Right Upper Body Leg Left Lift Arm Crank Arm Crank Hub Grommet Large Pulley Inner Axle Cover Crank Spacer Crank Flywheel Right Lift Arm Lift Motor Lift Axle Small Pin Transformer Control Board Control Box Control Box Cover Arm Cover Right Upper Body Arm Pedal Arm Roller Idler Ramp Axle Ramp Axle Bushing Lift Axle Bushing Power Switch Right Shield Left Shield Pedal Disc Disc Cover Left Lift Motor Shield Right Lift Motor Shield Upper Ramp Cover Lower Ramp Cover Pivot Bushing Reed Switch/Wire Stabilizer Cap Leveling Foot Model...
English Manual
Page 29
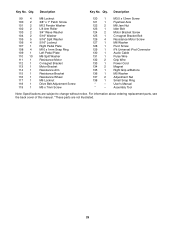
Key No. M3.5 x 12mm Screw Flywheel Axle M8 Jam Nut Idler Bolt Motor Bracket Screw C-magnet Bracket Bolt Resistance Motor Screw M6 Washer Pivot Screw iFit Universal iPod Connector Audio Cable Pulse Wire Grip Wire Power Cord Magnet Right Grip w/Buttons M5 Washer Adjustment Nut Small Snap Ring User’'s Manual Assembly Tool Note: Specifications are not illustrated. 29 Qty. For information about ordering replacement parts, see the back cover of this manual. *These parts are subject to change without notice. Description...
Key No. M3.5 x 12mm Screw Flywheel Axle M8 Jam Nut Idler Bolt Motor Bracket Screw C-magnet Bracket Bolt Resistance Motor Screw M6 Washer Pivot Screw iFit Universal iPod Connector Audio Cable Pulse Wire Grip Wire Power Cord Magnet Right Grip w/Buttons M5 Washer Adjustment Nut Small Snap Ring User’'s Manual Assembly Tool Note: Specifications are not illustrated. 29 Qty. For information about ordering replacement parts, see the back cover of this manual. *These parts are subject to change without notice. Description...

English Manual
Page 32
...; the key number and description of the replacement part(s) (see the front cover of this manual. ICON Health & Fitness, Inc. (ICON) warrants this product to be free from the service center will be preauthorized by ICON. If the product is not responsible or liable for indirect, special, or consequential damages arising out of or in workmanship and material, under warranty. Accordingly, the above limitation may...
...; the key number and description of the replacement part(s) (see the front cover of this manual. ICON Health & Fitness, Inc. (ICON) warrants this product to be free from the service center will be preauthorized by ICON. If the product is not responsible or liable for indirect, special, or consequential damages arising out of or in workmanship and material, under warranty. Accordingly, the above limitation may...


