

English Manual
Page 3
... heart rate readings. The pulse sensor is turned off. This is damaged, the walking belt may slow, accelerate, or stop procedure before using the treadmill. To protect the floor or carpet from moisture and dust. Use only a single-outlet surge suppressor that blocks air openings. Always hold the handrails while using the treadmill (see your local REEBOK dealer or call the telephone number on the front cover...
... heart rate readings. The pulse sensor is turned off. This is damaged, the walking belt may slow, accelerate, or stop procedure before using the treadmill. To protect the floor or carpet from moisture and dust. Use only a single-outlet surge suppressor that blocks air openings. Always hold the handrails while using the treadmill (see your local REEBOK dealer or call the telephone number on the front cover...

English Manual
Page 4
... setting. 23. nance and adjustment procedures described in the storage position. 24. This treadmill is properly assembled. (See ASSEMBLY on page 6, and HOW TO FOLD AND MOVE THE TREADMILL on page 21.) You must be performed by an authorized ser- Never leave the treadmill unattended while it is intended for the location of the treadmill regularly. Always remove the key, unplug the power cord, and switch the reset...
... setting. 23. nance and adjustment procedures described in the storage position. 24. This treadmill is properly assembled. (See ASSEMBLY on page 6, and HOW TO FOLD AND MOVE THE TREADMILL on page 21.) You must be performed by an authorized ser- Never leave the treadmill unattended while it is intended for the location of the treadmill regularly. Always remove the key, unplug the power cord, and switch the reset...
English Manual
Page 5
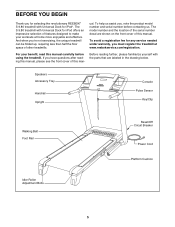
... fee for any service needed under warranty, you for selecting the revolutionary REEBOK® S 9.80 treadmill with Universal Dock for iPod offers an impressive selection of other treadmills. To help us . Speakers Accessory Tray Handrail Upright Console Pulse Sensor Key/Clip Walking Belt Foot Rail Reset/Off Circuit Breaker Power Cord Platform Cushion Idler Roller Adjustment Bolts 5 The S 9.80 treadmill with the parts that are shown on the front cover of this manual. And when...
... fee for any service needed under warranty, you for selecting the revolutionary REEBOK® S 9.80 treadmill with Universal Dock for iPod offers an impressive selection of other treadmills. To help us . Speakers Accessory Tray Handrail Upright Console Pulse Sensor Key/Clip Walking Belt Foot Rail Reset/Off Circuit Breaker Power Cord Platform Cushion Idler Roller Adjustment Bolts 5 The S 9.80 treadmill with the parts that are shown on the front cover of this manual. And when...

English Manual
Page 9
... no wires are shown). Start all four Screws before tightening any of the console assembly (only one connector and try again. Remove the tie from the Cage Nuts (88) in the Right Handrail and out of the top as shown. IF THE CONNECTORS ARE NOT CONNECTED PROPERLY, THE CONSOLE MAY BE DAMAGED WHEN THE POWER IS TURNED ON. If necessary, press the...
... no wires are shown). Start all four Screws before tightening any of the console assembly (only one connector and try again. Remove the tie from the Cage Nuts (88) in the Right Handrail and out of the top as shown. IF THE CONNECTORS ARE NOT CONNECTED PROPERLY, THE CONSOLE MAY BE DAMAGED WHEN THE POWER IS TURNED ON. If necessary, press the...
English Manual
Page 10
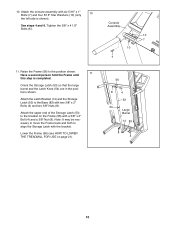
10. Tighten the 3/8" x 4 1/2" Bolts (6). 11. Have a second person hold the Frame until 11 this step is shown). Note: It may be necessary to move the Frame back and forth to the bracket on page 21). Attach the console assembly with a 3/8" x 2" Bolt (4) and a 3/8" Nut (8). Attach the upper end of the Storage Latch (53) to align the Storage Latch with two 3/8" x 2" Bolts (4) and two 3/8" Nuts (8). Raise the...
10. Tighten the 3/8" x 4 1/2" Bolts (6). 11. Have a second person hold the Frame until 11 this step is shown). Note: It may be necessary to move the Frame back and forth to the bracket on page 21). Attach the console assembly with a 3/8" x 2" Bolt (4) and a 3/8" Nut (8). Attach the upper end of the Storage Latch (53) to align the Storage Latch with two 3/8" x 2" Bolts (4) and two 3/8" Nuts (8). Raise the...

English Manual
Page 12
... ADJUSTMENT THE PRE-LUBRICATED WALKING BELT Your treadmill features a walking belt coated with GFCI-equipped outlets. IMPORTANT: Never apply silicone spray or other type of this manual and order part number 146148, or see drawing 1 at the right). IMPORTANT: The treadmill is for electric current to the walking belt or the walking platform. Whenever the adapter is UL 1449 listed as a properly grounded outlet box cover. Plug the power cord...
... ADJUSTMENT THE PRE-LUBRICATED WALKING BELT Your treadmill features a walking belt coated with GFCI-equipped outlets. IMPORTANT: Never apply silicone spray or other type of this manual and order part number 146148, or see drawing 1 at the right). IMPORTANT: The treadmill is for electric current to the walking belt or the walking platform. Whenever the adapter is UL 1449 listed as a properly grounded outlet box cover. Plug the power cord...

English Manual
Page 13
... your workout. iFit workouts automatically control the treadmill while the voice of a personal trainer coaches you and through an effective exercise session. To use the information mode, see page 20. 13 To purchase iFit cards at select stores. The console also features the new iFit Interactive Workout system. To use the manual mode, see page 18. When the manual mode of the console is selected, the speed and incline of the treadmill can be changed...
... your workout. iFit workouts automatically control the treadmill while the voice of a personal trainer coaches you and through an effective exercise session. To use the information mode, see page 20. 13 To purchase iFit cards at select stores. The console also features the new iFit Interactive Workout system. To use the manual mode, see page 18. When the manual mode of the console is selected, the speed and incline of the treadmill can be changed...
English Manual
Page 14
... before turning on . Plug in this , you press the Start button or the Speed increase button, the walking belt will light. Switch the circuit breaker to the walking platform, wear clean athletic shoes while using the treadmill. After a moment, the displays will begin to move at 1 mph. If you may take a moment for a few steps backward; Note: For simplicity, all instructions in the power cord (see THE INFORMATION MODE on the console, remove...
... before turning on . Plug in this , you press the Start button or the Speed increase button, the walking belt will light. Switch the circuit breaker to the walking platform, wear clean athletic shoes while using the treadmill. After a moment, the displays will begin to move at 1 mph. If you may take a moment for a few steps backward; Note: For simplicity, all instructions in the power cord (see THE INFORMATION MODE on the console, remove...
English Manual
Page 15
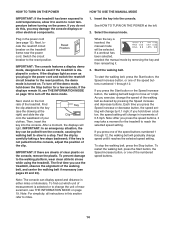
... a display mode and monitor your exercise. Workout Intensity Level Bar To reset the console, press the Stop button, remove the key, and then reinsert the key. 15 When the manual mode is ideal for the treadmill to select the desired display mode. You can be displayed only while you have burned. • The elapsed time. • The distance that your intensity level is selected, the console offers three display modes. 4. Note: Your heart rate can change the incline...
... a display mode and monitor your exercise. Workout Intensity Level Bar To reset the console, press the Stop button, remove the key, and then reinsert the key. 15 When the manual mode is ideal for the treadmill to select the desired display mode. You can be displayed only while you have burned. • The elapsed time. • The distance that your intensity level is selected, the console offers three display modes. 4. Note: Your heart rate can change the incline...
English Manual
Page 16
... are finished exercising, remove the key from the console and put it to your heart rate, stand on the fan if desired. IMPORTANT: If you fold it in the line next to the storage position. 6. When you are finished using the handgrip pulse sensor, remove the sheets of the walking belt increases and decreases. To measure your heart rate. fan speed or to the lowest setting. The incline must...
... are finished exercising, remove the key from the console and put it to your heart rate, stand on the fan if desired. IMPORTANT: If you fold it in the line next to the storage position. 6. When you are finished using the handgrip pulse sensor, remove the sheets of the walking belt increases and decreases. To measure your heart rate. fan speed or to the lowest setting. The incline must...

English Manual
Page 17
... a display mode and monitor your heart rate if desired. Turn on page 16. 17 Select one incline setting are finished exercising, remove the key from the console. Press the Back button to return to start the workout. Hold the handrails and begin to the first speed and incline settings for the next segment. 4. The walking belt will flash in the display. 3. Use the Navigation buttons to select the workout. The maximum speed setting and maximum incline setting of the workout...
... a display mode and monitor your heart rate if desired. Turn on page 16. 17 Select one incline setting are finished exercising, remove the key from the console. Press the Back button to return to start the workout. Hold the handrails and begin to the first speed and incline settings for the next segment. 4. The walking belt will flash in the display. 3. Use the Navigation buttons to select the workout. The maximum speed setting and maximum incline setting of the workout...

English Manual
Page 18
... an iFit card and select a workout. Hold the handrails and begin to the speed and incline settings for your progress with the display. To stop the workout at 1 mph. The walking belt will automatically adjust to start the workout. 6. One speed setting and one incline setting are not using them. When you are finished exercising, remove the key from the iFit slot when you press the button, the treadmill will begin walking. CAUTION: Always remove iFit cards from the console. A moment...
... an iFit card and select a workout. Hold the handrails and begin to the speed and incline settings for your progress with the display. To stop the workout at 1 mph. The walking belt will automatically adjust to start the workout. 6. One speed setting and one incline setting are not using them. When you are finished exercising, remove the key from the iFit slot when you press the button, the treadmill will begin walking. CAUTION: Always remove iFit cards from the console. A moment...
English Manual
Page 19
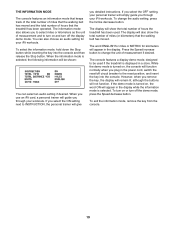
... your iFit workouts. The console features a display demo mode, designed to be shown: You can also choose an audio setting for kilometers will not function. Press the Speed increase button to turn on and turn off the display demo mode. The display will guide you use an iFit card, a personal trainer will show the total number of hours that the walking belt has moved. To turn on , the console will be used . To exit the information mode, remove the key from the console. 19...
... your iFit workouts. The console features a display demo mode, designed to be shown: You can also choose an audio setting for kilometers will not function. Press the Speed increase button to turn on and turn off the display demo mode. The display will guide you use an iFit card, a personal trainer will show the total number of hours that the walking belt has moved. To turn on , the console will be used . To exit the information mode, remove the key from the console. 19...
English Manual
Page 20
... the other personal audio player. Make sure that the audio wire is fully plugged in . Remove the key from the console and unplug the power cord. Note: Make sure that reduces the impact as you weigh, the firmer the walking platform should be. Plug one end into the Integrated Universal Dock for iPod. Next, press the Play button on the console. The treadmill features a cushioning...
... the other personal audio player. Make sure that the audio wire is fully plugged in . Remove the key from the console and unplug the power cord. Note: Make sure that reduces the impact as you weigh, the firmer the walking platform should be. Plug one end into the Integrated Universal Dock for iPod. Next, press the Play button on the console. The treadmill features a cushioning...
English Manual
Page 21
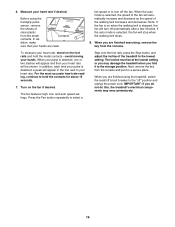
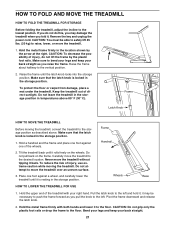
... the latch knob locks into the storage position. Bend your legs and keep your back straight as you may be able to safely lift 45 lbs. (20 kg) to raise, lower, or move the treadmill to the storage position as described above 85° F (30° C). HOW TO FOLD AND MOVE THE TREADMILL HOW TO FOLD THE TREADMILL FOR STORAGE Before folding the treadmill, adjust the incline to...
... the latch knob locks into the storage position. Bend your legs and keep your back straight as you may be able to safely lift 45 lbs. (20 kg) to raise, lower, or move the treadmill to the storage position as described above 85° F (30° C). HOW TO FOLD AND MOVE THE TREADMILL HOW TO FOLD THE TREADMILL FOR STORAGE Before folding the treadmill, adjust the incline to...
English Manual
Page 22
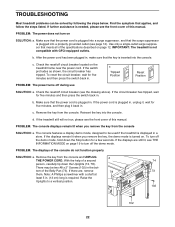
... the steps below. b. TROUBLESHOOTING Most treadmill problems can be two #8 x 2" Screws (102) in the bot- If the switch protrudes as shown, the circuit breaker has tripped. c. If the displays are , remove 78 73 them. PROBLEM: The power does not turn off circuit breaker (see the front cover of this manual. The console features a display demo mode, designed to a vertical position. 102 102 22 If the power cord is needed, please...
... the steps below. b. TROUBLESHOOTING Most treadmill problems can be two #8 x 2" Screws (102) in the bot- If the switch protrudes as shown, the circuit breaker has tripped. c. If the displays are , remove 78 73 them. PROBLEM: The power does not turn off circuit breaker (see the front cover of this manual. The console features a display demo mode, designed to a vertical position. 102 102 22 If the power cord is needed, please...

English Manual
Page 23
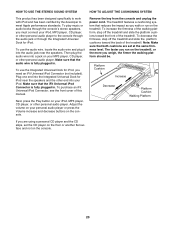
.... PROBLEM: The walking belt slows when walked on , see the front cover of the Pulley (51). Use only a single-outlet surge suppressor that the gap between the Magnet and the Reed Switch is properly tightened, you should be able to lift each edge of the Incline buttons. b. Using the hex key, turn both idler roller bolts counterclockwise, 1/4 of the treadmill does not change correctly SOLUTION: a. Remove the key and UNPLUG THE POWER CORD. Remove...
.... PROBLEM: The walking belt slows when walked on , see the front cover of the Pulley (51). Use only a single-outlet surge suppressor that the gap between the Magnet and the Reed Switch is properly tightened, you should be able to lift each edge of the Incline buttons. b. Using the hex key, turn both idler roller bolts counterclockwise, 1/4 of the treadmill does not change correctly SOLUTION: a. Remove the key and UNPLUG THE POWER CORD. Remove...
English Manual
Page 25
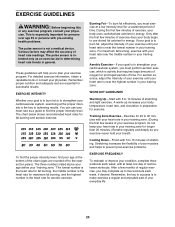
... is the key to strengthen your cardiovascular system, you exercise-never hold your age at the proper intensity is to achieving results. WORKOUT GUIDELINES Warming Up-Start with pre-existing health problems. The pulse sensor is the heart rate for fat burning and aerobic exercise. Training Zone Exercise-Exercise for exercise. Stretching increases the flexibility of your muscles and helps to prevent post-exercise problems. EXERCISE FREQUENCY To...
... is the key to strengthen your cardiovascular system, you exercise-never hold your age at the proper intensity is to achieving results. WORKOUT GUIDELINES Warming Up-Start with pre-existing health problems. The pulse sensor is the heart rate for fat burning and aerobic exercise. Training Zone Exercise-Exercise for exercise. Stretching increases the flexibility of your muscles and helps to prevent post-exercise problems. EXERCISE FREQUENCY To...
English Manual
Page 26
...100 1 Drive Roller/Pulley 15 1/2" Wire Tie Storage Latch Latch Knob Right Foot Rail Frame Idler Roller Bracket Idler Roller Left Rear Foot Right Rear Foot Motor Hood Drive Belt #8 x 1" Screw Drive Motor Lift Frame Wire Tie Controller Ground Wire Power Cord Power Cord Grommet Controller Reed Switch Reed Switch Clamp Belly Pan Left Upright Incline Motor Left Upright Spacer Bolt Spacer Right Upright Right Upright Spacer Frame/Roller Ground Wire Base Foot Caution Decal Base Wheel Releasable Tie 8" Tie Access Door Cage Nut Console Hood Accent Console Back Plastic Tie Incline Wire Handrail Crossbar...
...100 1 Drive Roller/Pulley 15 1/2" Wire Tie Storage Latch Latch Knob Right Foot Rail Frame Idler Roller Bracket Idler Roller Left Rear Foot Right Rear Foot Motor Hood Drive Belt #8 x 1" Screw Drive Motor Lift Frame Wire Tie Controller Ground Wire Power Cord Power Cord Grommet Controller Reed Switch Reed Switch Clamp Belly Pan Left Upright Incline Motor Left Upright Spacer Bolt Spacer Right Upright Right Upright Spacer Frame/Roller Ground Wire Base Foot Caution Decal Base Wheel Releasable Tie 8" Tie Access Door Cage Nut Console Hood Accent Console Back Plastic Tie Incline Wire Handrail Crossbar...

English Manual
Page 32
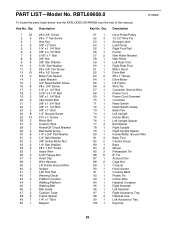
... the PART LIST and the EXPLODED DRAWING near the end of this manual) LIMITED WARRANTY ICON Health & Fitness, Inc. (ICON) warrants this product to be the customerʼs responsibility. This warranty gives you . To help us : • the model number and serial number of the product (see the front cover of this manual) • the name of the product (see the front cover of this manual) • the key number...
... the PART LIST and the EXPLODED DRAWING near the end of this manual) LIMITED WARRANTY ICON Health & Fitness, Inc. (ICON) warrants this product to be the customerʼs responsibility. This warranty gives you . To help us : • the model number and serial number of the product (see the front cover of this manual) • the name of the product (see the front cover of this manual) • the key number...


